2023 FORD SUPER DUTY air filter
[x] Cancel search: air filterPage 445 of 738

UNDER HOOD OVERVIEW - 6.7L DIESEL
Battery. See Changing the 12V Battery (page 457).A
Under hood fuse box. See Accessing the Under Hood Fuse Box (page 430).B
Engine oil dipstick. See Engine Oil Dipstick Overview (page 444).C
Secondary fuel filter. See Changing the Fuel Filter (page 453).D
Engine oil filler cap. See Checking the Engine Oil Level (page 444).E
Engine cooling system coolant reservoir - primary high-temperature coolingsystem. See Checking the Coolant Level (page 450).F
Brake fluid reservoir. See Checking the Brake Fluid (page 249).G
Battery. See Changing the 12V Battery (page 457).H
Windshield washer fluid reservoir. See Adding Washer Fluid (page 115).I
Power steering fluid reservoir. See Checking the Hydraulic Power SteeringFluid (page 280).J
Secondary cooling system coolant reservoir. See Checking the Coolant Level(page 450).K
Air filter assembly. See Changing the Engine Air Filter (page 445).L
441
2023 Super Duty (TFH) Canada/United States of America, enUSA, Edition date: 202211, DOMMaintenanceE350655
Page 446 of 738

UNDER HOOD OVERVIEW - 6.8L, GASOLINE
Engine compartment fuse box. See Locating the Under Hood Fuse Box (page430).A
Battery. See Changing the 12V Battery (page 457).B
Engine oil dipstick. See Engine Oil Dipstick Overview (page 444).C
Engine oil filler cap. See Checking the Engine Oil Level (page 444).D
Brake fluid reservoir. See Checking the Brake Fluid (page 249).E
Windshield washer fluid reservoir. See Adding Washer Fluid (page 115).F
Engine coolant reservoir. See Checking the Coolant Level (page 450).G
Power steering fluid reservoir. See Checking the Hydraulic Power SteeringFluid (page 280).H
Air cleaner assembly. See Changing the Engine Air Filter (page 445).I
442
2023 Super Duty (TFH) Canada/United States of America, enUSA, Edition date: 202211, DOMMaintenanceE398419
Page 447 of 738

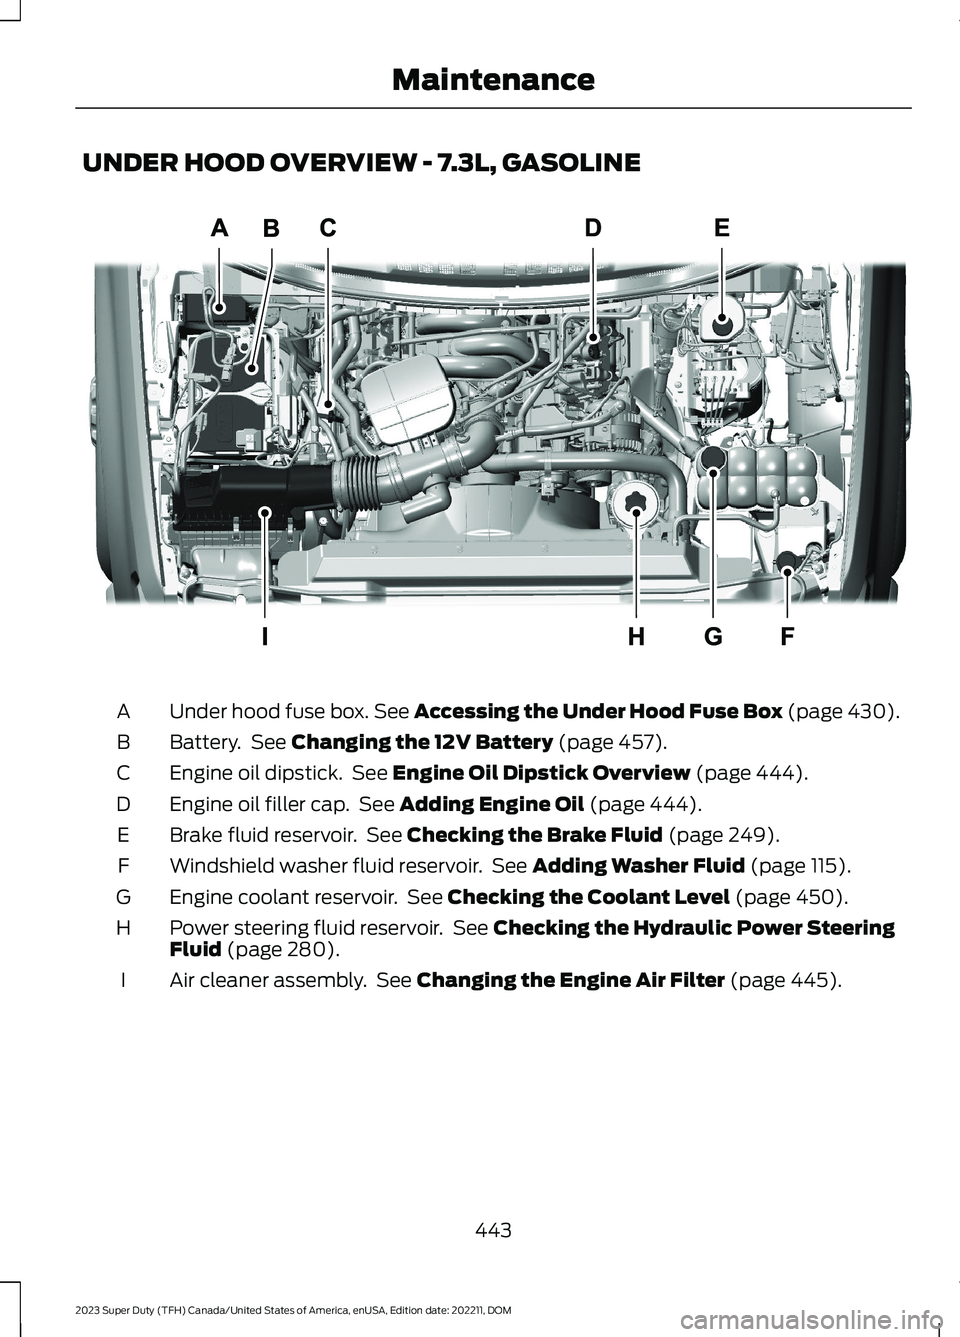
UNDER HOOD OVERVIEW - 7.3L, GASOLINE
Under hood fuse box. See Accessing the Under Hood Fuse Box (page 430).A
Battery. See Changing the 12V Battery (page 457).B
Engine oil dipstick. See Engine Oil Dipstick Overview (page 444).C
Engine oil filler cap. See Adding Engine Oil (page 444).D
Brake fluid reservoir. See Checking the Brake Fluid (page 249).E
Windshield washer fluid reservoir. See Adding Washer Fluid (page 115).F
Engine coolant reservoir. See Checking the Coolant Level (page 450).G
Power steering fluid reservoir. See Checking the Hydraulic Power SteeringFluid (page 280).H
Air cleaner assembly. See Changing the Engine Air Filter (page 445).I
443
2023 Super Duty (TFH) Canada/United States of America, enUSA, Edition date: 202211, DOMMaintenanceE351057
Page 449 of 738

WARNING: Do not add engine oilwhen the engine is hot. Failure to followthis instruction could result in personalinjury.
Do not use supplemental engine oiladditives because they are unnecessaryand could lead to engine damage that thevehicle warranty may not cover.
1.Clean the area surrounding the engineoil filler cap before you remove it.
2.Remove the engine oil filler cap.
3.Add engine oil that meets ourspecifications. See Capacities andSpecifications (page 520).
4.Reinstall the engine oil filler cap. Turnit clockwise until you feel a strongresistance.
Note: Do not add oil further than themaximum mark. Oil levels above themaximum mark may cause engine damage.
Note:Immediately soak up any oil spillagewith an absorbent cloth.
INTELLIGENT OIL LIFE MONITOR
Under certain conditions the vehicle’sintelligent oil life monitor may determineyour oil requires replacement prior to yourgeneral service. Should this occur it isrecommended you replace your oil withintwo weeks or 500 mi (800 km) of beingalerted.
Your authorized dealer will be able toadvise you whether only an engine oil andfilter change is recommended or whetheryou should complete your general serviceinclusive of oil and oil Filter.
RESETTING THE INTELLIGENT OILLIFE MONITOR
1.Press the Menu button on the steeringwheel to enter the instrument clusterdisplay main menu.
2.Select Vehicle Maintenance.
3.Select Oil Life.
4.Select Reset Oil Life.
5.Press and hold the OK button until thesystem reset confirmation appears.
ENGINE OIL CAPACITY ANDSPECIFICATION
For filling information, please refer to theCapacities and Specifications section ofyour owner's manual. See Capacities andSpecifications (page 520).
ENGINE AIR FILTER
CHANGING THE ENGINE AIRFILTER
WARNING: To reduce the risk ofvehicle damage and personal burninjuries, do not start your engine with theair cleaner removed and do not removeit while the engine is running.
Use the correct specification air filterelement. See Engine Air Filter (page 445).
Note: Failure to use the correct air filterelement may result in severe enginedamage. Resulting component damagemay not be covered by the vehicle Warranty.
445
2023 Super Duty (TFH) Canada/United States of America, enUSA, Edition date: 202211, DOMMaintenance
Page 450 of 738

Change the air filter element at the correctservice interval. See ScheduledMaintenance (page 591). Your vehicle maybe equipped with electronic engine air filtermaintenance minder, that providesoptimized service intervals and remindersbased on driving habits and environmentalconditions.
1.Clean any loose dirt or debris aroundthe air filter hosing.
2.Disconnect the mass air flow sensorelectrical connector, if required.
3.Remove the clips (x3) that secure theair filter housing cover. Remove the airfilter housing cover. Disconnect andpull the air intake tube away, asneeded.
4.Remove the air filter element from theair filter housing.
5.Inspect the air filter element for anydamage. Replace the air filter elementif the seal, paper, foam or steel meshhas any holes, cut or gouges.
6.Inspect the air filter housing for dirt,dust, snow, ice or debris in the aircleaner tray.
7.To install, reverse the removalprocedure. You can oscillate thehousing cover slightly left to right toassist with installation as needed, untilpositioned such that all three clips canbe re-engaged.
After operating your vehicle during heavysnowfall or extreme rain, do the following:
•Snow: At the earliest opportunity, openthe hood, clear any snow and ice fromthe air filter housing inlet.
•Extreme rain: The air filter elementdries out after approximately 15–30minutes of driving at highway speeds.
Note:Do not remove the foam block fromthe air cleaner tray.
RESETTING THE AIR FILTERREMINDER
1.Press the menu button on the steeringwheel to enter the instrument clusterdisplay main menu.
2.Select Vehicle Maintenance.
3.Select Engine Air Filter.
4.Press and hold the OK button until thesystem reset confirmation appears.
Note:The system displays 100% afterbeing successfully reset.
446
2023 Super Duty (TFH) Canada/United States of America, enUSA, Edition date: 202211, DOMMaintenanceE350657 E310319
Page 451 of 738

ENGINE AIR FILTER - INFORMATION MESSAGES
ActionMessage
Indicates the engine air filter should be replaced at theearliest convenience.Replace Engine Air FilterSoon
Indicates an air filter at the end of useful life. After engineair filter replacement, you must reset the system in order tochange the status status See Resetting the IntelligentOil Life Monitor (page 445).
Replace Engine Air FilterNow
Indicates that there is a higher-than-expected restrictionacross the engine air filter, which could represent an air filterat the end of useful life or a filter with an obstruction. Whenthis displays, inspect the engine air filter and replace ifnecessary. If the air filter is not replaced, no reset is required,the minder will automatically reset once the obstruction iscleared after driving the vehicle for approximately an hour.If the air filter was replaced, you must reset the system inorder to change the status See Resetting the IntelligentOil Life Monitor (page 445).
Check Engine Air Filter SeeManual
Indicates that there is an error within the electronic air filtermaintenance minder system requiring service.Engine Air Filter Fault SeeManual
When this displays, inspect the engine air filter and replaceif necessary. If the air filter is not replaced, no reset isrequired, the minder will automatically reset once theobstruction is cleared after driving the vehicle for approxim-ately an hour. If the air filter was replaced, you must resetthe system in order to change the status See Resettingthe Intelligent Oil Life Monitor (page 445).
Engine Power ReducedInspect Air Filter
DRAINING THE FUEL FILTER
WATER TRAP
WARNING: Do not drain thewater-in-fuel separator while the engineis running. Failure to follow this warningmay result in fire, serious injury, death orproperty damage.
WARNING: Do not dispose of fuelin the household refuse or the publicsewage system. Use an authorized wastedisposal facility.
Your vehicle has a diesel fuel conditionermodule. The module is mounted betweenthe outboard side of the fuel tank and theframe rail.
Note:The module is at the front of the fueltank or at the front of the aft-axle fuel tankon some models.
447
2023 Super Duty (TFH) Canada/United States of America, enUSA, Edition date: 202211, DOMMaintenance
Page 467 of 738

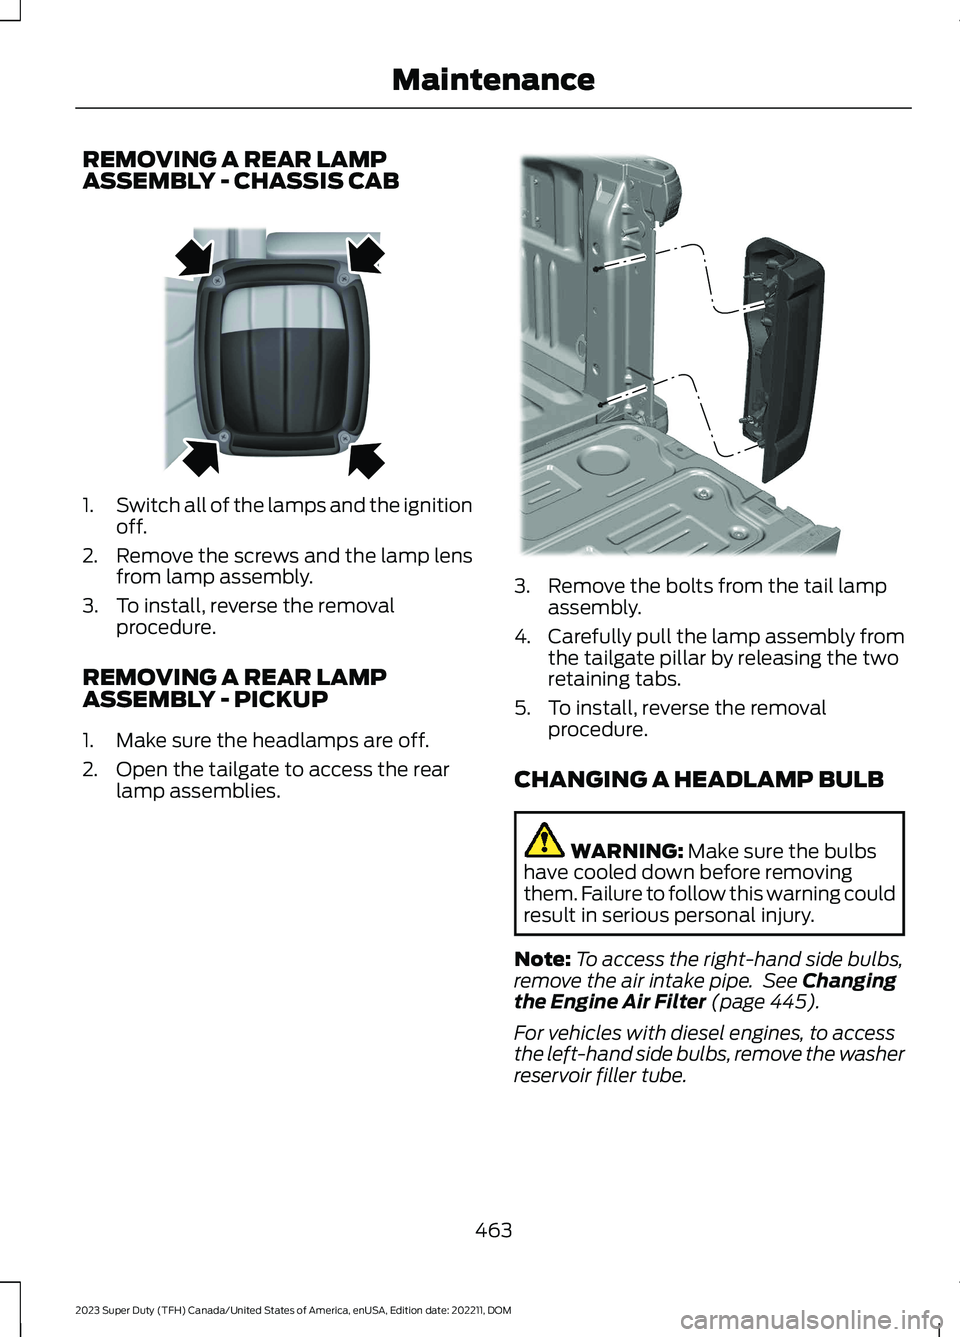
REMOVING A REAR LAMPASSEMBLY - CHASSIS CAB
1.Switch all of the lamps and the ignitionoff.
2.Remove the screws and the lamp lensfrom lamp assembly.
3.To install, reverse the removalprocedure.
REMOVING A REAR LAMPASSEMBLY - PICKUP
1.Make sure the headlamps are off.
2.Open the tailgate to access the rearlamp assemblies.
3.Remove the bolts from the tail lampassembly.
4.Carefully pull the lamp assembly fromthe tailgate pillar by releasing the tworetaining tabs.
5.To install, reverse the removalprocedure.
CHANGING A HEADLAMP BULB
WARNING: Make sure the bulbshave cooled down before removingthem. Failure to follow this warning couldresult in serious personal injury.
Note:To access the right-hand side bulbs,remove the air intake pipe. See Changingthe Engine Air Filter (page 445).
For vehicles with diesel engines, to accessthe left-hand side bulbs, remove the washerreservoir filler tube.
463
2023 Super Duty (TFH) Canada/United States of America, enUSA, Edition date: 202211, DOMMaintenanceE163828 E386885
Page 468 of 738

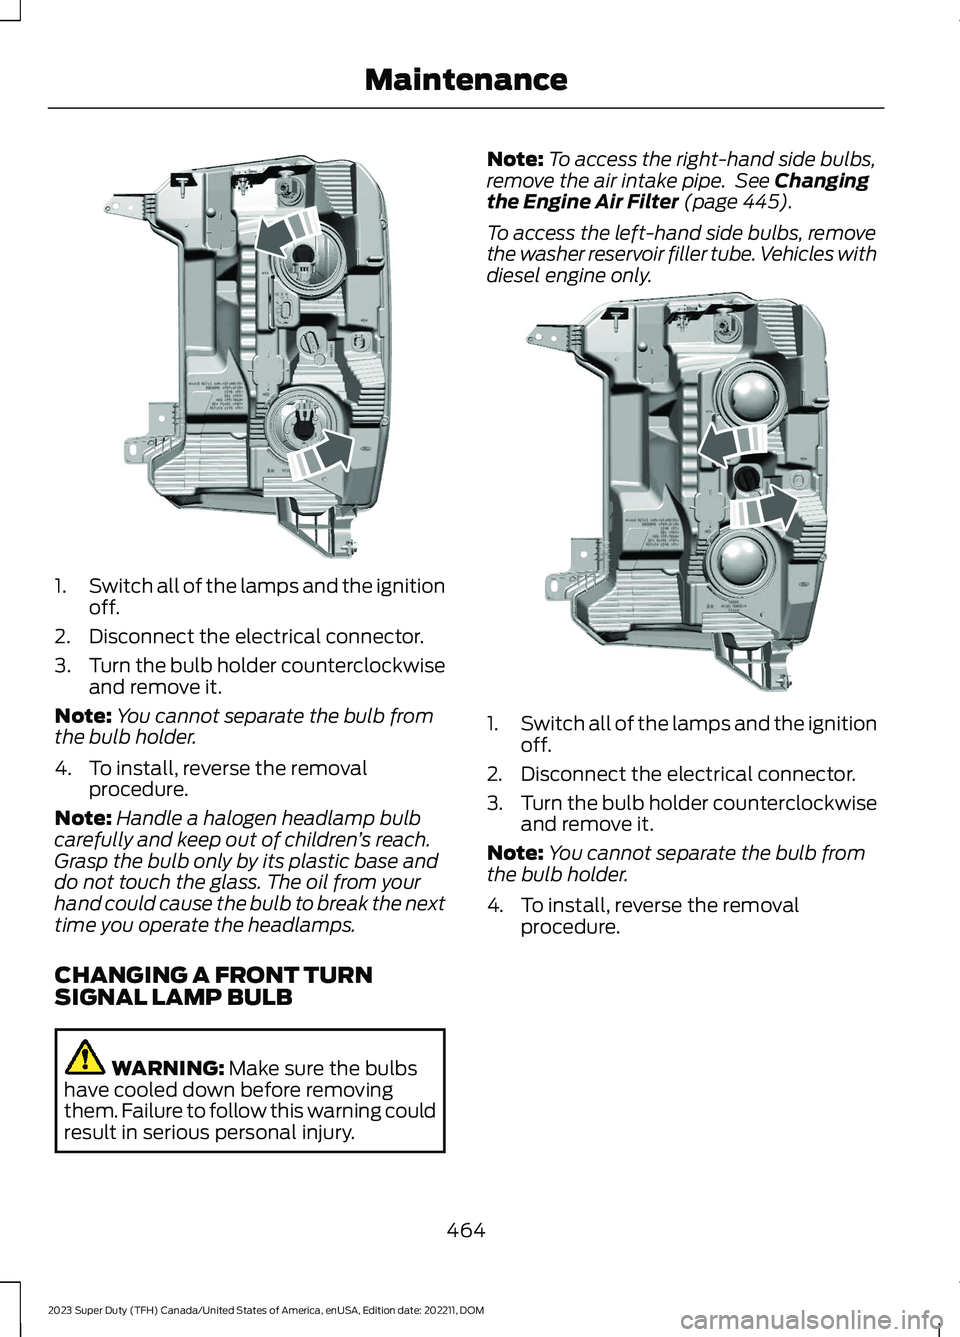
1.Switch all of the lamps and the ignitionoff.
2.Disconnect the electrical connector.
3.Turn the bulb holder counterclockwiseand remove it.
Note:You cannot separate the bulb fromthe bulb holder.
4.To install, reverse the removalprocedure.
Note:Handle a halogen headlamp bulbcarefully and keep out of children’s reach.Grasp the bulb only by its plastic base anddo not touch the glass. The oil from yourhand could cause the bulb to break the nexttime you operate the headlamps.
CHANGING A FRONT TURNSIGNAL LAMP BULB
WARNING: Make sure the bulbshave cooled down before removingthem. Failure to follow this warning couldresult in serious personal injury.
Note:To access the right-hand side bulbs,remove the air intake pipe. See Changingthe Engine Air Filter (page 445).
To access the left-hand side bulbs, removethe washer reservoir filler tube. Vehicles withdiesel engine only.
1.Switch all of the lamps and the ignitionoff.
2.Disconnect the electrical connector.
3.Turn the bulb holder counterclockwiseand remove it.
Note:You cannot separate the bulb fromthe bulb holder.
4.To install, reverse the removalprocedure.
464
2023 Super Duty (TFH) Canada/United States of America, enUSA, Edition date: 202211, DOMMaintenanceE386875 E386884