2023 FORD SUPER DUTY audio
[x] Cancel search: audioPage 20 of 738
Vehicle Identification
Vehicle Identification Number...............547
Connected Vehicle
What Is a Connected Vehicle.................548
Connected Vehicle Requirements.......548
Connected Vehicle Limitations.............548
Connecting the Vehicle to a MobileNetwork.....................................................548
Connecting the Vehicle to a Wi-FiNetwork.....................................................548
Connected Vehicle – Troubleshooting.......................................................................549
Connected Vehicle Videos......................550
Vehicle Wi-Fi Hotspot
Creating a Vehicle Wi-Fi Hotspot..........551
Changing the Vehicle Wi-Fi HotspotName or Password.................................551
Vehicle Wi-Fi Hotspot – Troubleshooting........................................................................552
Audio System
Audio System Precautions......................553
Identifying the Audio Unit.......................553
Switching the Audio Unit On and Off........................................................................553
Selecting the Audio Source....................553
Playing or Pausing the Audio Source........................................................................553
Adjusting the Volume...............................554
Switching Shuffle Mode On and Off........................................................................554
Switching Repeat Mode On and Off........................................................................554
Setting a Memory Preset.........................554
Muting the Audio........................................554
Adjusting the Sound Settings................554
Setting the Clock and Date.....................555
AM/FM Radio...............................................555
Switching the Display On and Off.......556
Digital Radio.................................................556
Satellite Radio..............................................557
Audio System – Troubleshooting........559
Center Display Overview
Center Display Precautions....................563
Center Display Limitations......................563
Status Bar.....................................................563
Feature Bar...................................................564
Information On Demand Screen..........564
Rebooting the Center Display...............564
Center Display Overview Videos..........564
Voice Interaction
Ford Assistant.............................................565
Alexa Built-In
What is Alexa Built-In................................567
Alexa Built-In Requirements..................567
Signing Into Your Account.......................567
Using Alexa Built-In...................................567
Alexa Built-In Settings..............................567
Phone
Phone Precautions....................................569
Connecting Your Phone...........................569
Phone Menu.................................................569
Making and Receiving a Phone Call......571
Sending and Receiving a Text Message........................................................................572
Switching Text Message Notification Onand Off........................................................573
Bluetooth®
Connecting a Bluetooth® Device.........574
Playing Media Using Bluetooth®..........574
Apps
App Precautions..........................................575
App Requirements.....................................575
16
2023 Super Duty (TFH) Canada/United States of America, enUSA, Edition date: 202211, DOMTable of Contents
Page 36 of 738
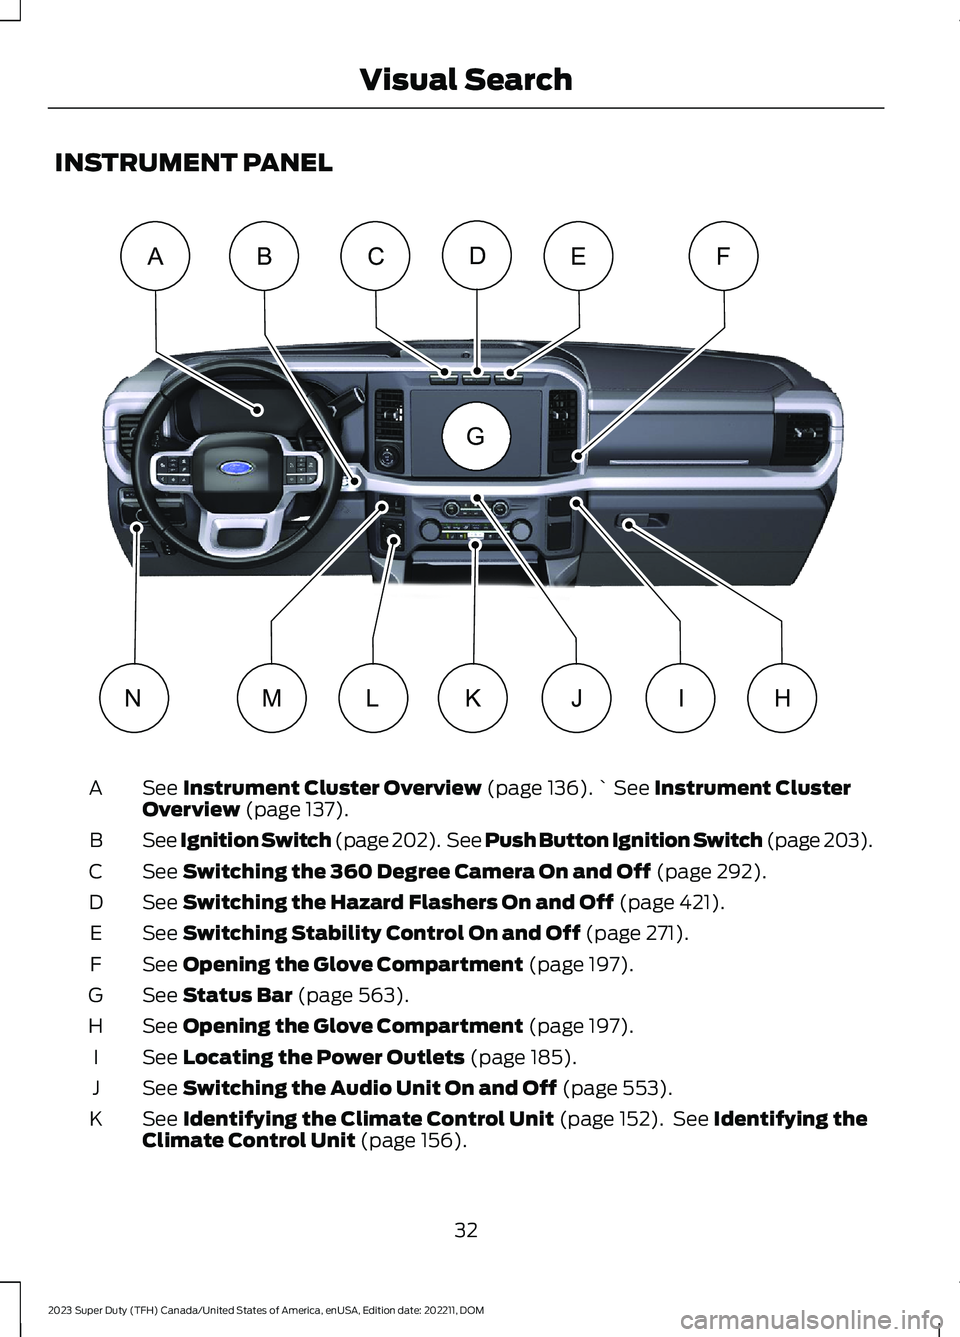
INSTRUMENT PANEL
See Instrument Cluster Overview (page 136).` See Instrument ClusterOverview (page 137).A
See Ignition Switch (page 202). See Push Button Ignition Switch (page 203).B
See Switching the 360 Degree Camera On and Off (page 292).C
See Switching the Hazard Flashers On and Off (page 421).D
See Switching Stability Control On and Off (page 271).E
See Opening the Glove Compartment (page 197).F
See Status Bar (page 563).G
See Opening the Glove Compartment (page 197).H
See Locating the Power Outlets (page 185).I
See Switching the Audio Unit On and Off (page 553).J
See Identifying the Climate Control Unit (page 152). See Identifying theClimate Control Unit (page 156).K
32
2023 Super Duty (TFH) Canada/United States of America, enUSA, Edition date: 202211, DOMVisual SearchABCEFDHLMIJKNG E374895
Page 148 of 738
INSTRUMENT CLUSTER
DISPLAY MAIN MENU -
VEHICLES WITH: 12 INCH
SCREEN
Depending on your vehicle options, somemenu items can appear different or not atall.
Note:For your safety, some features arespeed-dependent and could be unavailablewhen your vehicle is above a certain speed.
Menu Item
MyView
Trip/Fuel
HUD
Gauges
Off Road
Towing
Status/Information
Navigation
Phone
Audio
Vehicle Maintenance
Settings
CUSTOMIZING THE
INSTRUMENT CLUSTER
DISPLAY - VEHICLES WITH: 8
INCH SCREEN
Adding Screens Using SelectScreens
1.Select Select Screens.
2.Use the controls on the steering wheelto highlight a screen to add.
3.Press the OK button.
Note:The number of screens you can addis limited. If the selected screen does notappear you must deselect screens from theSelect Screens menu.
Configuring Gauges
1.Select Settings using the instrumentcluster display controls.
2.Select Gauge Selection.
3.Select to swap or change left-handside and right-hand side gauges.
CUSTOMIZING THE
INSTRUMENT CLUSTER
DISPLAY - VEHICLES WITH: 12
INCH SCREEN
Adding Screens Using MyView
1.Using the instrument cluster displaycontrols on the steering wheel, selectMyView.
2.Select Configure MyView.
3.Select a screen.
4.Press the OK button.
Note:The number of screens you can addis limited. If the selected screen does notappear you must deselect screens from theMyView menu.
Configuring Gauges
1.Select Settings.
2.Select Configure Gauges.
3.Select to swap or change left-handside and right-hand side gauges.
144
2023 Super Duty (TFH) Canada/United States of America, enUSA, Edition date: 202211, DOMInstrument Cluster Display
Page 169 of 738
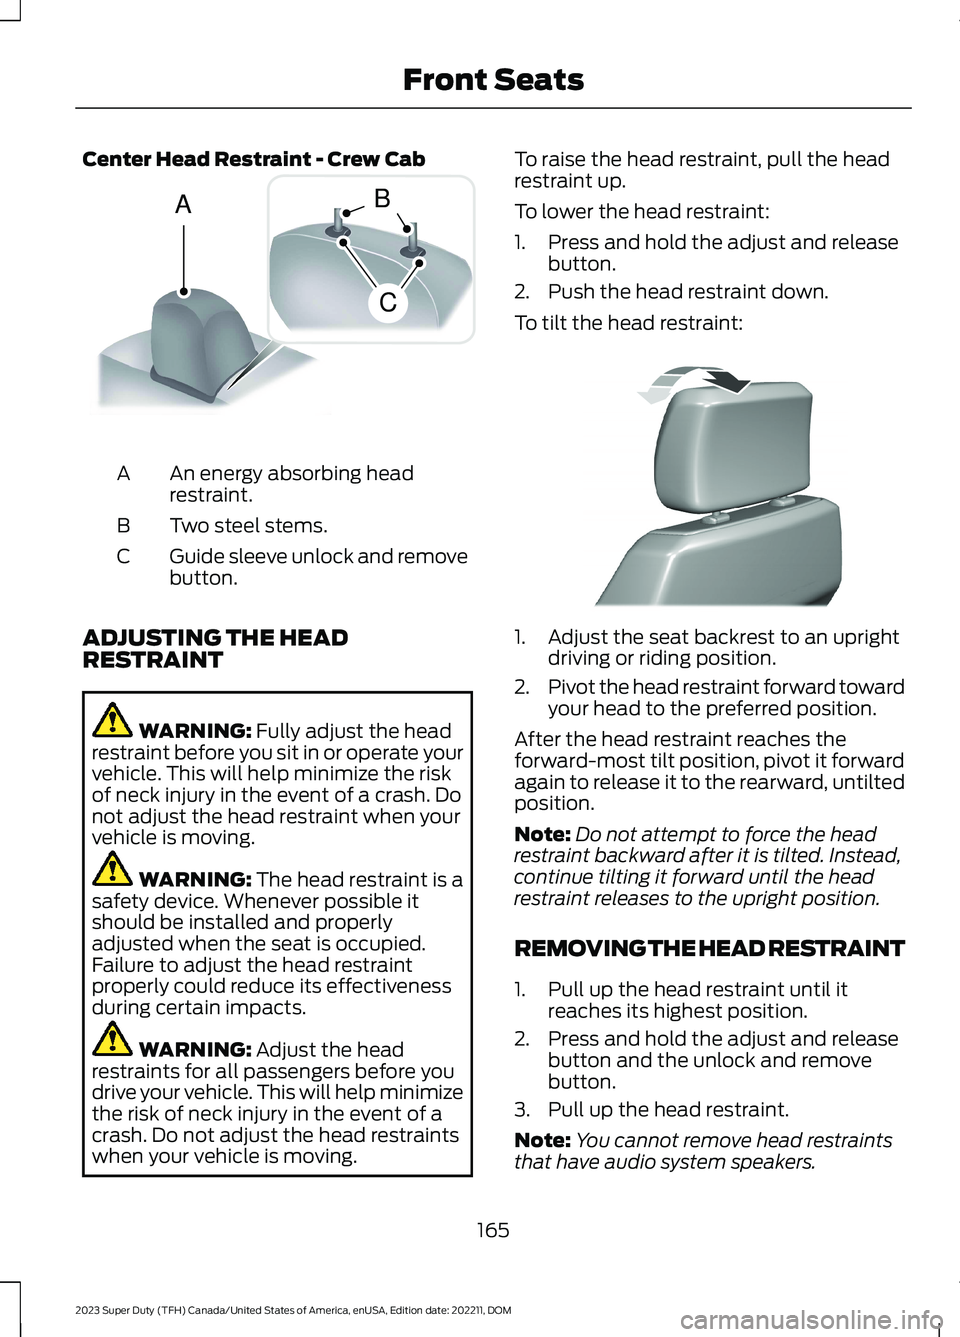
Center Head Restraint - Crew Cab
An energy absorbing headrestraint.A
Two steel stems.B
Guide sleeve unlock and removebutton.C
ADJUSTING THE HEADRESTRAINT
WARNING: Fully adjust the headrestraint before you sit in or operate yourvehicle. This will help minimize the riskof neck injury in the event of a crash. Donot adjust the head restraint when yourvehicle is moving.
WARNING: The head restraint is asafety device. Whenever possible itshould be installed and properlyadjusted when the seat is occupied.Failure to adjust the head restraintproperly could reduce its effectivenessduring certain impacts.
WARNING: Adjust the headrestraints for all passengers before youdrive your vehicle. This will help minimizethe risk of neck injury in the event of acrash. Do not adjust the head restraintswhen your vehicle is moving.
To raise the head restraint, pull the headrestraint up.
To lower the head restraint:
1.Press and hold the adjust and releasebutton.
2.Push the head restraint down.
To tilt the head restraint:
1.Adjust the seat backrest to an uprightdriving or riding position.
2.Pivot the head restraint forward towardyour head to the preferred position.
After the head restraint reaches theforward-most tilt position, pivot it forwardagain to release it to the rearward, untiltedposition.
Note:Do not attempt to force the headrestraint backward after it is tilted. Instead,continue tilting it forward until the headrestraint releases to the upright position.
REMOVING THE HEAD RESTRAINT
1.Pull up the head restraint until itreaches its highest position.
2.Press and hold the adjust and releasebutton and the unlock and removebutton.
3.Pull up the head restraint.
Note:You cannot remove head restraintsthat have audio system speakers.
165
2023 Super Duty (TFH) Canada/United States of America, enUSA, Edition date: 202211, DOMFront SeatsACB E162872 E327919
Page 187 of 738
LOCATING THE USB PORTS
Data Transfer USB Ports
The USB ports could be in the followinglocations:
•On the lower instrument panel.
•Inside the center console.
Note: These USB ports can also chargedevices.
Note: Not all USB ports in your vehicle havedata transfer capabilities.
Note: We recommend using only USB-IFcertified cables and adapters. Non-certifiedcables and adapters may not work.
Charge Only USB Ports
The USB ports could be in the followinglocations:
•On the lower instrument panel.
•On the upper instrument panel.
•Inside the media bin.
•Inside the center console.
•On the rear of the center console.
•Behind the first row seats.
•In the cargo area.
PLAYING MEDIA USING THE
USB PORT
WARNING: Driving while distractedcan result in loss of vehicle control, crashand injury. We strongly recommend thatyou use extreme caution when using anydevice that may take your focus off theroad. Your primary responsibility is thesafe operation of your vehicle. Werecommend against the use of anyhand-held device while driving andencourage the use of voice-operatedsystems when possible. Make sure youare aware of all applicable local lawsthat may affect the use of electronicdevices while driving.
Connect your device to a data transfer USBport.
Press the audio button on thefeature bar.
Select Sources.
Select the USB option.
Press to play a track. Press againto pause the track.
Press to skip to the next track.
Press and hold to fast forwardthrough the track.
Press once to return to thebeginning of a track. Repeatedlypress to return to previoustracks.
Press and hold to fast rewind.
CHARGING A DEVICE
Connect your device to the USB port.
183
2023 Super Duty (TFH) Canada/United States of America, enUSA, Edition date: 202211, DOMUSB PortsE250655 E263583 E100027
Page 260 of 738
DIESEL ENGINE EXHAUST
BRAKE – PRECAUTIONS
WARNING: Do not use tow/haulwhen the road surface is slippery. Failureto follow this instruction could result inthe loss of control of your vehicle.
WARNING: Do not use dieselengine exhaust braking when the roadsurface is slippery. Failure to follow thisinstruction could result in the loss ofcontrol of your vehicle.
USING THE DIESEL ENGINE
EXHAUST BRAKE
This feature increases engine braking athigher engine speeds to provide bettergrade descent control with less brake andtransmission wear and tear.
Note:Use this when driving downhill andcarrying heavy loads or trailering.
Benefits of engine braking are:
•Lower brake temperature.
•Reduced brake fade.
•Longer brake life.
•Improved driving and trailering control.
Press the button on the switchbank next to the audio unit toswitch the system on or off.
There are two engine brake modes, manualand automatic.
The following conditions must be met touse exhaust brake:
•Your vehicle is in a forward gear.
•The engine speed is above 1300 RPM.
•Your foot is off the accelerator.
You can use this feature with tow/haul orprogressive range selection to providefurther increased engine braking. Thetransmission upshifts to prevent the enginefrom entering the red zone on thetachometer.
Manual Engine Braking
1.Press the button to switch on manualengine braking.
2.Release the accelerator pedal tomaximize engine braking.
3.Apply the brakes. The transmissiondownshifts to lower gears.
Note:The engine braking feature onlyfunctions when you release the accelerator.
Note:You can shift the transmission tolower gears with progressive range selectionor manual shifting independent of pressingthe brakes.
Note:You can also use manual enginebraking with cruise control to improve gradedescent control.
Note:If your vehicle has adaptive cruisecontrol, the speed control system uses theselected engine brake mode, transmissiongears, and brakes to maintain the set speedand distance to the vehicle being followed.
Automatic Engine Braking
1.Press the button twice to switch onautomatic engine braking.
2.Release the accelerator or brake pedal.The system remembers your vehiclespeed.
256
2023 Super Duty (TFH) Canada/United States of America, enUSA, Edition date: 202211, DOMDiesel Engine Exhaust BrakeE171217
Page 288 of 738

REAR PARKING AID AUDIBLEWARNINGS
A warning tone sounds when your vehicleapproaches an object. As your vehiclemoves closer to an object, the rate of thetone increases. The warning tonecontinuously sounds when an object is 12 in(30 cm) or less from the rear bumper.
If your vehicle remains stationary for a fewseconds, the audible warning turns off. Ifyour vehicle moves backward the tonesounds again.
Note:When the parking aid system soundsa tone, the audio system could reduce theset volume.
FRONT PARKING AID
WHAT IS THE FRONT PARKINGAID
Front parking sensors detect objects infront of your vehicle.
FRONT PARKING AIDLIMITATIONS
The front parking aid sensors are activewhen your vehicle is in any position otherthan park (P) and the vehicle speed is lessthan 5 mph (8 km/h).
The sensor coverage area is up to 47 in(120 cm) from the bumper.
If your vehicle is in reverse (R), the frontparking aid detects objects when yourvehicle is moving at a low speed or anobject is moving toward your vehicle andprovides an audible warning, for exampleanother vehicle at a low speed. If yourvehicle remains stationary for a fewseconds, the audible warning turns off.Visual indication is always active in reverse(R).
If your vehicle is in any forward gear, thefront parking aid provides audible warningsand visual indication when your vehicle ismoving at a speed of 5 mph (8 km/h) orbelow and the system detects an objectwithin the detection zone. If your vehicleremains stationary for a few seconds, thevisual indication and audible warning turnsoff.
If your vehicle is in neutral (N), the frontand rear sensors provide visual indicationonly when your vehicle is moving below aspeed of 5 mph (8 km/h) and obstaclesare detected inside the detection areas.Once your vehicle stops, the visualindication and audible warning stops aftera few seconds.
LOCATING THE FRONT PARKINGAID SENSORS
The front parking aid sensors are in thefront bumper.
FRONT PARKING AID AUDIBLEWARNINGS
A warning tone sounds when there is anobject within 47 in (120 cm) from the frontbumper. As your vehicle moves closer toan object, the rate of the tone increases.
284
2023 Super Duty (TFH) Canada/United States of America, enUSA, Edition date: 202211, DOMParking Aids (If Equipped)E310332
Page 461 of 738
WHAT IS THE BATTERYMANAGEMENT SYSTEM
The battery management system monitorsbattery conditions and takes actions toextend battery life.
HOW DOES THE BATTERYMANAGEMENT SYSTEM WORK
If excessive battery drain is detected, thesystem temporarily disables someelectrical systems to protect the battery.
Systems included are:
•Heated rear window.
•Heated seats.
•Climate control.
•Heated steering wheel.
•Audio unit.
•Navigation system.
A message could appear in the informationdisplay to alert you that battery protectionactions are active. This message is only fornotification that an action is taking place,and not intended to indicate an electricalproblem or that the battery requiresreplacement.
BATTERY MANAGEMENT SYSTEMLIMITATIONS
After battery replacement, or in somecases after charging the battery with anexternal charger, the battery managementsystem requires eight hours of vehicle sleeptime to relearn the battery state of charge.During this time, your vehicle must remainfully locked with the ignition switched off.
Note:Prior to relearning the battery stateof charge, the battery management systemcould temporarily disable some electricalsystems.
Electrical Accessory Installation
To make sure the battery managementsystem works correctly, do not connect anelectrical device ground connectiondirectly to the battery negative post. Thiscan cause inaccurate measurements ofthe battery condition and potentialincorrect system operation.
Note:If you add electrical accessories orcomponents to the vehicle, it couldadversely affect battery performance anddurability. This could also affect theperformance of other electrical systems inthe vehicle.
CHANGING THE 12V BATTERY
The battery is in the engine compartment.See Maintenance (page 440).
Your vehicle has a maintenance-freebattery. It does not require additionalwater during service.
If the vehicle battery has a cover, makesure you correctly install it after cleaningor replacing the battery.
For longer, trouble-free operation, keep thetop of the battery clean and dry and thebattery cables tightly fastened to thebattery terminals. If any corrosion ispresent on the battery or terminals, removethe cables from the terminals and cleanwith a wire brush. You can neutralize theacid with a solution of baking soda andwater.
We recommend that you disconnect thenegative battery cable terminal from thebattery if you plan to store your vehicle foran extended period.
Note:If you only disconnect the negativebattery cable terminal, make sure it isisolated or placed away from the batteryterminal to avoid unintended connection orarcing.
457
2023 Super Duty (TFH) Canada/United States of America, enUSA, Edition date: 202211, DOMMaintenance