2023 FORD MAVERICK headlamp
[x] Cancel search: headlampPage 320 of 556

WARNING: Keep batteries out ofreach of children. Batteries containsulfuric acid. Avoid contact with skin,eyes or clothing. Shield your eyes whenworking near the battery to protectagainst possible splashing of acidsolution. In case of acid contact with skinor eyes, flush immediately with water fora minimum of 15 minutes and get promptmedical attention. If acid is swallowed,call a physician immediately.
WARNING: Battery posts,terminals and related accessoriescontain lead and lead compounds,chemicals known to the State ofCalifornia to cause cancer andreproductive harm.Wash your handsafter handling.
WARNING: This vehicle may havemore than one battery. Removing thebattery cables from only one batterydoes not disconnect your vehicleelectrical system. Make sure youdisconnect the battery cables from allbatteries when disconnecting power.Failure to do so may cause seriouspersonal injury or property damage.
WARNING: For vehicles withAuto-Start-Stop the battery requirementis different. You must replace the batterywith one of exactly the samespecification.
The battery is in the engine compartment.See Under Hood Overview (page 307).
Your vehicle has a maintenance-freebattery. It does not require additionalwater during service.
If the vehicle battery has a cover and venthose, make sure you correctly install it aftercleaning or replacing the battery.
For longer, trouble-free operation, keep thetop of the battery clean and dry and thebattery cables tightly fastened to thebattery terminals. If any corrosion ispresent on the battery or terminals, removethe cables from the terminals and cleanwith a wire brush. You can neutralize theacid with a solution of baking soda andwater.
We recommend that you disconnect thenegative battery cable terminal from thebattery if you plan to store your vehicle foran extended period.
Note:If you only disconnect the negativebattery cable terminal, make sure it isisolated or placed away from the batteryterminal to avoid unintended connection orarcing.
If you replace the battery make sure itmatches the electrical requirements ofyour vehicle.
If you disconnect or replace the batteryand your vehicle has an automatictransmission, it must relearn its adaptivestrategy. Because of this, the transmissionmay shift firmly when first driven. This isnormal operation while the transmissionfully updates its operation to optimumshift feel.
Battery Sensor Reset
When you install a new battery, reset thebattery sensor by doing the following:
1.Switch the ignition on, and leave theengine off.
Note:Complete Steps 2 and 3 within 10seconds.
2.Flash the high beam headlamps fivetimes, ending with the high beams off.
3.Press and release the brake pedal threetimes.
316
2023 Maverick (CFE) Canada/United States of America, enUSA, Edition date: 202208, First-PrintingMaintenance
Page 323 of 556

For longer, trouble-free operation, keep thetop of the battery clean and dry and thebattery cables tightly fastened to thebattery terminals. If any corrosion ispresent on the battery or terminals, removethe cables from the terminals and cleanwith a wire brush. You can neutralize theacid with a solution of baking soda andwater.
We recommend that you disconnect thenegative battery cable terminal from thebattery if you plan to store your vehicle foran extended period.
Note:If you only disconnect the negativebattery cable terminal, make sure it isisolated or placed away from the batteryterminal to avoid unintended connection orarcing.
If you replace the battery make sure itmatches the electrical requirements ofyour vehicle.
If you disconnect or replace the batteryand your vehicle has an automatictransmission, it must relearn its adaptivestrategy. Because of this, the transmissionmay shift firmly when first driven. This isnormal operation while the transmissionfully updates its operation to optimumshift feel.
Battery Sensor Reset
When you install a new battery, reset thebattery sensor by doing the following:
1.Switch the ignition on, and leave theengine off.
Note:Complete Steps 2 and 3 within 10seconds.
2.Flash the high beam headlamps fivetimes, ending with the high beams off.
3.Press and release the brake pedal threetimes.
The battery warning lamp flashes threetimes to confirm that the reset issuccessful.
Battery Management System (If
Equipped)
The system monitors battery conditionsand takes actions to extend battery life. Ifexcessive battery drain is detected, thesystem temporarily disables someelectrical systems to protect the battery.
Systems included are:
•Heated rear window.
•Heated seats.
•Climate control.
•Heated steering wheel.
•Audio unit.
•Navigation system.
A message may appear in the informationdisplay to alert you that battery protectionactions are active. This message is only fornotification that an action is taking place,and not intended to indicate an electricalproblem or that the battery requiresreplacement.
After battery replacement, or in somecases after charging the battery with anexternal charger, the battery managementsystem requires eight hours of vehicle sleeptime to relearn the battery state of charge.During this time, your vehicle must remainfully locked with the ignition switched off.
Note:Prior to relearning the battery stateof charge, the battery management systemmay temporarily disable some electricalsystems.
319
2023 Maverick (CFE) Canada/United States of America, enUSA, Edition date: 202208, First-PrintingMaintenance
Page 324 of 556

Electrical Accessory Installation
To make sure the battery managementsystem works correctly, do not connect anelectrical device ground connectiondirectly to the battery negative post. Thiscan cause inaccurate measurements ofthe battery condition and potentialincorrect system operation.
Note:If you add electrical accessories orcomponents to the vehicle, it may adverselyaffect battery performance and durability.This may also affect the performance ofother electrical systems in the vehicle.
Remove and Reinstall the Battery
Install a battery approved for use by ourspecifications. See Capacities andSpecifications (page 363).
To disconnect or remove the battery, dothe following:
1.Apply the parking brake and switch theignition off.
2.Switch all electrical equipment off, forexample lights and radio.
3.Wait a minimum of two minutes beforedisconnecting the battery.
Note:The engine management system hasa power hold function and remains poweredfor a period of time after you switch theignition off. This is to allow the system tostore diagnostic and adaptive tables.Disconnecting the battery without waitingcan cause damage not covered by thevehicle warranty.
4.Disconnect the negative battery cableterminal.
5.Disconnect the positive battery cableterminal.
6.Remove the battery securing clamp.
7.Remove the battery.
8.To install, reverse the removalprocedure.
Note:Before reconnecting the battery,make sure the ignition remains switched off.
Note:Make sure to fully tighten the batterycables.
If you disconnect or replace the vehiclebattery, you must reset the followingfeatures:
•Window bounce-back. See What IsWindow Bounce-Back (page 100).
•Clock Settings.
•Pre-set radio stations.
Battery Disposal
Make sure that you dispose ofold batteries in anenvironmentally friendly way.Seek advice from your local authorityabout recycling old batteries.
ADJUSTING THE HEADLAMPS
Vertical Aim Adjustment
The headlamps on your vehicle areproperly aimed at the assembly plant. Ifyour vehicle has been in an accident, havethe alignment of your headlamps checkedas soon as possible.
8 ft (2.4 m)A
Center height of lamp to groundB
320
2023 Maverick (CFE) Canada/United States of America, enUSA, Edition date: 202208, First-PrintingMaintenanceE107998 E142592
Page 325 of 556
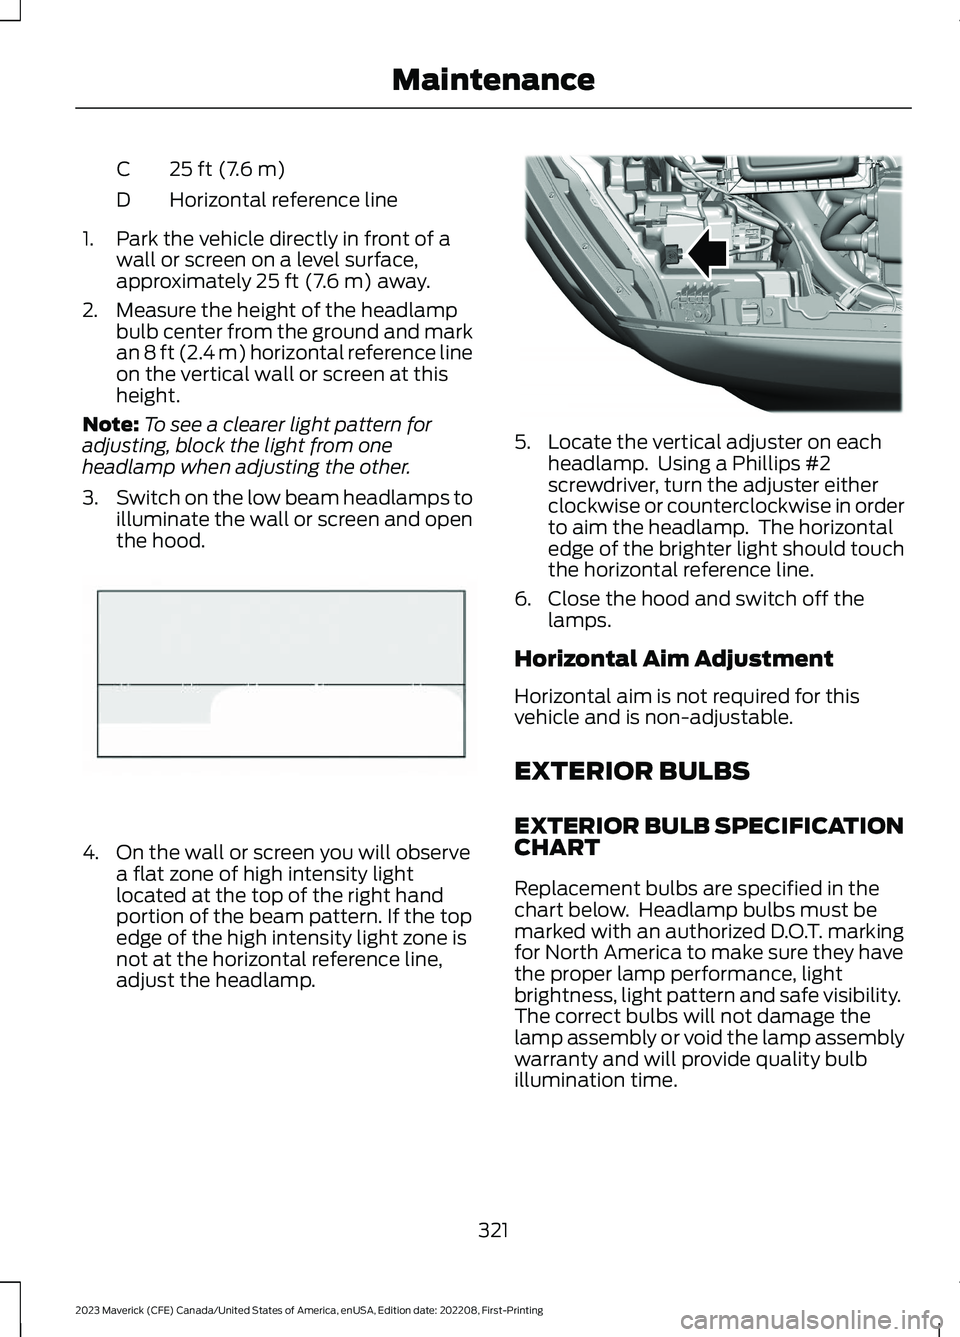
25 ft (7.6 m)C
Horizontal reference lineD
1.Park the vehicle directly in front of awall or screen on a level surface,approximately 25 ft (7.6 m) away.
2.Measure the height of the headlampbulb center from the ground and markan 8 ft (2.4 m) horizontal reference lineon the vertical wall or screen at thisheight.
Note:To see a clearer light pattern foradjusting, block the light from oneheadlamp when adjusting the other.
3.Switch on the low beam headlamps toilluminate the wall or screen and openthe hood.
4.On the wall or screen you will observea flat zone of high intensity lightlocated at the top of the right handportion of the beam pattern. If the topedge of the high intensity light zone isnot at the horizontal reference line,adjust the headlamp.
5.Locate the vertical adjuster on eachheadlamp. Using a Phillips #2screwdriver, turn the adjuster eitherclockwise or counterclockwise in orderto aim the headlamp. The horizontaledge of the brighter light should touchthe horizontal reference line.
6.Close the hood and switch off thelamps.
Horizontal Aim Adjustment
Horizontal aim is not required for thisvehicle and is non-adjustable.
EXTERIOR BULBS
EXTERIOR BULB SPECIFICATIONCHART
Replacement bulbs are specified in thechart below. Headlamp bulbs must bemarked with an authorized D.O.T. markingfor North America to make sure they havethe proper lamp performance, lightbrightness, light pattern and safe visibility.The correct bulbs will not damage thelamp assembly or void the lamp assemblywarranty and will provide quality bulbillumination time.
321
2023 Maverick (CFE) Canada/United States of America, enUSA, Edition date: 202208, First-PrintingMaintenanceE142465 E355886
Page 326 of 556
Power (Watt)SpecificationLamp
LEDLEDHeadlamp low beam.
LEDLEDHeadlamp high beam.
5W5WFront side marker lamp.
26.5/8.54257NA AmberFront turn signal lamp.
26.5/8.5WT21-7WRear lamp, brake lamp, rear turn signallamp and rear side marker lamp. Lowseries.
26.5/8.5WT21-7WRear lamp, brake lamp, and turn signallamp. High series.
LEDLEDRear side marker lamp. High series.
26.5WT21WReversing lamp.
LEDLEDLicense plate lamp.
LEDLEDRear cargo box lamp.
12.8912Central high mounted cargo lamp.
LEDLEDUnderhood lamp.
Note: LED lamps are not serviceable. Seean authorized dealer if they fail.
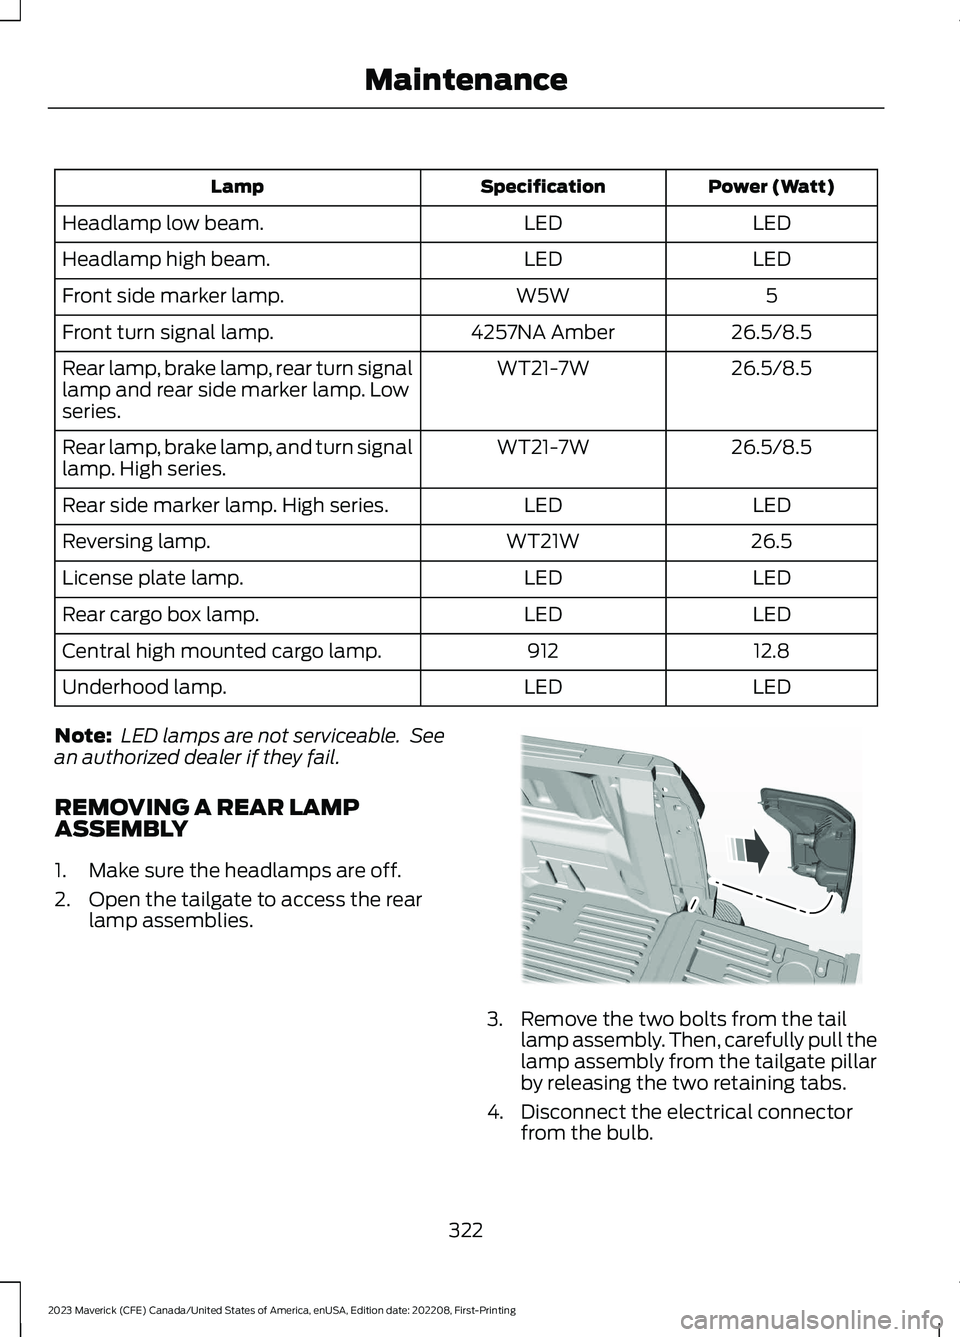
REMOVING A REAR LAMPASSEMBLY
1.Make sure the headlamps are off.
2.Open the tailgate to access the rearlamp assemblies.
3.Remove the two bolts from the taillamp assembly. Then, carefully pull thelamp assembly from the tailgate pillarby releasing the two retaining tabs.
4.Disconnect the electrical connectorfrom the bulb.
322
2023 Maverick (CFE) Canada/United States of America, enUSA, Edition date: 202208, First-PrintingMaintenanceE187288
Page 327 of 556
5.To install, reverse the removalprocedure.
CHANGING A FRONT TURNSIGNAL LAMP BULB
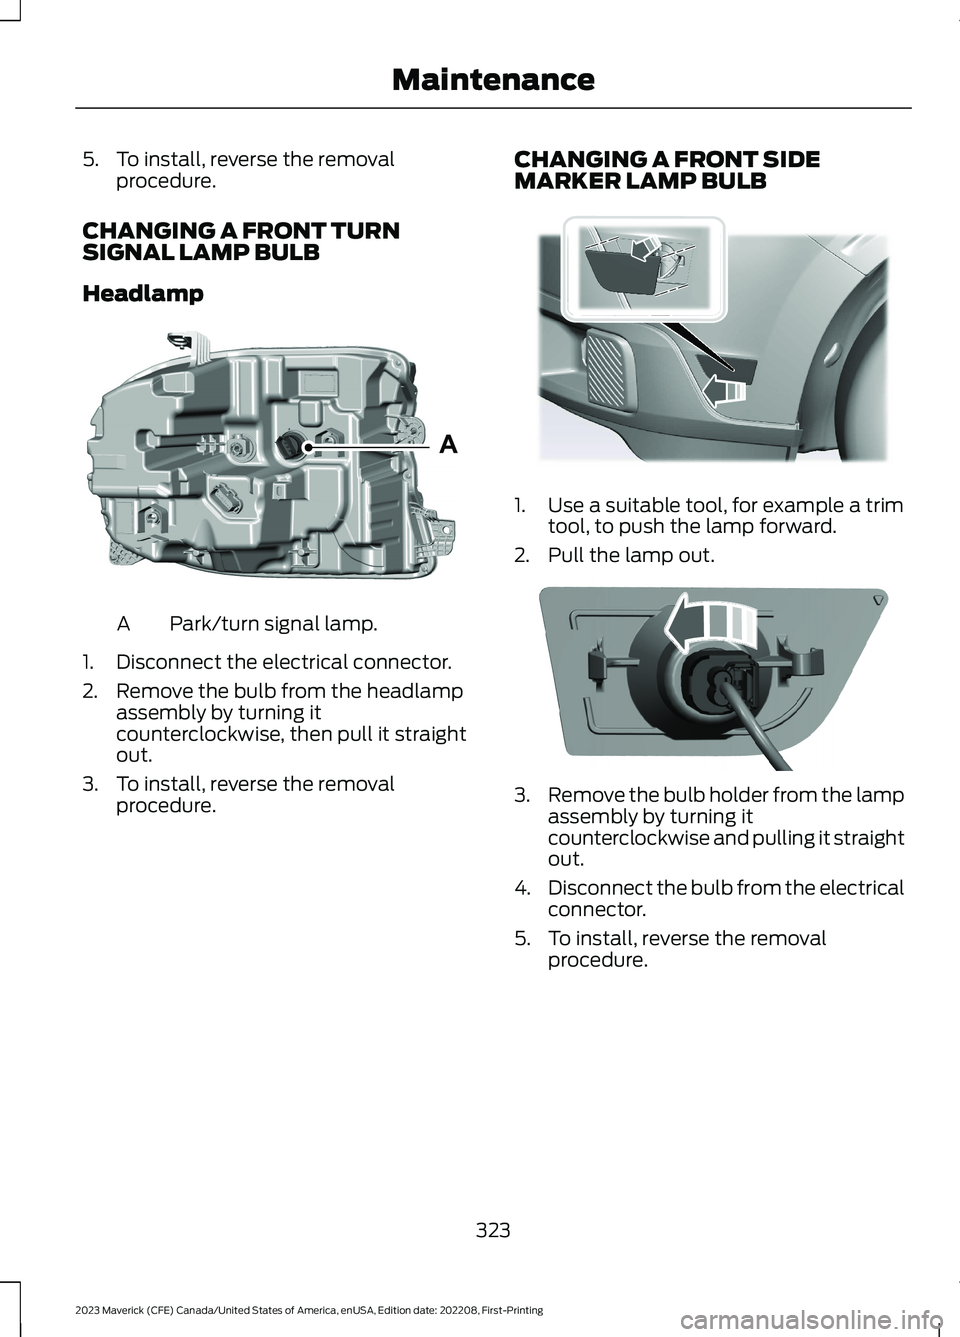
Headlamp
Park/turn signal lamp.A
1.Disconnect the electrical connector.
2.Remove the bulb from the headlampassembly by turning itcounterclockwise, then pull it straightout.
3.To install, reverse the removalprocedure.
CHANGING A FRONT SIDEMARKER LAMP BULB
1.Use a suitable tool, for example a trimtool, to push the lamp forward.
2.Pull the lamp out.
3.Remove the bulb holder from the lampassembly by turning itcounterclockwise and pulling it straightout.
4.Disconnect the bulb from the electricalconnector.
5.To install, reverse the removalprocedure.
323
2023 Maverick (CFE) Canada/United States of America, enUSA, Edition date: 202208, First-PrintingMaintenanceAE348847 E349259 E349260
Page 332 of 556
CLEANING THE EXTERIOR
CLEANING THE EXTERIORPRECAUTIONS
Immediately remove fuel spillages, additiveresiduals, bird droppings, insect depositsand road tar. These may cause damage toyour vehicle’s paintwork or trim over time.Remove any exterior accessories, forexample antennas, before entering a carwash.
CLEANING HEADLAMPS ANDREAR LAMPS
We recommend that you only use cold orlukewarm water containing car shampooto clean the headlamps and the rearlamps.
Do not scrape the lamps.
Do not wipe lamps when they are dry.
CLEANING WINDOWS AND WIPERBLADES
To clean the windshield and wiper blades:
•Clean the windshield with anon-abrasive glass cleaner.
Note:When cleaning the interior of thewindshield, avoid getting any glass cleaneron the instrument panel or door panels.Wipe any glass cleaner off these surfacesimmediately.
•Clean the wiper blades with washerfluid or water applied with a softsponge or cloth.
Note: Do not use razor blades or othersharp objects to clean or remove decalsfrom the inside of the heated rear window.This can cause damage not covered by thevehicle Warranty.
CLEANING CHROME, ALUMINIUMOR STAINLESS STEEL
We recommend that you only use a carshampoo, a soft cloth and water onbumpers and other chrome, aluminium orstainless steel parts.
Note:For additional information andassistance, we recommend that you contactan authorized dealer.
Note:Rinse the area well after cleaning.
Note:Do not use abrasive materials, forexample steel wool or plastic pads, as theycan scratch these surfaces.
Note:Do not use chrome cleaner, metalcleaner or polish on wheels or wheel covers.
CLEANING WHEELS
Only use a recommended wheel and tirecleaner to clean the wheels weekly. Foradditional information and assistance, werecommend that you contact anauthorized dealer.
1.Use a sponge to remove heavydeposits of dirt and brake dust.
2.Rinse well after cleaning.
Note:Do not apply a cleaning chemical towarm or hot wheel rims and covers.
If you intend on parking your vehicle for anextended period after cleaning the wheelswith a wheel cleaner, drive your vehicle fora few minutes before parking your vehicle.This reduces the risk of corrosion of thebrake discs, brake pads and linings.
Do not clean the wheels when they are hot.
Note: Some car washes could damagewheel rims and covers.
Note: Using non-recommended cleaners,harsh cleaning products, chrome wheelcleaners or abrasive materials coulddamage wheel rims and covers.
328
2023 Maverick (CFE) Canada/United States of America, enUSA, Edition date: 202208, First-PrintingVehicle Care
Page 539 of 556
1
12V Pre-Wired Connections.....................44712V Pre-Wired ConnectionsPrecautions.................................................447
9
911 Assist...........................................................59
A
A/CSee: Climate Control - Vehicles With: DualAutomatic Temperature Control(DATC)...............................................................125See: Climate Control - Vehicles With:Electronic Automatic Temperature Control(EATC)...............................................................130About This Manual..........................................17ABSSee: Brakes............................................................191Accessing the Trip Computer - VehiclesWith: 4.2 Inch Screen...............................120Accessing the Trip Computer - VehiclesWith: 6.5 Inch Screen...............................120Accessories....................................................446Adaptive Cruise Control.............................219Adaptive Cruise Control –Troubleshooting............................................228Lane Centering....................................................225Adaptive Cruise Control AutomaticCancellation................................................222Adaptive Cruise Control Indicators.......224Adaptive Cruise ControlLimitations..................................................220Adaptive Cruise ControlPrecautions..................................................219Adaptive Cruise Control –Troubleshooting........................................228Adaptive Cruise Control – InformationMessages.........................................................228Adjusting the Exterior Mirrors..................103Adjusting the Headlamps........................320Adjusting the Instrument Panel LightingBrightness......................................................98Adjusting the Integrated Trailer BrakeController Mode.........................................274
Adjusting the Seatbelt Height...................45Adjusting the Seatbelts DuringPregnancy......................................................45Adjusting the Sound Settings.................393Adjusting the Steering Wheel...................88Adjusting the Volume.................................392Aid Mode.........................................................236How Does Aid Mode Work.............................236What Is Aid Mode..............................................236Airbag Precautions........................................52Airbags...............................................................50Front Passenger Sensing System..................54Air ConditioningSee: Climate Control - Vehicles With: DualAutomatic Temperature Control(DATC)...............................................................125See: Climate Control - Vehicles With:Electronic Automatic Temperature Control(EATC)...............................................................130Air Conditioning System Capacity andSpecification - 2.0L EcoBoost™.........373Air Conditioning System Capacity andSpecification - 2.5L, Hybrid ElectricVehicle (HEV).............................................374Air FilterSee: Changing the Engine Air Filter - 2.0LEcoBoost™......................................................313See: Changing the Engine Air Filter - 2.5L,Hybrid Electric Vehicle (HEV)...................314Alert and Aid Mode.....................................236How Does Alert and Aid Mode Work..........237What Is Alert and Aid Mode...........................236Alert Mode......................................................235Adjusting the Steering Wheel VibrationIntensity............................................................236How Does Alert Mode Work..........................236What Is Alert Mode...........................................235All-Wheel Drive.............................................189All-Wheel Drive – Troubleshooting.............190All-Wheel Drive Limitations.....................190All-Wheel Drive Precautions...................190All-Wheel Drive –Troubleshooting........................................190All-Wheel Drive – InformationMessages.........................................................190AM/FM Radio................................................384AM/FM Radio Limitations..............................394Selecting a Radio Station...............................394
535
2023 Maverick (CFE) Canada/United States of America, enUSA, Edition date: 202208, First-PrintingIndex