2023 FORD F650/750 maintenance
[x] Cancel search: maintenancePage 261 of 378

Air Dryer
Climactic conditions affect performance
of desiccant or after-cooler type air dryers.
You must establish a maintenance
schedule for each specific operation.
The use of an air dryer on a vehicle does
not eliminate the need to drain the air
reservoirs periodically.
Inspect for moisture in the air system by
opening reservoirs, draincocks or valves
and checking for presence of water. The
presence of small amounts of water due
to condensation is normal and is not an
indication that the dryer is not functioning
properly.
Replace or rebuild the desiccant cartridge
when you determine that the desiccant is
contaminated and does not have adequate
water absorption capacity. The desiccant
change interval may vary. A general
recommendation is to replace the
desiccant every 12 months (yearly). If
experience has shown that extended or
shortened life has resulted for a particular
installation, then the yearly interval can be
increased or decreased accordingly.
Draining the Air Brake Reservoir
WARNING: Failure to drain air
brake reservoirs can result in a reduction
or loss of braking ability due to fluid
accumulation in the reservoir and/or
possible freeze-up during cold weather.
Completely drain all the air brake reservoirs
daily by opening the draincock at the ends
of the tanks. (Where accessible.
Pull-chains are used when the drains are
undercab or otherwise inaccessible.) Close
the draincock after draining. Manually drainany air tanks equipped with automatic
moisture ejector valves, as required, to
maintain a dry air system. Contact an
authorized dealer if you are unsure of the
air reservoir locations or the draining
procedure.
Hydraulic Brakes
Establish a regular schedule for periodic
cleaning, lubrication and adjustment
inspection based on vehicle use. Exact
maintenance intervals are difficult to
predetermine due to vehicle applications
and operating conditions. If you are
uncertain of the proper schedule for your
vehicle, contact an authorized dealer.
Regular inspections should include:
• Checking the brake lining (every service
interval). Establish inspection intervals
that provide for lining replacement
before damage to the disc occurs.
Excessive lining wear may expose the
backing plate to the disc causing
scoring of the disc faces. A qualified
technician should perform this
257
Maintenance
Page 262 of 378

inspection and keep to instructions
provided by the service manual.
Hydraulic brake systems are
power-assisted. There is a great
reduction in braking capabilities
without engine assist.
• Proper fluid level. The level should be
at the bottom edge of the ring on each
reservoir fill port. Do not fill the master
cylinder to the top of the reservoir. If
fluid level requires attention to
maintain a proper master cylinder level,
this is an indication of either severe
operation (pad wear) or fluid leakage.
A more frequent and thorough brake
inspection is required.
• Brake lines, hoses and fittings. Repair
or replace brake line tubes, hoses or
fittings as required. Inspect these
components every 4,000 mi
(6,000 km) for the following.
• Lines for kinks, dents, corrosion or
rupture.
• Hoses for abrasions, kinks, soft
spots or rupture, collapse, cracks,
twists or loose frame supports.
When replacing a hose, be sure
there is adequate clearance to the
hose to avoid an abrasion to the
new hose.
• All connections for leaks.
Driveline Parking Brake
WARNING: Use wheel chocks and
exercise caution when inspecting under
the vehicle. A vehicle roll-away could
result in property damage, personal injury
or death.
A qualified technician should adjust the
parking brake and keep to the instructions
in the service manual.
AXLE INSPECTION
Front Axle
Maintaining the front axle alignment to
specifications is very important. A qualified
technician should check and maintain the
alignment.
Regular inspections should include:
• Toe-in inspection and adjustment (if
necessary), particularly with radial
tires.
• Checking for proper tightness of axle
mounting U-bolt nuts, attaching or
mounting bolts and nuts.
• Checking the axle for damage, binding,
worn parts and adequate lubrication.
• Checking the kingpins for excessive
wear. Also, perform this check during
other scheduled maintenance, for
example as tire rotation or service,
wheel bearing service and alignment.
See the workshop manual for proper
procedures.
Toe-in
It is essential to maintain correct toe-in
and tire pressure for optimum tire wear.
Inspecting steer axle tires in the first
3,000–10,000 mi (5,000–16,000 km)
generally shows if tires are wearing
normally.
Rapid outside shoulder wear on both tires
indicates too much toe-in.
Rapid inside shoulder wear on both tires
indicates too much toe-out.
In P&D-type service, there can be a
left-to-right steer tire tread life differential
up to 40% depending on routes and other
variables.
258
Maintenance
Page 263 of 378

Follow the tire manufacturer's
recommended cold inflation pressure for
the tire size, load range (ply rating) and
steer axle loading typical for their operation
(each steer axle tire equals ½ steer axle
loading).
Special applications may warrant a setting
based on experience with the type of tire
operating loads and conditions. Radial tires
are more sensitive to toe-in setting than
bias ply tires. Fine tuning school bus
alignment to line-haul truck standards
does not drastically improve tire tread life.
STEERING SYSTEM
INSPECTION
WARNING: Failure to maintain the
steering system in proper condition can
cause reduced steering ability resulting
in property damage, personal injury or
death.
Note:Have any steering problems
immediately corrected by a qualified service
technician.
Ask your service technician to examine the
steering mechanism. Only minor
adjustments may be necessary.
Regular inspections should include:
• Checking the tie rod, drag link end
clamp bolts and ball joints for proper
tightness.
• Checking for installation and spread of
cotter pins and tightness of nuts at
both ends of the tie rod and drag link.
• Checking that the pitman arm (steering
arm at steering gear) mounting is tight
and locked. Check system for leaks or
hose chafing. Repair immediately, if
necessary.• Maintaining proper steering gear and
power steering pump lubricant levels.
• Checking steering column joint bolts
and steering linkage, particularly for
body-to-chassis clearance.
Steering Column Joint Bolts
As a good maintenance practice, check
steering column joint bolt tightness every
60,000 mi (96,000 km) or annually,
whichever occurs first. Do not overtighten
the bolts.
Hydraulic System
Whenever draining and refilling the power
steering's hydraulic system for any reason,
bleed air from the system before returning
the vehicle to service. Failure to bleed the
hydraulic system properly can result in
degradation of power system performance.
Consult an authorized dealer who is aware
of the proper procedures for filling and
bleeding the system.
SUSPENSION SYSTEM
INSPECTION
Note:Do not adjust air suspension height
to any setting other than the specified
setting. Altering the height setting changes
the driveline angle and may result in
unwarrantable component damage, such
as transmission component damage.
Verify drive axle air suspension height and
height control valve performance at engine
oil change intervals.
Periodically check:
• Condition of spring leaves for evidence
of fatigue, bending or breakage.
• Condition of suspension mounting
brackets and bushings.
• Torque rod mounting fasteners for
tightness.
259
Maintenance
Page 264 of 378

• For proper suspension alignment.
Maintain proper alignment at all times.
• U-bolts. After the chassis has been
operating under load for 1,000 mi
(1,600 km) or six months (whichever
comes first), the U-bolt nuts must be
re-torqued. Re-torque the U-bolt nuts
every 37,000 mi (60,000 km)
thereafter. Clean and lubricate the
U-bolt and nut threads and seats to
make sure a like new condition when
re-torqueing. See Spring U-Bolt
Check (page 260).
FRAME AND TOW HOOK
INSPECTION
Your vehicle's chassis is manufactured
with frame rails of either HSLA steel or
heat-treated steel. Handle each in a
specific manner to make sure maximum
service life. Consult the service manual or
an authorized dealer before attempting
frame repair or modification.
It is important, particularly on vehicles that
use tow hooks frequently, to inspect the
front and rear tow hooks for damage or a
loose mounting.
REAR AXLE FLUID CHECK
Your rear axle may have an optional
synthetic lubricant that allows the use of
extended service intervals. A tag on the
filler plug identifies the use of the synthetic
lubricant.
Only use a lubricant that meets
manufacturer specifications. Use of a
non-approved rear axle lubricant may
cause internal axle component damage.
See Rear Axle Fluid Capacity and
Specification (page 305).
Checking the Fluid Level
1. Park your vehicle on level ground.2. Set the parking brake and shift into
position neutral (N) or park (P). Turn
the engine off.
3. Clean any dirt from around the axle
filler plug.
4. Remove the filler plug and inspect the
lubricant level. It should be at the
bottom of the filler plug opening.
5. Add lubricant, if necessary, through the
filler plug opening.
6. Clean and install the filler plug securely.
Changing the Fluid
Note:Drain the rear axle while the lubricant
is warm.
1. Park your vehicle on level ground.
2. Set the parking brake and shift into
position neutral (N) or park (P). Turn
the engine off.
3. Clean any dirt from around the axle
filler and drain plugs.
4. Remove the filler and drain plugs. Drain
the lubricant into a suitable container.
Dispose of all used automotive fluids
in a responsible manner following your
local authorized standards.
5. Clean and install the drain plug
securely.
6. Add lubricant through the filler plug
opening.
7. Clean and install the filler plug securely.
SPRING U-BOLT CHECK
Check and tighten the U-bolt nuts after
your vehicle has been operated under load
for 1,000 mi (1,600 km) or six months,
whichever occurs first.
Check and tighten the U-bolt nuts every
37,000 mi (60,000 km).
Check and tighten the U-bolt nuts with
your vehicle at curb height and unloaded.
260
Maintenance
Page 265 of 378

Inspect the U-bolt threads for rust and
debris. Clean the threads if contaminated.
U-bolt Nut Torque
Front Axle
Note:Check and tighten the U-bolt nuts
evenly using a criss-cross pattern in the
following stages.
lb.ft (Nm) Stage
40 (60) 1.
90 (125) 2.
170 (225) 3.
240 (325) 4.
Rear Axle
Note:Check and tighten the U-bolt nuts
evenly using a criss-cross pattern in the
following stages.
lb.ft (Nm) Stage
60 (75) 1.
90 (125) 2.
170 (225) 3.
240 (325) 4.
320 (440) 5.
261
Maintenance
Page 271 of 378

2. Remove dirt and brake dust with a
sponge.
3. Remove tar and grease with a bug and
tar remover. We recommend that you
use Ford approved bug and tar remover
if available.
4. Thoroughly rinse the wheels with water
after cleaning.
If you intend on parking your vehicle for an
extended period after cleaning the wheels
with a wheel cleaner, drive your vehicle for
a few minutes before doing so. This
reduces the risk of corrosion of the brake
discs, brake pads and linings.
Do not clean the wheels when they are hot.
Note: Some car washes could damage
wheel rims and covers.
Note: Using non-recommended cleaners,
harsh cleaning products, chrome wheel
cleaners or abrasive materials could
damage wheel rims and covers.
VEHICLE STORAGE
If you plan on storing your vehicle for 30
days or more, read the following
maintenance recommendations to make
sure your vehicle stays in good operating
condition.
We engineer and test all motor vehicles
and their components for reliable, regular
driving. Under various conditions,
long-term storage may lead to degraded
engine performance or failure unless you
use specific precautions to preserve engine
components.
General
• Store all vehicles in a dry, ventilated
place.
• Protect from sunlight, if possible.
• If vehicles are stored outside, they
require regular maintenance to protect
against rust and damage.
Body
• Wash your vehicle thoroughly to
remove dirt, grease, oil, tar or mud from
exterior surfaces, rear-wheel housing
and the underside of front fenders.
• Periodically wash your vehicle if it is
stored in exposed locations.
• Touch-up exposed or primed metal to
prevent rust.
• Cover chrome and stainless steel parts
with a thick coat of auto wax to prevent
discoloration. Re-wax as necessary
when you wash your vehicle.
• Lubricate all hood, door and luggage
compartment hinges and latches with
a light grade oil.
• Cover interior trim to prevent fading.
• Keep all rubber parts free from oil and
solvents.
Engine
• Change the engine oil and filter prior to
storage because used engine oil
contains contaminates which may
cause engine damage.
• Start the engine every 15 days for a
minimum of 15 minutes. Run at fast
idle with the climate controls set to
defrost until the engine reaches normal
operating temperature.
267
Vehicle Care
Page 283 of 378

Improper or inadequate vehicle
maintenance can cause tires to
wear abnormally. Inspect all your
tires, including the spare,
frequently, and replace them if
one or more of the following
conditions exist:
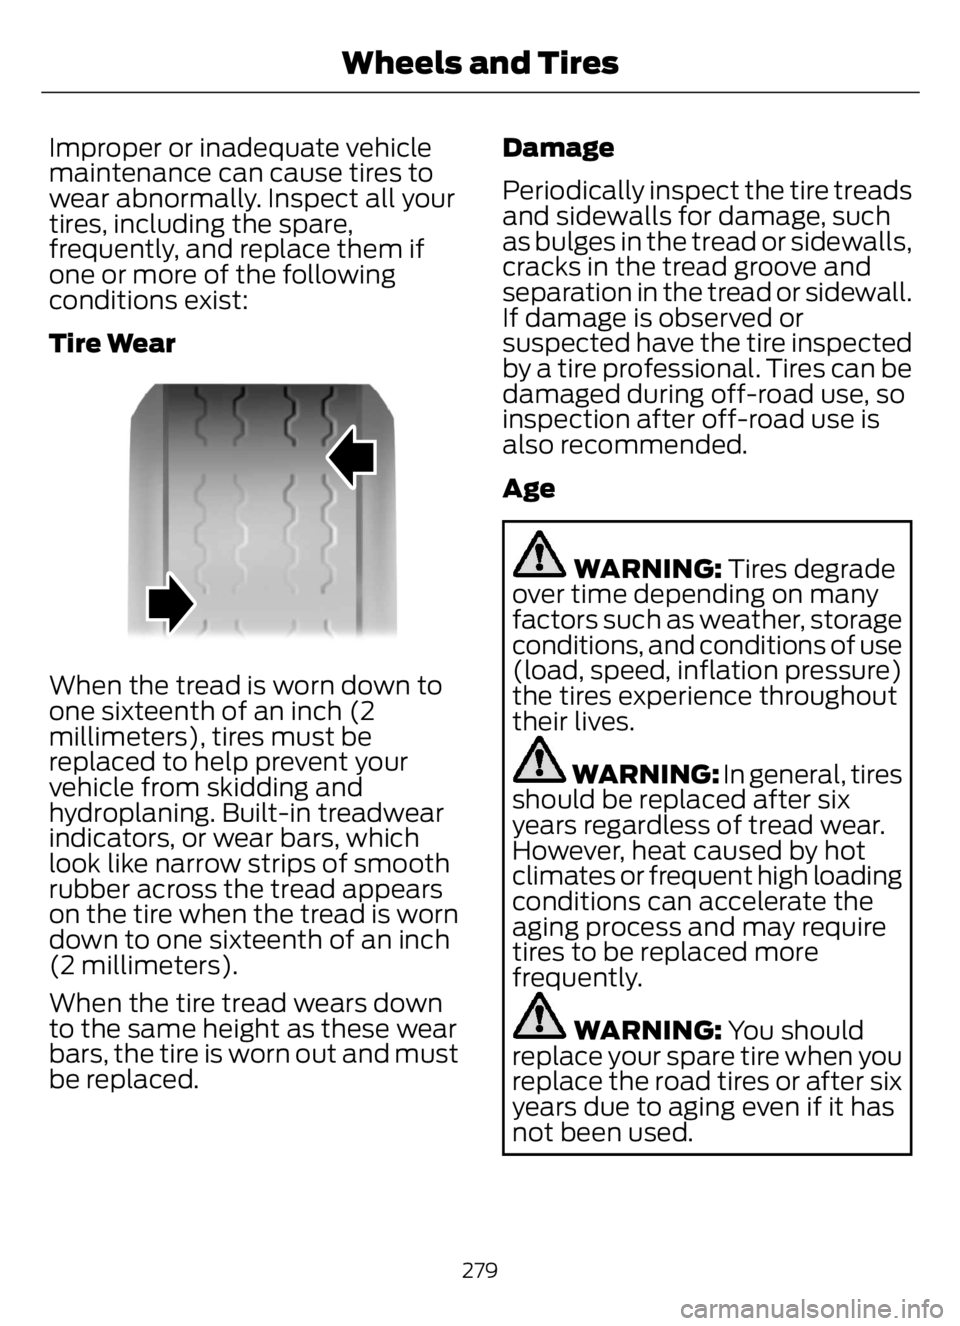
Tire Wear
E142546
When the tread is worn down to
one sixteenth of an inch (2
millimeters), tires must be
replaced to help prevent your
vehicle from skidding and
hydroplaning. Built-in treadwear
indicators, or wear bars, which
look like narrow strips of smooth
rubber across the tread appears
on the tire when the tread is worn
down to one sixteenth of an inch
(2 millimeters).
When the tire tread wears down
to the same height as these wear
bars, the tire is worn out and must
be replaced.Damage
Periodically inspect the tire treads
and sidewalls for damage, such
as bulges in the tread or sidewalls,
cracks in the tread groove and
separation in the tread or sidewall.
If damage is observed or
suspected have the tire inspected
by a tire professional. Tires can be
damaged during off-road use, so
inspection after off-road use is
also recommended.
Age
WARNING: Tires degrade
over time depending on many
factors such as weather, storage
conditions, and conditions of use
(load, speed, inflation pressure)
the tires experience throughout
their lives.
WARNING: In general, tires
should be replaced after six
years regardless of tread wear.
However, heat caused by hot
climates or frequent high loading
conditions can accelerate the
aging process and may require
tires to be replaced more
frequently.
WARNING: You should
replace your spare tire when you
replace the road tires or after six
years due to aging even if it has
not been used.
279
Wheels and Tires
Page 322 of 378

Less Cost to Properly Maintain Your
Vehicle
Ford Protect extended service plan also
offers a Premium Maintenance Plan that
covers all scheduled maintenance, and
selected wear items. The coverage is
prepaid, so you never have to worry about
the cost of your vehicle’s maintenance.
Covered maintenance includes:
• Windshield wiper blades.
• Spark plugs.
• The clutch disc (if equipped).
• Brake pads and linings.
• Shock absorbers.
• Struts.
• Engine belts.
• Engine coolant hoses, clamps and
O-rings.
• Diesel exhaust fluid replenishment (if
equipped).
• Cabin air filter replacement every
20,000 mi (32,000 km) (electric
vehicles only).
Interest Free Finance Options
Just a 5% down payment will provide you
with an affordable, no interest, no fee
payment program allowing you all the
security and benefits Ford Protect
extended service plan has to offer while
paying over time. You are pre-approved
with no credit check or hassles. To learn
more, call our Ford Protect extended
service plan specialists at 800-367-3377.
Ford Protect Extended Service Plan
P.O. Box 321067
Detroit, MI 48232Ford Protect Extended Service
Plan (CANADA ONLY)
You can get more protection for your
vehicle by purchasing a Ford Protect
extended service plan. Ford Protect
extended service plan is the only service
contract backed by Ford Motor Company
of Canada, Limited. Depending on the plan
you purchase, Ford Protect extended
service plan provides benefits such as:
• Rental reimbursement.
• Coverage for certain maintenance and
wear items.
• Protection against repair costs after
your New Vehicle Limited Warranty
Coverage expires.
• Roadside Assistance benefits.
There are several Ford Protect extended
service plans available in various time,
distance and deductible combinations.
Each plan is tailored to fit your own driving
needs, including reimbursement for towing
and rental. When you purchase Ford
Protect extended service plan, you receive
added peace-of-mind protection
throughout Canada, the United States and
Mexico, provided by a network of
participating authorized Ford Motor
Company dealers.
Note:Repairs performed outside of Canada
and the United States are not eligible for
Ford Protect extended service plan
coverage.
This information is subject to change. For
more information; visit your local Ford of
Canada dealer or www.ford.ca to find the
Ford Protect extended service plan that is
right for you.
318
Ford Protect