2023 FORD F650/750 ABS
[x] Cancel search: ABSPage 217 of 378

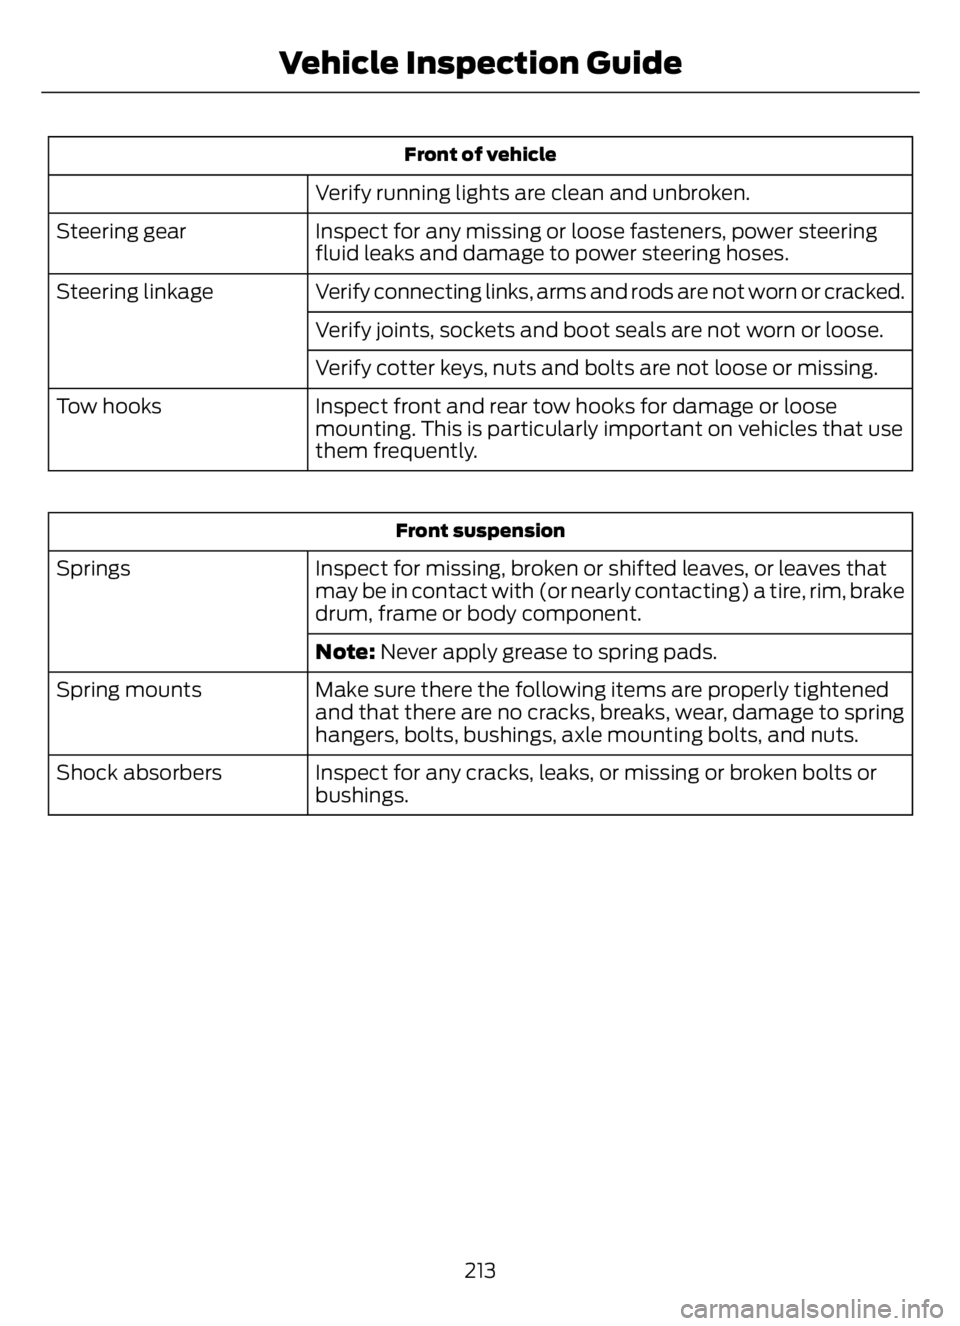
Front of vehicle
Verify running lights are clean and unbroken.
Inspect for any missing or loose fasteners, power steering
fluid leaks and damage to power steering hoses. Steering gear
Verify connecting links, arms and rods are not worn or cracked. Steering linkage
Verify joints, sockets and boot seals are not worn or loose.
Verify cotter keys, nuts and bolts are not loose or missing.
Inspect front and rear tow hooks for damage or loose
mounting. This is particularly important on vehicles that use
them frequently. Tow hooks
Front suspension
Inspect for missing, broken or shifted leaves, or leaves that
may be in contact with (or nearly contacting) a tire, rim, brake
drum, frame or body component. Springs
Note: Never apply grease to spring pads.
Make sure there the following items are properly tightened
and that there are no cracks, breaks, wear, damage to spring
hangers, bolts, bushings, axle mounting bolts, and nuts. Spring mounts
Inspect for any cracks, leaks, or missing or broken bolts or
bushings. Shock absorbers
213
Vehicle Inspection Guide
Page 220 of 378

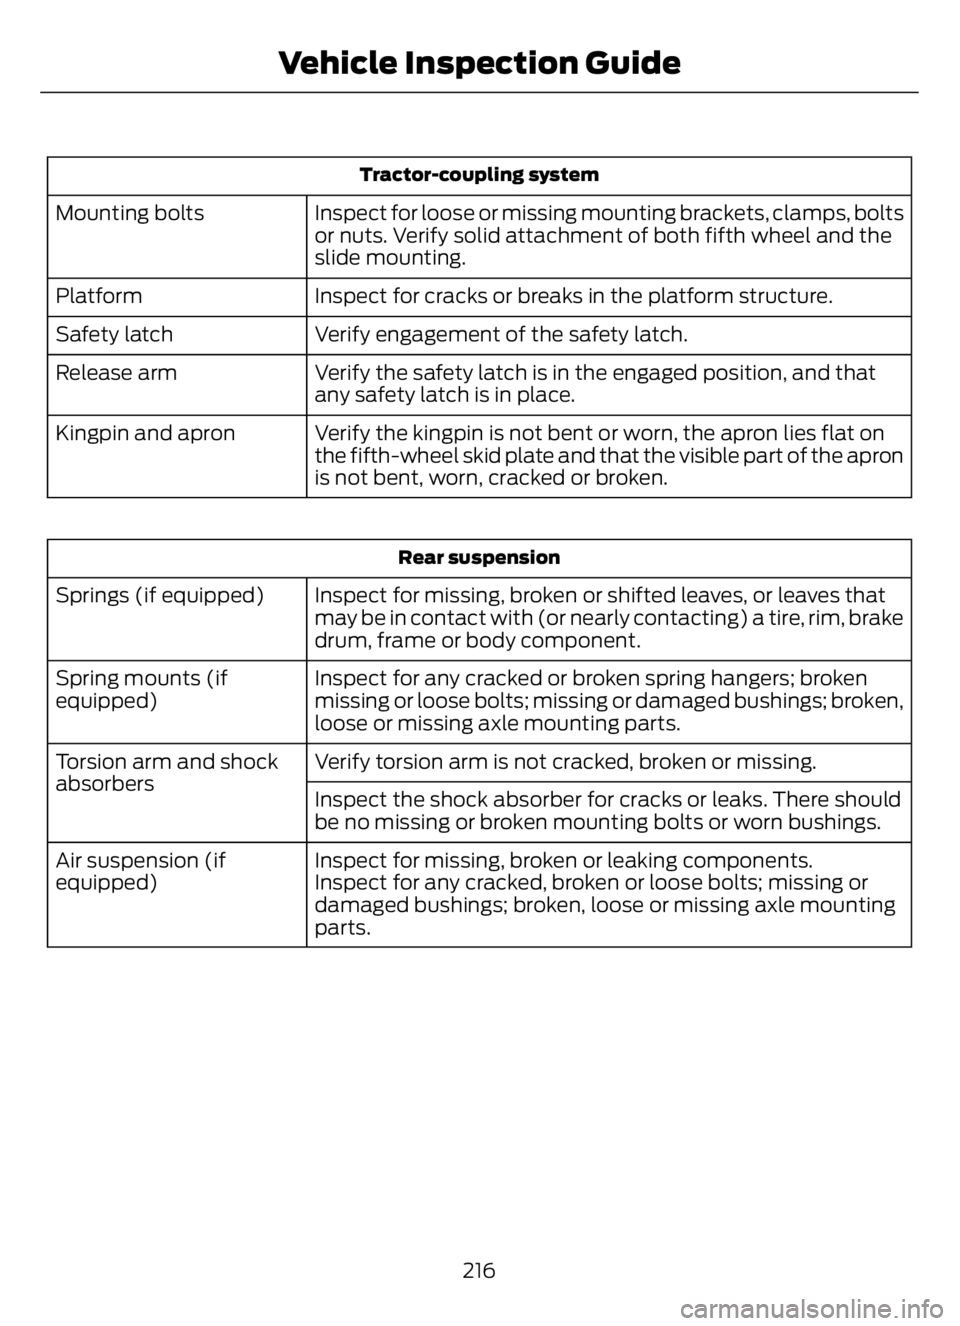
Tractor-coupling system
Inspect for loose or missing mounting brackets, clamps, bolts
or nuts. Verify solid attachment of both fifth wheel and the
slide mounting. Mounting bolts
Inspect for cracks or breaks in the platform structure. Platform
Verify engagement of the safety latch. Safety latch
Verify the safety latch is in the engaged position, and that
any safety latch is in place. Release arm
Verify the kingpin is not bent or worn, the apron lies flat on
the fifth-wheel skid plate and that the visible part of the apron
is not bent, worn, cracked or broken. Kingpin and apron
Rear suspension
Inspect for missing, broken or shifted leaves, or leaves that
may be in contact with (or nearly contacting) a tire, rim, brake
drum, frame or body component. Springs (if equipped)
Inspect for any cracked or broken spring hangers; broken
missing or loose bolts; missing or damaged bushings; broken,
loose or missing axle mounting parts. Spring mounts (if
equipped)
Verify torsion arm is not cracked, broken or missing. Torsion arm and shock
absorbers
Inspect the shock absorber for cracks or leaks. There should
be no missing or broken mounting bolts or worn bushings.
Inspect for missing, broken or leaking components. Air suspension (if
equipped) Inspect for any cracked, broken or loose bolts; missing or
damaged bushings; broken, loose or missing axle mounting
parts.
216
Vehicle Inspection Guide
Page 229 of 378

Do not use supplemental engine oil
additives because they are unnecessary
and could lead to engine damage that may
not be covered by the vehicle Warranty.
To top up the engine oil level do the
following:
1. Clean the area surrounding the engine
oil filler cap before you remove it.
2. Remove the engine oil filler cap. See
Under Hood Overview (page 222).
Turn it counterclockwise and remove
it.
3. Add engine oil of the proper viscosity
and grade that meets Ford
specifications. See Engine Oil
Capacity and Specification (page
292). You may have to use a funnel to
pour the engine oil into the opening.
4. Recheck the oil level.
5. If the oil level is correct, replace the
dipstick and make sure it is fully seated.
6. Replace the engine oil filler cap. Turn
it clockwise until you feel a strong
resistance.
Note: Do not add oil further than the
maximum mark. Oil levels above the
maximum mark may cause engine damage.
Note:Make sure you install the oil filler cap
correctly.
Note:Soak up any spillage with an
absorbent cloth immediately.
Engine lubrication for severe
service operation
The following conditions define severe
operation for which engine operation with
SAE 5W-40 oil which meets Ford
specification, WSS-M2C171-F1, is
recommended. Oil and oil filter change
intervals will be determined by the
Intelligent Oil Life Monitor™ as noted
previously.
ENGINE OIL CHECK - 7.3L
1. Make sure that your vehicle is on level
ground.
2. Check the oil level before starting the
engine, or switch the engine off after
warm up and wait 10 minutes for the
oil to drain into the oil pan.
3. Remove the dipstick and wipe it with
a clean, lint-free cloth.
4. Reinstall the dipstick and make sure it
is fully seated.
5. Remove the dipstick again to check the
oil level.
Note: If the oil level is between the
maximum and minimum marks, the oil level
is acceptable. Do not add oil.
6. If the oil level is at the minimum mark,
immediately add oil.
7. Reinstall the dipstick. Make sure it is
fully seated.
Note:The oil consumption of new engines
reaches its normal level after approximately
3,000 mi (5,000 km).
Adding Engine Oil
WARNING: Do not add engine oil
when the engine is hot. Failure to follow
this instruction could result in personal
injury.
WARNING: Do not remove the filler
cap when the engine is running.
Do not use supplemental engine oil
additives because they are unnecessary
and could lead to engine damage that the
vehicle warranty may not cover.
1. Clean the area surrounding the engine
oil filler cap before you remove it.
2. Remove the engine oil filler cap.
225
Maintenance
Page 230 of 378

3. Add engine oil that meets our
specifications. See Capacities and
Specifications (page 288).
4. Reinstall the engine oil filler cap. Turn
it clockwise until you feel a strong
resistance.
Note: Do not add oil further than the
maximum mark. Oil levels above the
maximum mark may cause engine damage.
Note:Immediately soak up any oil spillage
with an absorbent cloth.
Engine Oil Pressure Warning Lamp
WARNING: If it illuminates when
you are driving do not continue your
journey, even if the oil level is correct.
Have your vehicle checked.
It illuminates when you switch
the ignition on.
If it illuminates when the engine
is running this indicates a malfunction.
Stop your vehicle as soon as it is safe to
do so and switch the engine off. Check the
engine oil level. If the oil level is sufficient,
this indicates a system malfunction. Have
your vehicle checked as soon as possible.
CHANGING THE ENGINE OIL
AND OIL FILTER
WARNING: Do not add engine oil
when the engine is hot. Failure to follow
this instruction could result in personal
injury.If your vehicle has a diesel engine, an
Intelligent Oil Life Monitor™ calculates the
proper oil change service interval. When
the information display indicates: OIL
CHANGE REQUIRED, change the engine
oil and oil filter. See Information
Displays (page 70).
The engine oil filter protects your engine
by filtering harmful, abrasive or sludge
particles and particles significantly smaller
than most available will-fit filters. See
Motorcraft Parts (page 290).
1. Unscrew the oil filter and oil pan drain
plug and wait for the oil to drain.
2. Replace the filter.
3. Reinstall the oil pan drain plug.
4. Refill the engine with new oil. See
Engine Oil Capacity and
Specification (page 295).
5. For diesel engines, you need to reset
the Intelligent Oil Life Monitor™. See
Information Displays (page 70).
Engine Lubrication for Severe
Service Operation
The following conditions define severe
operation:
• Frequent or extended idling such as
over 10 minutes per hour of normal
driving.
• Low-speed operation or stationary use.
• If the vehicle is operated in sustained,
ambient temperatures below -9°F
(-23°C) or above 100°F (38°C).
• Frequent low-speed operation, or
consistent heavy traffic less than
25 mph (40 km/h).
• Operating in severe dust conditions.
• Operating the vehicle off road.
• Towing a trailer over 1,000 mi
(1,600 km).
226
Maintenance
Page 234 of 378

E163377
5. Install a new air filter element. Be sure
that the groove seal on the pleated
paper filter traps both sides of the
vertical partition of the air box.
6. Engage the clips to secure the air filter
housing cover to the air filter housing.
Be careful not to crimp the filter
element edges between the air filter
housing and cover. Ensure that you
align the tabs on the edge properly into
the slots.
7. Reconnect the mass airflow sensor
electrical connector to the inlet tube.
Make sure the locking tab on the
connector is in the locked position.
CHANGING THE ENGINE AIR
FILTER - 7.3L
WARNING: To reduce the risk of
vehicle damage and personal burn
injuries, do not start your engine with the
air cleaner removed and do not remove
it while the engine is running.
Note:Operating your vehicle in heavy
snowfall or extreme rain conditions may
allow excessive amounts of snow or water
into the air intake system. This could plug
or soak the air filter, and cause the engine
to lose power or shut down.When replacing the air filter element, use
a Motorcraft® air filter element. See
Motorcraft Parts (page 290).
Note: Failure to use the correct air filter
element may result in severe engine
damage, and may void the vehicle warranty.
Change the air filter element at the correct
interval. See Scheduled Maintenance
(page 319).
E317615E317615
1. Locate the mass air flow sensor
electrical connector on the air outlet
tube. Disconnect the mass air flow
sensor electrical connector.
E317616E317616
230
Maintenance
Page 235 of 378

2. Reposition the locking clip on the
connector, squeeze the connector and
pull it off the air outlet tube.
E317617E317617
3. Clean the area from around the air tube
to the air cover connection to prevent
debris from entering the system. Next,
loosen the bolt on the air tube clamp
so the clamp is no longer snug to the
air tube. It is not necessary to
completely remove the clamp.
4. Pull the air tube off from the air cleaner
housing.
E317618
x3
5. Remove the clips that secure the air
filter housing cover. Push the air filter
cover toward the center of the vehicle
and up slightly to release it.
6. Remove the air filter element from the
air filter housing.
7. Install the new air filter element.
8. Engage the clips to secure the air filter
housing cover to the air filter housing.
Be careful not to crimp the filter
element edges between the air filter
housing and cover. Ensure that you
align the tabs on the edge properly into
the slots.
9. Slip the air tube onto the air filter
housing and tighten the air-tube clamp
bolt snugly. Do not over tighten
air-tube clamp bolt.
231
Maintenance
Page 249 of 378

E170684
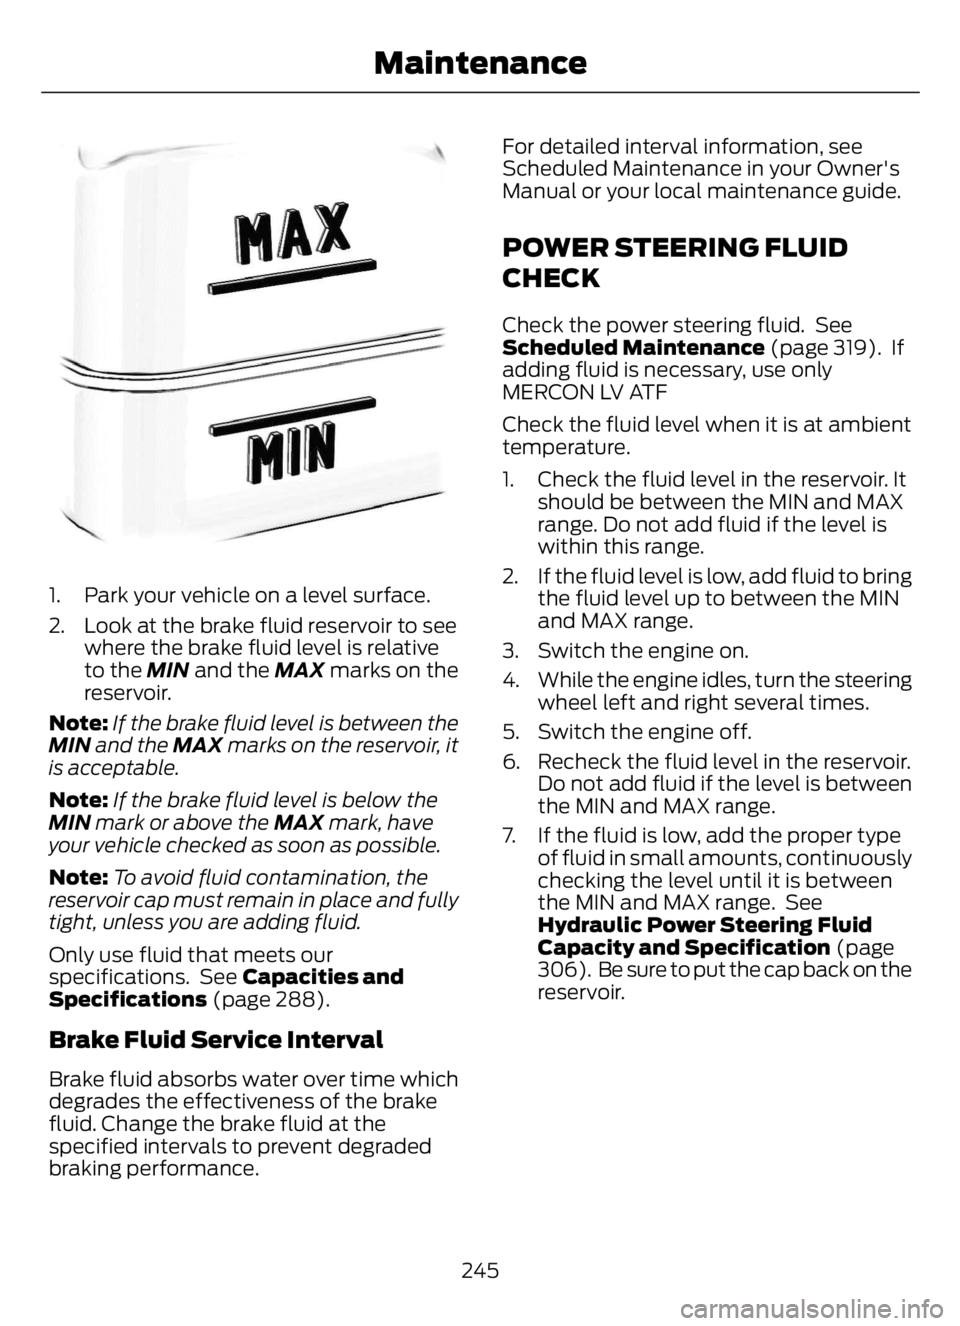
1. Park your vehicle on a level surface.
2. Look at the brake fluid reservoir to see
where the brake fluid level is relative
to the MIN and the MAX marks on the
reservoir.
Note:If the brake fluid level is between the
MIN and the MAX marks on the reservoir, it
is acceptable.
Note:If the brake fluid level is below the
MIN mark or above the MAX mark, have
your vehicle checked as soon as possible.
Note:To avoid fluid contamination, the
reservoir cap must remain in place and fully
tight, unless you are adding fluid.
Only use fluid that meets our
specifications. See Capacities and
Specifications (page 288).
Brake Fluid Service Interval
Brake fluid absorbs water over time which
degrades the effectiveness of the brake
fluid. Change the brake fluid at the
specified intervals to prevent degraded
braking performance.For detailed interval information, see
Scheduled Maintenance in your Owner's
Manual or your local maintenance guide.
POWER STEERING FLUID
CHECK
Check the power steering fluid. See
Scheduled Maintenance (page 319). If
adding fluid is necessary, use only
MERCON LV ATF
Check the fluid level when it is at ambient
temperature.
1. Check the fluid level in the reservoir. It
should be between the MIN and MAX
range. Do not add fluid if the level is
within this range.
2. If the fluid level is low, add fluid to bring
the fluid level up to between the MIN
and MAX range.
3. Switch the engine on.
4. While the engine idles, turn the steering
wheel left and right several times.
5. Switch the engine off.
6. Recheck the fluid level in the reservoir.
Do not add fluid if the level is between
the MIN and MAX range.
7. If the fluid is low, add the proper type
of fluid in small amounts, continuously
checking the level until it is between
the MIN and MAX range. See
Hydraulic Power Steering Fluid
Capacity and Specification (page
306). Be sure to put the cap back on the
reservoir.
245
Maintenance
Page 257 of 378

2. Install the lower portion of the housing
on the top portion. Tighten by hand
until you feel a strong resistance.
Continue to tighten with a 32mm
socket wrench until the mechanical
stop on the bottom meets the top.
3. Connect the electrical connector.
4. Tighten the drain plug, turn it clockwise
until it stops and you feel a strong
resistance. Do not use any tools to
tighten the drain plug.
5. Switch the ignition on for 30 seconds
and then switch the ignition off.
Repeat this operation six times in a row
to purge any trapped air from the fuel
system.
Engine-mounted Fuel Filter
Although the fuel system is not fully
pressurized when the vehicle is off, some
residual pressure may remain in the fuel
system since it can take some time for the
pressure to completely bleed off.
Therefore, we recommend you place an
absorbent cloth below the filter connectors
to absorb any fuel that may drain.
The engine-mounted fuel filter is a plastic
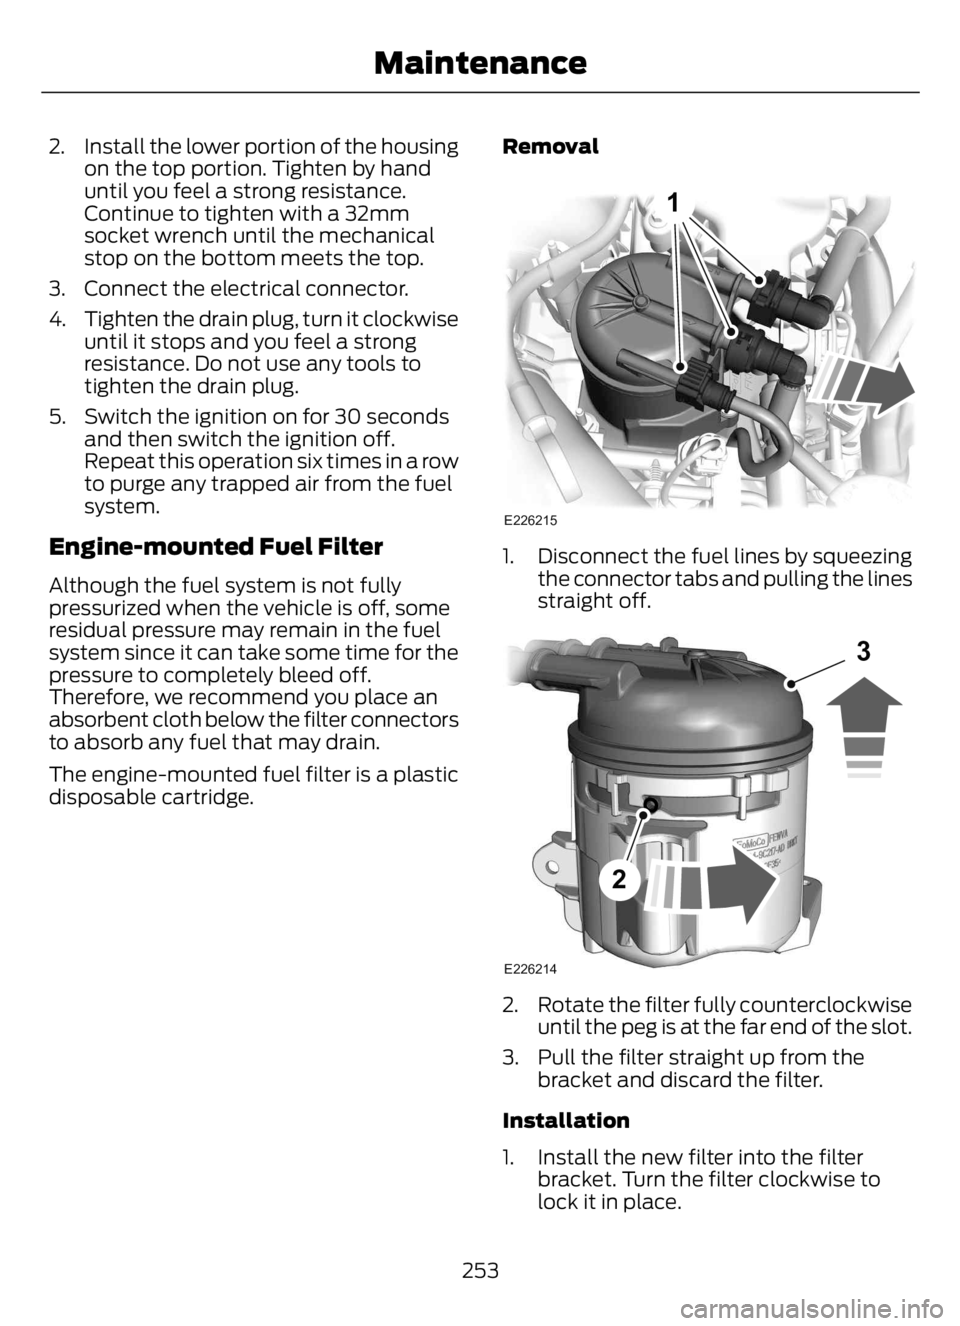
disposable cartridge.Removal
E226215
1
1. Disconnect the fuel lines by squeezing
the connector tabs and pulling the lines
straight off.
E226214
2
3
2. Rotate the filter fully counterclockwise
until the peg is at the far end of the slot.
3. Pull the filter straight up from the
bracket and discard the filter.
Installation
1. Install the new filter into the filter
bracket. Turn the filter clockwise to
lock it in place.
253
Maintenance