2023 FORD F650/750 lock
[x] Cancel search: lockPage 190 of 378

The following cold weather idling
guidelines are recommended:
• You can use Motorcraft® cetane
improvers or non-alcohol-based
cetane improvers from a reputable
manufacturer as needed.
• Maintain the engine cooling system
properly.
• Avoid shutting the engine down after
an extensive idling period. Drive your
vehicle for several miles with the
engine at normal operating
temperatures under a moderate load.
• Consider using an engine block heater.
• For extended idle times use an
approved idle speed increase device.
Winter Operating Tips for Arctic
Operation -20°F (-29°C) and
Below
The following information is a guideline
only and is not to be the only source of
possible solutions in resolving extreme
cold temperature issues.
Starting Aids
WARNING: Do not use starting
fluid, such as ether, in the air intake
system (see air filter decal). Such fluid
could cause immediate explosive
damage to the engine and possible
personal injury.
The use of the factory engine block heater
assists in engine starting in extreme cold
ambient temperatures. See Engine Block
Heater (page 103).Idle Control
Your vehicle may have a factory option for
a stationary elevated idle control through
dash-mounted upfitter switches that
allows the operator to elevate the idle rpm
for extended idle periods, as well as
aftermarket equipment such as PTO
operation. You must configure this feature
even if ordered from the factory. See your
authorized dealer for required upfitting.
Operation in Snow and Rain
Vehicle operation in heavy snowfall or
extreme rain conditions may feed
excessive amounts of snow or water into
the air intake system. This could plug the
air filter with snow and may cause the
engine to lose power and possibly shut
down.
We recommend the following actions after
operating your vehicle up to 199 mi
(320 km) in snowfall or extreme rain:
• Snow: At the earliest opportunity, open
the hood and clear all the snow and ice
from the air filter housing inlet (do not
remove the foam filter) and reset the
air filter restriction gauge.
Note:Removal of the foam filter degrades
your vehicle performance during snow and
hot weather conditions.
• Extreme rain: The air filter dries after
about 15–30 minutes at highway
speeds. At the earliest opportunity,
open the hood and reset the air filter
restriction gauge.
BREAKING-IN
You need to break in new tires for
approximately 300 mi (480 km). During
this time, your vehicle may exhibit some
unusual driving characteristics.
186
Driving Hints
Page 192 of 378

ROADSIDE ASSISTANCE
Vehicles Sold in the United States:
Getting Roadside Assistance
To fully assist you should you have a
vehicle concern, Ford Motor Company
offers a complimentary roadside
assistance program. This program is
separate from the New Vehicle Limited
Warranty.
The service is available:
• 24 hours a day, seven days a week.
• For the coverage period supplied with
your vehicle.
Roadside Assistance covers:
• A flat tire change with a good spare
(except vehicles supplied with a tire
inflation kit).
• Battery jump start.
• Lock-out assistance (key replacement
cost is the customer's responsibility).
• Fuel delivery — independent service
contractors, if not prohibited by state,
local or municipal law, shall deliver up
to 2 gal (8 L) of gasoline or 5 gal (20 L)
of diesel fuel to a disabled vehicle.
Roadside Assistance limits fuel delivery
service to two no-charge occurrences
within a 12-month period.
• Winch out — available within 100 ft
(30 m) of a paved or county
maintained road, no recoveries.• Towing — independent service
contractors, if not prohibited by state,
local or municipal law, shall tow Ford
eligible vehicles to an authorized dealer
within 35 mi (56 km) of the
disablement location or to the nearest
authorized dealer. If a member
requests a tow to an authorized dealer
that is more than 35 mi (56 km) from
the disablement location, the member
shall be responsible for any mileage
costs in excess of 35 mi (56 km).
• Roadside Assistance includes up to
$200 for a towed trailer if the disabled
eligible vehicle requires service at the
nearest authorized dealer. If the towing
vehicle is operational but the trailer is
not, then the trailer does not qualify for
any roadside services.
Vehicles Sold in the United States:
Using Roadside Assistance
Complete the roadside assistance
identification card and place it in your
wallet for quick reference. This card is in
the Owner's Manual kit.
United States vehicle customers who
require Roadside Assistance, call
1-800-241-3673.
If you need to arrange roadside assistance
for yourself, Ford Motor Company
reimburses a reasonable amount for
towing to the nearest dealership within
35 mi (56 km). To obtain reimbursement
information, United States vehicle
customers call 1-800-241-3673.
Customers need to submit their original
receipts.
188
Roadside Emergencies
Page 196 of 378

4
1
3
2
E142665
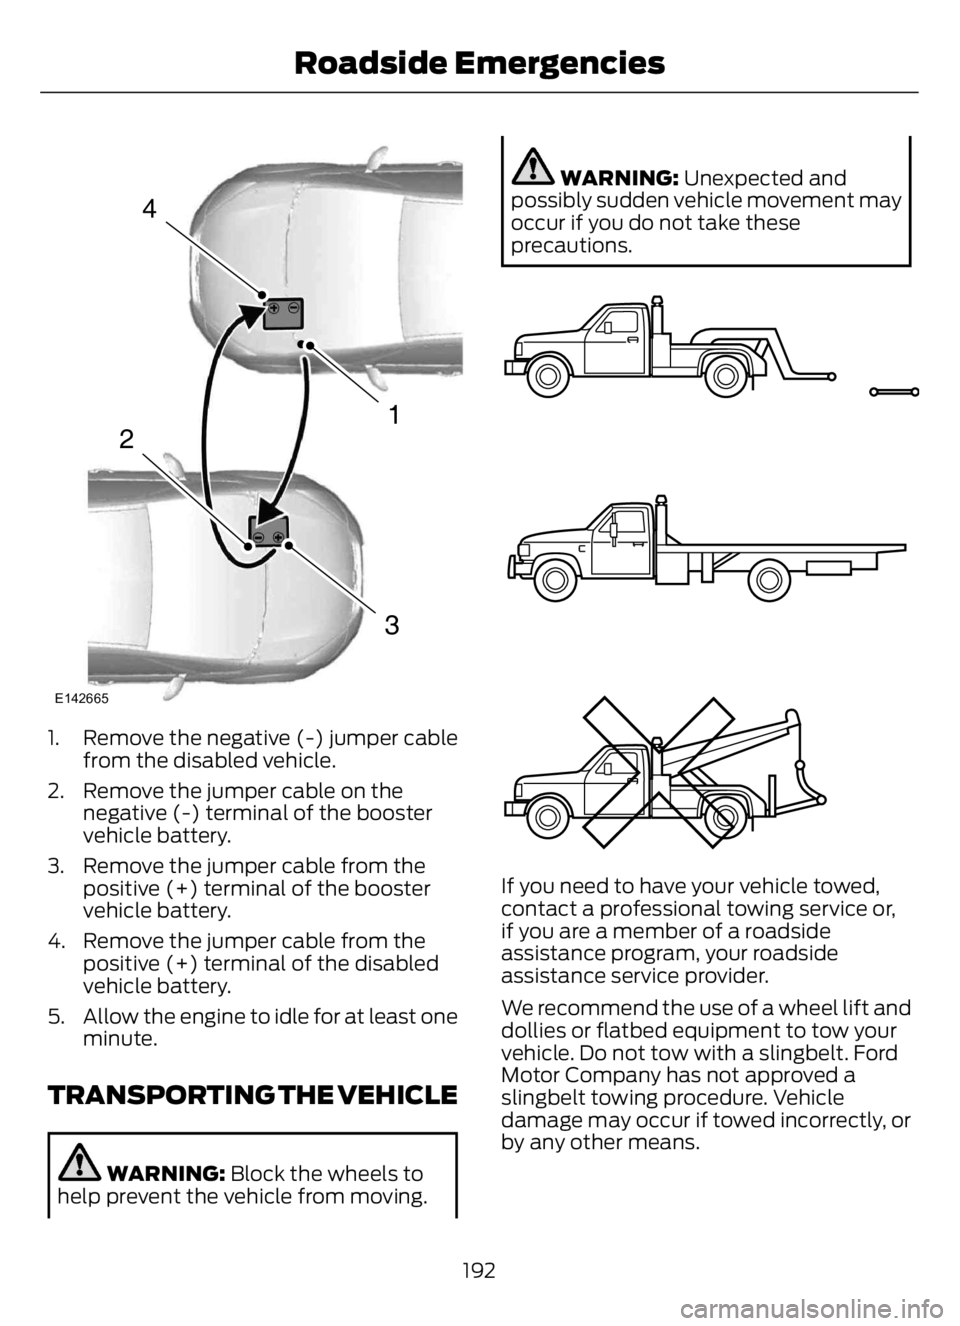
1. Remove the negative (-) jumper cable
from the disabled vehicle.
2. Remove the jumper cable on the
negative (-) terminal of the booster
vehicle battery.
3. Remove the jumper cable from the
positive (+) terminal of the booster
vehicle battery.
4. Remove the jumper cable from the
positive (+) terminal of the disabled
vehicle battery.
5. Allow the engine to idle for at least one
minute.
TRANSPORTING THE VEHICLE
WARNING: Block the wheels to
help prevent the vehicle from moving.
WARNING: Unexpected and
possibly sudden vehicle movement may
occur if you do not take these
precautions.
E143886
If you need to have your vehicle towed,
contact a professional towing service or,
if you are a member of a roadside
assistance program, your roadside
assistance service provider.
We recommend the use of a wheel lift and
dollies or flatbed equipment to tow your
vehicle. Do not tow with a slingbelt. Ford
Motor Company has not approved a
slingbelt towing procedure. Vehicle
damage may occur if towed incorrectly, or
by any other means.
192
Roadside Emergencies
Page 205 of 378

Protected Component Rating Item
Blower motor control.
Upfitter - frame. 20 A 3
Starter motor. 30 A 4
Not used. — 5
Upfitter relay 4. 20 A 6
Not used. — 8
Not used. — 10
Not used. — 12
Run/start spare. 10 A 13
Adaptive cruise control. 10 A 14
Blower motor relay. 10 A 15
Air dryer. 20 A 16
Powertrain control module
- ignition status run power. 10 A 17
Glow plug control module -
ignition status run power
(diesel).
Anti-lock brake system run/
start. 10 A 18
Transmission control
module. 10 A 19
Ignition status run power
(diesel).
Windshield wiper motor. 30 A 20
Not used. — 21
Not used. — 22
Alternator 2 (dual alternator
only). 10 A 23
Body control module run
power 2 bus. 40 A 24
201
Fuses
Page 208 of 378

Protected Component Rating Item
Driver seat compressor. 20 A 63
Passenger seat compressor. 20 A 64
Upfitter - run activate feed. 10 A 65
Four pack solenoid differen-
tial lock. 10 A 66
Hydromax relay power. 10 A 67
Not used. — 69
Inverter. 40 A 70
Anti-lock brake system
valves. 30 A 71
Brake on-off switch
(hydraulic brakes). 10 A 72
Stoplamp air pressure
switch 1 and 2 (air brakes).
Not used. — 73
Heated mirror. 15 A 74
Not used. — 75
Body control module battery
feed. 60 A 76
Body control module
voltage quality monitor
power feed. 30 A 77
Transmission module
(diesel). 10 A 78
Hydromax pump monitor. 5 A 79
Trailer tow backup signal. 10 A 80
Not used. — 81
Upfitter switch (factory
location for ignition power). 5 A 82
Upfitter switch (optional
location for power at all
times). 5 A 83
204
Fuses
Page 210 of 378

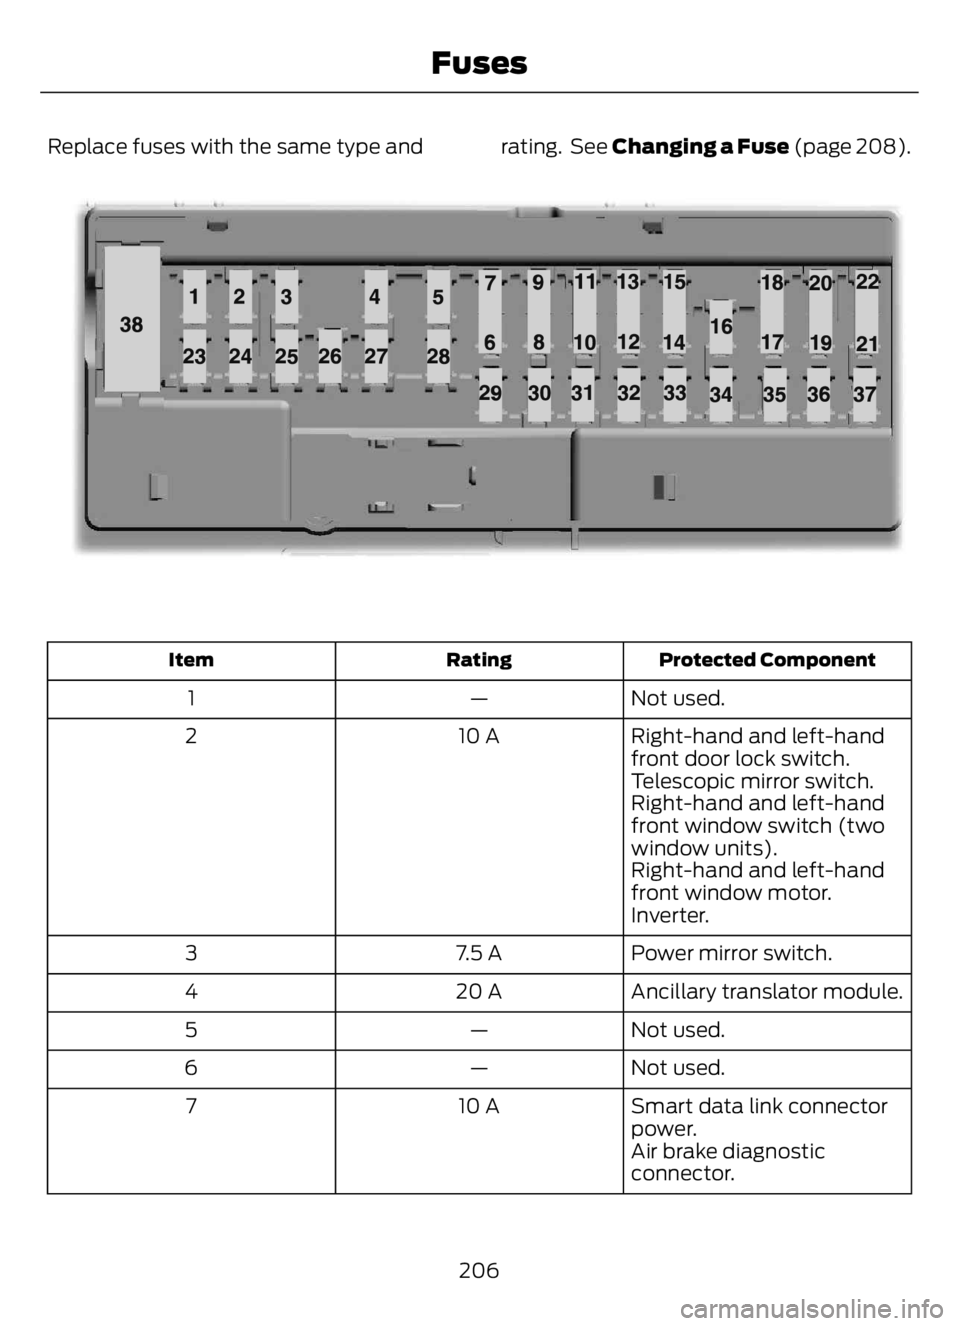
Replace fuses with the same type and rating. See Changing a Fuse (page 208).
598E145984
Protected Component Rating Item
Not used. — 1
Right-hand and left-hand
front door lock switch. 10 A 2
Telescopic mirror switch.
Right-hand and left-hand
front window switch (two
window units).
Right-hand and left-hand
front window motor.
Inverter.
Power mirror switch. 7.5 A 3
Ancillary translator module. 20 A 4
Not used. — 5
Not used. — 6
Smart data link connector
power. 10 A 7
Air brake diagnostic
connector.
206
Fuses
Page 215 of 378

Engine compartment (with engine off)
Inspect for glazing, fraying or cracking. There should be no
more than 5-7 cracks per rib, per 1 in (2.5 cm) Belts (fan, alternator,
water pump and air
conditioning
compressor)
Inspect for signs of fluid puddles or dripping fluid on the
ground under the engine, or the underside of the engine. Fluid leaks
Inspect for debris that may have collected on the HVAC air
inlet grille or inside the exterior module as this may reduce
system performance. HVAC air inlet
Engine starting (with parking brake applied)
Before entering the cab, verify that the vehicle is equipped
with spare electrical fuses (if used), three red reflective
triangles, a properly charged and rated fire extinguisher and
wheel chocks. Safety and emergency
equipment
Walk around the vehicle and verify all steps and grab handles,
inside and out (as well as behind), are tight and clean. Use
extreme caution and a three-point stance at all times.
Inspect door latches for proper closing, latching and locking.
Set the parking brake. Make sure the gearshift lever is in
neutral (N) or park (P) (if equipped with a park position). Starting the engine
Diesel engine: Turn the key to the on position. Turn the key
to start when the wait to start indicator light in the instrument
cluster turns off.
Gasoline engine: Turn the key to start, and then release it
as soon as the engine starts.
Verify pressure builds to normal operating range. Engine oil pressure
A tone indicating low air pressure should sound immediately
after the engine starts but before the compressor has built-
up pressure. The tone should stop when the air pressure
reaches 70 psi (483 kPa). Let the air pressure build to
governed cutout pressure, which should occur between
115–130 psi (793–896 kPa). Low air pressure warning
tone (if equipped with an
air compressor)
Press the accelerator and verify that it operates smoothly,
without any binding or irregular feel. Release the pedal and
verify the engine returns to idle speed immediately. Accelerator
211
Vehicle Inspection Guide
Page 224 of 378

Quality service parts are available through
an authorized dealer. If dealer parts are not
used, make sure the replacement parts are
of equivalent quality.
Working with the Engine Off
1. Set the parking brake and shift to
neutral (N) or park (P).
2. Switch off the engine.
3. Block the wheels.
Working with the Engine On
WARNING: To reduce the risk of
vehicle damage and/or personal burn
injuries, do not start your engine with the
air cleaner removed and do not remove
it while the engine is running.
1. Set the parking brake and shift to
neutral (N) or park (P).
2. Block the wheels
Supporting Your Vehicle for
Service
WARNING: Do not use a jack when
working under a vehicle. It may give way,
causing the vehicle to fall and result in
property damage, personal injury or
death. Always use floor stands to
support the vehicle.
Prepare your vehicle for service repairs by
doing the following:
1. Park your vehicle on a level, concrete
floor.
2. Set the parking brake and block the
wheels to prevent your vehicle from
moving.
3. Select a jack with a rated capacity
sufficient to lift and hold up your
vehicle.4. Raise your vehicle with the jack applied
to the axle(s). Do not use the bumper
as a lifting point.
5. Support your vehicle with floor stands
under the axle(s). When servicing the
axle or the suspension, support your
vehicle with floor stands under the
frame side-members, preferably
between the axles.
OPENING AND CLOSING THE
HOOD
WARNING: Before opening the
hood, fully apply the parking brake, shift
into park (P) or neutral (N) and switch
the ignition off.
WARNING: Do not stand under the
hood when you raise or lower it. Failure
to follow this warning could result in
serious personal injury or death.
WARNING: If the engine is running
while the hood is open, stay clear of
moving engine components. Failure to
follow this warning could result in serious
personal injury or death.
220
Maintenance