2023 FORD F650/750 lock
[x] Cancel search: lockPage 93 of 378

Note:Adjust the seat backrest to an upright
driving position before adjusting the head
restraint. Adjust the head restraint so that
the top of it is level with the top of your head
and as far forward as possible. Make sure
that you remain comfortable. If you are
extremely tall, adjust the head restraint to
its highest position.
Front Seat Adjustable Head Restraint
(If Equipped)
E138642
The head restraints consist of:
An energy absorbing head
restraint. A
Two steel stems. B
Guide sleeve adjust and release
button. C
Guide sleeve unlock and remove
button. D
Adjusting the Head Restraint
Raising the Head Restraint
Pull the head restraint up.
Lowering the Head Restraint
1. Press and hold button C.
2. Push the head restraint down.Removing the Head Restraint
1. Press and hold buttons C and D.
2. Pull the head restraint up.
Installing the Head Restraint
Align the steel stems into the guide sleeves
and push the head restraint down until it
locks.
Front Row Center, Outboard (Crew
Cab), and Rear Seat Center (Crew Cab)
Head Restraints
Note:The SuperCab has rear outermost
head restraints that you cannot remove and
are bolted to the back wall.
Your vehicle may have head restraints that
are non-adjustable. The non-adjustable
head restraints consist of:
E162872E162872
A
C
B
An energy absorbing head
restraint. A
Two steel stems. B
Guide sleeve unlock and remove
button. C
Removing the Head Restraint
1. Press and hold the C buttons.
2. Pull up the head restraint.
89
Seats
Page 94 of 378
Installing the Head Restraint
Align the steel stems into the guide sleeves
and push the head restraint down until it
locks.
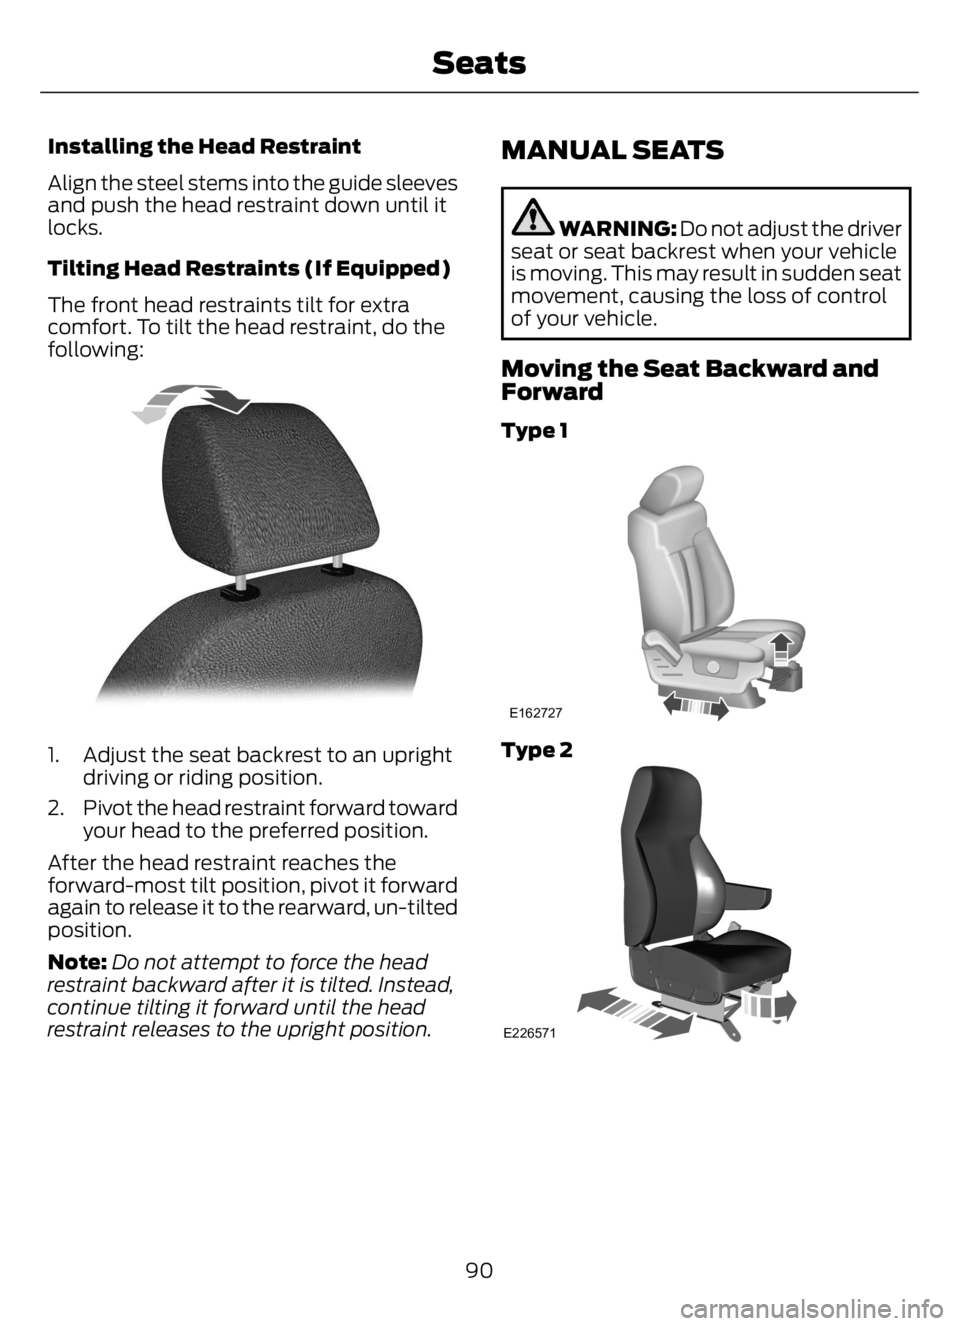
Tilting Head Restraints (If Equipped)
The front head restraints tilt for extra
comfort. To tilt the head restraint, do the
following:
E144727
1. Adjust the seat backrest to an upright
driving or riding position.
2. Pivot the head restraint forward toward
your head to the preferred position.
After the head restraint reaches the
forward-most tilt position, pivot it forward
again to release it to the rearward, un-tilted
position.
Note:Do not attempt to force the head
restraint backward after it is tilted. Instead,
continue tilting it forward until the head
restraint releases to the upright position.
MANUAL SEATS
WARNING: Do not adjust the driver
seat or seat backrest when your vehicle
is moving. This may result in sudden seat
movement, causing the loss of control
of your vehicle.
Moving the Seat Backward and
Forward
Type 1
E162727
Type 2
E226571
90
Seats
Page 95 of 378
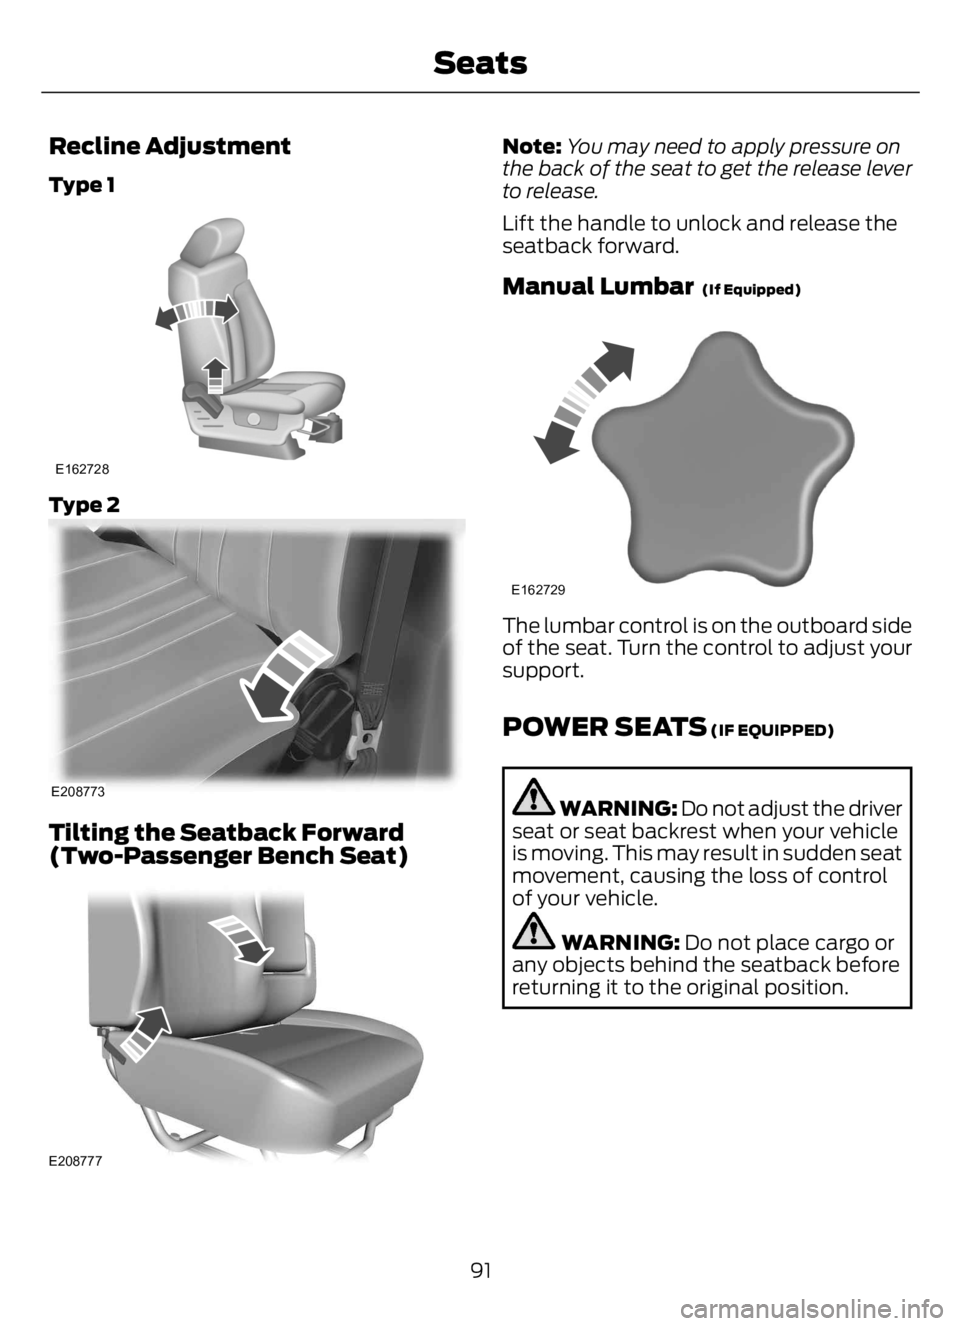
Recline Adjustment
Type 1
E162728
Type 2
E208773
Tilting the Seatback Forward
(Two-Passenger Bench Seat)
E208777
Note:You may need to apply pressure on
the back of the seat to get the release lever
to release.
Lift the handle to unlock and release the
seatback forward.
Manual Lumbar (If Equipped)
E162729
The lumbar control is on the outboard side
of the seat. Turn the control to adjust your
support.
POWER SEATS (IF EQUIPPED)
WARNING: Do not adjust the driver
seat or seat backrest when your vehicle
is moving. This may result in sudden seat
movement, causing the loss of control
of your vehicle.
WARNING: Do not place cargo or
any objects behind the seatback before
returning it to the original position.
91
Seats
Page 96 of 378
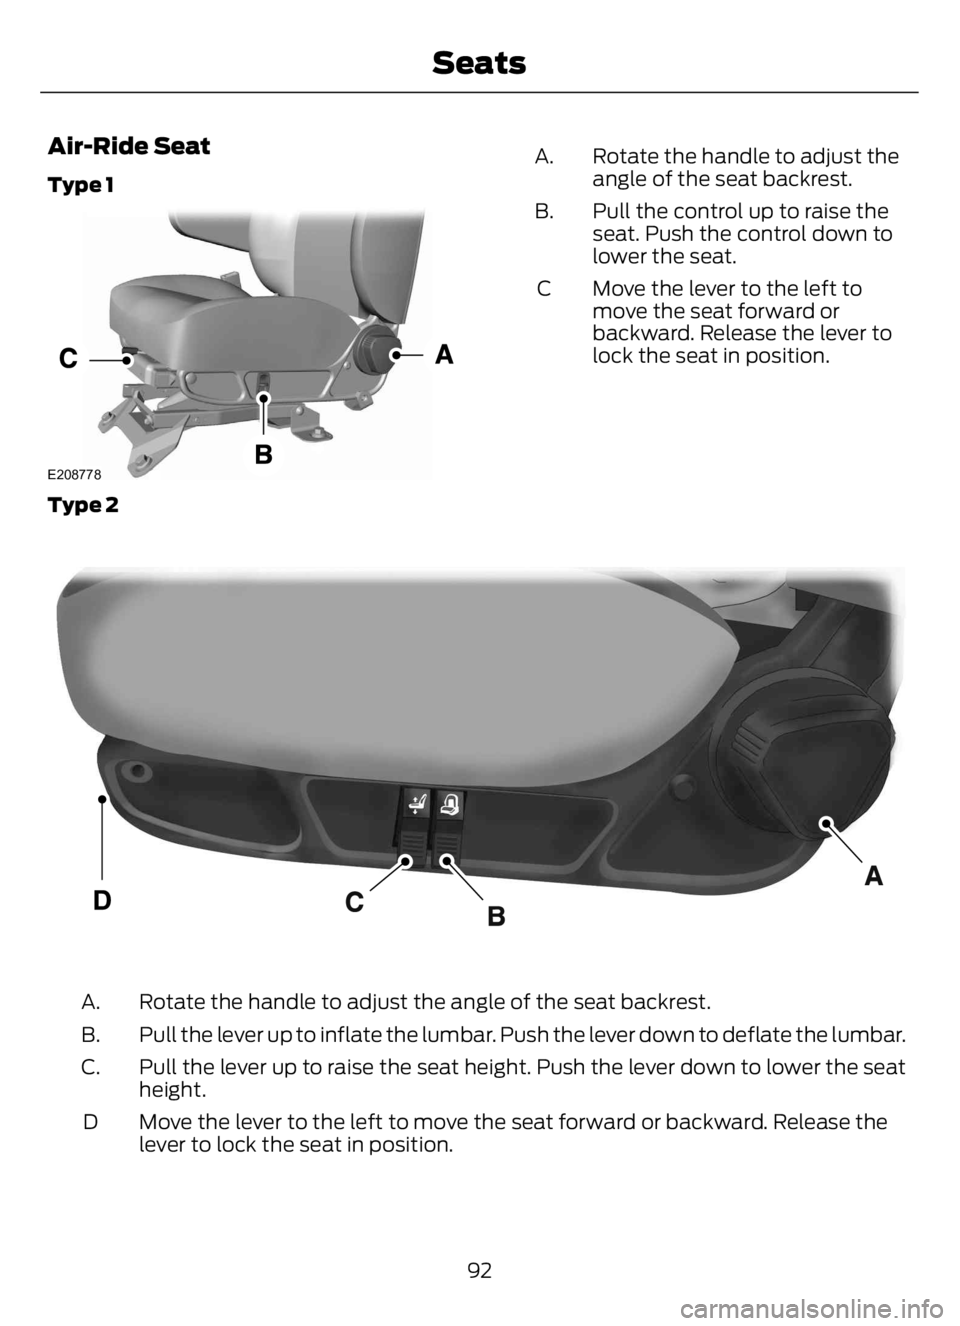
Air-Ride Seat
Type 1
E208778
Rotate the handle to adjust the
angle of the seat backrest. A.
Pull the control up to raise the
seat. Push the control down to
lower the seat. B.
Move the lever to the left to
move the seat forward or
backward. Release the lever to
lock the seat in position. C
Type 2
E298809E298809
Rotate the handle to adjust the angle of the seat backrest. A.
Pull the lever up to inflate the lumbar. Push the lever down to deflate the lumbar. B.
Pull the lever up to raise the seat height. Push the lever down to lower the seat
height. C.
Move the lever to the left to move the seat forward or backward. Release the
lever to lock the seat in position. D
92
Seats
Page 97 of 378
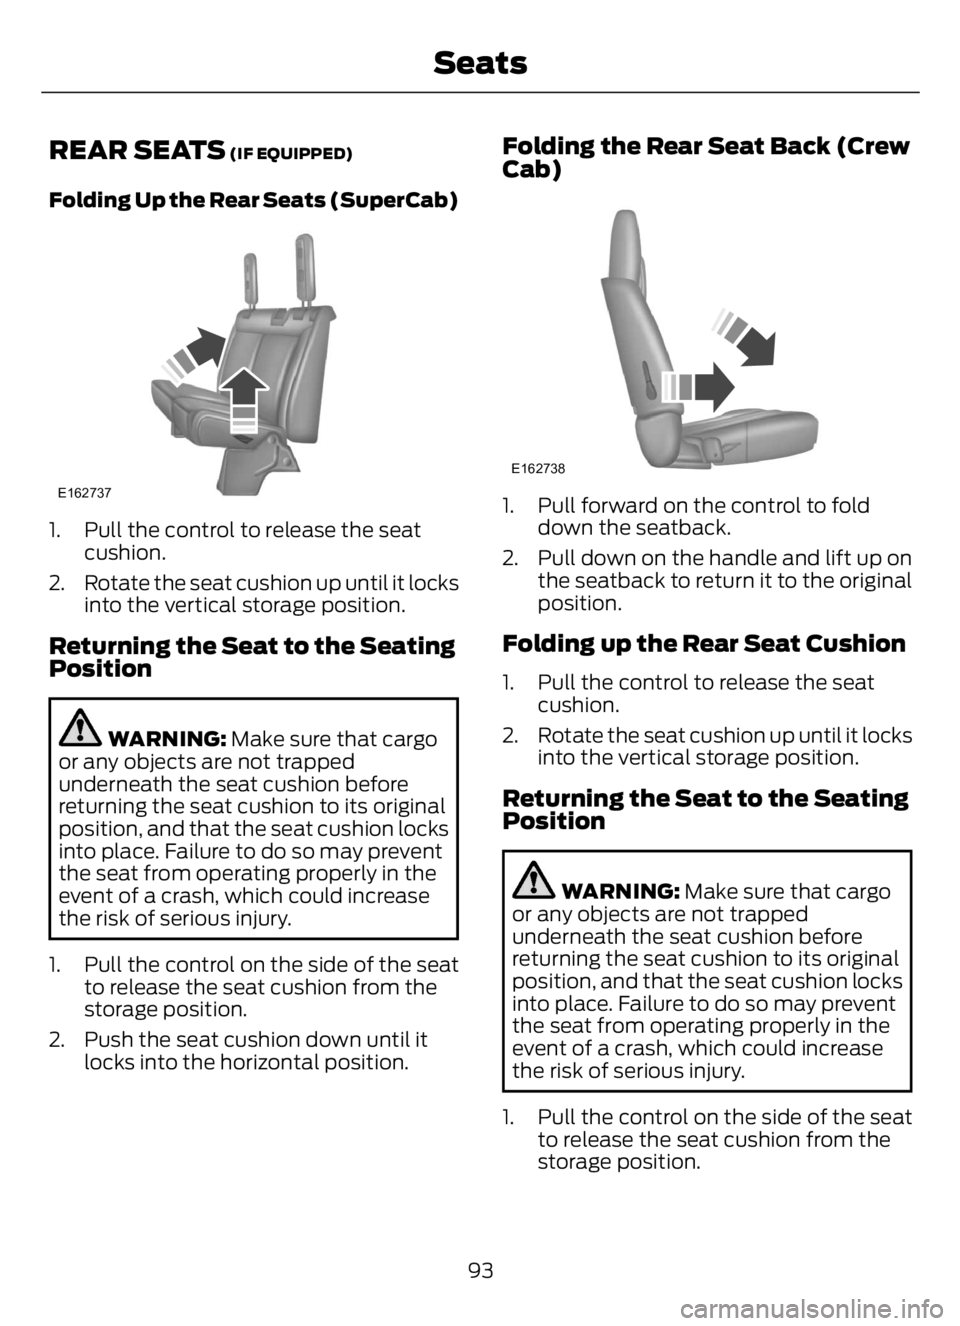
REAR SEATS (IF EQUIPPED)
Folding Up the Rear Seats (SuperCab)
E162737
1. Pull the control to release the seat
cushion.
2. Rotate the seat cushion up until it locks
into the vertical storage position.
Returning the Seat to the Seating
Position
WARNING: Make sure that cargo
or any objects are not trapped
underneath the seat cushion before
returning the seat cushion to its original
position, and that the seat cushion locks
into place. Failure to do so may prevent
the seat from operating properly in the
event of a crash, which could increase
the risk of serious injury.
1. Pull the control on the side of the seat
to release the seat cushion from the
storage position.
2. Push the seat cushion down until it
locks into the horizontal position.
Folding the Rear Seat Back (Crew
Cab)
E162738
1. Pull forward on the control to fold
down the seatback.
2. Pull down on the handle and lift up on
the seatback to return it to the original
position.
Folding up the Rear Seat Cushion
1. Pull the control to release the seat
cushion.
2. Rotate the seat cushion up until it locks
into the vertical storage position.
Returning the Seat to the Seating
Position
WARNING: Make sure that cargo
or any objects are not trapped
underneath the seat cushion before
returning the seat cushion to its original
position, and that the seat cushion locks
into place. Failure to do so may prevent
the seat from operating properly in the
event of a crash, which could increase
the risk of serious injury.
1. Pull the control on the side of the seat
to release the seat cushion from the
storage position.
93
Seats
Page 98 of 378
2. Push the seat cushion down until it
locks into the horizontal position.
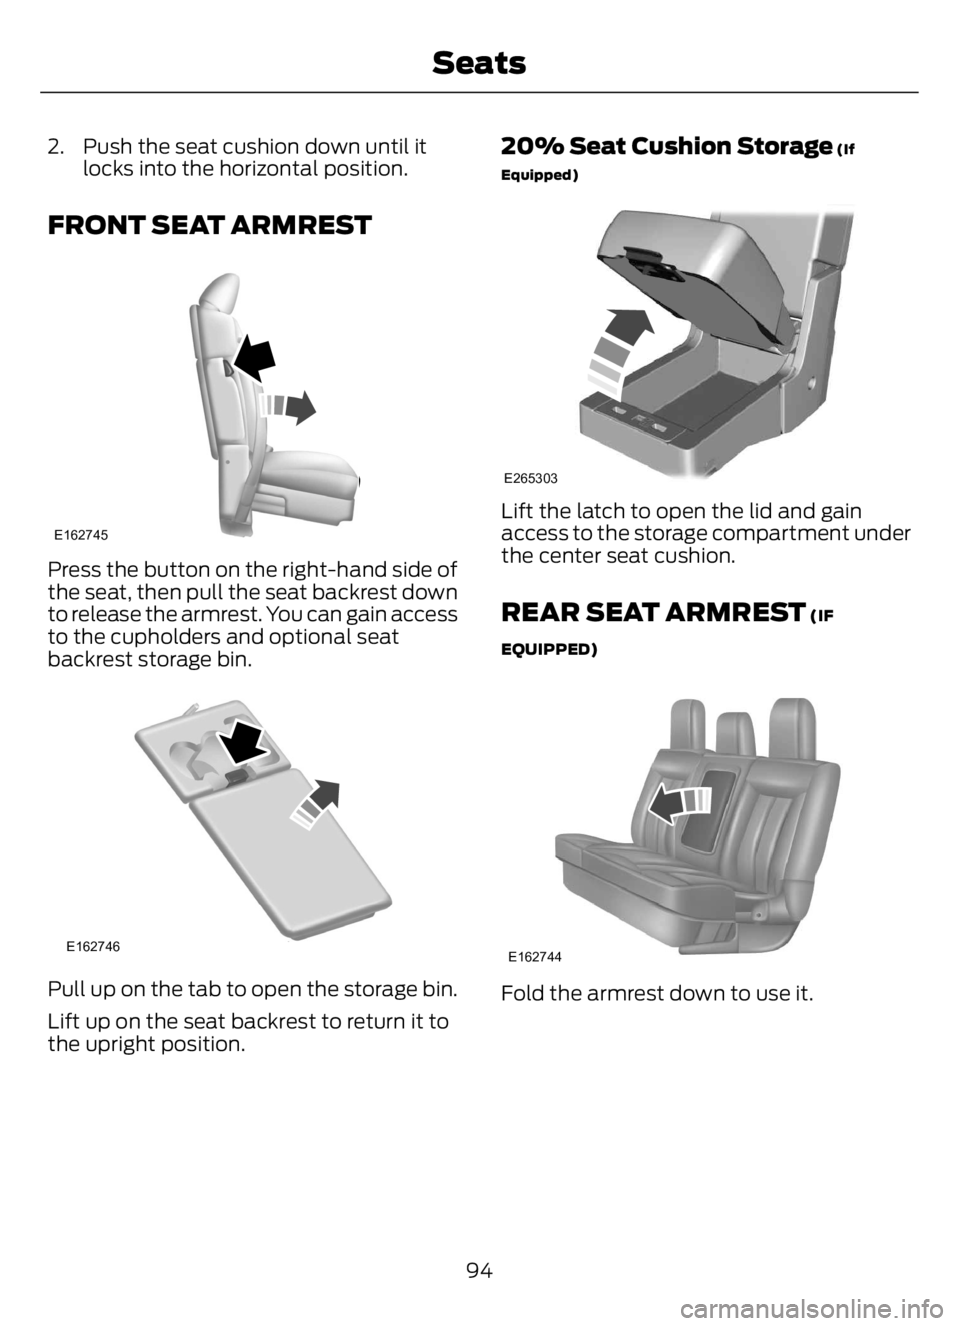
FRONT SEAT ARMREST
E162745
Press the button on the right-hand side of
the seat, then pull the seat backrest down
to release the armrest. You can gain access
to the cupholders and optional seat
backrest storage bin.
E162746
Pull up on the tab to open the storage bin.
Lift up on the seat backrest to return it to
the upright position.
20% Seat Cushion Storage (If
Equipped)
E265303
Lift the latch to open the lid and gain
access to the storage compartment under
the center seat cushion.
REAR SEAT ARMREST (IF
EQUIPPED)
E162744
Fold the armrest down to use it.
94
Seats
Page 105 of 378

III (start) - Cranks the engine.
STARTING A GASOLINE
ENGINE
When you start the engine, the idle speed
increases helping to warm up the engine.
If the engine idle speed does not slow
down, have your vehicle checked as soon
as possible.
Before starting the engine check the
following:
• Make sure all occupants fasten their
seatbelts.
• Make sure the headlamps and
electrical accessories are off.
• Make sure the parking brake is on.
• Make sure the transmission is in park
(P) or neutral (N).
• Turn the ignition key to the on position.
Note:Do not press the accelerator pedal.
1. Fully press the brake pedal.
2. Turn the key to the start position to
start the engine. Release the key when
the engine starts.
Note:The engine may continue cranking
for up to 15 seconds or until it starts.
Note:If you cannot start the engine on the
first try, wait for a short period and try again.
Failure to Start
If you cannot start the engine after three
attempts, wait 10 seconds and follow this
procedure:
1. Fully press the brake pedal.
2. Shift into park (P).
3. Fully press and hold the accelerator
pedal.
4. Attempt to start your vehicle and wait
until the engine stops cranking.5. Release the accelerator pedal.
6. Start the engine.
Stopping the Engine When Your
Vehicle is Stationary
1. Shift into park (P) or neutral (N).
2. Turn the key to the off position.
3. Apply the parking brake.
Stopping the Engine When Your
Vehicle is Moving
WARNING: Switching off the
engine when your vehicle is still moving
results in a significant decrease in
braking assistance. Higher effort is
required to apply the brakes and to stop
your vehicle. A significant decrease in
steering assistance could also occur. The
steering does not lock, but higher effort
could be required to steer your vehicle.
When you switch the ignition off, some
electrical circuits, for example airbags,
also turn off. If you unintentionally switch
the ignition off, shift into neutral (N) and
restart the engine.
1. Switch the ignition off to stop the
engine.
2. Put the transmission into neutral (N)
and use the brakes to bring your vehicle
to a safe stop.
3. When your vehicle has stopped, shift
into park (P).
4. Apply the parking brake.
101
Starting and Stopping the Engine
Page 107 of 378

When the engine idle shutdown process
has started:
• A chime sounds and a message
appears in the information display
showing a timer counting down from
30 seconds.
• You can reset the timer by pressing the
brake pedal, accelerator pedal, or by
shifting into another gear.
• If you do not intervene within 30
seconds, the engine shuts down and a
message appears in the information
display alerting you that the engine has
shut down.
• Shortly after the engine has shut down,
the electrical system simulates a key
off and even though the ignition is still
on, the electrical system simulates a
normal accessory delay period before
shutting down.
• You must switch the ignition off to
reset the system before restarting your
vehicle.
The engine idle shutdown timer does not
start if:
• The engine is operating in battery
charge protect or power take-off mode.
• The exhaust emission control device is
regenerating.
ENGINE BLOCK HEATER (IF
EQUIPPED)
WARNING: Failure to follow engine
block heater instructions could result in
property damage or serious personal
injury.
WARNING: Do not use your heater
with ungrounded electrical systems or
two-pronged adapters. There is a risk of
electrical shock.
WARNING: Do not fully close the
hood, or allow it to drop under its own
weight when using the engine block
heater. This could damage the power
cable and may cause an electrical short
resulting in fire, injury and property
damage.
Note:The heater is most effective when
outdoor temperatures are below 0°F
(-18°C).
The heater acts as a starting aid by
warming the engine coolant. This allows
the climate control system to respond
quickly. The equipment includes a heater
element (installed in the engine block) and
a wire harness. You can connect the
system to a grounded 120-volt AC
electrical source.
We recommend that you do the following
for a safe and correct operation:
• Use a 16-gauge outdoor extension cord
that is product certified by
Underwriter’s Laboratory (UL) or
Canadian Standards Association
(CSA). This extension cord must be
suitable for use outdoors, in cold
temperatures, and be clearly marked
Suitable for Use with Outdoor
Appliances. Do not use an indoor
extension cord outdoors. This could
result in an electric shock or become a
fire hazard.
• Use as short an extension cord as
possible.
• Do not use multiple extension cords.
• Make sure that when in operation, the
extension cord plug and heater cord
plug connections are free and clear of
water. This could cause an electric
shock or fire.
• Make sure your vehicle is parked in a
clean area, clear of combustibles.
103
Starting and Stopping the Engine