2023 DODGE HORNET display
[x] Cancel search: displayPage 132 of 288

130MULTIMEDIA
UCONNECT SETTINGS
The Uconnect system uses a combination of buttons on
the touchscreen and buttons on the faceplate located
next to the shifter. These buttons allow you to access and
change Programmable Features. Many features can vary
by vehicle and packages.
The Uconnect Settings can be accessed by pressing the
Settings tab.
Push and hold the Power dial next to the shifter for a
minimum of 15 seconds to reset the radio.
CUSTOMER PROGRAMMABLE FEATURES
Uconnect 5/5 NAV With 10.25-inch Display Button Next To The
Shifter And Buttons On The Touchscreen
For the Uconnect 5/5 NAV With 10.25-inch Display
Press the Vehicle button, then press the Settings tab on
the top of the touchscreen. In this menu, the Uconnect
system allows you to access all of the available
programmable features.
NOTE:
Only one touchscreen area may be selected at a time.
Depending on the vehicle’s options, feature settings
may vary.
When making a selection, press the button on the
touchscreen to enter the desired menu. Once in the
desired menu, press and release the preferred setting
option until a check mark appears next to the setting,
showing that setting has been selected. Once the setting
is complete, press the Vehicle button to exit to the screen.
Pressing the Up or Down Arrow button on the right side of
the screen will allow you to toggle up or down through the
available settings.
1 — Uconnect Buttons On The Touchscreen
2 — Uconnect Button Next To The Shifter
23_GG_OM_EN_USC_t.book Page 130
Page 133 of 288
MULTIMEDIA131
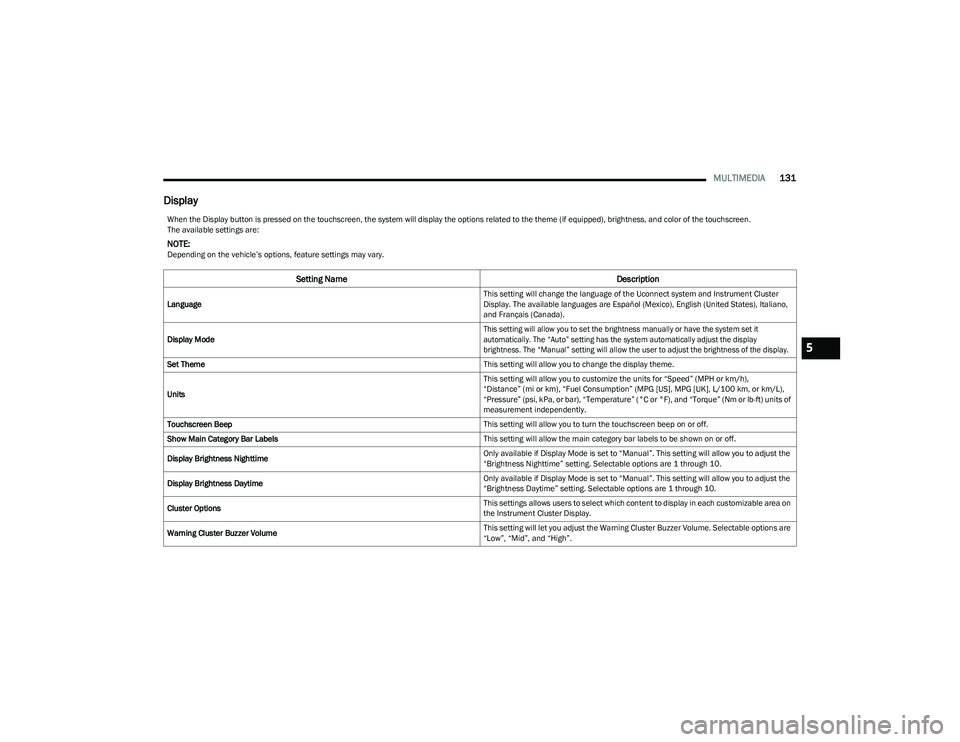
Display
When the Display button is pressed on the touchscreen, the system will display the options related to the theme (if equipped), brightness, and color of the touchscreen.
The available settings are:
NOTE:Depending on the vehicle’s options, feature settings may vary.
Setting Name Description
Language This setting will change the language of the Uconnect system and Instrument Cluster
Display. The available languages are Español (Mexico), English (United States), Italiano,
and Français (Canada).
Display Mode
This setting will allow you to set the brightness manually or have the system set it
automatically. The “Auto” setting has the system automatically adjust the display
brightness. The “Manual” setting will allow the user to adjust the brightness of the display.
Set Theme This setting will allow you to change the display theme.
Units This setting will allow you to customize the units for “Speed” (MPH or km/h),
“Distance” (mi or km), “Fuel Consumption” (MPG [US], MPG [UK], L/100 km, or km/L),
“Pressure” (psi, kPa, or bar), “Temperature” (°C or °F), and “Torque” (Nm or lb-ft) units of
measurement independently.
Touchscreen Beep This setting will allow you to turn the touchscreen beep on or off.
Show Main Category Bar Labels This setting will allow the main category bar labels to be shown on or off.
Display Brightness Nighttime Only available if Display Mode is set to “Manual”. This setting will allow you to adjust the
“Brightness Nighttime” setting. Selectable options are 1 through 10.
Display Brightness Daytime Only available if Display Mode is set to “Manual”. This setting will allow you to adjust the
“Brightness Daytime” setting. Selectable options are 1 through 10.
Cluster Options This settings allows users to select which content to display in each customizable area on
the Instrument Cluster Display.
Warning Cluster Buzzer Volume This setting will let you adjust the Warning Cluster Buzzer Volume. Selectable options are
“Low”, “Mid”, and “High”.
5
23_GG_OM_EN_USC_t.book Page 131
Page 134 of 288

132MULTIMEDIA
My Profile
Navigation Turn-by-Turn Displayed in Cluster This setting will display Navigation prompts in the Instrument Cluster Display.
Phone Pop-ups Displayed In Cluster This setting will display smartphone notifications and messages in the Instrument Cluster
Display.
Setting Name
Description
When the My Profile button is pressed on the touchscreen, the system displays options related to the vehicle’s profiles.
NOTE:Depending on the vehicle’s options, feature settings may vary.
Setting NameDescription
Language This setting will change the language of the Uconnect system and Instrument Cluster
Display. The available languages are Español (Mexico), English (United States), Italiano,
and Français (Canada).
Display Mode This setting will adjust the display for the radio to “Auto” or “Manual”. “Manual” allows for
more customization with the radio display.
Display Brightness Nighttime This setting will allow you to adjust the “Brightness Nighttime” setting. Selectable options
are 1 through 10.
Display Brightness Daytime This setting will allow you to adjust the “Brightness Daytime” setting. Selectable options
are 1 through 10.
Set Theme This setting will allow you to change the display theme.
Units This setting will allow you to customize the units for “Speed” (MPH or km/h), “Distance”
(mi or km), “Fuel Consumption” (MPG [US], MPG [UK], L/100 km, or km/L), “Pressure”
(psi, kPa, or bar), “Temperature” (°C or °F), and “Torque” (Nm or lb-ft) units of
measurement independently. Unit settings can be selected for “US”, “Metric A”,
“Metric B”, “Imperial”, or “Custom”.
23_GG_OM_EN_USC_t.book Page 132
Page 136 of 288
134MULTIMEDIA
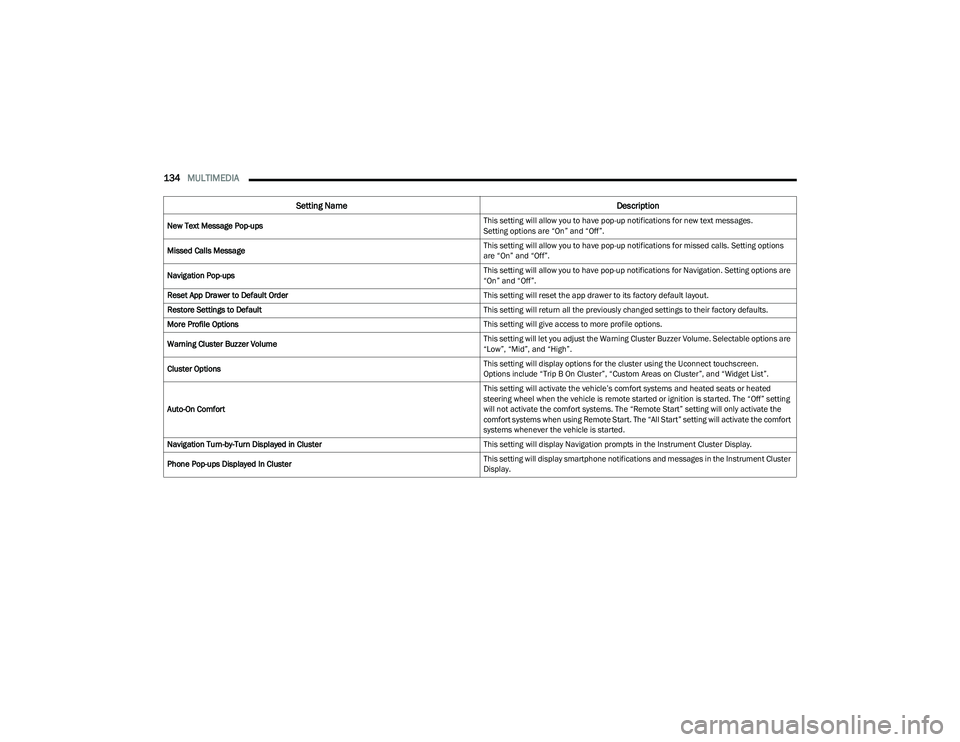
New Text Message Pop-ups This setting will allow you to have pop-up notifications for new text messages.
Setting options are “On” and “Off”.
Missed Calls Message This setting will allow you to have pop-up notifications for missed calls. Setting options
are “On” and “Off”.
Navigation Pop-ups This setting will allow you to have pop-up notifications for Navigation. Setting options are
“On” and “Off”.
Reset App Drawer to Default Order This setting will reset the app drawer to its factory default layout.
Restore Settings to Default This setting will return all the previously changed settings to their factory defaults.
More Profile Options This setting will give access to more profile options.
Warning Cluster Buzzer Volume This setting will let you adjust the Warning Cluster Buzzer Volume. Selectable options are
“Low”, “Mid”, and “High”.
Cluster Options This setting will display options for the cluster using the Uconnect touchscreen.
Options include “Trip B On Cluster”, “Custom Areas on Cluster”, and “Widget List”.
Auto-On Comfort This setting will activate the vehicle’s comfort systems and heated seats or heated
steering wheel when the vehicle is remote started or ignition is started. The “Off” setting
will not activate the comfort systems. The “Remote Start” setting will only activate the
comfort systems when using Remote Start. The “All Start” setting will activate the comfort
systems whenever the vehicle is started.
Navigation Turn-by-Turn Displayed in Cluster This setting will display Navigation prompts in the Instrument Cluster Display.
Phone Pop-ups Displayed In Cluster This setting will display smartphone notifications and messages in the Instrument Cluster
Display.
Setting Name
Description
23_GG_OM_EN_USC_t.book Page 134
Page 137 of 288
MULTIMEDIA135
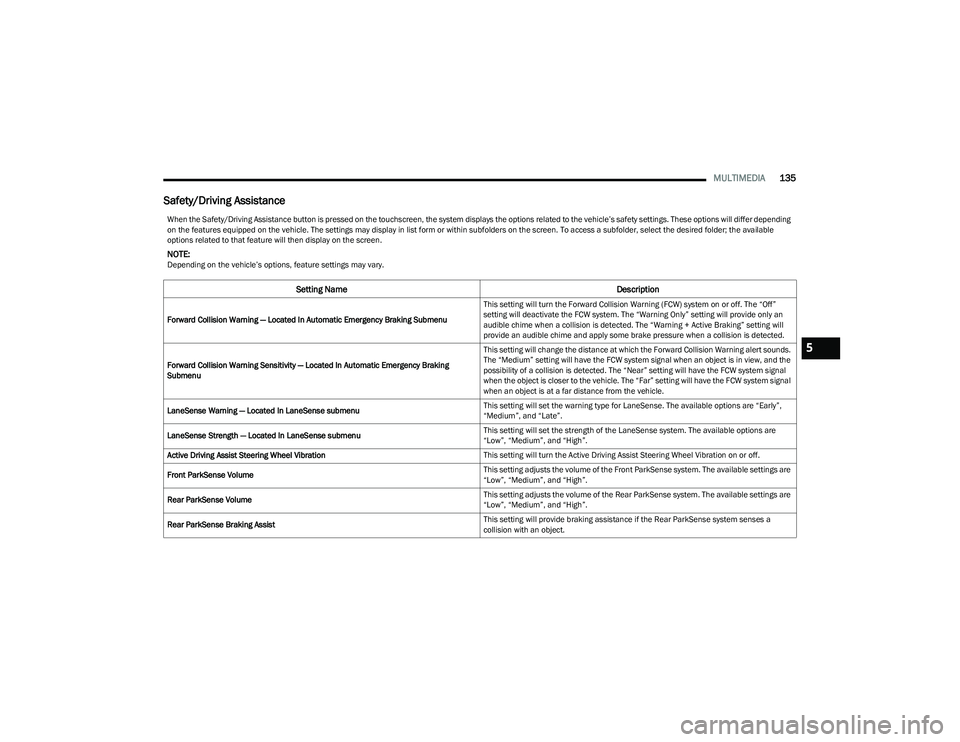
Safety/Driving Assistance
When the Safety/Driving Assistance button is pressed on the touchscreen, the system displays the options related to the vehicle’s safety settings. These options will differ depending
on the features equipped on the vehicle. The settings may display in list form or within subfolders on the screen. To access a subfolder, select the desired folder; the available
options related to that feature will then display on the screen.
NOTE:Depending on the vehicle’s options, feature settings may vary.
Setting Name Description
Forward Collision Warning — Located In Automatic Emergency Braking Submenu This setting will turn the Forward Collision Warning (FCW) system on or off. The “Off”
setting will deactivate the FCW system. The “Warning Only” setting will provide only an
audible chime when a collision is detected. The “Warning + Active Braking” setting will
provide an audible chime and apply some brake pressure when a collision is detected.
Forward Collision Warning Sensitivity — Located In Automatic Emergency Braking
Submenu This setting will change the distance at which the Forward Collision Warning alert sounds.
The “Medium” setting will have the FCW system signal when an object is in view, and the
possibility of a collision is detected. The “Near” setting will have the FCW system signal
when the object is closer to the vehicle. The “Far” setting will have the FCW system signal
when an object is at a far distance from the vehicle.
LaneSense Warning — Located In LaneSense submenu This setting will set the warning type for LaneSense. The available options are “Early”,
“Medium”, and “Late”.
LaneSense Strength — Located In LaneSense submenu This setting will set the strength of the LaneSense system. The available options are
“Low”, “Medium”, and “High”.
Active Driving Assist Steering Wheel Vibration This setting will turn the Active Driving Assist Steering Wheel Vibration on or off.
Front ParkSense Volume This setting adjusts the volume of the Front ParkSense system. The available settings are
“Low”, “Medium”, and “High”.
Rear ParkSense Volume This setting adjusts the volume of the Rear ParkSense system. The available settings are
“Low”, “Medium”, and “High”.
Rear ParkSense Braking Assist This setting will provide braking assistance if the Rear ParkSense system senses a
collision with an object.
5
23_GG_OM_EN_USC_t.book Page 135
Page 139 of 288

MULTIMEDIA137
Clock & Date
When the Clock & Date button is pressed on the touchscreen, the system displays the different options related to the vehicle’s internal clock.
NOTE:Depending on the vehicle’s options, feature settings may vary.
Setting Name Description
Sync Time With GPS This setting will sync the time to the GPS receiver in the system. The system will control
the time via the GPS location.
Set Time This setting will allow you to set the hours and minutes. Sync Time With GPS must be off
for this setting to be available. The “+” setting will increase the hours or minutes.
The “-” setting will decrease the hours or minutes.
Time Format This setting will allow you to set the time format (AM/PM). Sync Time With GPS must be
off for this setting to be available. The “12 hrs” setting will set the time to a 12-hour
format. The “24 hrs” setting will set the time to a 24-hour format. You will also be able to
adjust the clock.
Set Date This setting will allow you to set the date.
Show Time in Status Bar This setting will place the time in the radio’s status bar.
Show Time and Date During Screen Off This setting will allow you to show the time and date while the screen is off.
Available options are “On” and “Off”.
5
23_GG_OM_EN_USC_t.book Page 137
Page 140 of 288
138MULTIMEDIA
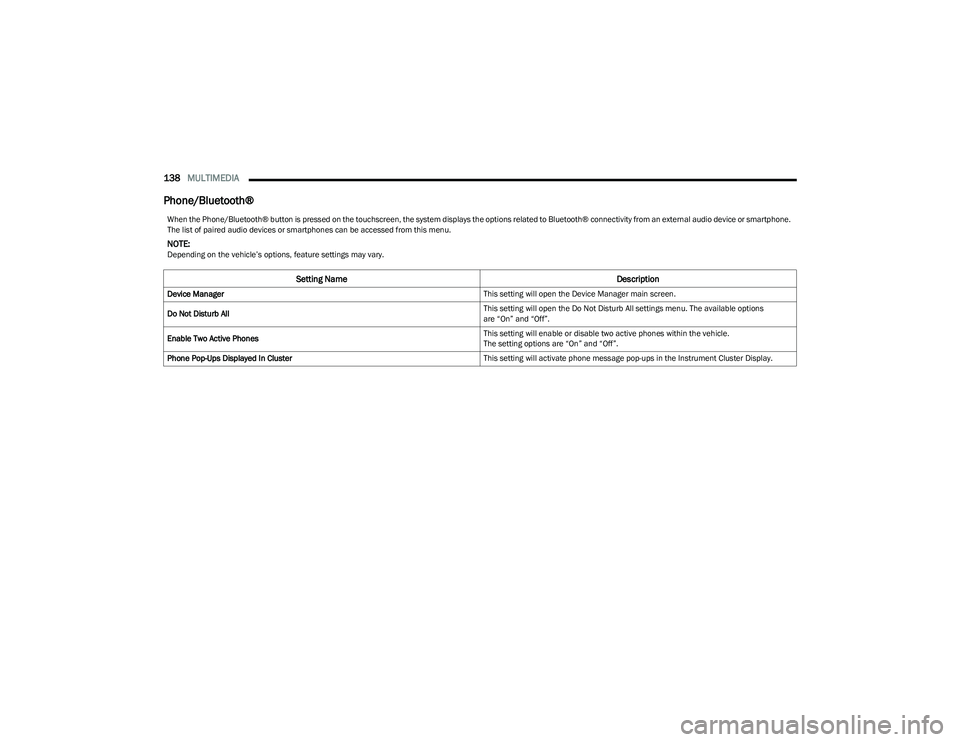
Phone/Bluetooth®
When the Phone/Bluetooth® button is pressed on the touchscreen, the system displays the options related to Bluetooth® connectivity from an external audio device or smartphone.
The list of paired audio devices or smartphones can be accessed from this menu.
NOTE:Depending on the vehicle’s options, feature settings may vary.
Setting Name Description
Device Manager This setting will open the Device Manager main screen.
Do Not Disturb All This setting will open the Do Not Disturb All settings menu. The available options
are “On” and “Off”.
Enable Two Active Phones This setting will enable or disable two active phones within the vehicle.
The setting options are “On” and “Off”.
Phone Pop-Ups Displayed In Cluster This setting will activate phone message pop-ups in the Instrument Cluster Display.
23_GG_OM_EN_USC_t.book Page 138
Page 141 of 288
MULTIMEDIA139
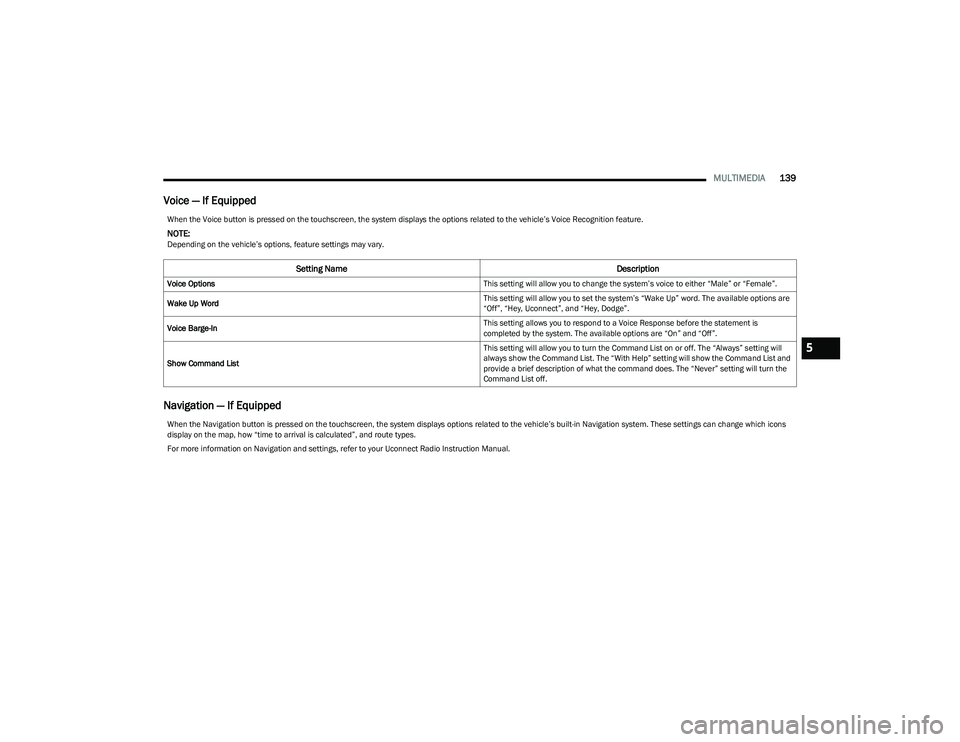
Voice — If Equipped
Navigation — If Equipped
When the Voice button is pressed on the touchscreen, the system displays the options related to the vehicle’s Voice Recognition feature.
NOTE:Depending on the vehicle’s options, feature settings may vary.
Setting Name Description
Voice Options This setting will allow you to change the system’s voice to either “Male” or “Female”.
Wake Up Word This setting will allow you to set the system’s “Wake Up” word. The available options are
“Off”, “Hey, Uconnect”, and “Hey, Dodge”.
Voice Barge-In This setting allows you to respond to a Voice Response before the statement is
completed by the system. The available options are “On” and “Off”.
Show Command List This setting will allow you to turn the Command List on or off. The “Always” setting will
always show the Command List. The “With Help” setting will show the Command List and
provide a brief description of what the command does. The “Never” setting will turn the
Command List off.
When the Navigation button is pressed on the touchscreen, the system displays options related to the vehicle’s built-in Navigation system. These settings can change which icons
display on the map, how “time to arrival is calculated”, and route types.
For more information on Navigation and settings, refer to your Uconnect Radio Instruction Manual.
5
23_GG_OM_EN_USC_t.book Page 139