2023 DODGE HORNET change wheel
[x] Cancel search: change wheelPage 136 of 288
134MULTIMEDIA
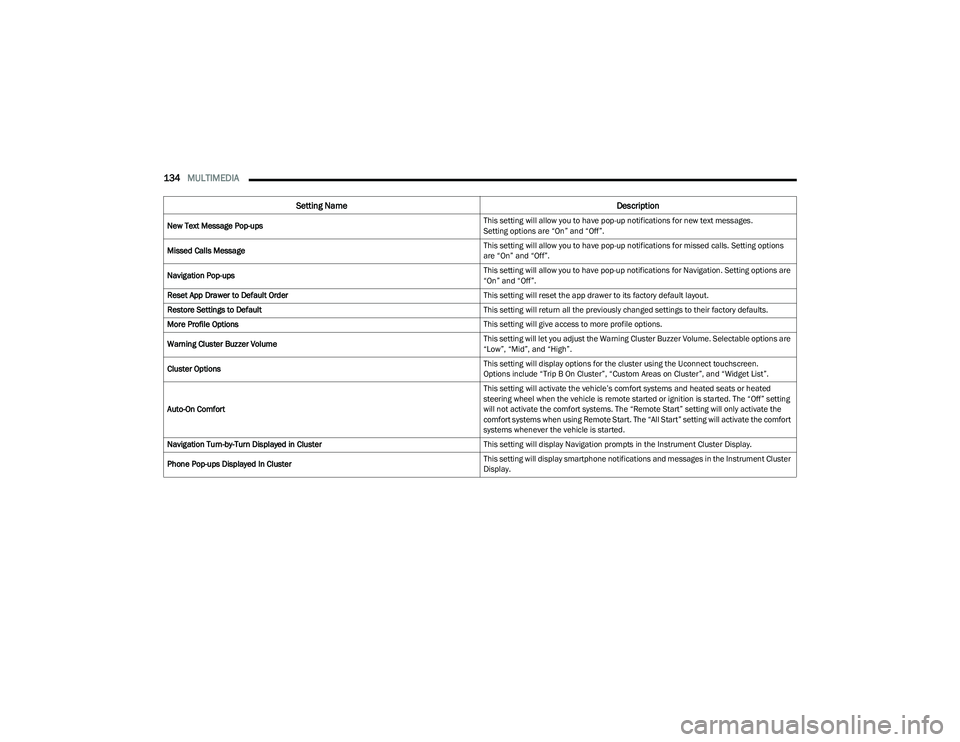
New Text Message Pop-ups This setting will allow you to have pop-up notifications for new text messages.
Setting options are “On” and “Off”.
Missed Calls Message This setting will allow you to have pop-up notifications for missed calls. Setting options
are “On” and “Off”.
Navigation Pop-ups This setting will allow you to have pop-up notifications for Navigation. Setting options are
“On” and “Off”.
Reset App Drawer to Default Order This setting will reset the app drawer to its factory default layout.
Restore Settings to Default This setting will return all the previously changed settings to their factory defaults.
More Profile Options This setting will give access to more profile options.
Warning Cluster Buzzer Volume This setting will let you adjust the Warning Cluster Buzzer Volume. Selectable options are
“Low”, “Mid”, and “High”.
Cluster Options This setting will display options for the cluster using the Uconnect touchscreen.
Options include “Trip B On Cluster”, “Custom Areas on Cluster”, and “Widget List”.
Auto-On Comfort This setting will activate the vehicle’s comfort systems and heated seats or heated
steering wheel when the vehicle is remote started or ignition is started. The “Off” setting
will not activate the comfort systems. The “Remote Start” setting will only activate the
comfort systems when using Remote Start. The “All Start” setting will activate the comfort
systems whenever the vehicle is started.
Navigation Turn-by-Turn Displayed in Cluster This setting will display Navigation prompts in the Instrument Cluster Display.
Phone Pop-ups Displayed In Cluster This setting will display smartphone notifications and messages in the Instrument Cluster
Display.
Setting Name
Description
23_GG_OM_EN_USC_t.book Page 134
Page 137 of 288
MULTIMEDIA135
Safety/Driving Assistance
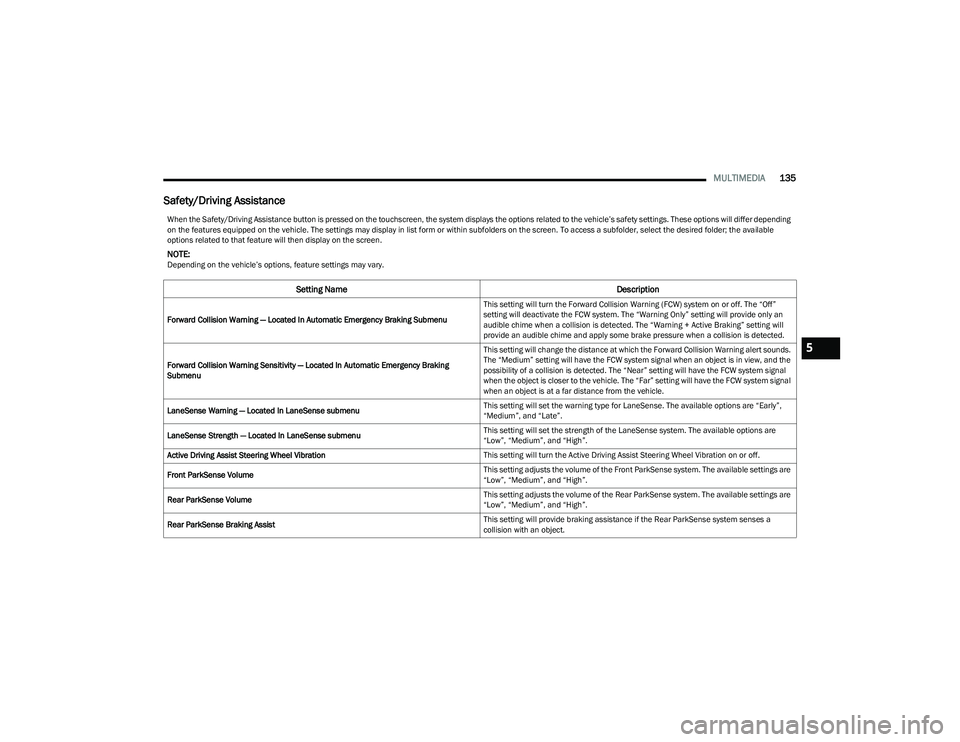
When the Safety/Driving Assistance button is pressed on the touchscreen, the system displays the options related to the vehicle’s safety settings. These options will differ depending
on the features equipped on the vehicle. The settings may display in list form or within subfolders on the screen. To access a subfolder, select the desired folder; the available
options related to that feature will then display on the screen.
NOTE:Depending on the vehicle’s options, feature settings may vary.
Setting Name Description
Forward Collision Warning — Located In Automatic Emergency Braking Submenu This setting will turn the Forward Collision Warning (FCW) system on or off. The “Off”
setting will deactivate the FCW system. The “Warning Only” setting will provide only an
audible chime when a collision is detected. The “Warning + Active Braking” setting will
provide an audible chime and apply some brake pressure when a collision is detected.
Forward Collision Warning Sensitivity — Located In Automatic Emergency Braking
Submenu This setting will change the distance at which the Forward Collision Warning alert sounds.
The “Medium” setting will have the FCW system signal when an object is in view, and the
possibility of a collision is detected. The “Near” setting will have the FCW system signal
when the object is closer to the vehicle. The “Far” setting will have the FCW system signal
when an object is at a far distance from the vehicle.
LaneSense Warning — Located In LaneSense submenu This setting will set the warning type for LaneSense. The available options are “Early”,
“Medium”, and “Late”.
LaneSense Strength — Located In LaneSense submenu This setting will set the strength of the LaneSense system. The available options are
“Low”, “Medium”, and “High”.
Active Driving Assist Steering Wheel Vibration This setting will turn the Active Driving Assist Steering Wheel Vibration on or off.
Front ParkSense Volume This setting adjusts the volume of the Front ParkSense system. The available settings are
“Low”, “Medium”, and “High”.
Rear ParkSense Volume This setting adjusts the volume of the Rear ParkSense system. The available settings are
“Low”, “Medium”, and “High”.
Rear ParkSense Braking Assist This setting will provide braking assistance if the Rear ParkSense system senses a
collision with an object.
5
23_GG_OM_EN_USC_t.book Page 135
Page 138 of 288

136MULTIMEDIA
Blind Spot Alert This setting will change the type of alert provided when an object is detected in the
vehicle’s blind spot. The “Off” setting will turn off Blind Spot Alert. The “Lights” setting will
activate the Blind Spot Alert lights on the outside mirrors. The “Lights & Chime” setting
will activate both the lights on the outside mirrors and an audible chime.
Traffic Sign Recognition This setting sill turn Traffic Sign Recognition on or off.
Traffic Sign Assist This setting will turn Traffic Sign Assist on or off.
Traffic Sign Assist Warning This setting will allow you to set the warning type related to the traffic sign.
The available options are “Off”, “Visual”, and “Visual + Chime”.
New Speed Zone Indication This setting will allow you to set if the system will warn you that the speed limit has
changed in an area. The available options are “Off”, “Visual”, and “Visual + Chime”.
Drowsy Driver Alert This setting will monitor the driver’s driving habits and warn you of any changes,
indicating that the driver may be drowsy. The available options are “On” and “Off”.
Highway Assist Steering Wheel Vibration This setting will customize the Highway Assist Steering Wheel Vibration.
The available options are “On” and “Off”.
Side Distance Warning This setting will customize the Side Distance Warning. The available options are
“On” and “Off”.
Hill Start Assist This setting will turn the Hill Start Assist system on or off.
Intelligent Speed Options This setting will let you customize your intelligent speed options. Selectable options are
“Manual Confirm” and “Auto Confirm”.
New Speed Zone Indication This setting will allow you to set if the system will warn you that the speed limit has
changed in an area. The available options are “Off”, “Visual”, and “Visual + Chime”.
Rear Seat Alert When this setting is turned on and the rear doors are opened while the engine is running,
or if the engine is turned on within 10 minutes of the door opening, a message will
appear to check the rear seat when the vehicle is powered OFF.
Front Passenger Airbag This setting will let you enable or disable the Front Passenger Airbag.
Setting NameDescription
23_GG_OM_EN_USC_t.book Page 136
Page 145 of 288

MULTIMEDIA143
Seats & Comfort
Remote Door Unlock/1st Press Of Key Fob Unlocks This setting will change how many pushes of the Unlock button on the key fob are needed
to unlock all the doors. The “Driver Door” setting will only unlock the driver door on the
first push on the Unlock button. The “All Doors” setting will unlock all doors on the first
push of the Unlock button.
Passive Entry This setting will allow you to turn the Passive Entry feature (Keyless Enter ‘n Go™) on
or off.
Power Liftgate Alert This setting will chime an audible alert when the power liftgate is raising or lowering.
Selectable options are “On” and “Off”.
Power Liftgate Angle This setting will let you customize the angle of the power liftgate. Selectable options are
“Custom”, “Level 1”, “Level 2”, “Level 3”, and “Level 4”.
Hands Free Power Liftgate This setting will use hands-free technology to automatically open or close the liftgate.
Selectable options are “On” and “Off”.
Setting Name
Description
When the Seats & Comfort button is pressed on the touchscreen, the system displays the option related to the vehicle’s comfort systems when remote start has been activated or
the vehicle has been started.
NOTE:Depending on the vehicle’s options, feature settings may vary.
Setting NameDescription
Auto-On Comfort This setting will activate the vehicle’s comfort systems and heated seats or heated
steering wheel when the vehicle is remote started or ignition is started. The “Off” setting
will not activate the comfort systems. The “Remote Start” setting will only activate the
comfort systems when using Remote Start. The “All Start” setting will activate the comfort
systems whenever the vehicle is started.
5
23_GG_OM_EN_USC_t.book Page 143
Page 152 of 288
150MULTIMEDIA
STEERING WHEEL AUDIO CONTROLS —
IF EQUIPPED
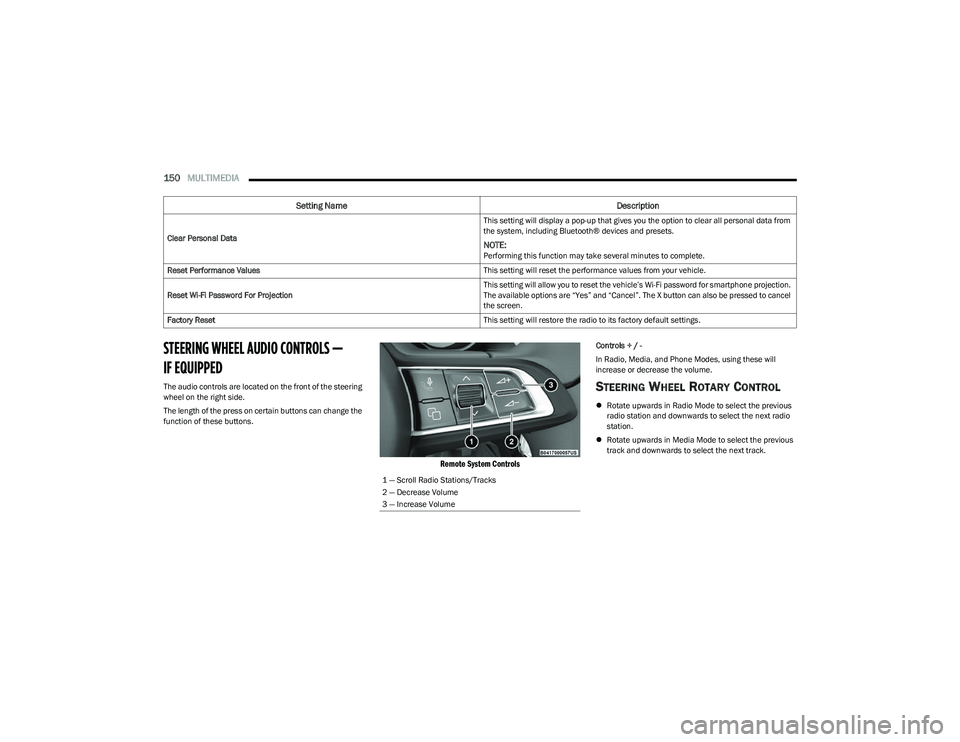
The audio controls are located on the front of the steering
wheel on the right side.
The length of the press on certain buttons can change the
function of these buttons.
Remote System Controls
Controls + / -
In Radio, Media, and Phone Modes, using these will
increase or decrease the volume.
STEERING WHEEL ROTARY CONTROL
Rotate upwards in Radio Mode to select the previous
radio station and downwards to select the next radio
station.
Rotate upwards in Media Mode to select the previous
track and downwards to select the next track.
Clear Personal Data
This setting will display a pop-up that gives you the option to clear all personal data from
the system, including Bluetooth® devices and presets.
NOTE:Performing this function may take several minutes to complete.
Reset Performance Values This setting will reset the performance values from your vehicle.
Reset Wi-Fi Password For Projection This setting will allow you to reset the vehicle’s Wi-Fi password for smartphone projection.
The available options are “Yes” and “Cancel”. The X button can also be pressed to cancel
the screen.
Factory Reset This setting will restore the radio to its factory default settings.
Setting NameDescription
1 — Scroll Radio Stations/Tracks
2 — Decrease Volume
3 — Increase Volume
23_GG_OM_EN_USC_t.book Page 150
Page 157 of 288

SAFETY155
ELECTRONIC BRAKE CONTROL (EBC)
S
YSTEM
Your vehicle is equipped with an advanced Electronic
Brake Control (EBC) system. This system includes
Anti-Lock Brake System (ABS), Brake Assist System (BAS),
Electronic Brake Force Distribution (EBD), Electronic Roll
Mitigation (ERM), Electronic Stability Control (ESC), Hill
Start Assist (HSA), and Traction Control System (TCS).
These systems work together to enhance both vehicle
stability and control in various driving conditions.
Your vehicle may also be equipped with Dynamic Steering
Torque (DST), Hill Descent Control (HDC), Rain Brake
Support (RBS), Ready Alert Braking (RAB), and Trailer
Sway Control (TSC).
Brake Assist System (BAS)
The BAS is designed to optimize the vehicle’s braking
capability during emergency braking maneuvers. The
system detects an emergency braking situation by sensing
the rate and amount of brake application and then applies
optimum pressure to the brakes. This can help reduce
braking distances. The BAS complements the Anti-Lock
Brake System (ABS). Applying the brakes very quickly
results in the best BAS assistance. To receive the benefit
of the system, you must apply continuous braking
pressure during the stopping sequence (do not “pump”
the brakes). Do not reduce brake pedal pressure unless
braking is no longer desired. Once the brake pedal is
released, the BAS is deactivated.
Brake System Warning Light
The red Brake System Warning Light will turn on when the
ignition is placed in the ON/RUN mode and may stay on for
as long as four seconds.
If the Brake System Warning Light remains on or comes on
while driving, it indicates that the brake system is not
functioning properly and that immediate service is
required. If the Brake System Warning Light does not
come on when the ignition is placed in the ON/RUN mode,
have the light repaired as soon as possible.
Dynamic Steering Torque (DST)
DST is a feature of the Electronic Stability Control (ESC)
and Electric Power Steering (EPS) modules that provides
torque at the steering wheel for certain driving conditions
in which the ESC module is detecting vehicle instability.
The torque that the steering wheel receives is only meant
to help the driver realize optimal steering behavior in order to reach/maintain vehicle stability. The only notification
the driver receives that the feature is active is the torque
applied to the steering wheel.
NOTE:The DST feature is only meant to help the driver realize the
correct course of action through small torques on the
steering wheel, which means the effectiveness of the DST
feature is highly dependent on the driver’s sensitivity and
overall reaction to the applied torque. It is very important
to realize that this feature will not steer the vehicle,
meaning the driver is still responsible for steering the
vehicle.
Electronic Brake Force Distribution (EBD)
EBD manages the distribution of the braking torque
between the front and rear axles by limiting braking
pressure to the rear axle. This is done to prevent overslip
of the rear wheels to avoid vehicle instability, and to
prevent the rear axle from entering ABS before the
front axle.
Electronic Roll Mitigation (ERM)
ERM anticipates the potential for wheel lift by monitoring
the driver’s steering wheel input and the speed of the
vehicle. When ERM determines that the rate of change of
the steering wheel angle and vehicle’s speed are
sufficient to potentially cause wheel lift, it then applies the
appropriate brake and may also reduce engine power to
lessen the chance that wheel lift will occur. ERM can only
reduce the chance of wheel lift occurring during severe or
evasive driving maneuvers; it cannot prevent wheel lift
due to other factors, such as road conditions, leaving the
roadway, or striking objects or other vehicles.
WARNING!
The Brake Assist System (BAS) cannot prevent the
natural laws of physics from acting on the vehicle, nor
can it increase the traction afforded by prevailing road
conditions. BAS cannot prevent collisions, including
those resulting from excessive speed in turns, driving
on very slippery surfaces, or hydroplaning. The
capabilities of a BAS-equipped vehicle must never be
exploited in a reckless or dangerous manner, which
could jeopardize the user's safety or the safety of
others.
6
23_GG_OM_EN_USC_t.book Page 155
Page 158 of 288

156SAFETY
(Continued)
Electronic Stability Control (ESC)
ESC enhances directional control and stability of the
vehicle under various driving conditions. ESC corrects for
oversteering or understeering of the vehicle by applying
the brake of the appropriate wheel(s) to counteract these
conditions. Engine power may also be reduced to help the
vehicle maintain the desired path.
Oversteer — when the vehicle is turning more than
appropriate for the steering wheel position.
Understeer — when the vehicle is turning less than
appropriate for the steering wheel position.
ESC uses sensors in the vehicle to determine the vehicle
path intended by the driver and compares it to the actual
path of the vehicle. When the actual path does not match
the intended path, ESC applies the brake of the
appropriate wheel to assist in counteracting the oversteer
or understeer condition. The ESC Activation/Malfunction Indicator Light located in
the instrument cluster will start to flash as soon as the ESC
system becomes active. The ESC Activation/Malfunction
Indicator Light also flashes when the TCS is active. If the
ESC Activation/Malfunction Indicator Light begins to flash
during acceleration, ease up on the accelerator and apply
as little throttle as possible. Be sure to adapt your speed
and driving to the prevailing road conditions.
ESC Operating Modes
Depending upon model and mode of operation, the
ESC system may have multiple operating modes.
ESC On
This is the normal operating mode for the ESC. Whenever
the vehicle is started, the ESC system will be in this mode.
This mode should be used for most driving conditions.
Alternate ESC modes should only be used for specific
reasons as noted in the following paragraphs.
WARNING!
Many factors, such as vehicle loading, road conditions
and driving conditions, influence the chance that wheel
lift or rollover may occur. ERM cannot prevent all wheel
lift or rollovers, especially those that involve leaving the
roadway or striking objects or other vehicles. The
capabilities of an ERM-equipped vehicle must never be
exploited in a reckless or dangerous manner which could
jeopardize the user's safety or the safety of others.
WARNING!
Electronic Stability Control (ESC) cannot prevent the
natural laws of physics from acting on the vehicle,
nor can it increase the traction afforded by prevailing
road conditions. ESC cannot prevent accidents,
including those resulting from excessive speed in
turns, driving on very slippery surfaces, or hydro -
planing. ESC also cannot prevent accidents resulting
from loss of vehicle control due to inappropriate
driver input for the conditions. Only a safe, attentive,
and skillful driver can prevent accidents. The capabil -
ities of an ESC equipped vehicle must never be
exploited in a reckless or dangerous manner which
could jeopardize the user’s safety or the safety of
others.
Vehicle modifications, or failure to properly maintain
your vehicle, may change the handling characteris -
tics of your vehicle, and may negatively affect the
performance of the ESC system. Changes to the
steering system, suspension, braking system, tire
type and size or wheel size may adversely affect ESC
performance. Improperly inflated and unevenly worn
tires may also degrade ESC performance. Any vehicle
modification or poor vehicle maintenance that
reduces the effectiveness of the ESC system can
increase the risk of loss of vehicle control, vehicle
rollover, personal injury and death.
WARNING!
23_GG_OM_EN_USC_t.book Page 156
Page 168 of 288

166SAFETY
NOTE:
The TPMS is not intended to replace normal tire care
and maintenance, or to provide warning of a tire failure
or condition.
The TPMS should not be used as a tire pressure gauge
while adjusting your tire pressure.
Driving on a significantly underinflated tire causes the
tire to overheat and can lead to tire failure. Underinfla -
tion also reduces fuel efficiency and tire tread life, and
may affect the vehicle’s handling and stopping ability.
The TPMS is not a substitute for proper tire mainte -
nance, and it is the driver’s responsibility to maintain
correct tire pressure using an accurate tire pressure
gauge, even if underinflation has not reached the level
to trigger illumination of the Tire Pressure Monitoring
System Warning Light.
Seasonal temperature changes will affect tire pres -
sure, and the TPMS will monitor the actual tire pres -
sure in the tire.
Premium System
The Tire Pressure Monitoring System (TPMS) uses wireless
technology with wheel rim mounted electronic sensors to
monitor tire pressure levels. Sensors, mounted to each
wheel as part of the valve stem, transmit tire pressure
readings to the receiver module.
NOTE:It is particularly important for you to check the tire
pressure in all of the tires on your vehicle monthly and to
maintain the proper pressure.
The TPMS consists of the following components:
Receiver module
Four Tire Pressure Monitoring System sensors
Various Tire Pressure Monitoring System messages,
which will display in the instrument cluster display
Tire Pressure Monitoring System Warning Light
Tire Pressure Monitoring System Low
Pressure Warnings
The Tire Pressure Monitoring System Warning
Light will illuminate in the instrument cluster
and a chime will sound when tire pressure is
low in one or more of the four active road tires.
In addition, the instrument cluster will display a "Tire Low"
message, an “Inflate to XX” message, and a graphic
showing the pressure values of each tire with the low tire
pressure values highlighted or in a different color.
Tire Pressure Monitoring System Low Pressure Warning
Should this occur, you should stop as soon as possible and
inflate the tires with low pressure (those highlighted or in a
different color in the instrument cluster display graphic) to
the vehicle’s recommended cold placard pressure value, as
shown in the “Inflate to XX” message. Once the system
receives the updated tire pressures, the system will
automatically update, the pressure values in the graphic
display in the instrument cluster will stop being highlighted
or return to their original color, and the Tire Pressure
Monitoring System Warning Light will turn off.
CAUTION!
The TPMS has been optimized for the original equip -
ment tires and wheels. TPMS pressures and warning
have been established for the tire size equipped on
your vehicle. Undesirable system operation or sensor
damage may result when using replacement equip -
ment that is not of the same size, type, and/or style.
The TPMS sensor is not designed for use on after -
market wheels and may contribute to a poor overall
system performance or sensor damage. Customers
are encouraged to use Original Equipment Manufac -
turer (OEM) wheels to ensure proper TPMS feature
operation.
Using aftermarket tire sealants may cause the Tire
Pressure Monitoring System (TPMS) sensor to
become inoperable. After using an aftermarket tire
sealant it is recommended that you take your vehicle
to an authorized dealer to have your sensor function
checked.
After inspecting or adjusting the tire pressure always
reinstall the valve stem cap. This will prevent mois -
ture and dirt from entering the valve stem, which
could damage the TPMS sensor.
23_GG_OM_EN_USC_t.book Page 166