2023 DODGE CHARGER child lock
[x] Cancel search: child lockPage 60 of 292

58GETTING TO KNOW YOUR VEHICLE
OPENING AND CLOSING THE SUNROOF
Express Open/Close
Push the switch rearward and release it within one second
and the sunroof will open automatically from any position.
The sunroof will open fully and stop automatically. Push the switch forward and release it within one second
and the sunroof will close automatically from any position.
The sunroof will close fully and stop automatically.
During Express Open or Express Close operation, any
other movement of the sunroof switch will stop the
sunroof.
Manual Open/Close
To open the sunroof, push and hold the switch rearward to
full open.
To close the sunroof, push and hold the switch in the
forward position.
Any release of the switch during open or close operation
will stop the sunroof movement. The sunroof will remain in
a partially opened position until the switch is operated and
held again.
Venting The Sunroof
Push and release the Vent switch within one second, and
the sunroof will express open to the vent position. Push
and hold the Vent switch for more than one second for
manual opening of the sunroof vent.
PINCH PROTECT FEATURE
This feature will detect an obstruction in the closing of the
sunroof during the Express Close operation. If an
obstruction in the path of the sunroof is detected, the
sunroof will automatically retract. Remove the obstruction
if this occurs.
NOTE:If three consecutive sunroof close attempts result in Pinch
Protect reversals, Pinch Protect will disable and the
sunroof must be closed in Manual mode.
SUNSHADE OPERATION
The sunshade can be opened manually. However, the
sunshade will open automatically as the sunroof opens.
NOTE:The sunshade cannot be closed if the sunroof is open.
SUNROOF MAINTENANCE
Use only a non-abrasive cleaner and a soft cloth to clean
the glass panel. Periodically check for and clear out any
debris that may have collected in the tracks.
IGNITION OFF OPERATION
The power sunroof switch can remain active in Accessory
Delay for up to approximately 10 minutes after the
vehicle’s ignition is placed to the OFF position. Opening
either front door will cancel this feature.
This feature is programmable using the Uconnect system
Úpage 112.
WARNING!
Never leave children unattended in a vehicle, or with
access to an unlocked vehicle. Never leave the key
fob in or near the vehicle, or in a location accessible
to children. Do not leave the Keyless Enter ‘n Go™
Ignition in the ACC or ON/RUN position. Occupants,
particularly unattended children, can become
entrapped by the power sunroof while operating the
power sunroof switch. Such entrapment may result
in serious injury or death.
In a collision, there is a greater risk of being thrown
from a vehicle with an open sunroof. You could also
be seriously injured or killed. Always fasten your seat
belt properly and make sure all passengers are also
properly secured.
Do not allow small children to operate the sunroof.
Never allow your fingers, other body parts, or any
object, to project through the sunroof opening. Injury
may result.
23_LD_OM_EN_USC_t.book Page 58
Page 62 of 292
60GETTING TO KNOW YOUR VEHICLE
Power Trunk Release Button
The trunk can be opened from inside the
vehicle using the power trunk release button
located on the instrument panel to the left of
the steering wheel.
NOTE:The gear selector must be in PARK before the button will
operate.
Key Fob Trunk Release ButtonPush the power trunk button on the key fob
twice within five seconds to release the trunk.
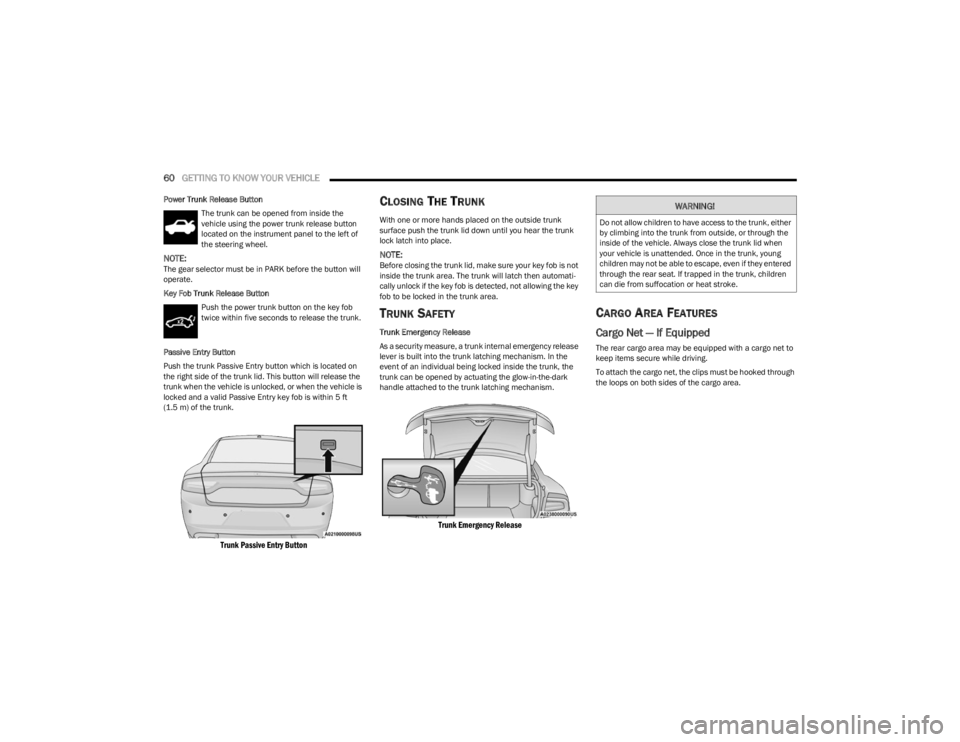
Passive Entry Button
Push the trunk Passive Entry button which is located on
the right side of the trunk lid. This button will release the
trunk when the vehicle is unlocked, or when the vehicle is
locked and a valid Passive Entry key fob is within 5 ft
(1.5 m) of the trunk.
Trunk Passive Entry Button
CLOSING THE TRUNK
With one or more hands placed on the outside trunk
surface push the trunk lid down until you hear the trunk
lock latch into place.
NOTE:Before closing the trunk lid, make sure your key fob is not
inside the trunk area. The trunk will latch then automati -
cally unlock if the key fob is detected, not allowing the key
fob to be locked in the trunk area.
TRUNK SAFETY
Trunk Emergency Release
As a security measure, a trunk internal emergency release
lever is built into the trunk latching mechanism. In the
event of an individual being locked inside the trunk, the
trunk can be opened by actuating the glow-in-the-dark
handle attached to the trunk latching mechanism.
Trunk Emergency Release
CARGO AREA FEATURES
Cargo Net — If Equipped
The rear cargo area may be equipped with a cargo net to
keep items secure while driving.
To attach the cargo net, the clips must be hooked through
the loops on both sides of the cargo area.
WARNING!
Do not allow children to have access to the trunk, either
by climbing into the trunk from outside, or through the
inside of the vehicle. Always close the trunk lid when
your vehicle is unattended. Once in the trunk, young
children may not be able to escape, even if they entered
through the rear seat. If trapped in the trunk, children
can die from suffocation or heat stroke.
23_LD_OM_EN_USC_t.book Page 60
Page 78 of 292

76
STARTING AND OPERATING
STARTING THE ENGINE
Before starting your vehicle, adjust your seat, adjust the
inside and outside mirrors, fasten your seat belt, and if
present, instruct all other occupants to buckle their seat
belts.
AUTOMATIC TRANSMISSION
The gear selector must be in the PARK position before you
can start the engine. Apply the brakes before shifting into
any driving gear.
NORMAL STARTING
To Turn On The Engine Using The ENGINE START/STOP
Button
1. The transmission must be in PARK.
2. Press and hold the brake pedal while pushing the ENGINE START/STOP button once.
3. If the vehicle fails to start, the starter will disengage automatically after 10 seconds. 4. If you wish to stop the cranking of the engine prior to
the engine starting, push the ENGINE START/STOP
button again.
NOTE:Normal starting of either a cold or a warm engine is
obtained without pumping or pressing the accelerator
pedal.
To Turn Off The Engine Using The ENGINE START/STOP
Button
1. Place the gear selector in PARK, then push and release the ENGINE START/STOP button.
2. The ignition will return to the OFF position.
3. If the gear selector is not in PARK, the ENGINE START/STOP button must be held for two seconds or
three short pushes in a row with the vehicle speed
above 5 mph (8 km/h) before the engine will shut off.
The ignition will remain in the ACC position until the
gear selector is in PARK and the button is pushed
twice to the OFF position. If the gear selector is not in
PARK and the ENGINE START/STOP button is pushed
once, the instrument cluster will display a “Vehicle
Not In Park” message and the engine will remain
running. Never leave a vehicle out of the PARK
position, or it could roll.
WARNING!
When exiting the vehicle, always make sure the igni -
tion is in OFF position, remove the key fob from the
vehicle and lock the vehicle.
Never leave children alone in a vehicle, or with
access to an unlocked vehicle. Leaving children in a
vehicle unattended is dangerous for a number of
reasons. A child or others could be seriously or fatally
injured. Children should be warned not to touch the
parking brake, brake pedal or the transmission gear
selector.
Do not leave the key fob in or near the vehicle (or in
a location accessible to children), and do not leave
the ignition (of a vehicle equipped with Keyless Enter
’n Go™) in the ACC or ON/RUN position. A child could
operate power windows, other controls, or move the
vehicle.
Do not leave children or animals inside parked vehi -
cles in hot weather. Interior heat buildup may cause
serious injury or death.
CAUTION!
Shift into or out of PARK or REVERSE only after the
vehicle has come to a complete stop.
Do not shift between PARK, REVERSE, NEUTRAL, or
DRIVE when the engine is above idle speed.
Before shifting into any gear, make sure your foot is
firmly pressing the brake pedal.
23_LD_OM_EN_USC_t.book Page 76
Page 81 of 292
STARTING AND OPERATING79
(Continued)
ENGINE BREAK-IN RECOMMENDATIONS —
3.6L & 5.7L
A long break-in period is not required for the drivetrain
(engine, transmission, clutch, and rear axle) in your new
vehicle.
Drive moderately during the first 300 miles (500 km).
After the initial 60 miles (100 km), speeds up to 50 or
55 mph (80 or 90 km/h) are desirable.
While cruising, brief full-throttle acceleration within the
limits of local traffic laws contributes to a good break-in.
However, wide-open throttle acceleration in low gear can
be detrimental and should be avoided.
The engine oil, transmission fluid, and axle lubricant
installed at the factory is high-quality and
energy-conserving. Oil, fluid, and lubricant changes should
be consistent with anticipated climate and conditions
under which vehicle operations will occur. For the
recommended viscosity and quality grades
Úpage 271.
NOTE:A new engine may consume some oil during its first few
thousand miles (kilometers) of operation. This should be
considered a normal part of the break-in and not inter -
preted as an indication of difficulty. Please check your oil
level with the engine oil indicator often during the break in
period. Add oil as required.
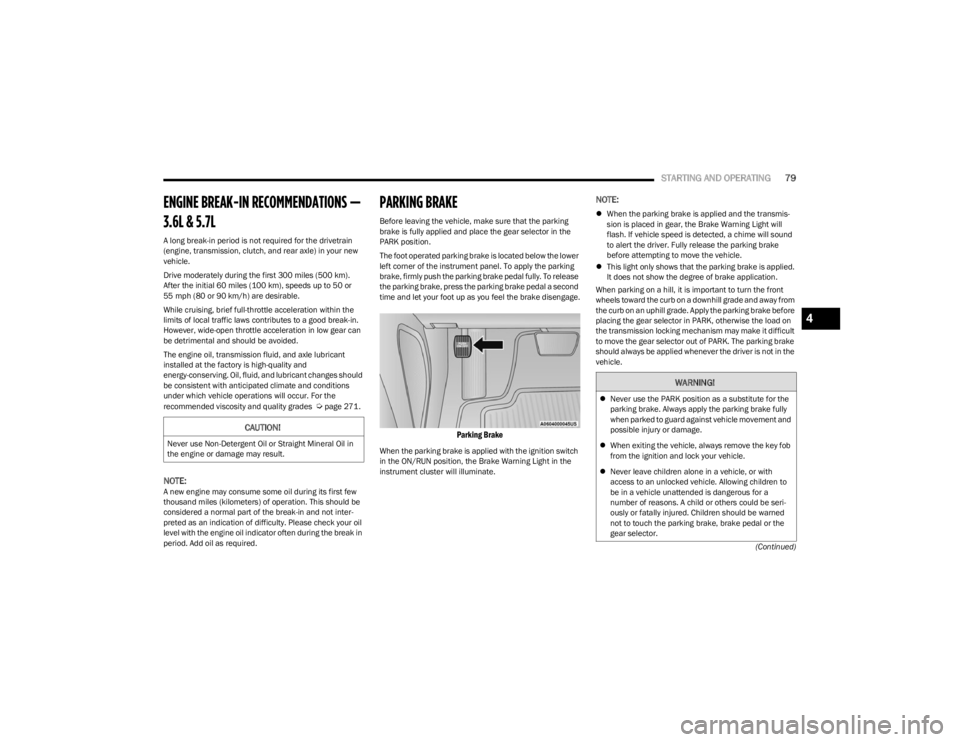
PARKING BRAKE
Before leaving the vehicle, make sure that the parking
brake is fully applied and place the gear selector in the
PARK position.
The foot operated parking brake is located below the lower
left corner of the instrument panel. To apply the parking
brake, firmly push the parking brake pedal fully. To release
the parking brake, press the parking brake pedal a second
time and let your foot up as you feel the brake disengage.
Parking Brake
When the parking brake is applied with the ignition switch
in the ON/RUN position, the Brake Warning Light in the
instrument cluster will illuminate.
NOTE:
When the parking brake is applied and the transmis -
sion is placed in gear, the Brake Warning Light will
flash. If vehicle speed is detected, a chime will sound
to alert the driver. Fully release the parking brake
before attempting to move the vehicle.
This light only shows that the parking brake is applied.
It does not show the degree of brake application.
When parking on a hill, it is important to turn the front
wheels toward the curb on a downhill grade and away from
the curb on an uphill grade. Apply the parking brake before
placing the gear selector in PARK, otherwise the load on
the transmission locking mechanism may make it difficult
to move the gear selector out of PARK. The parking brake
should always be applied whenever the driver is not in the
vehicle.
CAUTION!
Never use Non-Detergent Oil or Straight Mineral Oil in
the engine or damage may result.
WARNING!
Never use the PARK position as a substitute for the
parking brake. Always apply the parking brake fully
when parked to guard against vehicle movement and
possible injury or damage.
When exiting the vehicle, always remove the key fob
from the ignition and lock your vehicle.
Never leave children alone in a vehicle, or with
access to an unlocked vehicle. Allowing children to
be in a vehicle unattended is dangerous for a
number of reasons. A child or others could be seri -
ously or fatally injured. Children should be warned
not to touch the parking brake, brake pedal or the
gear selector.
4
23_LD_OM_EN_USC_t.book Page 79
Page 82 of 292
80STARTING AND OPERATING
(Continued)
AUTOMATIC TRANSMISSION
You must press and hold the brake pedal while shifting out
of PARK.
When exiting the vehicle, always make sure the
keyless ignition node is in the OFF position, remove
the key fob from the vehicle and lock the vehicle.
Do not leave the key fob in or near the vehicle or in a
location accessible to children, and do not leave the
ignition of a vehicle equipped with Keyless Enter ’n
Go™ in the ACC or ON/RUN position. A child could
operate power windows, other controls, or move the
vehicle.
Be sure the parking brake is fully disengaged before
driving; failure to do so can lead to brake failure and
a collision.
Always fully apply the parking brake when leaving
your vehicle, or it may roll and cause damage or
injury. Also be certain to leave the transmission in
PARK. Failure to do so may allow the vehicle to roll
and cause damage or injury.
CAUTION!
If the Brake Warning Light remains on with the parking
brake released, a brake system malfunction is
indicated. Have the brake system serviced by an
authorized dealer immediately.
WARNING!
WARNING!
Never use the PARK position as a substitute for the
parking brake. Always apply the parking brake fully
when exiting the vehicle to guard against vehicle
movement and possible injury or damage.
Your vehicle could move and injure you and others if
it is not in PARK. Check by trying to move the trans -
mission gear selector out of PARK with the brake
pedal released. Make sure the transmission is in
PARK before exiting the vehicle.
The transmission may not engage PARK if the vehicle
is moving. Always bring the vehicle to a complete
stop before shifting to PARK, and verify that the
transmission gear position indicator solidly indicates
PARK (P) without blinking. Ensure that the vehicle is
completely stopped, and the PARK position is prop -
erly indicated, before exiting the vehicle.
It is dangerous to shift out of PARK or NEUTRAL if the
engine speed is higher than idle speed. If your foot is
not firmly pressing the brake pedal, the vehicle could
accelerate quickly forward or in reverse. You could
lose control of the vehicle and hit someone or some -
thing. Only shift into gear when the engine is idling
normally and your foot is firmly pressing the brake
pedal.
Unintended movement of a vehicle could injure
those in or near the vehicle. As with all vehicles, you
should never exit a vehicle while the engine is
running. Before exiting a vehicle, always come to a
complete stop, then apply the parking brake, shift
the transmission into PARK, and turn the ignition
OFF. When the ignition is in the OFF position, the
transmission is locked in PARK, securing the vehicle
against unwanted movement.
When exiting the vehicle, always make sure the igni -
tion is in the OFF position, remove the key fob from
the vehicle, and lock the vehicle.
Never leave children alone in a vehicle, or with
access to an unlocked vehicle. Allowing children to
be in a vehicle unattended is dangerous for a
number of reasons. A child or others could be seri -
ously or fatally injured. Children should be warned
not to touch the parking brake, brake pedal or the
transmission gear selector.
Do not leave the key fob in or near the vehicle (or in
a location accessible to children), and do not leave
the ignition in the ACC or ON/RUN position. A child
could operate power windows, other controls, or
move the vehicle.
WARNING!
23_LD_OM_EN_USC_t.book Page 80
Page 131 of 292

MULTIMEDIA129
Safe Usage Of The Uconnect System
The Uconnect system is a sophisticated electronic
device. Do not let young children use the system.
Permanent hearing loss may occur if you play your
music or sound system at loud volumes. Exercise
caution when setting the volume on the system.
Keep drinks, rain and other sources of moisture away
from the system. Besides damage to the system, mois -
ture can cause electric shocks as with any electronic
device.
NOTE:Many features of this system are speed dependent.
For your own safety, it is not possible to use some of the
touchscreen features while the vehicle is in motion.
Care And Maintenance
Do not press the touchscreen with any hard or sharp
objects (pen, USB stick, jewelry, etc.), which could
scratch the surface.
Do not spray any liquid or chemicals directly on the
screen! Use a clean and dry microfiber lens cleaning
cloth in order to clean the touchscreen.
If necessary, use a lint-free cloth dampened with a
cleaning solution, such as isopropyl alcohol or an
isopropyl alcohol and water solution ratio of 50:50.
Be sure to follow the solvent manufacturer's precau -
tions and directions
Úpage 277.
UCONNECT MODES
STEERING WHEEL AUDIO CONTROLS
The remote sound system controls are located on the rear
surface of the steering wheel at the three and nine o’clock
positions.
Remote Sound System Controls
The right-hand control is a rocker-type switch with a push
button in the center and controls the volume and mode of
the sound system. Pushing the top of the rocker switch will
increase the volume, and pushing the bottom of the rocker
switch will decrease the volume. Pushing the right-hand control’s center button will make
the radio switch between the various modes available
(AM/FM/SXM or Media, etc.).
The left-hand control is a rocker-type switch with a push
button in the center. The function of the left-hand control
is different depending on which mode you are in.
The following describes the left-hand control operation in
each mode:
Radio Operation
Pushing the top of the switch will seek up for the next
available station and pushing the bottom of the switch will
seek down for the next available station.
The button located in the center of the left-hand control
will tune to the next preset station that you have
programmed in the radio presets.
Media Mode
Pushing the top of the switch skips to the next track on the
selected media (AUX/USB/Bluetooth®). Pushing the
switch up twice will go forward two tracks. Pushing the
bottom switch goes to the beginning of the current track,
or the beginning of the previous track if it is within eight
seconds after the current track begins to play. Double
pressing the bottom button switch will skip to the previous
track if it is after eight seconds into the current track.
5
23_LD_OM_EN_USC_t.book Page 129
Page 184 of 292
182SAFETY
Seat Belts And Pregnant Women
Seat Belts And Pregnant Women
Seat belts must be worn by all occupants including
pregnant women: the risk of injury in the event of an
accident is reduced for the mother and the unborn child if
they are wearing a seat belt.
Position the lap belt snug and low below the abdomen and
across the strong bones of the hips. Place the shoulder
belt across the chest and away from the neck. Never place
the shoulder belt behind the back or under the arm.
Seat Belt Pretensioner
The front outboard seat belt system is equipped with
pretensioning devices that are designed to remove slack
from the seat belt in the event of a collision. These devices
may improve the performance of the seat belt by removing
slack from the seat belt early in a collision. Pretensioners
work for all size occupants, including those in child
restraints.
NOTE:These devices are not a substitute for proper seat belt
placement by the occupant. The seat belt still must be
worn snugly and positioned properly.
The pretensioners are triggered by the Occupant Restraint
Controller (ORC). Like the air bags, the pretensioners are
single use items. A deployed pretensioner or a deployed
air bag must be replaced immediately.
Energy Management Feature
The front outboard seat belt system is equipped with an
Energy Management feature that may help further reduce
the risk of injury in the event of a collision. The seat belt
system has a retractor assembly that is designed to
release webbing in a controlled manner.
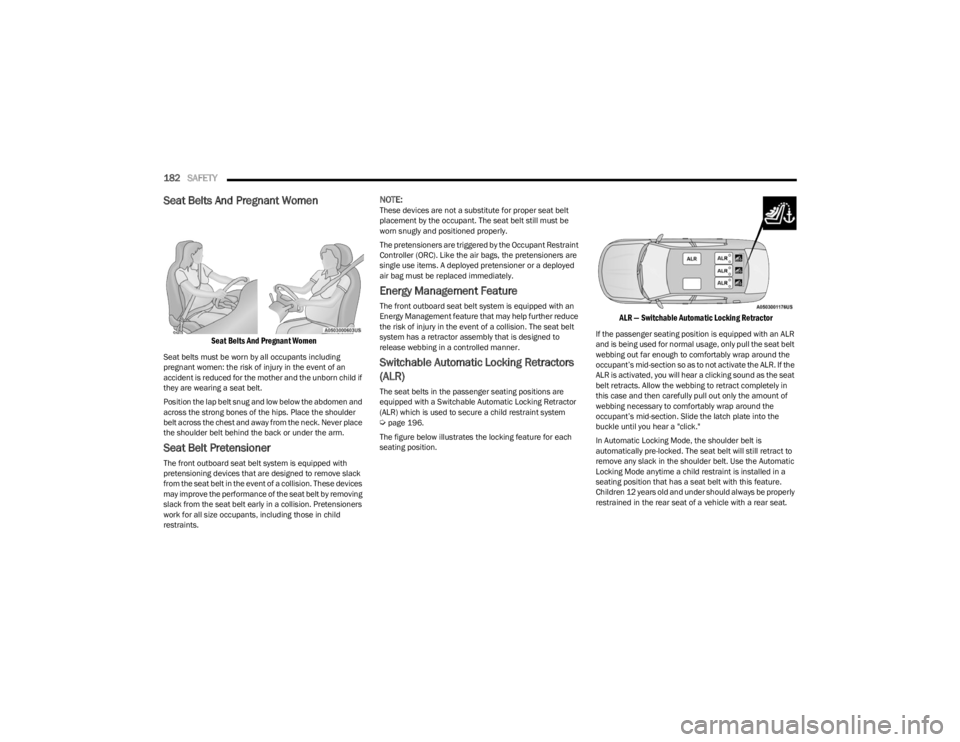
Switchable Automatic Locking Retractors
(ALR)
The seat belts in the passenger seating positions are
equipped with a Switchable Automatic Locking Retractor
(ALR) which is used to secure a child restraint system
Úpage 196.
The figure below illustrates the locking feature for each
seating position.
ALR — Switchable Automatic Locking Retractor
If the passenger seating position is equipped with an ALR
and is being used for normal usage, only pull the seat belt
webbing out far enough to comfortably wrap around the
occupant’s mid-section so as to not activate the ALR. If the
ALR is activated, you will hear a clicking sound as the seat
belt retracts. Allow the webbing to retract completely in
this case and then carefully pull out only the amount of
webbing necessary to comfortably wrap around the
occupant’s mid-section. Slide the latch plate into the
buckle until you hear a "click."
In Automatic Locking Mode, the shoulder belt is
automatically pre-locked. The seat belt will still retract to
remove any slack in the shoulder belt. Use the Automatic
Locking Mode anytime a child restraint is installed in a
seating position that has a seat belt with this feature.
Children 12 years old and under should always be properly
restrained in the rear seat of a vehicle with a rear seat.
23_LD_OM_EN_USC_t.book Page 182
Page 185 of 292
SAFETY183
How To Engage The Automatic Locking Mode
1. Buckle the combination lap and shoulder belt.
2. Grab the shoulder portion and pull downward until
the entire seat belt is extracted.
3. Allow the seat belt to retract. As the seat belt retracts, you will hear a clicking sound. This indicates the seat
belt is now in the Automatic Locking Mode.
How To Disengage The Automatic Locking Mode
Unbuckle the combination lap/shoulder belt and allow it
to retract completely to disengage the Automatic Locking
Mode and activate the vehicle sensitive (emergency)
locking mode.
SUPPLEMENTAL RESTRAINT SYSTEMS
(SRS)
Some of the safety features described in this section may
be standard equipment on some models, or may be
optional equipment on others. If you are not sure, ask an
authorized dealer.
The air bag system must be ready to protect you in a
collision. The Occupant Restraint Controller (ORC)
monitors the internal circuits and interconnecting wiring
associated with the electrical Air Bag System Components. Your vehicle may be equipped with the
following Air Bag System Components:
Air Bag System Components
Occupant Restraint Controller (ORC)
Air Bag Warning Light
Steering Wheel and Column
Instrument Panel
Knee Impact Bolsters
Driver and Front Passenger Air Bags
Seat Belt Buckle Switch
Supplemental Side Air Bags
Supplemental Knee Air Bags
Front and Side Impact Sensors
Seat Belt Pretensioners
Seat Track Position Sensors
Air Bag Warning Light
The Occupant Restraint Controller (ORC)
monitors the readiness of the electronic parts
of the air bag system whenever the ignition
switch is in the START or ON/RUN position.
If the ignition switch is in the OFF position or in the ACC
position, the air bag system is not on and the air bags will
not inflate.
The ORC contains a backup power supply system that may
deploy the air bag system even if the battery loses power
or it becomes disconnected prior to deployment.
WARNING!
Never place a rear-facing child restraint in front of an
air bag. A deploying passenger front air bag can
cause death or serious injury to a child 12 years or
younger, including a child in a rear-facing child
restraint.
Never install a rear-facing child restraint in the front
seat of a vehicle. Only use a rear-facing child
restraint in the rear seat. If the vehicle does not have
a rear seat, do not transport a rear-facing child
restraint in that vehicle.
WARNING!
The seat belt assembly must be replaced if the
switchable Automatic Locking Retractor (ALR)
feature or any other seat belt function is not working
properly when checked according to the procedures
in the Service Manual.
Failure to replace the seat belt assembly could
increase the risk of injury in collisions.
Do not use the Automatic Locking Mode to restrain
occupants who are wearing the seat belt or children
who are using booster seats. The locked mode is only
used to install rear-facing or forward-facing child
restraints that have a harness for restraining the
child.
6
23_LD_OM_EN_USC_t.book Page 183