2023 DODGE CHARGER child lock
[x] Cancel search: child lockPage 189 of 292
SAFETY187
The SABICs may help reduce the risk of partial or complete
ejection of vehicle occupants through side windows in
certain side impact events.
Side Impacts
The Side Air Bags are designed to activate in certain side
impacts. The Occupant Restraint Controller (ORC)
determines whether the deployment of the Side Air Bags
in a particular impact event is appropriate, based on the
severity and type of collision. The side impact sensors aid
the ORC in determining the appropriate response to
impact events. The system is calibrated to deploy the Side
Air Bags on the impact side of the vehicle during impacts
that require Side Air Bag occupant protection. In side
impacts, the Side Air Bags deploy independently; a left
side impact deploys the left Side Air Bags only and a
right-side impact deploys the right Side Air Bags only. Vehicle damage by itself is not a good indicator of whether
or not Side Air Bags should have deployed.
The Side Air Bags will not deploy in all side collisions,
including some collisions at certain angles, or some side
collisions that do not impact the area of the passenger
compartment. The Side Air Bags may deploy during angled
or offset frontal collisions where the front air bags deploy.
Side Air Bags are a supplement to the seat belt restraint
system. Side Air Bags deploy in less time than it takes to
blink your eyes.
NOTE:Air bag covers may not be obvious in the interior trim, but
they will open during air bag deployment.
Rollover Events
Side Air Bags and seat belt pretensioners are designed to
activate in certain rollover events. The Occupant Restraint
Controller (ORC) determines whether deployment in a
particular rollover event is appropriate, based on the
severity and type of collision. Vehicle damage by itself is
not a good indicator of whether or not Side Air Bags and
seat belt pretensioners should have deployed.
WARNING!
Do not mount equipment, or stack luggage or other
cargo up high enough to block the deployment of the
SABICs. The trim covering above the side windows
where the SABIC and its deployment path are located
should remain free from any obstructions.
In order for the SABICs to work as intended, do not
install any accessory items in your vehicle which
could alter the roof. Do not add an aftermarket
sunroof to your vehicle. Do not add roof racks that
require permanent attachments (bolts or screws) for
installation on the vehicle roof. Do not drill into the
roof of the vehicle for any reason.
WARNING!
Occupants, including children, who are up against or
very close to Side Air Bags can be seriously injured or
killed. Occupants, including children, should never
lean on or sleep against the door, side windows, or
area where the side air bags inflate, even if they are
in an infant or child restraint.
Seat belts (and child restraints where appropriate)
are necessary for your protection in all collisions.
They also help keep you in position, away from an
inflating Side Air Bag. To get the best protection from
the Side Air Bags, occupants must wear their seat
belts properly and sit upright with their backs against
the seats. Children must be properly restrained in a
child restraint or booster seat that is appropriate for
the size of the child.
WARNING!
Side Air Bags need room to inflate. Do not lean
against the door or window. Sit upright in the center
of the seat.
Being too close to the Side Air Bags during deploy -
ment could cause you to be severely injured or killed.
Relying on the Side Air Bags alone could lead to more
severe injuries in a collision. The Side Air Bags work
with your seat belt to restrain you properly. In some
collisions, Side Air Bags won’t deploy at all. Always
wear your seat belt even though you have Side Air
Bags.
6
23_LD_OM_EN_USC_t.book Page 187
Page 197 of 292

SAFETY195
Locating The LATCH Anchorages
The lower anchorages are round bars that are
found at the rear of the seat cushion where it
meets the seatback, below the anchorage
symbols on the seatback. They are just visible
when you lean into the rear seat to install the child
restraint. You will easily feel them if you run your finger
along the gap between the seatback and seat cushion.
LATCH Anchorages
Locating The Upper Tether Anchorages
There are tether strap anchorages behind each
rear seating position located in the panel
between the rear seatback and the rear
window. They are found under a plastic cover
with the tether anchorage symbol on it.
Tether Strap Anchorages
LATCH-compatible child restraint systems will be equipped
with a rigid bar or a flexible strap on each side. Each will
have a hook or connector to attach to the lower anchorage
and a way to tighten the connection to the anchorage.
Forward-facing child restraints and some rear-facing child
restraints will also be equipped with a tether strap. The
tether strap will have a hook at the end to attach to the top
tether anchorage and a way to tighten the strap after it is
attached to the anchorage.
Center Seat LATCH
If a child restraint installed in the center position blocks
the seat belt webbing or buckle for the outboard position,
do not use that outboard position. If a child seat in the
center position blocks the outboard LATCH anchors or
seat belt, do not install a child seat in that outboard
position. Always follow the directions of the child restraint
manufacturer when installing your child restraint. Not all
child restraint systems will be installed as described here.
To Install A LATCH-Compatible Child
Restraint
If the selected seating position has a Switchable
Automatic Locking Retractor (ALR) seat belt, stow the seat
belt, following the instructions below. See
Úpage 196 to
check what type of seat belt each seating position has.
1. Loosen the adjusters on the lower straps and on the tether strap of the child seat so that you can more
easily attach the hooks or connectors to the vehicle
anchorages.
2. Place the child seat between the lower anchorages for that seating position. If the second row seat can
be reclined, you may recline the seat and/or raise the
head restraint (if adjustable) to get a better fit. If the
rear seat can be moved forward and rearward in the
vehicle, you may wish to move it to its rear-most
position to make room for the child seat. You may
also move the front seat forward to allow more room
for the child seat.
WARNING!
Never use the same lower anchorage to attach more
than one child restraint. Please see Úpage 195 for
typical installation instructions.
6
23_LD_OM_EN_USC_t.book Page 195
Page 198 of 292
196SAFETY
3. Attach the lower hooks or connectors of the child
restraint to the lower anchorages in the selected
seating position.
4. If the child restraint has a tether strap, connect it to the top tether anchorage. See
Úpage 198 for
directions to attach a tether anchor.
5. Tighten all of the straps as you push the child restraint rearward and downward into the seat.
Remove slack in the straps according to the child
restraint manufacturer’s instructions.
6. Test that the child restraint is installed tightly by pulling back and forth on the child seat at the belt
path. It should not move more than 1 inch (25.4 mm) in any direction.
How To Stow An Unused Switchable-ALR
Seat Belt:
When using the LATCH attaching system to install a child
restraint, stow all ALR seat belts that are not being used
by other occupants or being used to secure child
restraints. An unused belt could injure a child if they play
with it and accidentally lock the seat belt retractor. Before
installing a child restraint using the LATCH system, buckle
the seat belt behind the child restraint and out of the
child’s reach. If the buckled seat belt interferes with the
child restraint installation, instead of buckling it behind
the child restraint, route the seat belt through the child
restraint belt path and then buckle it. Do not lock the seat
belt. Remind all children in the vehicle that the seat belts
are not toys and that they should not play with them.
Installing Child Restraints Using The
Vehicle Seat Belt
Child restraint systems are designed to be secured in
vehicle seats by lap belts or the lap belt portion of a lap/
shoulder belt.
The seat belts in the passenger seating positions are
equipped with a Switchable Automatic Locking Retractor
(ALR) that is designed to keep the lap portion of the seat
belt tight around the child restraint so that it is not
necessary to use a locking clip. The ALR retractor can be “switched” into a locked mode by
pulling all of the webbing out of the retractor and then
letting the webbing retract back into the retractor. If it is
locked, the ALR will make a clicking noise while the
webbing is pulled back into the retractor.
Refer to the “Automatic Locking Mode” description in
“Switchable Automatic Locking Retractors (ALR)”
Úpage 182 for additional information on ALR.
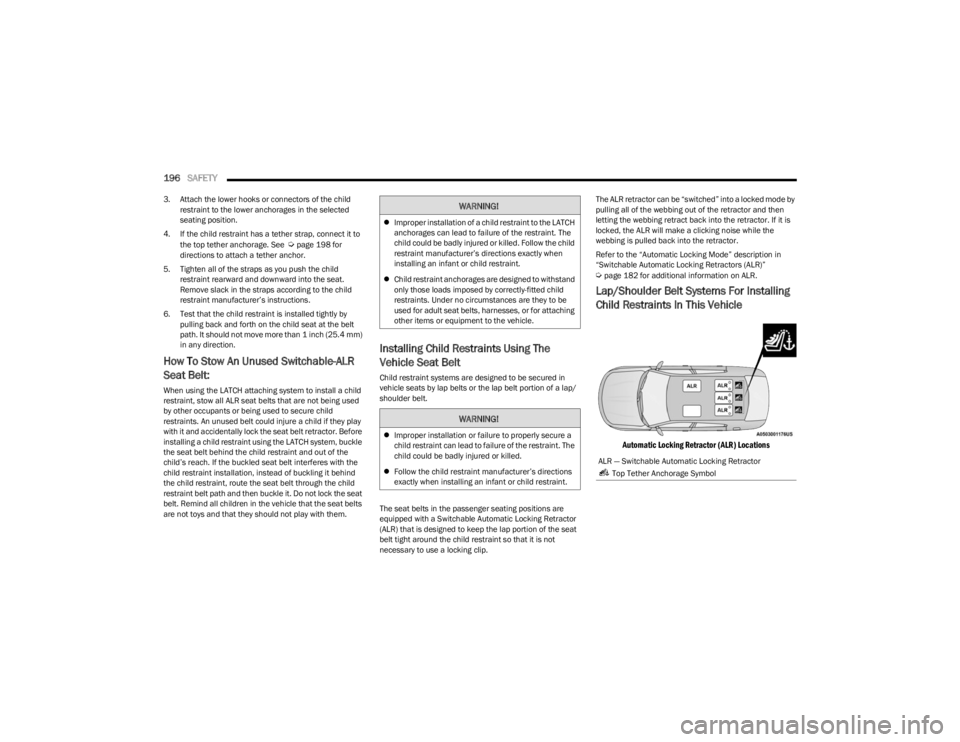
Lap/Shoulder Belt Systems For Installing
Child Restraints In This Vehicle
Automatic Locking Retractor (ALR) Locations
WARNING!
Improper installation of a child restraint to the LATCH
anchorages can lead to failure of the restraint. The
child could be badly injured or killed. Follow the child
restraint manufacturer’s directions exactly when
installing an infant or child restraint.
Child restraint anchorages are designed to withstand
only those loads imposed by correctly-fitted child
restraints. Under no circumstances are they to be
used for adult seat belts, harnesses, or for attaching
other items or equipment to the vehicle.
WARNING!
Improper installation or failure to properly secure a
child restraint can lead to failure of the restraint. The
child could be badly injured or killed.
Follow the child restraint manufacturer’s directions
exactly when installing an infant or child restraint.
ALR — Switchable Automatic Locking Retractor
Top Tether Anchorage Symbol
23_LD_OM_EN_USC_t.book Page 196
Page 199 of 292
SAFETY197
Installing A Child Restraint With A
Switchable Automatic Locking Retractor
(ALR):
Child restraint systems are designed to be secured in
vehicle seats by lap belts or the lap belt portion of a
lap/shoulder belt.
1. Place the child seat in the center of the seating
position. If the second row seat can be reclined, you
may recline the seat and/or raise the head restraint
(if adjustable) to get a better fit. If the rear seat can
be moved forward and rearward in the vehicle, you
may wish to move it to its rear-most position to make
room for the child seat. You may also move the front
seat forward to allow more room for the child seat.
2. Pull enough of the seat belt webbing from the retractor to pass it through the belt path of the child
restraint. Do not twist the belt webbing in the belt
path. 3. Slide the latch plate into the buckle until you hear a
“click.”
4. Pull on the webbing to make the lap portion tight against the child seat.
5. To lock the seat belt, pull down on the shoulder part of the belt until you have pulled all the seat belt
webbing out of the retractor. Then, allow the webbing
to retract back into the retractor. As the webbing
retracts, you will hear a clicking sound. This means
the seat belt is now in the Automatic Locking mode.
Frequently Asked Questions About Installing Child Restraints With Seat Belts
What is the weight limit (child’s weight +
weight of the child restraint) for using the
Tether Anchor with the seat belt to attach a
forward-facing child restraint? Weight limit of the Child RestraintAlways use the tether anchor when using
the seat belt to install a forward-facing
child restraint, up to the recommended
weight limit of the child restraint.
Can the rear-facing child restraint touch the
back of the front passenger seat? YesContact between the front passenger seat
and the child restraint is allowed, if the
child restraint manufacturer also allows
contact.
Can the rear head restraints be removed? No
Can the buckle stalk be twisted to tighten
the seat belt against the belt path of the
child restraint? No
Do not twist the buckle stalk in a seating
position with an ALR retractor.
WARNING!
Improper installation or failure to properly secure a
child restraint can lead to failure of the restraint. The
child could be badly injured or killed.
Follow the child restraint manufacturer’s directions
exactly when installing an infant or child restraint.
6
23_LD_OM_EN_USC_t.book Page 197
Page 200 of 292
198SAFETY
6. Try to pull the webbing out of the retractor. If it is
locked, you should not be able to pull out any
webbing. If the retractor is not
locked, repeat step 5.
7. Finally, pull up on any excess webbing to tighten the lap portion around the child restraint while you push
the child restraint rearward and downward into the
vehicle seat.
8. If the child restraint has a top tether strap and the seating position has a top tether anchorage, connect
the tether strap to the anchorage and tighten the
tether strap. See
Úpage 198 for directions to attach
a tether anchor.
9. Test that the child restraint is installed tightly by pulling back and forth on the child seat at the belt
path. It should not move more than 1 inch (25.4 mm) in any direction.
Any seat belt system will loosen with time, so check the
belt occasionally, and pull it tight if necessary.
Installing Child Restraints Using The Top
Tether Anchorage:
1. Look behind the seating position where you plan to install the child restraint to find the tether
anchorage. You may need to move the seat forward
to provide better access to the tether anchorage. If
there is no top tether anchorage for that seating
position, move the child restraint to another position
in the vehicle if one is available.
2. Rotate or lift the cover to access the anchor directly behind the seat where you are placing the child
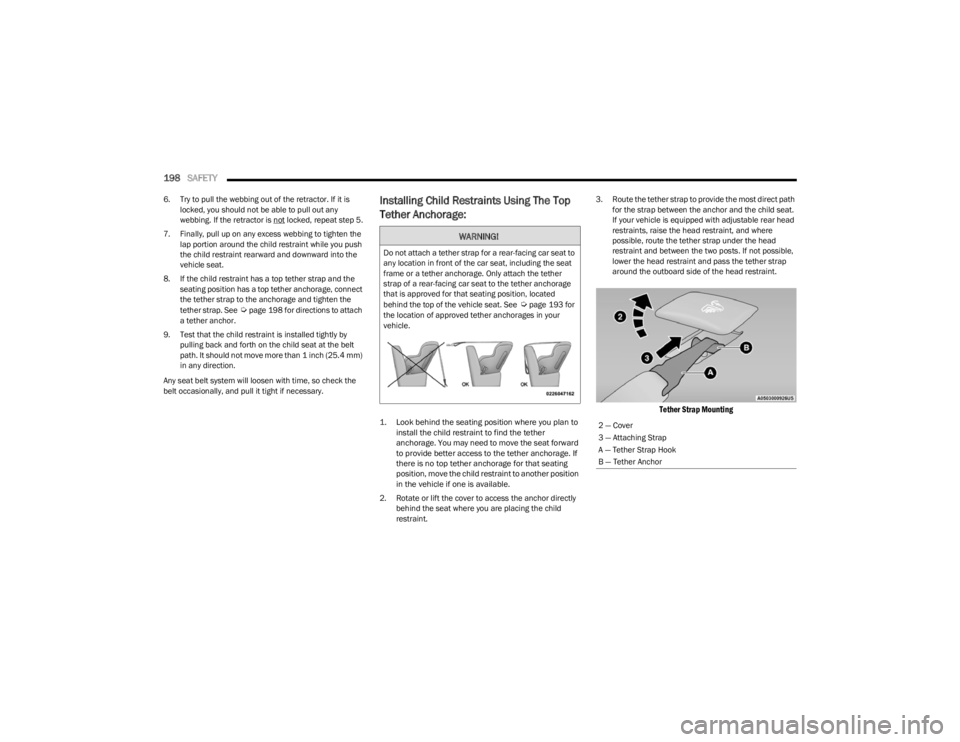
restraint. 3. Route the tether strap to provide the most direct path
for the strap between the anchor and the child seat.
If your vehicle is equipped with adjustable rear head
restraints, raise the head restraint, and where
possible, route the tether strap under the head
restraint and between the two posts. If not possible,
lower the head restraint and pass the tether strap
around the outboard side of the head restraint.
Tether Strap Mounting
WARNING!
Do not attach a tether strap for a rear-facing car seat to
any location in front of the car seat, including the seat
frame or a tether anchorage. Only attach the tether
strap of a rear-facing car seat to the tether anchorage
that is approved for that seating position, located
behind the top of the vehicle seat. See
Úpage 193 for
the location of approved tether anchorages in your
vehicle.
2 — Cover
3 — Attaching Strap
A — Tether Strap Hook
B — Tether Anchor
23_LD_OM_EN_USC_t.book Page 198
Page 281 of 292

279
BluetoothConnecting To A Particular Mobile PhoneOr Audio Device After Pairing ............................ 143
Body Mechanism Lubrication...................................... 231
B-Pillar Location ........................................................... 252
Brake Assist System .................................................... 165
Brake Control System .................................................. 165
Brake Fluid .......................................................... 236
, 272
Brake System ...................................................... 236, 267
Fluid Check..................................................... 236, 272
Master Cylinder ....................................................... 236
Parking ....................................................................... 79
Warning Light ................................................... 68
, 267
Brake/Transmission Interlock........................................81
Break-In Recommendations, New Vehicle .................... 79
Brightness, Interior Lights .............................................. 45
Bulb Replacement ....................................................... 246
Bulbs, Light.......................................................... 201
, 246
CCamera, Rear ............................................................... 100
Capacities, Fluid ........................................................... 270
Caps, Filler Oil (Engine) .............................................................. 225
Radiator (Coolant Pressure)................................... 235
Car Washes .................................................................. 265
Carbon Monoxide Warning .......................................... 201
Cargo Vehicle Loading....................................................... 102
Cargo Area Cover ............................................................60
Cargo Compartment ....................................................... 60
Cargo Net .........................................................................60
CD.................................................................................. 138
Certification Label ........................................................ 102 Chains, Tire ...................................................................262
Chart, Tire Sizing ...........................................................249
Check Engine Light (Malfunction Indicator Light) ........ 75
Checking Your Vehicle For Safety ................................ 199
Checks, Safety .............................................................. 199
Child Restraint .............................................................. 190
Child Restraints Booster Seats .......................................................... 192
Child Seat Installation ............................................. 197How To Stow An unused ALR Seat Belt .................196Infant And Child Restraints ..................................... 191
Lower Anchors And Tethers For Children............... 193
Older Children And Child Restraints....................... 191
Seating Positions ..................................................... 193
Child Safety Locks .......................................................... 24
Clean Air Gasoline ........................................................ 268
Cleaning Wheels .....................................................................260
Climate Control ............................................................... 46 Automatic ................................................................... 47
Manual ....................................................................... 49
Coin Holder ..................................................................... 53
Cold Weather Operation ................................................. 78
Compact Spare Tire ...................................................... 259
Console Floor ........................................................................... 53
Contract, Service .......................................................... 275
Controls ......................................................................... 130
Cooling Pressure Cap (Radiator Cap) ..........................235
Cooling System ............................................................. 234 Adding Coolant (Antifreeze) ....................................235
Coolant Level ................................................. 234
, 235
Cooling Capacity ...................................................... 270
Disposal Of Used Coolant ....................................... 235 Drain, Flush, And Refill............................................234 Inspection ................................................................ 235
Points To Remember .............................................. 236
Pressure Cap ........................................................... 235
Radiator Cap............................................................ 235
Selection Of Coolant (Antifreeze) ........ 234
, 270, 271
Corrosion Protection .................................................... 264
Cruise Control (Speed Control) ............................... 85
, 87
Cruise Light .............................................................. 73, 74
Customer Assistance ................................................... 273
Customer Programmable Features ............................. 112
Cybersecurity ................................................................ 111
DDaytime Running Lights ................................................. 41 Deck Lid Power Release........................................................... 59
Defroster, Windshield .................................................. 200
De-Icer, Remote Start .................................................... 18
Deleting A Phone .......................................................... 144
Deluxe Security Alarm .................................................... 19
Diagnostic System, Onboard ......................................... 74 Dimmer Switch Headlight ................................................................... 41
Dipsticks Oil (Engine) .............................................................. 227
Disabled Vehicle Towing .............................................. 219
Disc Drive ...................................................................... 138
Disconnecting ............................................................... 144
Disposal Antifreeze (Engine Coolant) .................................... 235
Disturb........................................................................... 146
Door Ajar ......................................................................... 69
Door Ajar Light ................................................................ 69
11
23_LD_OM_EN_USC_t.book Page 279
Page 282 of 292
280
Door LocksAutomatic ...................................................................23
Child-Protection Door Lock — Rear Doors ................24
Doors................................................................................ 21
Drag & Drop.................................................................. 128
Drive Modes ................................................................. 159
Driver Memory Presets ................................................ 135
Driver’s Seat Back Tilt ....................................................28
Driving Through Flowing, Rising, Or ShallowStanding Water .................................................. 110
EElectric Brake Control System..................................... 165Anti-Lock Brake System ......................................... 164
Electronic Roll Mitigation .............................. 165
, 168
Electric Remote Mirrors ..................................................36 Electronic Power Distribution Center (Fuses) ............ 238
Electronic Speed Control (Cruise Control) ..................... 86Electronic Stability Control (ESC) ................................ 166
Electronic Throttle Control Warning Light...................... 69Emergency Gas Can Refueling .................................... 215
Emergency, In Case Of Freeing Vehicle When Stuck .................................. 218
Hazard Warning Flasher ......................................... 202
Jacking..................................................................... 205
Jump Starting ................................................. 213
, 214
Towing ..................................................................... 219
Emission Control System Maintenance.........................75
Engine .................................................................. 225
, 226
Air Cleaner ............................................................... 229 Break-In Recommendations ..................................... 79
Checking Oil Level .................................................. 227Compartment ................................................. 225
, 226 Compartment Identification....................................225
Coolant (Antifreeze)....................................... 234
, 271
Cooling .....................................................................234
Exhaust Gas Caution ............................................... 201
Fails To Start .............................................................. 78
Flooded, Starting ....................................................... 78
Fuel Requirements ........................................ 268
, 270
Jump Starting................................................. 213, 214
Oil .......................................................... 228, 270, 271
Oil Filler Cap ............................................................. 225
Oil Filter ....................................................................229 Oil Selection ................................................... 228
, 270
Oil Synthetic ............................................................. 229
Overheating ............................................................. 216
Starting....................................................................... 76
Engine Oil Life Reset
b
................................................ 65
Enhanced Accident Response Feature ............. 188, 220
Ethanol .......................................................................... 269
Exhaust Gas Cautions ..................................................201
Exhaust System .................................................. 201
, 233
Exterior Lighting .............................................................. 40
Exterior Lights ........................................................40
, 201
FFilters Air Cleaner ............................................................... 229
Air Conditioning ................................................52
, 230
Engine Oil ................................................................. 229
Engine Oil Disposal..................................................229
Flashers ......................................................................... 202 Hazard Warning ....................................................... 202
Turn Signals ...............................................43
, 74, 201
Flash-To-Pass .................................................................. 42
Flooded Engine Starting ................................................. 78 Floor Console .................................................................. 53
Fluid Capacities ............................................................ 270
Fluid Leaks.................................................................... 201
Fluid Level Checks
Brake........................................................................ 236
Cooling System........................................................ 234Engine Oil................................................................. 227
Fluid, Brake................................................................... 272
Fog Lights........................................................................ 42
Fold-Flat Seats ................................................................ 28
Folding Rear Seats ......................................................... 29
Forward Collision Warning ........................................... 172
Four-Way Hazard Flasher ............................................. 202
Freeing A Stuck Vehicle ............................................... 218
Fuel................................................................................ 268 Additives .................................................................. 268
Clean Air .................................................................. 268
Ethanol..................................................................... 269Gasoline ................................................................... 268
Materials Added ...................................................... 268
Methanol ................................................................. 269
Octane Rating.................................................268
, 271
Requirements .................................................268, 270
Specifications .......................................................... 271
Tank Capacity .......................................................... 270
Fuses ............................................................................. 238
GGarage Door Opener (HomeLink) .................................. 36 Gasoline, Clean Air ....................................................... 268
Gasoline, Reformulated ............................................... 268
Gear Ranges ................................................................... 82
Glass Cleaning .............................................................. 266
23_LD_OM_EN_USC_t.book Page 280
Page 284 of 292

282
ECO Mode Indicator...................................................73
Electric Power Steering Fault .................................... 69
Electronic Stability Control (ESC) Active Warning .... 71
Electronic Stability Program(ESP) Indicator ............. 70
Exterior ............................................................. 40
, 201
Fog .............................................................................. 42
Forward Collision Warning (FCW) OFF Indicator ......73
Front Fog Indicator ....................................................73
Hazard Warning Flasher ......................................... 202
Headlight Switch ........................................................40
Headlights ...........................................................40
, 42
Headlights On With Wipers .......................................42
High Beam..................................................................41
High Beam Indicator ..................................................74
High Beam/Low Beam Select ...................................41
Instrument Cluster ..................................................... 40
Intensity Control .........................................................45
Interior ........................................................................43
LaneSense Indicator...........................................73
, 74
License .................................................................... 247
Lights On Reminder ...................................................42
Low Fuel .....................................................................71
Low Washer Fluid Warning........................................71
Malfunction Indicator (Check Engine) ...................... 71
Oil Temperature Warning ..........................................70
Park ..................................................................... 42
, 73
Passing ....................................................................... 42
Reading ...................................................................... 44
Seat Belt Reminder ...................................................70
Security Alarm ............................................................70
Service ..................................................................... 246
Service Adaptive Cruise Control (ACC) Warning ......72
Service Forward Collision Warning (FCW) ................72
Service LaneSense Warning ..................................... 71
Traction Control ...................................................... 167 Transmission Temperature Warning ........................ 70
Trunk Open Warning ................................................. 70
Turn Signals ........................................41
, 43, 74, 201
Vanity Mirror .............................................................. 35
Warning Instrument Cluster Descriptions......... 70
, 74
Load Shed Battery Saver On .......................................... 67
Load Shed Electrical Load Reduction ........................... 67
Load Shed Intelligent Battery Sensor............................ 67
Loading Vehicle................................................... 102
, 103
Capacities ................................................................ 103
Tires.......................................................................... 252
Locks Auto Unlock................................................................ 23
Automatic Door.......................................................... 23
Child Protection ......................................................... 24
Power Door ................................................................ 21
Low Tire Pressure System ............................................174
Lubrication, Body .......................................................... 231
Lug Nuts/Bolts .............................................................. 267
MMaintenance ................................................................... 58 Maintenance Free Battery ...........................................228
Maintenance Schedule ...................................... 221
, 222
Malfunction Indicator Light (Check Engine) ........... 71, 75
Manual Service .....................................................................276
Media Hub....................................................................... 54
Media Mode .................................................................. 138
Memory Seat ................................................................... 27 Memory Settings............................................................. 27
Methanol ....................................................................... 269
Mirrors ............................................................................. 34 Electric Powered ........................................................ 36 Electric Remote ......................................................... 36
Heated ....................................................................... 36
Outside....................................................................... 35
Rearview .................................................... 34
, 35, 202
Vanity ......................................................................... 35
Modifications/Alterations Vehicle ..........................................................................8
Monitor, Tire Pressure System .................................... 174
Mopar Parts .................................................................. 276
MP3 Control .................................................................... 54
Multi-Function Control Lever ......................................... 41
NNew Vehicle Break-In Period ......................................... 79
OOccupant Restraints .................................................... 177
Octane Rating, Gasoline (Fuel) ........................... 268, 271
Oil Change Indicator ....................................................... 65 Reset.......................................................................... 65
Oil Filter, Change .......................................................... 229
Oil Filter, Selection ....................................................... 229
Oil Pressure Light ........................................................... 70
Oil, Engine ............................................................ 228
, 271
Capacity ................................................................... 270
Checking .................................................................. 227
Dipstick .................................................................... 227
Disposal ................................................................... 229
Filter ......................................................................... 229
Filter Disposal.......................................................... 229
Identification Logo .................................................. 229
Materials Added To ................................................. 229 Pressure Warning Light ............................................ 70
Recommendation...........................................228
, 270
23_LD_OM_EN_USC_t.book Page 282