2023 CHRYSLER PACIFICA HYBRID tow
[x] Cancel search: towPage 281 of 328

SERVICING AND MAINTENANCE279
F54 40 Amp Green –ESP-ECU And Valves
F55 –15 Amp BlueRadio Frequency HUB/ Keyless Ignition
System (KIN) / ESL / DVD
F56 –10 Amp RedFront and Rear HVAC Control Module /
Occupant Classification Module (OCM) /
Electronic Steering Lock (ESL) / ESP / ESC
F57 ––Not Populated
F58 –10 Amp RedDrive Train Control Mod / Power Transfer
Unit *
F59 30 Amp Pink –Trailer Tow Receptacle *
F60 –20 Amp Yellow Rear Cargo Pwr Outlet
F61 –20 Amp YellowTrailer Tow Right Stop/Turn *
F62 –20 Amp Yellow Power Transfer Unit *
F63 –20 Amp Yellow Trailer Tow Left Stop/Turn *
F64 –15 Amp Blue RT HID Headlamp *
F65 ––Not Populated
F66 –15 Amp Blue Cluster
F67 –10 Amp RedHaptic Lane Feedback Module (HALF) /
Parktronics System (PTS)/Drivers Assist System Module (DASM)
F68 ––Not Populated
F69 ––Not Populated
F70 ––Not Populated
F71 –20 Amp Yellow Horn
Cavity
Cartridge Fuse Blade FuseDescription
*If Equipped
8
23_RUP_OM_EN_USC_t.book Page 279
Page 282 of 328

280SERVICING AND MAINTENANCE
F72 –10 Amp Red Heated Mirror *
F73 30 Amp Pink –Rear Defroster
F74 20 Amp Blue –Trailer Tow Backup Lights*
F75 –5 Amp TanOverhead Console / RR Center Stack
F76 –20 Amp YellowUconnect / Center Display / Telematics
F77 –10 Amp RedRR Entertainment / Media HUB / USB(S) /
Rain Sensor / Sunroof / RR View Mirror/ Overhead DVD Player / INT Monitoring Camera / Wireless Charging Pad
F78 –15 Amp BlueTCM (ZF) / E-Shifter / Cluster
F79 –10 Amp RedICS / HVAC / SCCM/ EPB SW
F80 ––Not Populated
F81 ––Not Populated
F82 ––Not Populated
F83 20 Amp Blue
–TT Park Lights *
30 Amp Pink –Headlamp Washer Pump *
F84 30 Amp Pink –Drive Train Control MOD *
F85 –20 Amp Yellow Cigar Lighter
F86 ––Not Populated
F87 ––Not Populated
F88 –20 Amp Yellow Front Heated Seats *
F89 –20 Amp Yellow Rear Heated Seats *
F90 ––Not Populated
Cavity
Cartridge Fuse Blade FuseDescription
*If Equipped
23_RUP_OM_EN_USC_t.book Page 280
Page 283 of 328

SERVICING AND MAINTENANCE281
30 Amp mini fuse is substituted for 25 Amp Circuit Breaker.F91
–15 Amp BlueFront Ventilated Seats/Heated Steering
Wheel *
F92 –5 Amp Tan Security Gateway
F93 ––Not Populated
F94 40 Amp Green –ESC Motor Pump
F95A –10 Amp RedUSB Charge Port — ACC/RUN
F95B –10 Amp Red
Selectable Fuse Location – USB IP (Direct) B+
F96 –10 Amp Red Airbag
F97 –10 Amp Red Airbag
F98 –15 Amp Blue Left HID Headlamp *
F99 30 Amp Pink –Trailer Tow Elect Brake Module *
F100 –10 Amp RedHeadlamp Level / RR Camera / Blindspot /
Humidity SNSR / In Car Temp SNSR / Headlamp SW *
Circuit Breakers
CB1 25 AmpPower Seats (Driver)
CB2 25 Amp *Power Seats (Pass)
CB3 25 AmpFRT PWR Window W/O Door Nodes + RR
PWR Window Lockout
Cavity
Cartridge Fuse Blade FuseDescription
*If Equipped
8
23_RUP_OM_EN_USC_t.book Page 281
Page 290 of 328
288SERVICING AND MAINTENANCE
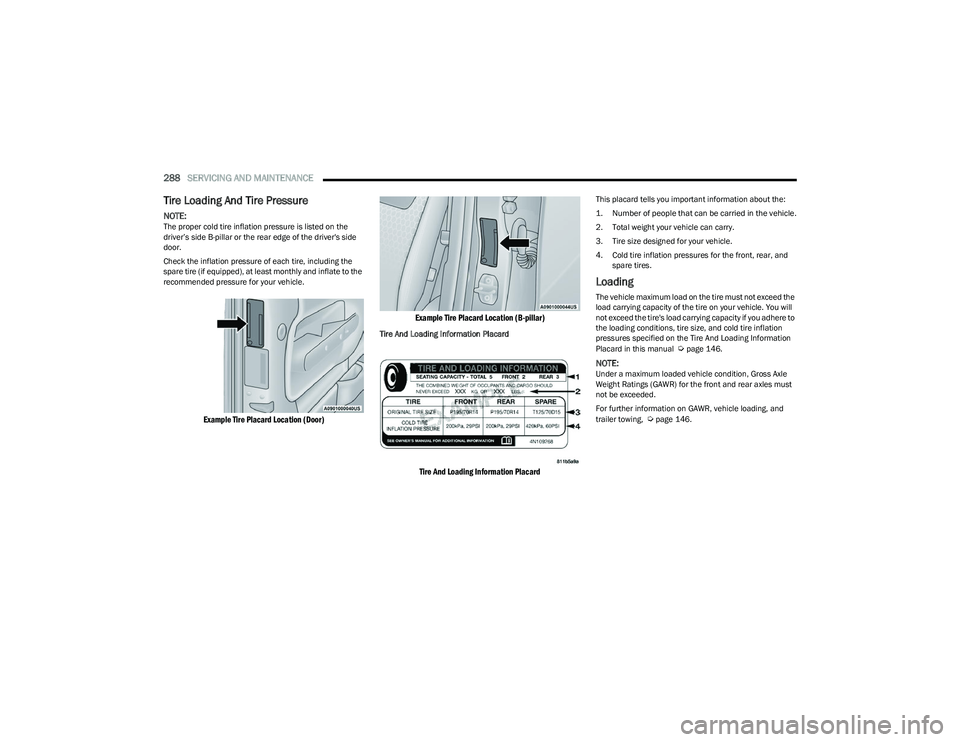
Tire Loading And Tire Pressure
NOTE:The proper cold tire inflation pressure is listed on the
driver’s side B-pillar or the rear edge of the driver's side
door.
Check the inflation pressure of each tire, including the
spare tire (if equipped), at least monthly and inflate to the
recommended pressure for your vehicle.
Example Tire Placard Location (Door) Example Tire Placard Location (B-pillar)
Tire And Loading Information Placard
Tire And Loading Information Placard
This placard tells you important information about the:
1. Number of people that can be carried in the vehicle.
2. Total weight your vehicle can carry.
3. Tire size designed for your vehicle.
4. Cold tire inflation pressures for the front, rear, and
spare tires.
Loading
The vehicle maximum load on the tire must not exceed the
load carrying capacity of the tire on your vehicle. You will
not exceed the tire's load carrying capacity if you adhere to
the loading conditions, tire size, and cold tire inflation
pressures specified on the Tire And Loading Information
Placard in this manual
Úpage 146.
NOTE:Under a maximum loaded vehicle condition, Gross Axle
Weight Ratings (GAWR) for the front and rear axles must
not be exceeded.
For further information on GAWR, vehicle loading, and
trailer towing,
Úpage 146.
23_RUP_OM_EN_USC_t.book Page 288
Page 291 of 328
SERVICING AND MAINTENANCE289
To determine the maximum loading conditions of your
vehicle, locate the statement “The combined weight of
occupants and cargo should never exceed XXX kg or
XXX lbs” on the Tire And Loading Information Placard. The
combined weight of occupants, cargo/luggage and trailer
tongue weight (if applicable) should never exceed the
weight referenced here.
Steps For Determining Correct Load
Limit—
(1) Locate the statement “The combined
weight of occupants and cargo should
never exceed XXX kg or XXX lbs.” on your
vehicle's placard.
(2) Determine the combined weight of
the driver and passengers that will be
riding in your vehicle.
(3) Subtract the combined weight of the
driver and passengers from XXX kg or
XXX lbs. (4) The resulting figure equals the
available amount of cargo and luggage
load capacity. For example, if “XXX”
amount equals 1400 lbs. and there will
be five 150 lb passengers in your
vehicle, the amount of available cargo
and luggage load capacity is 650 lbs.
(1400-750 (5x150) = 650 lbs.)
(5) Determine the combined weight of
luggage and cargo being loaded on the
vehicle. That weight may not safely
exceed the available cargo and luggage
load capacity calculated in Step 4.
(6) If your vehicle will be towing a trailer,
load from your trailer will be transferred
to your vehicle. Consult this manual to
determine how this reduces the
available cargo and luggage load
capacity of your vehicle.
Metric Example For Load Limit
For example, if “XXX” amount equals 635 kg and there will
be five 68 kg passengers in your vehicle, the amount of
available cargo and luggage load capacity is 295 kg
(635-340 (5x68) = 295 kg) as shown in step 4.
NOTE:
If your vehicle will be towing a trailer, load from your
trailer will be transferred to your vehicle. The following
table shows examples on how to calculate total load,
cargo/luggage, and towing capacities of your vehicle
with varying seating configurations and number and
size of occupants. This table is for illustration purposes
only and may not be accurate for the seating and load
carry capacity of your vehicle.
For the following example, the combined weight of
occupants and cargo should never exceed 865 lbs
(392 kg).
8
23_RUP_OM_EN_USC_t.book Page 289
Page 294 of 328
292SERVICING AND MAINTENANCE
Check tire pressures more often if subject to a wide range
of outdoor temperatures, as tire pressures vary with
temperature changes.
Tire pressures change by approximately 1 psi (7 kPa) per
12°F (7°C) of air temperature change. Keep this in mind
when checking tire pressure inside a garage, especially in
the Winter.
Example: If garage temperature = 68°F (20°C) and the
outside temperature = 32°F (0°C) then the cold tire
inflation pressure should be increased by 3 psi (21 kPa),
which equals 1 psi (7 kPa) for every 12°F (7°C) for this
outside temperature condition.
Tire pressure may increase from 2 to 6 psi (13 to 40 kPa)
during operation. DO NOT reduce this normal pressure
build-up or your tire pressure will be too low.
Tire Pressures For High Speed Operation
The manufacturer advocates driving at safe speeds and
within posted speed limits. Where speed limits or
conditions are such that the vehicle can be driven at high
speeds, maintaining correct tire inflation pressure is very
important. Increased tire pressure and reduced vehicle
loading may be required for high-speed vehicle operation.
Refer to an authorized tire dealer or original equipment
vehicle dealer for recommended safe operating speeds,
loading and cold tire inflation pressures.
Radial Ply Tires
Tire Repair
If your tire becomes damaged, it may be repaired if it
meets the following criteria:
The tire has not been driven on when flat.
The damage is only on the tread section of your tire
(sidewall damage is not repairable).
The puncture is no greater than ¼ of an inch (6 mm).
Consult an authorized tire dealer for tire repairs and
additional information.
Damaged Run Flat tires, or Run Flat tires that have
experienced a loss of pressure should be replaced
immediately with another Run Flat tire of identical size and
service description (Load Index and Speed Symbol).
Replace the tire pressure sensor as well as it is not
designed to be reused.
Run Flat Tires — If Equipped
Run Flat tires allow you the capability to drive 50 miles
(80 km) at 50 mph (80 km/h) after a rapid loss of inflation
pressure. This rapid loss of inflation is referred to as the
Run Flat mode. A Run Flat mode occurs when the tire
inflation pressure is of/or below 14 psi (96 kPa). Once a
Run Flat tire reaches the Run Flat mode it has limited
driving capabilities and needs to be replaced immediately.
A Run Flat tire is not repairable. When a Run Flat tire is
changed after being driven in the Run Flat mode 14 psi
(96 kPa) condition, please replace the TPMS sensor as it
is not designed to be reused.
NOTE:TPMS sensor must be replaced after driving the vehicle on
a flat tire condition.
It is not recommended driving a vehicle loaded at full
capacity or to tow a trailer while a tire is in the Run Flat
mode
Úpage 197.
Tire Spinning
When stuck in mud, sand, snow, or ice conditions, do not
spin your vehicle's wheels above 30 mph (48 km/h) or for
longer than 30 seconds continuously without stopping.
WARNING!
High speed driving with your vehicle under maximum
load is dangerous. The added strain on your tires could
cause them to fail. You could have a serious collision.
Do not drive a vehicle loaded to the maximum capacity
at continuous speeds above 75 mph (120 km/h).
WARNING!
Combining radial ply tires with other types of tires on
your vehicle will cause your vehicle to handle poorly.
The instability could cause a collision. Always use radial
ply tires in sets of four. Never combine them with other
types of tires.
WARNING!
Fast spinning tires can be dangerous. Forces generated
by excessive wheel speeds may cause tire damage or
failure. A tire could explode and injure someone. Do not
spin your vehicle's wheels faster than 30 mph
(48 km/h) for more than 30 seconds continuously
when you are stuck, and do not let anyone near a
spinning wheel, no matter what the speed.
23_RUP_OM_EN_USC_t.book Page 292
Page 297 of 328
SERVICING AND MAINTENANCE295
SPARE TIRES — IF EQUIPPED
NOTE:For vehicles equipped with Tire Service Kit instead of a
spare tire Úpage 245.
For restrictions when towing with a spare tire designated
for temporary emergency use
Úpage 152.
Spare Tire Matching Original Equipped Tire
And Wheel — If Equipped
Your vehicle may be equipped with a spare tire and wheel
equivalent in look and function to the original equipment
tire and wheel found on the front or rear axle of your
vehicle. This spare tire may be used in the tire rotation for
your vehicle. If your vehicle has this option, refer to an
authorized tire dealer for the recommended tire rotation
pattern.
Compact Spare Tire — If Equipped
The compact spare is for temporary emergency use only.
You can identify if your vehicle is equipped with a compact
spare by looking at the spare tire description on the Tire
And Loading Information Placard located on the driver’s
side door opening or on the sidewall of the tire. Compact
spare tire descriptions begin with the letter “T” or “S”
preceding the size designation. Example: T145/80D18
103M.
T, S = Temporary Spare Tire
Since this tire has limited tread life, the original equipment
tire should be repaired (or replaced) and reinstalled on
your vehicle at the first opportunity.
Do not install a wheel cover or attempt to mount a
conventional tire on the compact spare wheel, since the
wheel is designed specifically for the compact spare tire.
Do not install more than one compact spare tire and wheel
on the vehicle at any given time.
Collapsible Spare Tire — If Equipped
The collapsible spare is for temporary emergency use only.
You can identify if your vehicle is equipped with a
collapsible spare by looking at the spare tire description
on the Tire And Loading Information Placard located on
the driver’s side door opening or on the sidewall of the tire.
Collapsible spare tire description example: 165/80-17
101P.
Since this tire has limited tread life, the original equipment
tire should be repaired (or replaced) and reinstalled on
your vehicle at the first opportunity.
Inflate collapsible tire only after the wheel is properly
installed to the vehicle. Inflate the collapsible tire using
the electric air pump before lowering the vehicle.
Do not install a wheel cover or attempt to mount a
conventional tire on the collapsible spare wheel, since the
wheel is designed specifically for the collapsible spare tire.
CAUTION!
Because of the reduced ground clearance, do not take
your vehicle through an automatic car wash with a
compact or limited use temporary spare installed.
Damage to the vehicle may result.
WARNING!
Compact and collapsible spares are for temporary
emergency use only. With these spares, do not drive
more than 50 mph (80 km/h). Temporary use spares have limited tread life. When the tread is worn to the
tread wear indicators, the temporary use spare tire
needs to be replaced. Be sure to follow the warnings,
which apply to your spare. Failure to do so could result
in spare tire failure and loss of vehicle control.
8
23_RUP_OM_EN_USC_t.book Page 295
Page 304 of 328
302SERVICING AND MAINTENANCE
Cleaning Plastic Instrument Cluster
Lenses
The lenses in front of the instruments in this vehicle are
molded in clear plastic. When cleaning the lenses, care
must be taken to avoid scratching the plastic.
Clean with a wet soft cloth. A mild soap solution may be
used, but do not use high alcohol content or abrasive
cleaners. If soap is used, wipe clean with a clean damp
cloth. Dry with a soft cloth.
LEATHER SURFACES
Mopar® Total Clean is specifically recommended for
leather upholstery.
Your leather upholstery can be best preserved by regular
cleaning with a damp soft cloth. Small particles of dirt can
act as an abrasive and damage the leather upholstery and
should be removed promptly with a damp cloth. Stubborn
soils can be removed easily with a soft cloth and Mopar®
Total Clean. Care should be taken to avoid soaking your
leather upholstery with any liquid. Please do not use
polishes, oils, cleaning fluids, solvents, detergents, or
ammonia-based cleaners to clean your leather upholstery.
NOTE:If equipped with light colored leather, it tends to show any
foreign material, dirt, and fabric dye transfer more so than
darker colors. The leather is designed for easy cleaning,
and the manufacturer recommends Mopar® total care
leather cleaner applied on a cloth to clean the leather
seats as needed.
GLASS SURFACES
All glass surfaces should be cleaned on a regular basis
with Mopar® Glass Cleaner, or any commercial
household-type glass cleaner. Never use an abrasive type
cleaner. Use caution when cleaning the inside rear
window equipped with electric defrosters or windows
equipped with radio antennas. Do not use scrapers or
other sharp instruments that may scratch the elements.
When cleaning the rearview mirror, spray cleaner on the
towel or cloth that you are using. Do not spray cleaner
directly on the mirror.
CAUTION!
Do not use alcohol and alcohol-based and/or
ketone-based cleaning products to clean leather seats,
as damage to the seat may result.
23_RUP_OM_EN_USC_t.book Page 302