2023 CHRYSLER PACIFICA HYBRID tow
[x] Cancel search: towPage 258 of 328
256IN CASE OF EMERGENCY
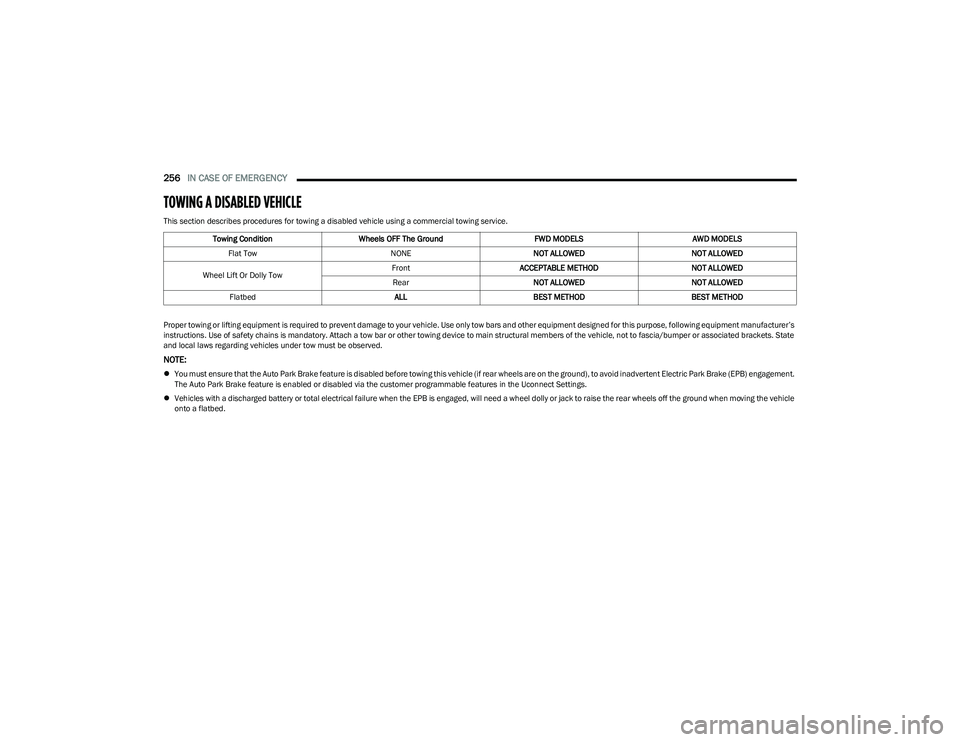
TOWING A DISABLED VEHICLE
This section describes procedures for towing a disabled vehicle using a commercial towing service.
Proper towing or lifting equipment is required to prevent damage to your vehicle. Use only tow bars and other equipment designed for this purpose, following equipment manufacturer’s
instructions. Use of safety chains is mandatory. Attach a tow bar or other towing device to main structural members of the vehicle, not to fascia/bumper or associated brackets. State
and local laws regarding vehicles under tow must be observed.
NOTE:
You must ensure that the Auto Park Brake feature is disabled before towing this vehicle (if rear wheels are on the ground), to avoid inadvertent Electric Park Brake (EPB) engagement.
The Auto Park Brake feature is enabled or disabled via the customer programmable features in the Uconnect Settings.
Vehicles with a discharged battery or total electrical failure when the EPB is engaged, will need a wheel dolly or jack to raise the rear wheels off the ground when moving the vehicle
onto a flatbed. Towing Condition
Wheels OFF The Ground FWD MODELS AWD MODELS
Flat Tow NONENOT ALLOWED NOT ALLOWED
Wheel Lift Or Dolly Tow Front
ACCEPTABLE METHOD NOT ALLOWED
Rear NOT ALLOWED NOT ALLOWED
Flatbed ALLBEST METHOD BEST METHOD
23_RUP_OM_EN_USC_t.book Page 256
Page 259 of 328
IN CASE OF EMERGENCY257
(Continued)
FCA US LLC recommends towing your vehicle with all four
wheels
OFF the ground using a flatbed.
If flatbed equipment is not available, this vehicle must be
towed with the front wheels OFF the ground (using a
towing dolly, or wheel lift equipment with the front wheels
raised).
NOTE:Ensure that the Electric Park Brake is released, and
remains released, while being towed.
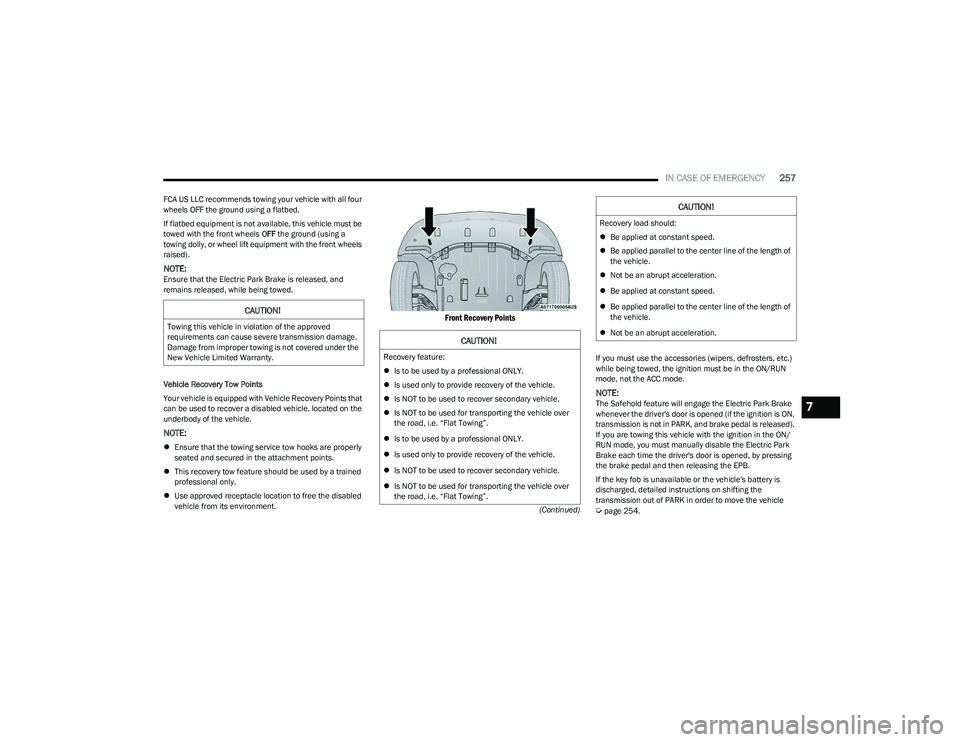
Vehicle Recovery Tow Points
Your vehicle is equipped with Vehicle Recovery Points that
can be used to recover a disabled vehicle, located on the
underbody of the vehicle.
NOTE:
Ensure that the towing service tow hooks are properly
seated and secured in the attachment points.
This recovery tow feature should be used by a trained
professional only.
Use approved receptacle location to free the disabled
vehicle from its environment.
Front Recovery Points
If you must use the accessories (wipers, defrosters, etc.)
while being towed, the ignition must be in the ON/RUN
mode, not the ACC mode.
NOTE:The Safehold feature will engage the Electric Park Brake
whenever the driver's door is opened (if the ignition is ON,
transmission is not in PARK, and brake pedal is released).
If you are towing this vehicle with the ignition in the ON/
RUN mode, you must manually disable the Electric Park
Brake each time the driver's door is opened, by pressing
the brake pedal and then releasing the EPB.
If the key fob is unavailable or the vehicle's battery is
discharged, detailed instructions on shifting the
transmission out of PARK in order to move the vehicle
Úpage 254.
CAUTION!
Towing this vehicle in violation of the approved
requirements can cause severe transmission damage.
Damage from improper towing is not covered under the
New Vehicle Limited Warranty.
CAUTION!
Recovery feature:
Is to be used by a professional ONLY.
Is used only to provide recovery of the vehicle.
Is NOT to be used to recover secondary vehicle.
Is NOT to be used for transporting the vehicle over
the road, i.e. “Flat Towing”.
Is to be used by a professional ONLY.
Is used only to provide recovery of the vehicle.
Is NOT to be used to recover secondary vehicle.
Is NOT to be used for transporting the vehicle over
the road, i.e. “Flat Towing”.
Recovery load should:
Be applied at constant speed.
Be applied parallel to the center line of the length of
the vehicle.
Not be an abrupt acceleration.
Be applied at constant speed.
Be applied parallel to the center line of the length of
the vehicle.
Not be an abrupt acceleration.
CAUTION!
7
23_RUP_OM_EN_USC_t.book Page 257
Page 260 of 328
258IN CASE OF EMERGENCY
ALL WHEEL DRIVE (AWD) MODELS
FCA US LLC recommends towing your vehicle with all four
wheels OFF the ground using a flatbed.
ENHANCED ACCIDENT RESPONSE SYSTEM
(EARS)
This vehicle is equipped with an Enhanced Accident
Response System.
This feature is a communication network that takes effect
in the event of an impact. Detailed information can be
found on
Úpage 218.
EVENT DATA RECORDER (EDR)
This vehicle is equipped with an event data recorder
(EDR). The main purpose of an EDR is to record data that
will assist in understanding how a vehicle’s systems
performed under certain crash or near crash-like
situations, such as an air bag deployment or hitting a road
obstacle. Detailed information can be found on
Úpage 219.
CAUTION!
Do not use sling-type equipment when towing.
Vehicle damage may occur.
When securing the vehicle to a flatbed truck, do not
attach to front or rear suspension components.
Damage to your vehicle may result from improper
towing.
Ensure that the Electric Park Brake is released, and
remains released, while being towed.
CAUTION!
Towing this vehicle using any other method can
cause severe transmission and/or transfer case
damage.
Damage from improper towing is not covered under
the New Vehicle Limited Warranty.
23_RUP_OM_EN_USC_t.book Page 258
Page 261 of 328

259
SERVICING AND MAINTENANCE
SCHEDULED SERVICING
Your vehicle is equipped with an automatic oil change
indicator system. The oil change indicator system will
remind you that it is time to take your vehicle in for
scheduled maintenance.
Based on engine operation conditions, the oil change
indicator message will illuminate. This means that service
is required for your vehicle. Operating conditions such as
frequent short-trips, trailer towing, extremely hot or cold
ambient temperatures will influence when the “Oil Change
Required” message is displayed. Have your vehicle
serviced as soon as possible, within the next 500 miles
(805 km).An authorized dealer will reset the oil change indicator
message after completing the scheduled oil change. If a
scheduled oil change is performed by someone other than
an authorized dealer Úpage 97.
NOTE:Under no circumstances should oil change intervals
exceed 10,000 miles (16,000 km), 12 months or
350 hours of engine run time, whichever comes first. The
350 hours of engine run or idle time is generally only a
concern for fleet customers.
Once A Month Or Before A Long Trip:
Check engine oil level.
Check windshield washer fluid level.
Check tire pressure and look for unusual wear or
damage. Rotate tires at the first sign of irregular wear,
even if it occurs before the oil indicator system turns
on.
Check the fluid levels of the coolant reservoir and
brake master cylinder, fill as needed.
Check function of all interior and exterior lights.
8
23_RUP_OM_EN_USC_t.book Page 259
Page 265 of 328
SERVICING AND MAINTENANCE263
CHECKING OIL LEVEL
To ensure proper engine lubrication, the engine oil must
be maintained at the correct level. Check the oil level at
regular intervals, such as every fuel stop. The best time to
check the engine oil level is about five minutes after a fully
warmed up engine is shut off.
Checking the oil while the vehicle is on level ground will
improve the accuracy of the oil level readings.
There are four possible dipstick types:
Crosshatched zone.
Crosshatched zone marked SAFE.
Crosshatched zone marked with MIN at the low end of
the range and MAX at the high end of the range.
Crosshatched zone marked with dimples at the MIN
and the MAX ends of the range.
NOTE:Always maintain the oil level within the crosshatch
markings on the dipstick.
Adding 1 qt (1 L) of oil when the reading is at the low end
of the dipstick range will raise the oil level to the high end
of the range marking.
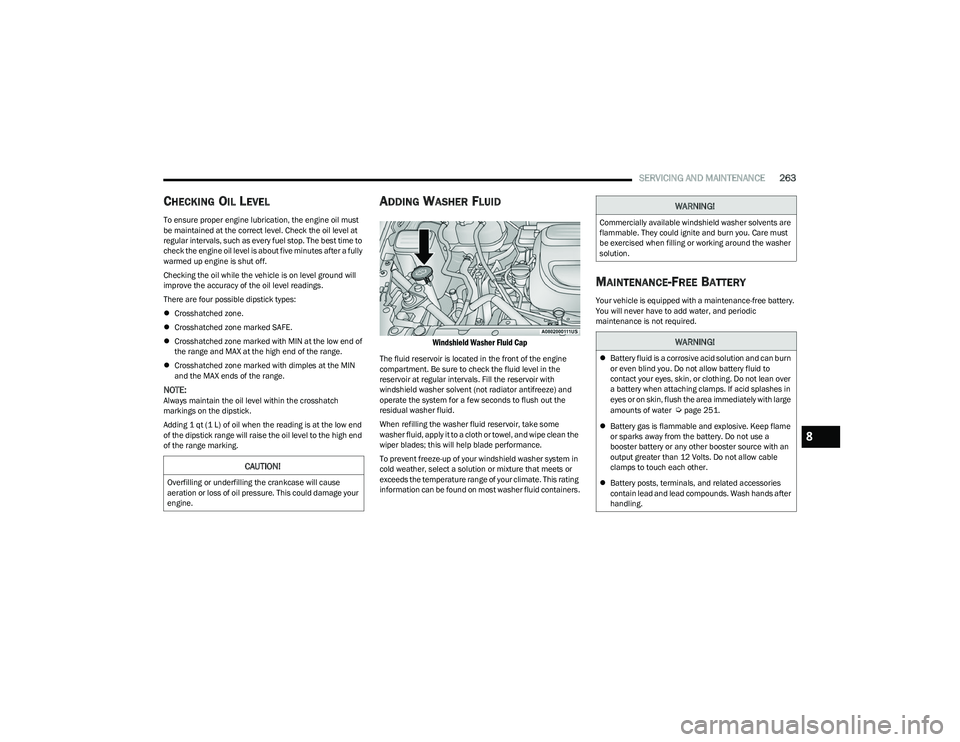
ADDING WASHER FLUID
Windshield Washer Fluid Cap
The fluid reservoir is located in the front of the engine
compartment. Be sure to check the fluid level in the
reservoir at regular intervals. Fill the reservoir with
windshield washer solvent (not radiator antifreeze) and
operate the system for a few seconds to flush out the
residual washer fluid.
When refilling the washer fluid reservoir, take some
washer fluid, apply it to a cloth or towel, and wipe clean the
wiper blades; this will help blade performance.
To prevent freeze-up of your windshield washer system in
cold weather, select a solution or mixture that meets or
exceeds the temperature range of your climate. This rating
information can be found on most washer fluid containers.
MAINTENANCE-FREE BATTERY
Your vehicle is equipped with a maintenance-free battery.
You will never have to add water, and periodic
maintenance is not required.
CAUTION!
Overfilling or underfilling the crankcase will cause
aeration or loss of oil pressure. This could damage your
engine.
WARNING!
Commercially available windshield washer solvents are
flammable. They could ignite and burn you. Care must
be exercised when filling or working around the washer
solution.
WARNING!
Battery fluid is a corrosive acid solution and can burn
or even blind you. Do not allow battery fluid to
contact your eyes, skin, or clothing. Do not lean over
a battery when attaching clamps. If acid splashes in
eyes or on skin, flush the area immediately with large
amounts of water
Úpage 251.
Battery gas is flammable and explosive. Keep flame
or sparks away from the battery. Do not use a
booster battery or any other booster source with an
output greater than 12 Volts. Do not allow cable
clamps to touch each other.
Battery posts, terminals, and related accessories
contain lead and lead compounds. Wash hands after
handling.
8
23_RUP_OM_EN_USC_t.book Page 263
Page 269 of 328
SERVICING AND MAINTENANCE267
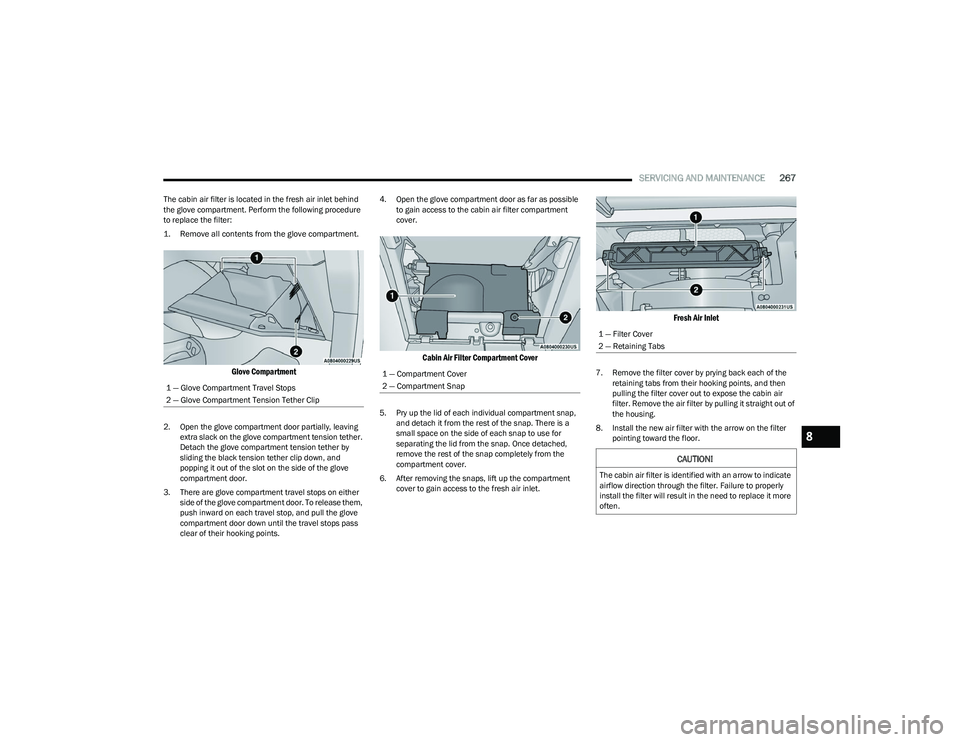
The cabin air filter is located in the fresh air inlet behind
the glove compartment. Perform the following procedure
to replace the filter:
1. Remove all contents from the glove compartment.
Glove Compartment
2. Open the glove compartment door partially, leaving
extra slack on the glove compartment tension tether.
Detach the glove compartment tension tether by
sliding the black tension tether clip down, and
popping it out of the slot on the side of the glove
compartment door.
3. There are glove compartment travel stops on either side of the glove compartment door. To release them,
push inward on each travel stop, and pull the glove
compartment door down until the travel stops pass
clear of their hooking points. 4. Open the glove compartment door as far as possible
to gain access to the cabin air filter compartment
cover.
Cabin Air Filter Compartment Cover
5. Pry up the lid of each individual compartment snap, and detach it from the rest of the snap. There is a
small space on the side of each snap to use for
separating the lid from the snap. Once detached,
remove the rest of the snap completely from the
compartment cover.
6. After removing the snaps, lift up the compartment cover to gain access to the fresh air inlet.
Fresh Air Inlet
7. Remove the filter cover by prying back each of the retaining tabs from their hooking points, and then
pulling the filter cover out to expose the cabin air
filter. Remove the air filter by pulling it straight out of
the housing.
8. Install the new air filter with the arrow on the filter pointing toward the floor.
1 — Glove Compartment Travel Stops
2 — Glove Compartment Tension Tether Clip1 — Compartment Cover
2 — Compartment Snap
1 — Filter Cover
2 — Retaining Tabs
CAUTION!
The cabin air filter is identified with an arrow to indicate
airflow direction through the filter. Failure to properly
install the filter will result in the need to replace it more
often.
8
23_RUP_OM_EN_USC_t.book Page 267
Page 271 of 328
SERVICING AND MAINTENANCE269
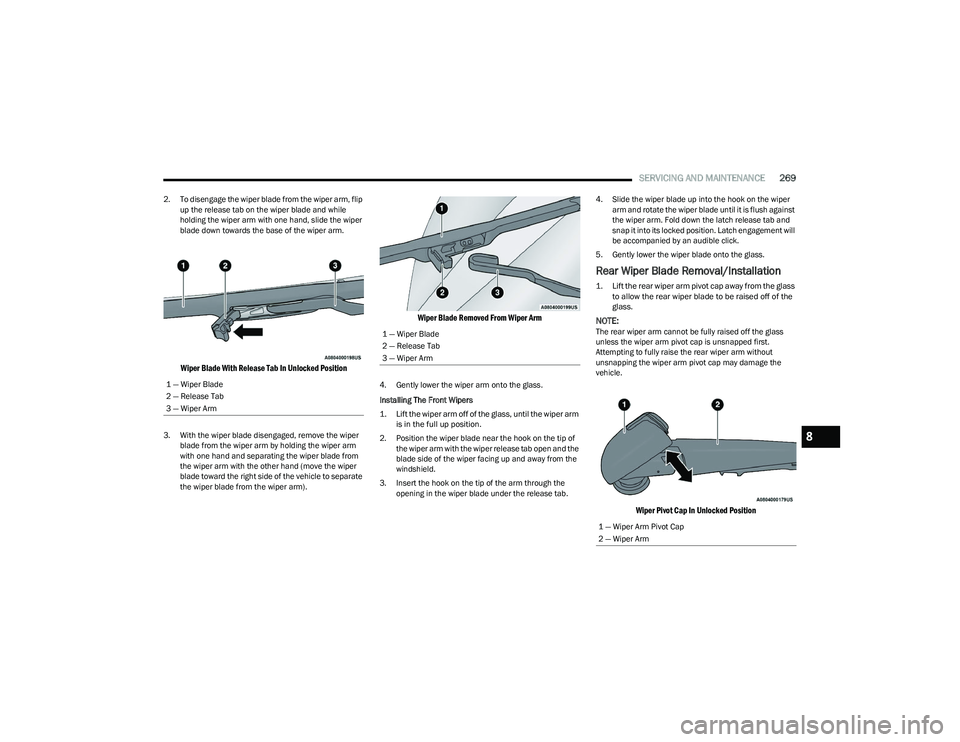
2. To disengage the wiper blade from the wiper arm, flip
up the release tab on the wiper blade and while
holding the wiper arm with one hand, slide the wiper
blade down towards the base of the wiper arm.
Wiper Blade With Release Tab In Unlocked Position
3. With the wiper blade disengaged, remove the wiper blade from the wiper arm by holding the wiper arm
with one hand and separating the wiper blade from
the wiper arm with the other hand (move the wiper
blade toward the right side of the vehicle to separate
the wiper blade from the wiper arm).
Wiper Blade Removed From Wiper Arm
4. Gently lower the wiper arm onto the glass.
Installing The Front Wipers
1. Lift the wiper arm off of the glass, until the wiper arm is in the full up position.
2. Position the wiper blade near the hook on the tip of the wiper arm with the wiper release tab open and the
blade side of the wiper facing up and away from the
windshield.
3. Insert the hook on the tip of the arm through the opening in the wiper blade under the release tab. 4. Slide the wiper blade up into the hook on the wiper
arm and rotate the wiper blade until it is flush against
the wiper arm. Fold down the latch release tab and
snap it into its locked position. Latch engagement will
be accompanied by an audible click.
5. Gently lower the wiper blade onto the glass.
Rear Wiper Blade Removal/Installation
1. Lift the rear wiper arm pivot cap away from the glass to allow the rear wiper blade to be raised off of the
glass.
NOTE:The rear wiper arm cannot be fully raised off the glass
unless the wiper arm pivot cap is unsnapped first.
Attempting to fully raise the rear wiper arm without
unsnapping the wiper arm pivot cap may damage the
vehicle.
Wiper Pivot Cap In Unlocked Position
1 — Wiper Blade
2 — Release Tab
3 — Wiper Arm
1 — Wiper Blade
2 — Release Tab
3 — Wiper Arm
1 — Wiper Arm Pivot Cap
2 — Wiper Arm
8
23_RUP_OM_EN_USC_t.book Page 269
Page 273 of 328
SERVICING AND MAINTENANCE271
Under normal operating conditions, the catalytic converter
will not require maintenance. However, it is important to
keep the engine properly tuned to ensure proper catalyst
operation and prevent possible catalyst damage.
NOTE:Intentional tampering with emissions control systems can
result in civil penalties being assessed against you.
In unusual situations involving grossly malfunctioning
engine operation, a scorching odor may suggest severe
and abnormal catalyst overheating. If this occurs, stop the
vehicle, turn off the engine and allow it to cool. Service,
including a tune-up to the manufacturer specifications,
should be obtained immediately.
To minimize the possibility of catalytic converter damage:
Do not interrupt the ignition when the transmission is
in gear and the vehicle is in motion.
Do not try to start the vehicle by pushing or towing the
vehicle.
Do not idle the engine with any ignition components
disconnected or removed, such as when diagnostic
testing, or for prolonged periods during very rough idle
or malfunctioning operating conditions.
COOLING SYSTEM
Engine Coolant Checks
Check the engine coolant (antifreeze) protection every
12 months (before the onset of freezing weather, where
applicable). If the engine coolant is dirty, the system
should be drained, flushed, and refilled with fresh Organic
Additive Technology (OAT) coolant (conforming to
MS.90032) by an authorized dealer. Check the front of the
A/C condenser for any accumulation of bugs, leaves, etc.
If dirty, clean by gently spraying water from a garden hose
vertically down the face of the condenser.
WARNING!
Exhaust gases can injure or kill. They contain carbon
monoxide (CO), which is colorless and odorless.
Breathing it can make you unconscious and can
eventually poison you
Úpage 233.
A hot exhaust system can start a fire if you park over
materials that can burn, such as grass or leaves, and
those items can come into contact with your exhaust
system. Do not park or operate your vehicle in areas
where your exhaust system can contact anything that
can burn.
CAUTION!
The catalytic converter requires the use of unleaded
fuel only. Leaded gasoline will destroy the effective -
ness of the catalyst as an emissions control device
and may seriously reduce engine performance and
cause serious damage to the engine.
Damage to the catalytic converter can result if your
vehicle is not kept in proper operating condition. In
the event of engine malfunction, particularly
involving engine misfire or other apparent loss of
performance, have your vehicle serviced promptly.
Continued operation of your vehicle with a severe
malfunction could cause the converter to overheat,
resulting in possible damage to the converter and
vehicle.
WARNING!
You or others can be badly burned by hot engine
coolant (antifreeze) or steam from your radiator. If
you see or hear steam coming from under the hood,
do not open the hood until the radiator has had time
to cool. Never open a cooling system pressure cap
when the radiator or coolant bottle is hot.
Keep hands, tools, clothing, and jewelry away from
the radiator cooling fan when the hood is raised. The
fan starts automatically and may start at any time,
whether the engine is running or not.
When working near the radiator cooling fan, discon -
nect the fan motor lead or turn the ignition to the OFF
mode. The fan is temperature controlled and can
start at any time the ignition is in the ON mode.
8
23_RUP_OM_EN_USC_t.book Page 271