2023 CHEVROLET SILVERADO 1500 clock
[x] Cancel search: clockPage 97 of 463
Chevrolet Silverado 1500 Owner Manual (GMNA-Localizing-U.S./Canada/
Mexico/Paraguay-16515119) - 2023 - CRC - 6/2/22
96 Storage
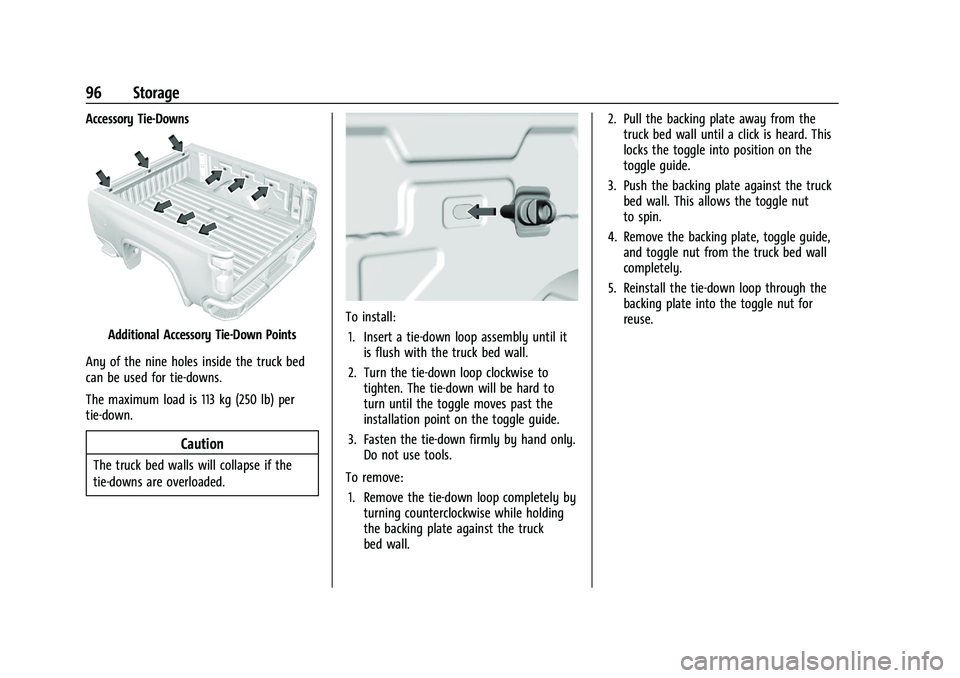
Accessory Tie-Downs
Additional Accessory Tie-Down Points
Any of the nine holes inside the truck bed
can be used for tie-downs.
The maximum load is 113 kg (250 lb) per
tie-down.
Caution
The truck bed walls will collapse if the
tie-downs are overloaded.
To install: 1. Insert a tie-down loop assembly until it is flush with the truck bed wall.
2. Turn the tie-down loop clockwise to tighten. The tie-down will be hard to
turn until the toggle moves past the
installation point on the toggle guide.
3. Fasten the tie-down firmly by hand only. Do not use tools.
To remove: 1. Remove the tie-down loop completely by turning counterclockwise while holding
the backing plate against the truck
bed wall. 2. Pull the backing plate away from the
truck bed wall until a click is heard. This
locks the toggle into position on the
toggle guide.
3. Push the backing plate against the truck bed wall. This allows the toggle nut
to spin.
4. Remove the backing plate, toggle guide, and toggle nut from the truck bed wall
completely.
5. Reinstall the tie-down loop through the backing plate into the toggle nut for
reuse.
Page 98 of 463

Chevrolet Silverado 1500 Owner Manual (GMNA-Localizing-U.S./Canada/
Mexico/Paraguay-16515119) - 2023 - CRC - 6/2/22
Instruments and Controls 97
Instruments and Controls
Controls
Steering Wheel Adjustment . . . . . . . . . . . . 98
Heated Steering Wheel . . . . . . . . . . . . . . . . . 99
Horn . . . . . . . . . . . . . . . . . . . . . . . . . . . . . . . . . . . 99
Windshield Wiper/Washer . . . . . . . . . . . . . 99
Compass . . . . . . . . . . . . . . . . . . . . . . . . . . . . . . 100
Clock . . . . . . . . . . . . . . . . . . . . . . . . . . . . . . . . . . 100
Power Outlets . . . . . . . . . . . . . . . . . . . . . . . . . 101
Wireless Charging . . . . . . . . . . . . . . . . . . . . . 103
Warning Lights, Gauges, and Indicators
Warning Lights, Gauges, andIndicators . . . . . . . . . . . . . . . . . . . . . . . . . . . . 105
Instrument Cluster (Base Level) . . . . . . . . 106
Instrument Cluster (Uplevel) . . . . . . . . . . . 107
Speedometer . . . . . . . . . . . . . . . . . . . . . . . . . . 110
Odometer . . . . . . . . . . . . . . . . . . . . . . . . . . . . . . 110
Trip Odometer . . . . . . . . . . . . . . . . . . . . . . . . . 110
Tachometer . . . . . . . . . . . . . . . . . . . . . . . . . . . . 110
Fuel Gauge . . . . . . . . . . . . . . . . . . . . . . . . . . . . 110
Engine Oil Pressure Gauge . . . . . . . . . . . . . 111
Engine Coolant Temperature Gauge . . . . 112
Transmission Temperature Gauge (Uplevel only) . . . . . . . . . . . . . . . . . . . . . . . . 113
Voltmeter Gauge . . . . . . . . . . . . . . . . . . . . . . . 113
Seat Belt Reminders . . . . . . . . . . . . . . . . . . . 114
Airbag Readiness Light . . . . . . . . . . . . . . . . . 115
Passenger Airbag Status Indicator . . . . . . 115 Charging System Light . . . . . . . . . . . . . . . . . 116
Malfunction Indicator Lamp (Check
Engine Light) . . . . . . . . . . . . . . . . . . . . . . . . . 116
Brake System Warning Light . . . . . . . . . . . 118
Electric Parking Brake Light . . . . . . . . . . . . 118
Service Electric Parking Brake Light . . . . 119
Antilock Brake System (ABS) Warning Light . . . . . . . . . . . . . . . . . . . . . . . . . . . . . . . . . 119
Four-Wheel-Drive Light . . . . . . . . . . . . . . . . . 119
Tow/Haul Mode Light . . . . . . . . . . . . . . . . . 120
Hill Descent Control Light . . . . . . . . . . . . . 120
Lane Keep Assist (LKA) Light . . . . . . . . . . . 120
Automatic Emergency Braking (AEB) Disabled Light . . . . . . . . . . . . . . . . . . . . . . . 120
Vehicle Ahead Indicator . . . . . . . . . . . . . . . . 121
Pedestrian Ahead Indicator . . . . . . . . . . . . . 121
Traction Off Light . . . . . . . . . . . . . . . . . . . . . . 121
StabiliTrak OFF Light . . . . . . . . . . . . . . . . . . . 121
Traction Control System (TCS)/ StabiliTrak Light . . . . . . . . . . . . . . . . . . . . . . 122
Engine Coolant Temperature Warning Light . . . . . . . . . . . . . . . . . . . . . . . . . . . . . . . . . 122
Driver Mode Control Light . . . . . . . . . . . . . 122
Tire Pressure Light . . . . . . . . . . . . . . . . . . . . . 123
Engine Oil Pressure Light (Uplevel Cluster) . . . . . . . . . . . . . . . . . . . . . . . . . . . . . . 123
Low Fuel Warning Light . . . . . . . . . . . . . . . 124
Security Light . . . . . . . . . . . . . . . . . . . . . . . . . . 124
High-Beam On Light . . . . . . . . . . . . . . . . . . . 124
Front Fog Lamp Light . . . . . . . . . . . . . . . . . . 125 Lamps On Reminder . . . . . . . . . . . . . . . . . . . 125
Cruise Control Light . . . . . . . . . . . . . . . . . . . . 125
Door Ajar Light . . . . . . . . . . . . . . . . . . . . . . . . 126
Information Displays
Driver Information Center (DIC) (Base
Level) . . . . . . . . . . . . . . . . . . . . . . . . . . . . . . . . 126
Driver Information Center (DIC) (Uplevel) . . . . . . . . . . . . . . . . . . . . . . . . . . . . . 127
Head-Up Display (HUD) . . . . . . . . . . . . . . . . 129
Vehicle Messages
Vehicle Messages . . . . . . . . . . . . . . . . . . . . . . 133
Engine Power Messages . . . . . . . . . . . . . . . 133
Vehicle Speed Messages . . . . . . . . . . . . . . . 134
Universal Remote System
Universal Remote System . . . . . . . . . . . . . . 134
Universal Remote System Programming . . . . . . . . . . . . . . . . . . . . . . . . 134
Universal Remote System Operation . . . 136
Page 101 of 463
Chevrolet Silverado 1500 Owner Manual (GMNA-Localizing-U.S./Canada/
Mexico/Paraguay-16515119) - 2023 - CRC - 6/2/22
100 Instruments and Controls
L:PressLon the windshield wiper
control to spray windshield washer fluid and
activate the wipers. The front 360 degree
viewing camera will also be washed,
if equipped. The wipers will continue until
Lis released or the maximum wash time
is reached. When
Lis released, additional
wipes may occur depending on how long
the windshield washer had been activated.
See Washer Fluid 0348 for information on
filling the windshield washer fluid reservoir.
Clear snow and ice from the wiper blades
before using them. If frozen to the
windshield, carefully loosen or thaw them.
Damaged blades should be replaced. See
Wiper Blade Replacement 0355.
Heavy snow or ice can overload the wiper
motor.
{Warning
In freezing weather, do not use the
washer until the windshield is warmed.
Otherwise the washer fluid can form ice
on the windshield, blocking your vision.
{Warning
Before driving the vehicle, always clear
snow and ice from the hood, windshield,
washer nozzles, roof, and rear of the
vehicle, including all lamps and windows.
Reduced visibility from snow and ice
buildup could lead to a crash.
Wipe Parking
If the ignition is turned off while the wipers
are on LO, HI, or
3, they will
immediately stop.
If the windshield wiper control is ON then
moved to OFF before the driver door is
opened or within 10 minutes, the wipers will
restart and move to the base of the
windshield.
If the ignition is turned off while the wipers
are performing wipes due to windshield
washing, the wipers continue to run until
they reach the base of the windshield.
Compass
The vehicle may have a compass display on
the Driver Information Center (DIC). The
compass receives its heading and other
information from the Global Positioning
System (GPS) antenna, Electronic Stability
Control (ESC), and vehicle speed information.
The compass system is designed to operate
for a certain number of miles or degrees of
turn before needing a signal from the GPS
satellites. When the compass display shows
CAL, drive the vehicle for a short distance in
an open area where it can receive a GPS
signal. The compass system will
automatically determine when a GPS signal
is restored and provide a heading again.
Clock
Set the time and date using the
infotainment system. See "Time/Date" under
Settings (Uplevel Radio) 0177 or
Settings (Base Radio) 0175.
Page 176 of 463
Chevrolet Silverado 1500 Owner Manual (GMNA-Localizing-U.S./Canada/
Mexico/Paraguay-16515119) - 2023 - CRC - 6/2/22
Infotainment System 175
3. Touch Phones.
4. Touch Option on the phone card to showthe cell phone’s or mobile device’s
settings.
5. Turn off Apple CarPlay or Android Auto.
Press
{on the center stack to return to the
Home Page.
Features are subject to change. For further
information on how to set up Android Auto
and Apple CarPlay in the vehicle, visit your
brand website. See Online Account0432 for
details.
Android Auto is provided by Google and is
subject to Google’s terms and privacy policy.
Apple CarPlay is provided by Apple and is
subject to Apple’s terms and privacy policy.
Data plan rates apply. For Android Auto
support and to see if your phone is
compatible, see https:/www.android.com/
auto/compatability. For Apple CarPlay
support and to see if your phone is
compatible, see www.apple.com/ios/carplay/
. Apple or Google may change or suspend
availability at any time. Google, Android,
Android Auto, Google Maps, and other
marks are trademarks of Google LLC. Apple
CarPlay is a trademark of Apple Inc. Press
{on the center stack to exit Android
Auto or Apple CarPlay. To enter back into
Android Auto or Apple CarPlay, press and
hold
{on the center stack.
Settings
Settings (Base Radio)
The settings menu may be organized into
three categories. Select the desired category
by touching System, Apps, or Vehicle.
To access the menus:
1. Touch Settings on the Home Page on the infotainment display.
2. Touch the desired category to display a list of available options.
3. Touch to select the desired feature setting.
4. Touch the options on the infotainment display to disable or enable a feature.
5. Touch
zto go to the top level of the
Settings menu.
System
The menu may contain the following:
Time / Date
Allows setting of the clock.
Language
Sets the display language used on the
infotainment display. It may also use the
selected language for voice recognition and
audio feedback.
Phones
Allows connecting to a different cell phone
or mobile device source, disconnect a cell
phone or media device, or delete a cell
phone or media device.
Wi-Fi Networks
Shows connected and available Wi-Fi
networks.
If a 4G LTE data package is not active on the
vehicle, the infotainment system can be
connected to an external protected Wi-Fi
network, such as a mobile device or home
hotspot, to utilize connected services.
Wi-Fi Hotspot
Allows adjustment of different Wi-Fi
features.
Page 179 of 463
Chevrolet Silverado 1500 Owner Manual (GMNA-Localizing-U.S./Canada/
Mexico/Paraguay-16515119) - 2023 - CRC - 6/2/22
178 Infotainment System
Remote Lock, Unlock, and Start
Adjusts different remote lock settings.
Ride Height
Adjusts different ride height settings.
Power Assist Steps
Adjusts different running board settings.
Seating Position
Adjusts different seating position settings.
Suspension
Adjusts different suspension settings.
Trailering
Adjusts different trailering settings.
Apps and Notifications
Shows a list of installed apps and the
permissions used.
Date / Time
Allows setting of the clock.
Display
Allows adjustment of the infotainment
display.
Sounds
Allows adjustment of the infotainment
system sounds.
Users
Modifies the infotainment system’s users.
Accounts
Allows adding or adjusting of the user
accounts.
Privacy
The menu may contain the following:
Location Services
Touch to view the Location Services screen.
App permissions
Touch to view the Permission manager
screen.
GM Privacy Statement
Touch to view the GM Privacy Statement
screen.
Google legal
Touch to view the Google legal screen.
Storage
This menu shows the storage info on the
infotainment system.
Security
This menu allows adjustment of the
infotainment security settings.
System
The menu may contain the following:
Language
This will set the display language used on
the infotainment display.
Keyboard & speech
Touch to change keyboard and speech
settings.
Units
Touch to change units settings.
Reset Options
Touch to change reset settings.
About
Touch to view the infotainment system
software information.
Page 187 of 463
Chevrolet Silverado 1500 Owner Manual (GMNA-Localizing-U.S./Canada/
Mexico/Paraguay-16515119) - 2023 - CRC - 6/2/22
186 Climate Controls
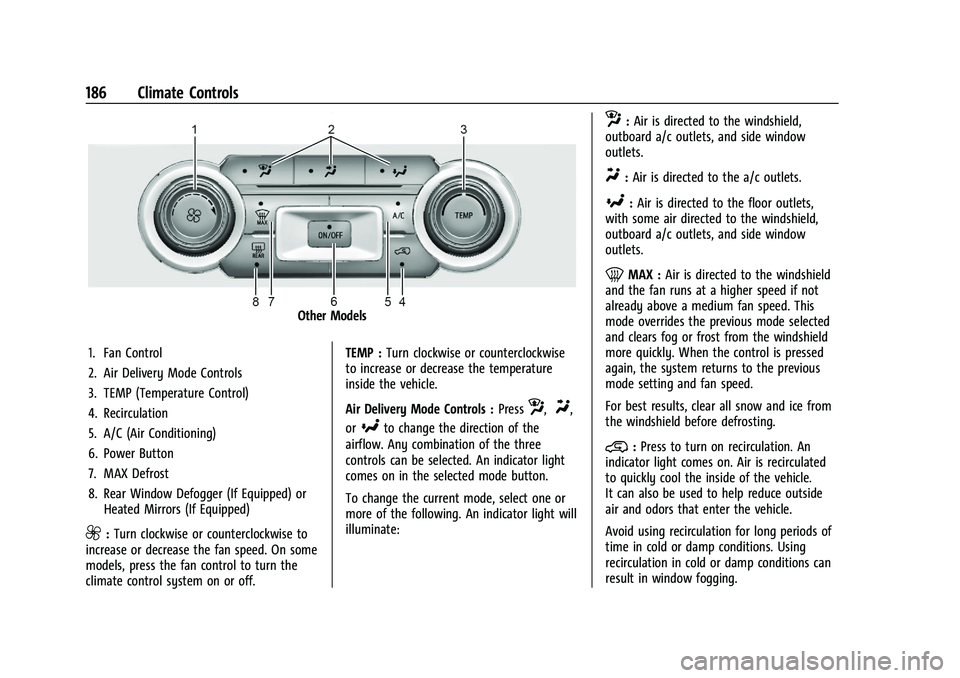
Other Models
1. Fan Control
2. Air Delivery Mode Controls
3. TEMP (Temperature Control)
4. Recirculation
5. A/C (Air Conditioning)
6. Power Button
7. MAX Defrost
8. Rear Window Defogger (If Equipped) or Heated Mirrors (If Equipped)
9:Turn clockwise or counterclockwise to
increase or decrease the fan speed. On some
models, press the fan control to turn the
climate control system on or off. TEMP :
Turn clockwise or counterclockwise
to increase or decrease the temperature
inside the vehicle.
Air Delivery Mode Controls : Press
z,Y,
or
[to change the direction of the
airflow. Any combination of the three
controls can be selected. An indicator light
comes on in the selected mode button.
To change the current mode, select one or
more of the following. An indicator light will
illuminate:
z: Air is directed to the windshield,
outboard a/c outlets, and side window
outlets.
Y: Air is directed to the a/c outlets.
[:Air is directed to the floor outlets,
with some air directed to the windshield,
outboard a/c outlets, and side window
outlets.
0MAX : Air is directed to the windshield
and the fan runs at a higher speed if not
already above a medium fan speed. This
mode overrides the previous mode selected
and clears fog or frost from the windshield
more quickly. When the control is pressed
again, the system returns to the previous
mode setting and fan speed.
For best results, clear all snow and ice from
the windshield before defrosting.
@: Press to turn on recirculation. An
indicator light comes on. Air is recirculated
to quickly cool the inside of the vehicle.
It can also be used to help reduce outside
air and odors that enter the vehicle.
Avoid using recirculation for long periods of
time in cold or damp conditions. Using
recirculation in cold or damp conditions can
result in window fogging.
Page 190 of 463
Chevrolet Silverado 1500 Owner Manual (GMNA-Localizing-U.S./Canada/
Mexico/Paraguay-16515119) - 2023 - CRC - 6/2/22
Climate Controls 189
Driver and Passenger Temperature Control :
The temperature can be adjusted separately
for the driver and passenger.
Turn the knob clockwise or counterclockwise
to increase or decrease the driver or
passenger temperature setting. The driver
side or passenger side temperature display
shows the temperature setting increasing or
decreasing.
SYNC :Press to link the passenger
temperature setting to the driver setting.
The SYNC indicator light will turn on. When
the passenger setting is adjusted, the SYNC
indicator light will turn off.
Air Delivery Mode Control : Press
z,Y,
or
[to change the direction of the
airflow. Any combination of the three
controls can be selected. An indicator light
comes on in the selected mode button.
Changing the mode cancels the automatic
operation and the system goes into manual
mode. Press AUTO to return to automatic
operation.
To change the current mode, select one or
more of the following:
z: Air is directed to the windshield,
outboard A/C outlets, and side window
outlets.
Y: Air is directed to the A/C outlets.
[:Air is directed to the floor outlets,
with some air directed to the windshield,
outboard A/C outlets, and side window
outlets.
0MAX : Air is directed to the windshield
and the fan runs at a higher speed if not
already above a medium fan speed. This
mode overrides the previous mode selected
and clears fog or frost from the windshield
more quickly. When the control is pressed
again, the system returns to the previous
mode setting and fan speed.
For best results, clear all snow and ice from
the windshield before defrosting.
@: Press to turn on recirculation. An
indicator light comes on. Air is recirculated
to quickly cool the inside of the vehicle.
It can also be used to help reduce outside
air and odors that enter the vehicle.
Avoid using recirculation for long periods of
time in cold or damp conditions. Using
recirculation in cold or damp conditions can
result in window fogging. A/C :
Press to turn the air conditioning on
or off. An indicator light comes on to show
that the air conditioning is enabled. If the
fan is turned off, the air conditioner will not
run. The A/C light will stay on even if the
outside temperatures are below freezing.
Rear Window Defogger
1REAR : If equipped, press to turn the
rear window defogger on or off. An indicator
light on the button comes on to show that
the rear window defogger is on.
The rear window defogger only works when
the engine is running. The defogger can be
turned off by turning the vehicle off or to
accessory mode.
If equipped with heated outside mirrors,
press
fto turn them on or off. See Heated
Mirrors 034.
Caution
Using a razor blade or sharp object to
clear the inside rear window can damage
the rear window defogger. Repairs would
not be covered by the vehicle warranty.
Do not clear the inside rear window with
sharp objects.
Page 298 of 463
Chevrolet Silverado 1500 Owner Manual (GMNA-Localizing-U.S./Canada/
Mexico/Paraguay-16515119) - 2023 - CRC - 6/2/22
Driving and Operating 297
{Warning
Attempting to refuel from a portable fuel
container without using the funnel
adapter may cause fuel spillage and
damage the capless fuel system. This
could cause a fire. You or others could be
badly burned and the vehicle could be
damaged.
3. Remove and clean the funnel adapter and return it to the storage location.
Filling the Tank (Chassis Cab
Model)
An arrow on the fuel gauge indicates which
side of the vehicle the fuel door is on. See
Fuel Gauge 0110.
{Warning
Fuel vapors and fuel fires burn violently
and can cause injury or death.
Follow these guidelines to help avoid
injuries to you and others:
.Read and follow all the instructions on
the fuel pump island.
(Continued)
Warning (Continued)
.Turn off the engine when refueling.
.Keep sparks, flames, and smoking
materials away from fuel.
.Do not leave the fuel pump
unattended.
.Avoid using electronic devices while
refueling.
.Do not re-enter the vehicle while
pumping fuel.
.Keep children away from the fuel
pump and never let children
pump fuel.
.Before touching the fill nozzle, touch a
metallic object to discharge static
electricity from your body.
.Fuel can spray out if the fuel cap is
opened too quickly. This spray can
happen if the tank is nearly full, and is
more likely in hot weather. Open the
fuel cap slowly and wait for any hiss
noise to stop, then unscrew the cap all
the way.
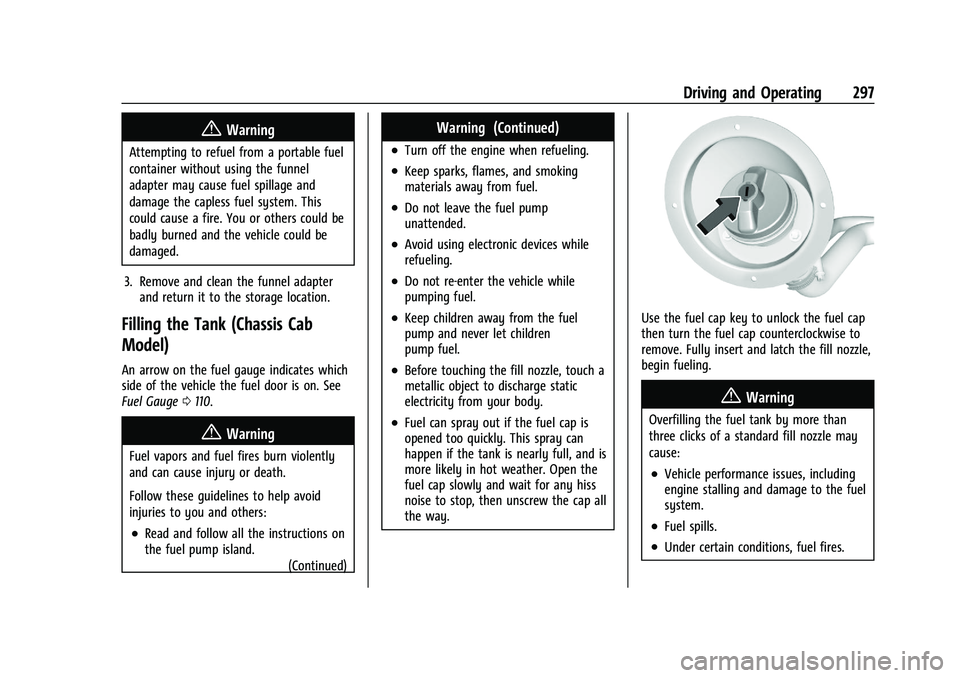
Use the fuel cap key to unlock the fuel cap
then turn the fuel cap counterclockwise to
remove. Fully insert and latch the fill nozzle,
begin fueling.
{Warning
Overfilling the fuel tank by more than
three clicks of a standard fill nozzle may
cause:
.Vehicle performance issues, including
engine stalling and damage to the fuel
system.
.Fuel spills.
.Under certain conditions, fuel fires.