2023 CHEVROLET SILVERADO 1500 speed info
[x] Cancel search: speed infoPage 21 of 463
Chevrolet Silverado 1500 Owner Manual (GMNA-Localizing-U.S./Canada/
Mexico/Paraguay-16515119) - 2023 - CRC - 6/2/22
20 Keys, Doors, and Windows
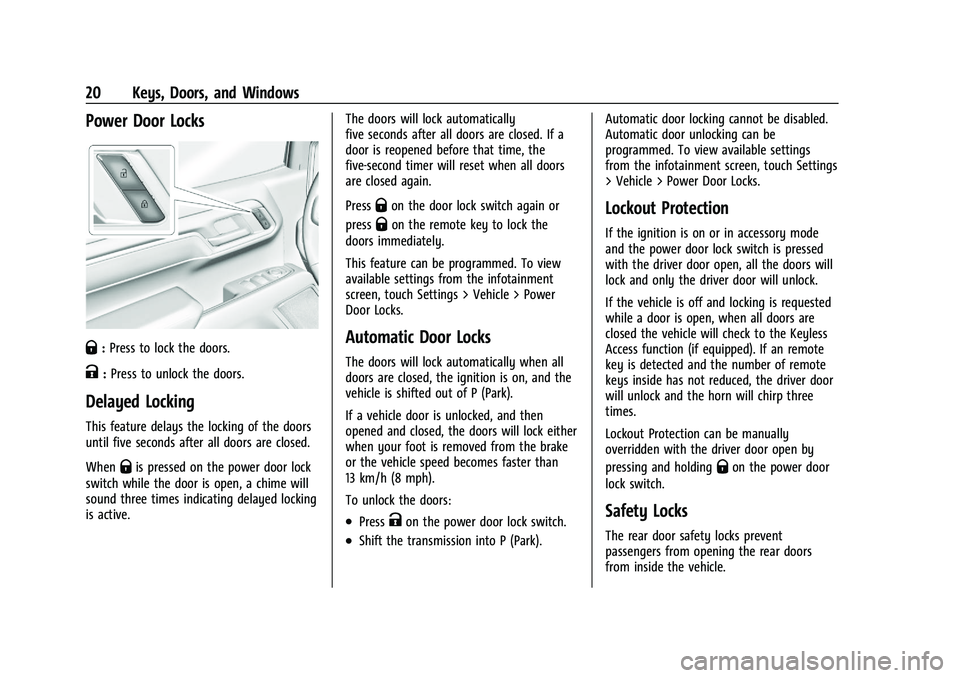
Power Door Locks
Q:Press to lock the doors.
K:Press to unlock the doors.
Delayed Locking
This feature delays the locking of the doors
until five seconds after all doors are closed.
When
Qis pressed on the power door lock
switch while the door is open, a chime will
sound three times indicating delayed locking
is active. The doors will lock automatically
five seconds after all doors are closed. If a
door is reopened before that time, the
five-second timer will reset when all doors
are closed again.
Press
Qon the door lock switch again or
press
Qon the remote key to lock the
doors immediately.
This feature can be programmed. To view
available settings from the infotainment
screen, touch Settings > Vehicle > Power
Door Locks.
Automatic Door Locks
The doors will lock automatically when all
doors are closed, the ignition is on, and the
vehicle is shifted out of P (Park).
If a vehicle door is unlocked, and then
opened and closed, the doors will lock either
when your foot is removed from the brake
or the vehicle speed becomes faster than
13 km/h (8 mph).
To unlock the doors:
.PressKon the power door lock switch.
.Shift the transmission into P (Park). Automatic door locking cannot be disabled.
Automatic door unlocking can be
programmed. To view available settings
from the infotainment screen, touch Settings
> Vehicle > Power Door Locks.
Lockout Protection
If the ignition is on or in accessory mode
and the power door lock switch is pressed
with the driver door open, all the doors will
lock and only the driver door will unlock.
If the vehicle is off and locking is requested
while a door is open, when all doors are
closed the vehicle will check to the Keyless
Access function (if equipped). If an remote
key is detected and the number of remote
keys inside has not reduced, the driver door
will unlock and the horn will chirp three
times.
Lockout Protection can be manually
overridden with the driver door open by
pressing and holding
Qon the power door
lock switch.
Safety Locks
The rear door safety locks prevent
passengers from opening the rear doors
from inside the vehicle.
Page 35 of 463
Chevrolet Silverado 1500 Owner Manual (GMNA-Localizing-U.S./Canada/
Mexico/Paraguay-16515119) - 2023 - CRC - 6/2/22
34 Keys, Doors, and Windows
Resetting the Power Folding Mirrors
Reset the power folding mirrors if:
.The mirrors are accidentally obstructed
while folding.
.The mirrors are accidentally manually
folded/unfolded.
.The mirrors will not stay in the unfolded
position.
.The mirrors vibrate at normal driving
speeds.
Fold and unfold the mirrors one time using
the mirror controls to reset them to their
normal position. A noise may be heard
during the resetting of the power folding
mirrors. This sound is normal after a manual
folding operation.
Remote Mirror Folding
If equipped, press and holdQon the
remote key for approximately one second to
remotely fold the exterior mirrors. Press and
hold
Kon the remote key for
approximately one second to unfold. See
Remote Key Operation 012.
This feature can be turned on or off. To
view available settings from the
infotainment screen, touch Settings >
Vehicle > Comfort and Convenience.
Heated Mirrors
1REAR : If equipped, the rear window
defogger also heats the outside mirrors.
W: If equipped, press to turn the heated
outside mirrors on or off.
See “Rear Window Defogger” underClimate
Control Systems 0185 or
Dual Automatic Climate Control System
0 187.
Automatic Dimming Mirror
If equipped, the driver outside mirror
automatically adjusts for the glare of the
headlamps from behind. This feature comes
on when the vehicle is started.
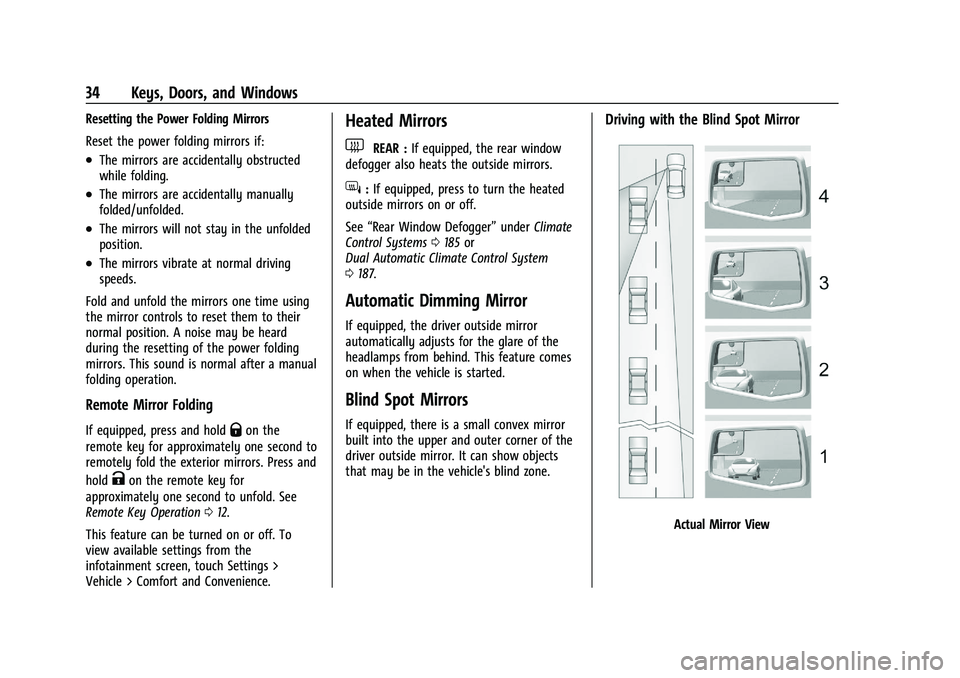
Blind Spot Mirrors
If equipped, there is a small convex mirror
built into the upper and outer corner of the
driver outside mirror. It can show objects
that may be in the vehicle's blind zone.
Driving with the Blind Spot Mirror
Actual Mirror View
Page 36 of 463
Chevrolet Silverado 1500 Owner Manual (GMNA-Localizing-U.S./Canada/
Mexico/Paraguay-16515119) - 2023 - CRC - 6/2/22
Keys, Doors, and Windows 35
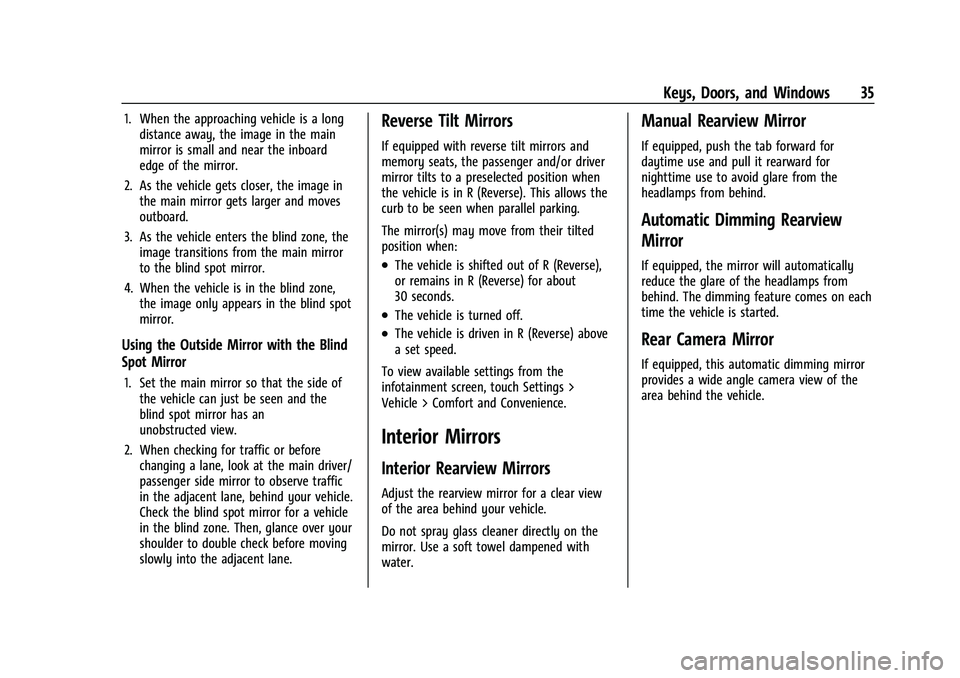
1. When the approaching vehicle is a longdistance away, the image in the main
mirror is small and near the inboard
edge of the mirror.
2. As the vehicle gets closer, the image in the main mirror gets larger and moves
outboard.
3. As the vehicle enters the blind zone, the image transitions from the main mirror
to the blind spot mirror.
4. When the vehicle is in the blind zone, the image only appears in the blind spot
mirror.
Using the Outside Mirror with the Blind
Spot Mirror
1. Set the main mirror so that the side ofthe vehicle can just be seen and the
blind spot mirror has an
unobstructed view.
2. When checking for traffic or before changing a lane, look at the main driver/
passenger side mirror to observe traffic
in the adjacent lane, behind your vehicle.
Check the blind spot mirror for a vehicle
in the blind zone. Then, glance over your
shoulder to double check before moving
slowly into the adjacent lane.
Reverse Tilt Mirrors
If equipped with reverse tilt mirrors and
memory seats, the passenger and/or driver
mirror tilts to a preselected position when
the vehicle is in R (Reverse). This allows the
curb to be seen when parallel parking.
The mirror(s) may move from their tilted
position when:
.The vehicle is shifted out of R (Reverse),
or remains in R (Reverse) for about
30 seconds.
.The vehicle is turned off.
.The vehicle is driven in R (Reverse) above
a set speed.
To view available settings from the
infotainment screen, touch Settings >
Vehicle > Comfort and Convenience.
Interior Mirrors
Interior Rearview Mirrors
Adjust the rearview mirror for a clear view
of the area behind your vehicle.
Do not spray glass cleaner directly on the
mirror. Use a soft towel dampened with
water.
Manual Rearview Mirror
If equipped, push the tab forward for
daytime use and pull it rearward for
nighttime use to avoid glare from the
headlamps from behind.
Automatic Dimming Rearview
Mirror
If equipped, the mirror will automatically
reduce the glare of the headlamps from
behind. The dimming feature comes on each
time the vehicle is started.
Rear Camera Mirror
If equipped, this automatic dimming mirror
provides a wide angle camera view of the
area behind the vehicle.
Page 98 of 463

Chevrolet Silverado 1500 Owner Manual (GMNA-Localizing-U.S./Canada/
Mexico/Paraguay-16515119) - 2023 - CRC - 6/2/22
Instruments and Controls 97
Instruments and Controls
Controls
Steering Wheel Adjustment . . . . . . . . . . . . 98
Heated Steering Wheel . . . . . . . . . . . . . . . . . 99
Horn . . . . . . . . . . . . . . . . . . . . . . . . . . . . . . . . . . . 99
Windshield Wiper/Washer . . . . . . . . . . . . . 99
Compass . . . . . . . . . . . . . . . . . . . . . . . . . . . . . . 100
Clock . . . . . . . . . . . . . . . . . . . . . . . . . . . . . . . . . . 100
Power Outlets . . . . . . . . . . . . . . . . . . . . . . . . . 101
Wireless Charging . . . . . . . . . . . . . . . . . . . . . 103
Warning Lights, Gauges, and Indicators
Warning Lights, Gauges, andIndicators . . . . . . . . . . . . . . . . . . . . . . . . . . . . 105
Instrument Cluster (Base Level) . . . . . . . . 106
Instrument Cluster (Uplevel) . . . . . . . . . . . 107
Speedometer . . . . . . . . . . . . . . . . . . . . . . . . . . 110
Odometer . . . . . . . . . . . . . . . . . . . . . . . . . . . . . . 110
Trip Odometer . . . . . . . . . . . . . . . . . . . . . . . . . 110
Tachometer . . . . . . . . . . . . . . . . . . . . . . . . . . . . 110
Fuel Gauge . . . . . . . . . . . . . . . . . . . . . . . . . . . . 110
Engine Oil Pressure Gauge . . . . . . . . . . . . . 111
Engine Coolant Temperature Gauge . . . . 112
Transmission Temperature Gauge (Uplevel only) . . . . . . . . . . . . . . . . . . . . . . . . 113
Voltmeter Gauge . . . . . . . . . . . . . . . . . . . . . . . 113
Seat Belt Reminders . . . . . . . . . . . . . . . . . . . 114
Airbag Readiness Light . . . . . . . . . . . . . . . . . 115
Passenger Airbag Status Indicator . . . . . . 115 Charging System Light . . . . . . . . . . . . . . . . . 116
Malfunction Indicator Lamp (Check
Engine Light) . . . . . . . . . . . . . . . . . . . . . . . . . 116
Brake System Warning Light . . . . . . . . . . . 118
Electric Parking Brake Light . . . . . . . . . . . . 118
Service Electric Parking Brake Light . . . . 119
Antilock Brake System (ABS) Warning Light . . . . . . . . . . . . . . . . . . . . . . . . . . . . . . . . . 119
Four-Wheel-Drive Light . . . . . . . . . . . . . . . . . 119
Tow/Haul Mode Light . . . . . . . . . . . . . . . . . 120
Hill Descent Control Light . . . . . . . . . . . . . 120
Lane Keep Assist (LKA) Light . . . . . . . . . . . 120
Automatic Emergency Braking (AEB) Disabled Light . . . . . . . . . . . . . . . . . . . . . . . 120
Vehicle Ahead Indicator . . . . . . . . . . . . . . . . 121
Pedestrian Ahead Indicator . . . . . . . . . . . . . 121
Traction Off Light . . . . . . . . . . . . . . . . . . . . . . 121
StabiliTrak OFF Light . . . . . . . . . . . . . . . . . . . 121
Traction Control System (TCS)/ StabiliTrak Light . . . . . . . . . . . . . . . . . . . . . . 122
Engine Coolant Temperature Warning Light . . . . . . . . . . . . . . . . . . . . . . . . . . . . . . . . . 122
Driver Mode Control Light . . . . . . . . . . . . . 122
Tire Pressure Light . . . . . . . . . . . . . . . . . . . . . 123
Engine Oil Pressure Light (Uplevel Cluster) . . . . . . . . . . . . . . . . . . . . . . . . . . . . . . 123
Low Fuel Warning Light . . . . . . . . . . . . . . . 124
Security Light . . . . . . . . . . . . . . . . . . . . . . . . . . 124
High-Beam On Light . . . . . . . . . . . . . . . . . . . 124
Front Fog Lamp Light . . . . . . . . . . . . . . . . . . 125 Lamps On Reminder . . . . . . . . . . . . . . . . . . . 125
Cruise Control Light . . . . . . . . . . . . . . . . . . . . 125
Door Ajar Light . . . . . . . . . . . . . . . . . . . . . . . . 126
Information Displays
Driver Information Center (DIC) (Base
Level) . . . . . . . . . . . . . . . . . . . . . . . . . . . . . . . . 126
Driver Information Center (DIC) (Uplevel) . . . . . . . . . . . . . . . . . . . . . . . . . . . . . 127
Head-Up Display (HUD) . . . . . . . . . . . . . . . . 129
Vehicle Messages
Vehicle Messages . . . . . . . . . . . . . . . . . . . . . . 133
Engine Power Messages . . . . . . . . . . . . . . . 133
Vehicle Speed Messages . . . . . . . . . . . . . . . 134
Universal Remote System
Universal Remote System . . . . . . . . . . . . . . 134
Universal Remote System Programming . . . . . . . . . . . . . . . . . . . . . . . . 134
Universal Remote System Operation . . . 136
Page 101 of 463
Chevrolet Silverado 1500 Owner Manual (GMNA-Localizing-U.S./Canada/
Mexico/Paraguay-16515119) - 2023 - CRC - 6/2/22
100 Instruments and Controls
L:PressLon the windshield wiper
control to spray windshield washer fluid and
activate the wipers. The front 360 degree
viewing camera will also be washed,
if equipped. The wipers will continue until
Lis released or the maximum wash time
is reached. When
Lis released, additional
wipes may occur depending on how long
the windshield washer had been activated.
See Washer Fluid 0348 for information on
filling the windshield washer fluid reservoir.
Clear snow and ice from the wiper blades
before using them. If frozen to the
windshield, carefully loosen or thaw them.
Damaged blades should be replaced. See
Wiper Blade Replacement 0355.
Heavy snow or ice can overload the wiper
motor.
{Warning
In freezing weather, do not use the
washer until the windshield is warmed.
Otherwise the washer fluid can form ice
on the windshield, blocking your vision.
{Warning
Before driving the vehicle, always clear
snow and ice from the hood, windshield,
washer nozzles, roof, and rear of the
vehicle, including all lamps and windows.
Reduced visibility from snow and ice
buildup could lead to a crash.
Wipe Parking
If the ignition is turned off while the wipers
are on LO, HI, or
3, they will
immediately stop.
If the windshield wiper control is ON then
moved to OFF before the driver door is
opened or within 10 minutes, the wipers will
restart and move to the base of the
windshield.
If the ignition is turned off while the wipers
are performing wipes due to windshield
washing, the wipers continue to run until
they reach the base of the windshield.
Compass
The vehicle may have a compass display on
the Driver Information Center (DIC). The
compass receives its heading and other
information from the Global Positioning
System (GPS) antenna, Electronic Stability
Control (ESC), and vehicle speed information.
The compass system is designed to operate
for a certain number of miles or degrees of
turn before needing a signal from the GPS
satellites. When the compass display shows
CAL, drive the vehicle for a short distance in
an open area where it can receive a GPS
signal. The compass system will
automatically determine when a GPS signal
is restored and provide a heading again.
Clock
Set the time and date using the
infotainment system. See "Time/Date" under
Settings (Uplevel Radio) 0177 or
Settings (Base Radio) 0175.
Page 105 of 463
Chevrolet Silverado 1500 Owner Manual (GMNA-Localizing-U.S./Canada/
Mexico/Paraguay-16515119) - 2023 - CRC - 6/2/22
104 Instruments and Controls
2. Remove all objects from the chargingpad. The system may not charge if there
are any objects between the smartphone
and charger.
3. Place the smartphone face up against the rear of the charger.
To maximize the charge rate, ensure the
smartphone is fully seated and centered
in the holder with nothing under it.
A thick smartphone case may prevent
the charger from working, or reduce the
charging performance. See your dealer
for additional information.
4. A green
]will appear on the
infotainment display, next to the phone
icon. This indicates that the smartphone
is detected.
5. If a smartphone is placed on the charger and
]turns off or a yellow triangle
appears, remove the smartphone and
any objects from the pad. Turn the
smartphone 180 degrees and wait a few
seconds before placing/aligning it on the
pad again.
6. If a smartphone is placed on the charger and a red circle appears, the charger
and/or the smartphone is overheated. Remove the smartphone and any objects
from the charger in order to cool the
system.
The smartphone may become warm during
charging. This is normal. In warmer
temperatures, the speed of charging may be
reduced.
For vehicles with wireless phone projection,
the smartphone may overheat during
wireless charging. The smartphone may slow
down, stop charging, or shut down to
protect the battery. The phone may need to
be removed from its case to prevent
overheating. The
]may flash while the
phone is cooling down enough for wireless
charging to automatically resume. This is
normal. Individual phone performance
may vary.
Software Acknowledgements
Certain Wireless Charging Module product
from LG Electronics, Inc. ("LGE") contains the
open source software detailed below. Refer
to the indicated open source licenses (as are
included following this notice) for the terms
and conditions of their use. OSS Notice Information
To obtain the source code that is contained
in this product, please visit https://
opensource.lge.com. In addition to the
source code, all referred license terms,
warranty disclaimers and copyright notices
are available for download. LG Electronics
will also provide open source code to you
on CD-ROM for a charge covering the cost of
performing such distribution (such as the
cost of media, shipping, and handling) upon
email request to [email protected]. This
offer is valid for three (3) years from the
date on which you purchased the product.
Freescale-WCT library
Copyright (c) 2012-2014 Freescale
Semiconductor, Inc.. All rights reserved.
Redistribution and use in source and binary
forms, with or without modification, are
permitted provided that the following
conditions are met:
1. Redistributions of source code must retain the above copyright notice, this
list of conditions and the following
disclaimer.
2. Redistributions in binary form must reproduce the above copyright notice,
this list of conditions and the following
Page 107 of 463
Chevrolet Silverado 1500 Owner Manual (GMNA-Localizing-U.S./Canada/
Mexico/Paraguay-16515119) - 2023 - CRC - 6/2/22
106 Instruments and Controls
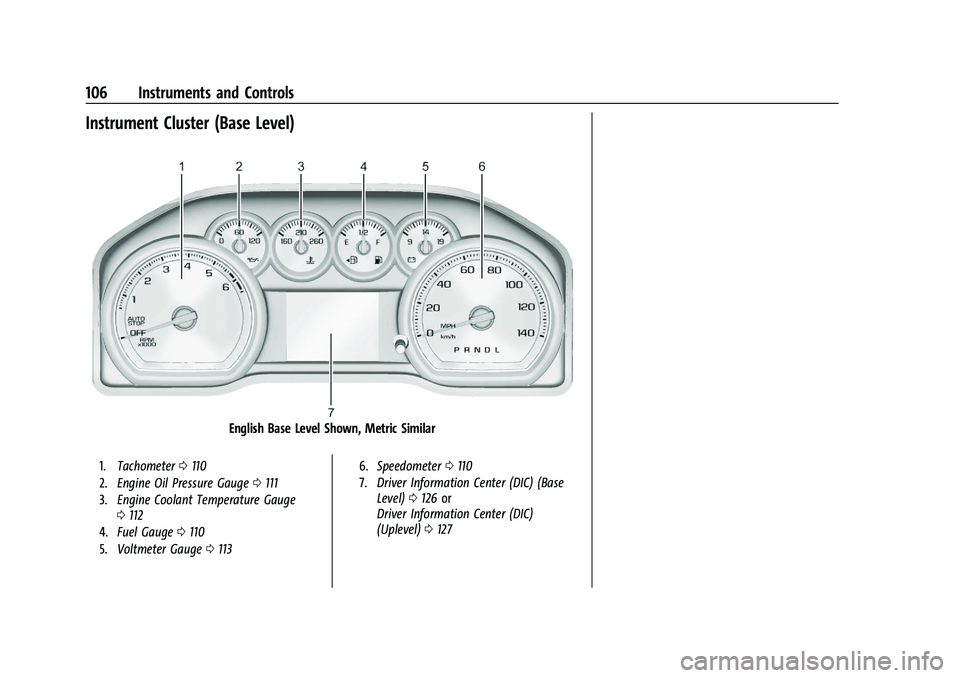
Instrument Cluster (Base Level)
English Base Level Shown, Metric Similar
1.Tachometer 0110
2. Engine Oil Pressure Gauge 0111
3. Engine Coolant Temperature Gauge
0112
4. Fuel Gauge 0110
5. Voltmeter Gauge 0113 6.
Speedometer 0110
7. Driver Information Center (DIC) (Base
Level) 0126 or
Driver Information Center (DIC)
(Uplevel) 0127
Page 108 of 463
Chevrolet Silverado 1500 Owner Manual (GMNA-Localizing-U.S./Canada/
Mexico/Paraguay-16515119) - 2023 - CRC - 6/2/22
Instruments and Controls 107
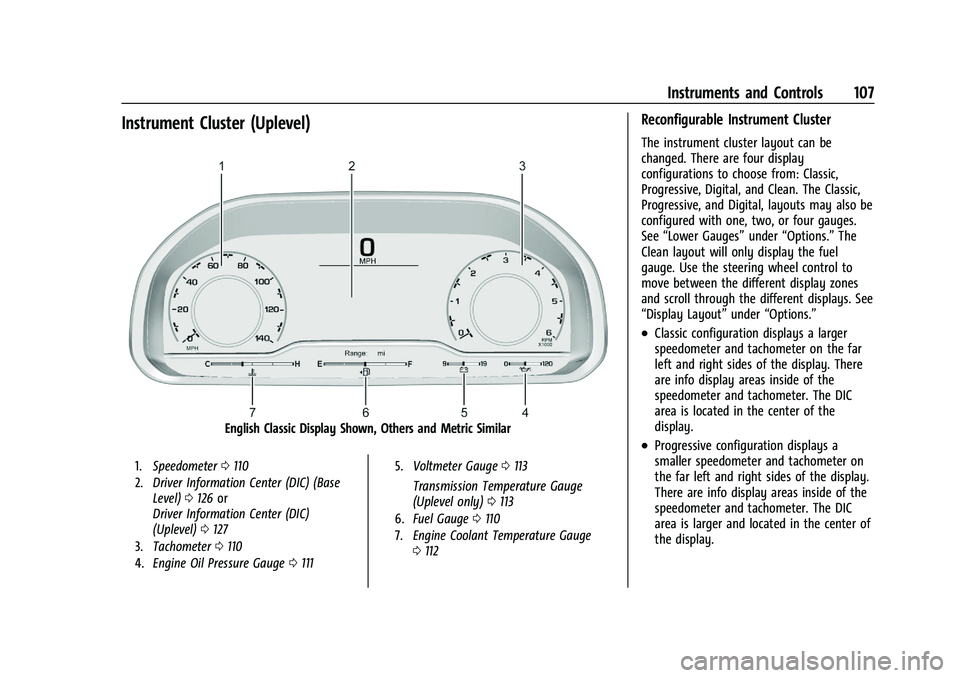
Instrument Cluster (Uplevel)
English Classic Display Shown, Others and Metric Similar
1.Speedometer 0110
2. Driver Information Center (DIC) (Base
Level) 0126 or
Driver Information Center (DIC)
(Uplevel) 0127
3. Tachometer 0110
4. Engine Oil Pressure Gauge 0111 5.
Voltmeter Gauge 0113
Transmission Temperature Gauge
(Uplevel only) 0113
6. Fuel Gauge 0110
7. Engine Coolant Temperature Gauge
0112
Reconfigurable Instrument Cluster
The instrument cluster layout can be
changed. There are four display
configurations to choose from: Classic,
Progressive, Digital, and Clean. The Classic,
Progressive, and Digital, layouts may also be
configured with one, two, or four gauges.
See “Lower Gauges” under“Options.” The
Clean layout will only display the fuel
gauge. Use the steering wheel control to
move between the different display zones
and scroll through the different displays. See
“Display Layout” under“Options.”
.Classic configuration displays a larger
speedometer and tachometer on the far
left and right sides of the display. There
are info display areas inside of the
speedometer and tachometer. The DIC
area is located in the center of the
display.
.Progressive configuration displays a
smaller speedometer and tachometer on
the far left and right sides of the display.
There are info display areas inside of the
speedometer and tachometer. The DIC
area is larger and located in the center of
the display.