2023 CHEVROLET SILVERADO 1500 wheel torque
[x] Cancel search: wheel torquePage 218 of 463
Chevrolet Silverado 1500 Owner Manual (GMNA-Localizing-U.S./Canada/
Mexico/Paraguay-16515119) - 2023 - CRC - 6/2/22
Driving and Operating 217
If you have to leave the vehicle with the
engine running, be sure the vehicle is in
P (Park) and the parking brake is firmly set
before you leave it. After moving the shift
lever into P (Park), hold the regular brake
pedal down. Then, see if you can move the
shift lever away from P (Park) without first
pulling it toward you. If you can, it means
that the shift lever was not fully locked into
P (Park).
Torque Lock
If you are parking on a hill and you do not
shift the transmission into P (Park) properly,
the weight of the vehicle may put too much
force on the parking pawl in the
transmission. You may find it difficult to pull
the shift lever out of P (Park). This is called
torque lock. To prevent torque lock, set the
parking brake and then shift into P (Park)
properly before you leave the driver seat.
When you are ready to drive, move the
shift lever out of P (Park) before you release
the parking brake.
If torque lock does occur, you may need to
have another vehicle push yours a little
uphill to take some of the pressure from theparking pawl in the transmission. You will
then be able to pull the shift lever out of
P (Park).
Shifting Into Park (Electronic
Shifter)
{Warning
Parking on grades with poor traction such
as ice, snow, mud, or gravel may cause
the vehicle to unintentionally move and
could result in injury, death, and/or
vehicle damage. If equipped with
four-wheel drive, use AUTO or 4 (HI) to
provide additional traction. Be sure to
apply the parking brake. See
Electric
Parking Brake 0235 and
Four-Wheel Drive 0230.
{Warning
It can be dangerous to get out of the
vehicle if the shift lever is not fully in
P (Park) with the parking brake firmly set.
The vehicle can roll. If you have left the
engine running, the vehicle can move
suddenly. You or others could be injured.
(Continued)
Warning (Continued)
To be sure the vehicle will not move,
even when you are on fairly level ground,
use the steps that follow. With
four-wheel drive, if the transfer case is in
N (Neutral), the vehicle will be free to
roll, even if the shift lever is in P (Park).
Be sure the transfer case is in a drive
gear. If towing a trailer, seeDriving
Characteristics and Towing Tips 0299.
1. Hold the brake pedal down and set the parking brake. See Electric Parking Brake
0 235.
2. Press the P (Park) switch on the top of the shift lever. See Automatic
Transmission (Electronic Shifter) 0223 or
Automatic Transmission (Mechanical
Shifter) 0220.
3. The P indicator on the shift lever will turn red when the vehicle is in P (Park).
If the vehicle is shifted into P (Park) on a
hill, the Electric Parking Brake (EPB) may
apply automatically. The driver may not be
able to release the EPB using the EPB
switch. It should automatically release when
the vehicle is shifted out of P (Park).
Page 222 of 463
Chevrolet Silverado 1500 Owner Manual (GMNA-Localizing-U.S./Canada/
Mexico/Paraguay-16515119) - 2023 - CRC - 6/2/22
Driving and Operating 221
P (Park). See“Torque Lock” underShifting
Into Park (Mechanical Shifter) 0216 or
Shifting Into Park (Electronic Shifter) 0217.
{Warning
It is dangerous to get out of the vehicle
if the shift lever is not fully in P (Park)
with the parking brake firmly set. The
vehicle can roll.
Do not leave the vehicle when the engine
is running. If you have left the engine
running, the vehicle can move suddenly.
You or others could be injured. To be
sure the vehicle will not move, even
when you are on fairly level ground,
always set the parking brake and move
the shift lever to P (Park). See Shifting
Into Park (Mechanical Shifter) 0216 or
Shifting Into Park (Electronic Shifter) 0217
and
Driving Characteristics and Towing Tips
0 299.
{Warning
If equipped with four-wheel drive, the
vehicle will be free to roll if the transfer
case is in N (Neutral), even when the shift
lever is in P (Park). You or someone else
could be seriously injured. Be sure the
transfer case is in a drive gear —2
m, 4m,
or 4
n— or set the parking brake before
placing the transfer case in N (Neutral).
See Four-Wheel Drive 0230.
R : Use this gear to back up.
Caution
Shifting to R (Reverse) while the vehicle is
moving forward could damage the
transmission. The repairs would not be
covered by the vehicle warranty. Shift to
R (Reverse) only after the vehicle is
stopped.
To rock the vehicle back and forth to get
out of snow, ice, or sand without damaging
the transmission, see If the Vehicle Is Stuck
0 203. N :
In this position, the engine does not
connect with the wheels. To restart the
engine when the vehicle is already moving,
use N (Neutral) only.
{Warning
Shifting into a drive gear while the
engine is running at high speed is
dangerous. Unless your foot is firmly on
the brake pedal, the vehicle could move
very rapidly. You could lose control and
hit people or objects. Do not shift into a
drive gear while the engine is running at
high speed.
Caution
Shifting out of P (Park) or N (Neutral) with
the engine running at high speed may
damage the transmission. The repairs
would not be covered by the vehicle
warranty. Be sure the engine is not
running at high speed when shifting the
vehicle.
Page 232 of 463
Chevrolet Silverado 1500 Owner Manual (GMNA-Localizing-U.S./Canada/
Mexico/Paraguay-16515119) - 2023 - CRC - 6/2/22
Driving and Operating 231
Automatic Transfer Case
Two-Speed Transfer Case
Work Truck and Custom
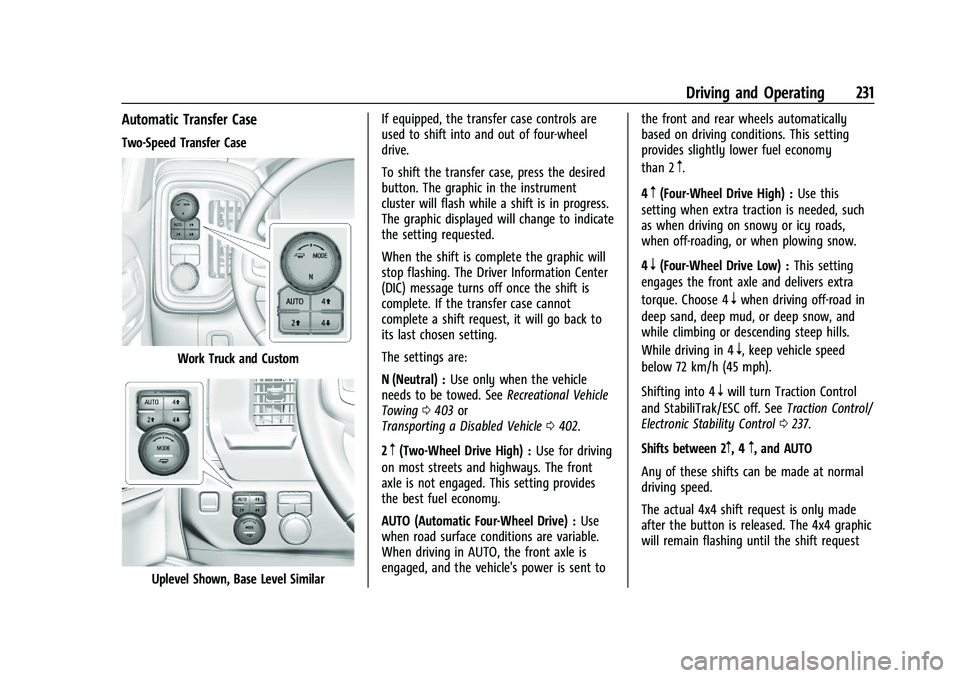
Uplevel Shown, Base Level SimilarIf equipped, the transfer case controls are
used to shift into and out of four-wheel
drive.
To shift the transfer case, press the desired
button. The graphic in the instrument
cluster will flash while a shift is in progress.
The graphic displayed will change to indicate
the setting requested.
When the shift is complete the graphic will
stop flashing. The Driver Information Center
(DIC) message turns off once the shift is
complete. If the transfer case cannot
complete a shift request, it will go back to
its last chosen setting.
The settings are:
N (Neutral) :
Use only when the vehicle
needs to be towed. See Recreational Vehicle
Towing 0403 or
Transporting a Disabled Vehicle 0402.
2
m(Two-Wheel Drive High) : Use for driving
on most streets and highways. The front
axle is not engaged. This setting provides
the best fuel economy.
AUTO (Automatic Four-Wheel Drive) : Use
when road surface conditions are variable.
When driving in AUTO, the front axle is
engaged, and the vehicle's power is sent to the front and rear wheels automatically
based on driving conditions. This setting
provides slightly lower fuel economy
than 2
m.
4
m(Four-Wheel Drive High) : Use this
setting when extra traction is needed, such
as when driving on snowy or icy roads,
when off-roading, or when plowing snow.
4
n(Four-Wheel Drive Low) : This setting
engages the front axle and delivers extra
torque. Choose 4
nwhen driving off-road in
deep sand, deep mud, or deep snow, and
while climbing or descending steep hills.
While driving in 4
n, keep vehicle speed
below 72 km/h (45 mph).
Shifting into 4
nwill turn Traction Control
and StabiliTrak/ESC off. See Traction Control/
Electronic Stability Control 0237.
Shifts between 2
m, 4m, and AUTO
Any of these shifts can be made at normal
driving speed.
The actual 4x4 shift request is only made
after the button is released. The 4x4 graphic
will remain flashing until the shift request
Page 243 of 463
Chevrolet Silverado 1500 Owner Manual (GMNA-Localizing-U.S./Canada/
Mexico/Paraguay-16515119) - 2023 - CRC - 6/2/22
242 Driving and Operating
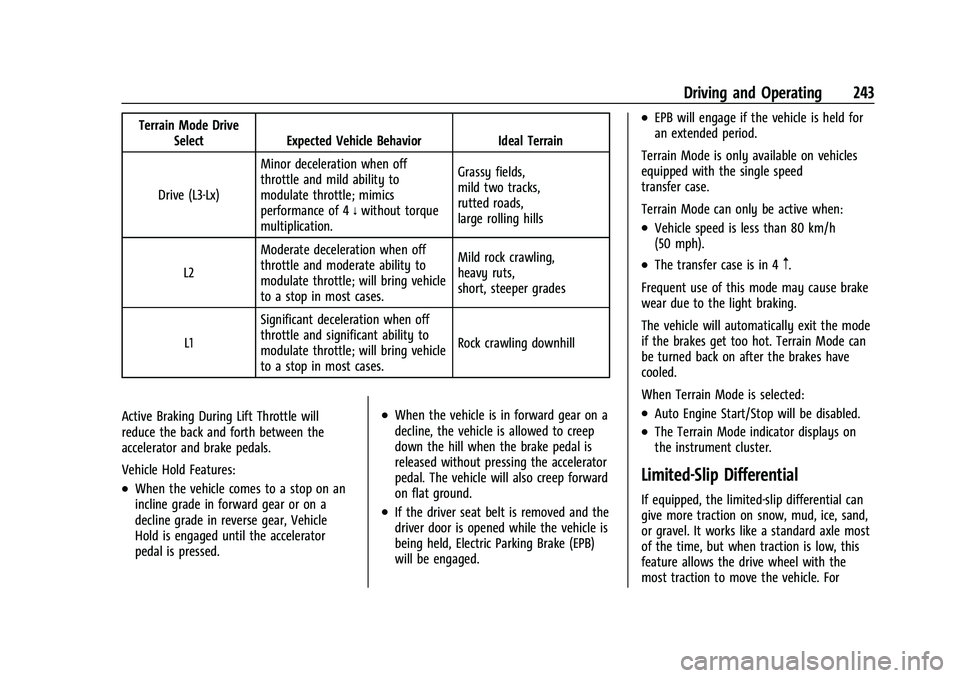
gTerrain Mode :Use for finer control
during low speed, off-road driving. When
using this mode it will mimic the
characteristics of four-wheel-drive low (4
n)
without the torque capabilities.
Use when:
.Traveling on very rough roads at very low
speeds, such as a two-track or heavily
rutted road.
.Traveling slowly in grassy fields.
.Pulling a boat out of the water on a
trailer.
.Using the vehicle for public off-road
recreational driving. See Off-Road Driving
0 197 and
Hill and Mountain Roads 0202. Using terrain mode in extreme conditions
that cause the wheel(s) to slip can lead to
excessive heat in the transfer case causing
four-wheel drive and terrain mode to
automatically turn off, leaving the vehicle in
two-wheel drive. Four-wheel drive will
automatically re-engage once the transfer
case has cooled, then terrain mode can be
turned back on.
When in Terrain Mode, the vehicle will shift
automatically but may hold a lower gear
longer to maximize engine torque. A unique
pedal map, transmission shift pattern, and
rpm control are utilized to give better
control at lower speeds and over rough
terrain. When the vehicle comes to a stop,
Vehicle Hold is engaged. TCS will be
optimized for maximum torque transfer
across axles, and Active Braking During Lift
Throttle will be engaged. Active Braking During Lift Throttle:
.Automatically applies light braking,
similar to heavy engine braking of
four-wheel-drive low.
.Applies light braking in D (Drive) until the
vehicle is at idle speeds. In Manual L1 and
Manual L2, moderate braking may stop
the vehicle.
.Reduces trailer braking.
Page 244 of 463
Chevrolet Silverado 1500 Owner Manual (GMNA-Localizing-U.S./Canada/
Mexico/Paraguay-16515119) - 2023 - CRC - 6/2/22
Driving and Operating 243
Terrain Mode DriveSelect Expected Vehicle Behavior Ideal Terrain
Drive (L3-Lx) Minor deceleration when off
throttle and mild ability to
modulate throttle; mimics
performance of 4
nwithout torque
multiplication. Grassy fields,
mild two tracks,
rutted roads,
large rolling hills
L2 Moderate deceleration when off
throttle and moderate ability to
modulate throttle; will bring vehicle
to a stop in most cases. Mild rock crawling,
heavy ruts,
short, steeper grades
L1 Significant deceleration when off
throttle and significant ability to
modulate throttle; will bring vehicle
to a stop in most cases. Rock crawling downhill
Active Braking During Lift Throttle will
reduce the back and forth between the
accelerator and brake pedals.
Vehicle Hold Features:
.When the vehicle comes to a stop on an
incline grade in forward gear or on a
decline grade in reverse gear, Vehicle
Hold is engaged until the accelerator
pedal is pressed.
.When the vehicle is in forward gear on a
decline, the vehicle is allowed to creep
down the hill when the brake pedal is
released without pressing the accelerator
pedal. The vehicle will also creep forward
on flat ground.
.If the driver seat belt is removed and the
driver door is opened while the vehicle is
being held, Electric Parking Brake (EPB)
will be engaged.
.EPB will engage if the vehicle is held for
an extended period.
Terrain Mode is only available on vehicles
equipped with the single speed
transfer case.
Terrain Mode can only be active when:
.Vehicle speed is less than 80 km/h
(50 mph).
.The transfer case is in 4m.
Frequent use of this mode may cause brake
wear due to the light braking.
The vehicle will automatically exit the mode
if the brakes get too hot. Terrain Mode can
be turned back on after the brakes have
cooled.
When Terrain Mode is selected:
.Auto Engine Start/Stop will be disabled.
.The Terrain Mode indicator displays on
the instrument cluster.
Limited-Slip Differential
If equipped, the limited-slip differential can
give more traction on snow, mud, ice, sand,
or gravel. It works like a standard axle most
of the time, but when traction is low, this
feature allows the drive wheel with the
most traction to move the vehicle. For
Page 245 of 463
Chevrolet Silverado 1500 Owner Manual (GMNA-Localizing-U.S./Canada/
Mexico/Paraguay-16515119) - 2023 - CRC - 6/2/22
244 Driving and Operating
vehicles with the limited-slip differential,
driven under severe conditions, the rear axle
fluid should be changed. SeeMaintenance
Schedule 0417.
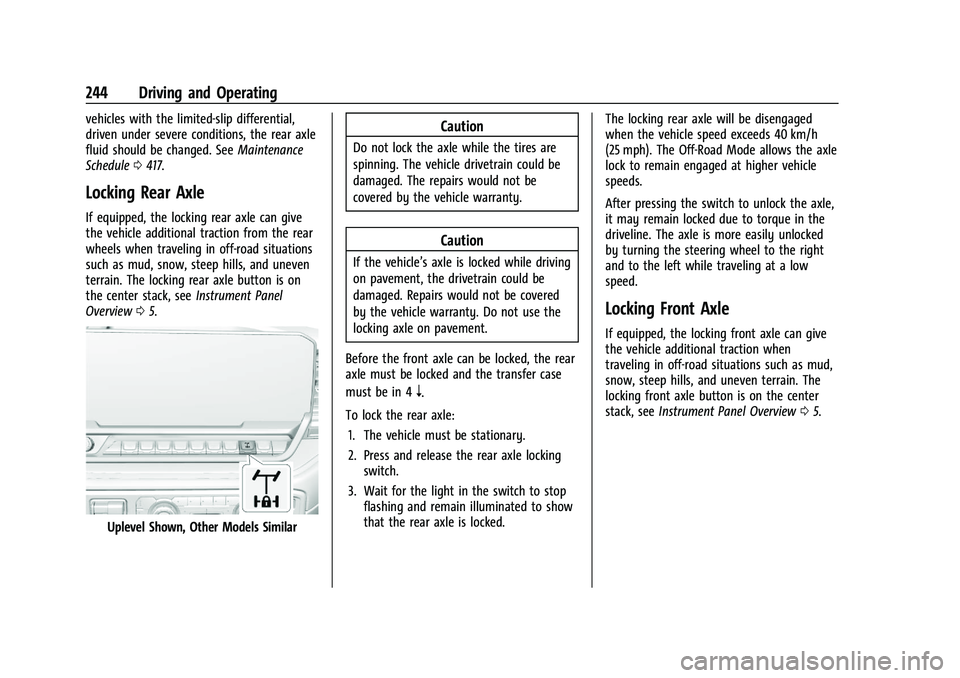
Locking Rear Axle
If equipped, the locking rear axle can give
the vehicle additional traction from the rear
wheels when traveling in off-road situations
such as mud, snow, steep hills, and uneven
terrain. The locking rear axle button is on
the center stack, see Instrument Panel
Overview 05.
Uplevel Shown, Other Models Similar
Caution
Do not lock the axle while the tires are
spinning. The vehicle drivetrain could be
damaged. The repairs would not be
covered by the vehicle warranty.
Caution
If the vehicle’s axle is locked while driving
on pavement, the drivetrain could be
damaged. Repairs would not be covered
by the vehicle warranty. Do not use the
locking axle on pavement.
Before the front axle can be locked, the rear
axle must be locked and the transfer case
must be in 4
n.
To lock the rear axle: 1. The vehicle must be stationary.
2. Press and release the rear axle locking switch.
3. Wait for the light in the switch to stop flashing and remain illuminated to show
that the rear axle is locked. The locking rear axle will be disengaged
when the vehicle speed exceeds 40 km/h
(25 mph). The Off-Road Mode allows the axle
lock to remain engaged at higher vehicle
speeds.
After pressing the switch to unlock the axle,
it may remain locked due to torque in the
driveline. The axle is more easily unlocked
by turning the steering wheel to the right
and to the left while traveling at a low
speed.
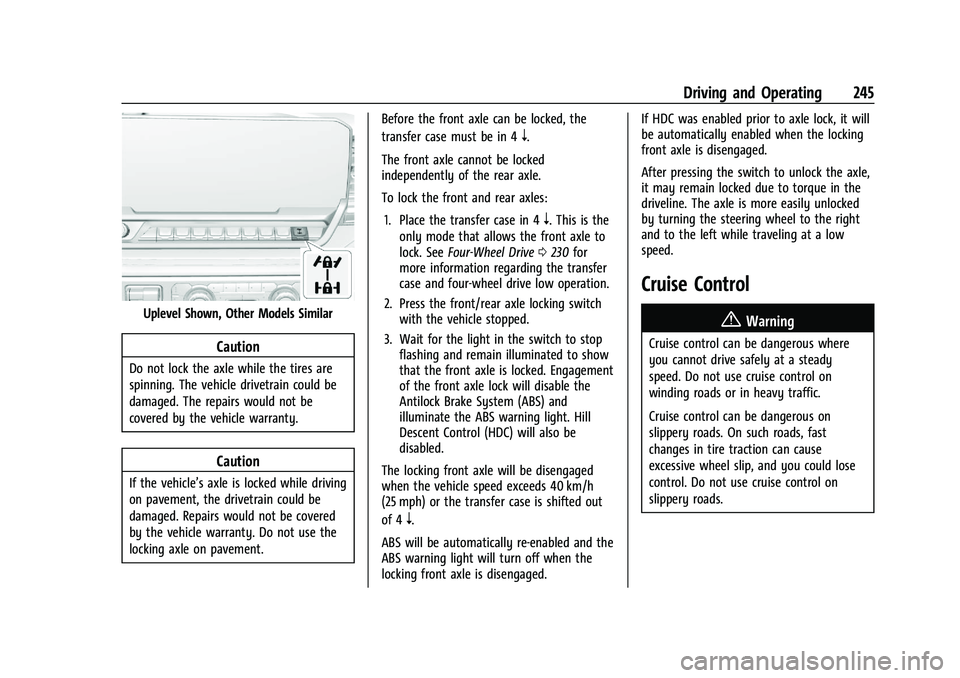
Locking Front Axle
If equipped, the locking front axle can give
the vehicle additional traction when
traveling in off-road situations such as mud,
snow, steep hills, and uneven terrain. The
locking front axle button is on the center
stack, see
Instrument Panel Overview 05.
Page 246 of 463
Chevrolet Silverado 1500 Owner Manual (GMNA-Localizing-U.S./Canada/
Mexico/Paraguay-16515119) - 2023 - CRC - 6/2/22
Driving and Operating 245
Uplevel Shown, Other Models Similar
Caution
Do not lock the axle while the tires are
spinning. The vehicle drivetrain could be
damaged. The repairs would not be
covered by the vehicle warranty.
Caution
If the vehicle’s axle is locked while driving
on pavement, the drivetrain could be
damaged. Repairs would not be covered
by the vehicle warranty. Do not use the
locking axle on pavement.Before the front axle can be locked, the
transfer case must be in 4
n.
The front axle cannot be locked
independently of the rear axle.
To lock the front and rear axles: 1. Place the transfer case in 4
n. This is the
only mode that allows the front axle to
lock. See Four-Wheel Drive 0230 for
more information regarding the transfer
case and four-wheel drive low operation.
2. Press the front/rear axle locking switch with the vehicle stopped.
3. Wait for the light in the switch to stop flashing and remain illuminated to show
that the front axle is locked. Engagement
of the front axle lock will disable the
Antilock Brake System (ABS) and
illuminate the ABS warning light. Hill
Descent Control (HDC) will also be
disabled.
The locking front axle will be disengaged
when the vehicle speed exceeds 40 km/h
(25 mph) or the transfer case is shifted out
of 4
n.
ABS will be automatically re-enabled and the
ABS warning light will turn off when the
locking front axle is disengaged. If HDC was enabled prior to axle lock, it will
be automatically enabled when the locking
front axle is disengaged.
After pressing the switch to unlock the axle,
it may remain locked due to torque in the
driveline. The axle is more easily unlocked
by turning the steering wheel to the right
and to the left while traveling at a low
speed.
Cruise Control
{
Warning
Cruise control can be dangerous where
you cannot drive safely at a steady
speed. Do not use cruise control on
winding roads or in heavy traffic.
Cruise control can be dangerous on
slippery roads. On such roads, fast
changes in tire traction can cause
excessive wheel slip, and you could lose
control. Do not use cruise control on
slippery roads.
Page 350 of 463
Chevrolet Silverado 1500 Owner Manual (GMNA-Localizing-U.S./Canada/
Mexico/Paraguay-16515119) - 2023 - CRC - 6/2/22
Vehicle Care 349
Caution (Continued)
.Do not mix water with ready-to-use
washer fluid. Water can cause the
solution to freeze and damage the
washer fluid tank and other parts of
the washer system.
.When using concentrated washer fluid,
follow the manufacturer instructions
for adding water.
.Fill the washer fluid tank only
three-quarters full when it is very cold.
This allows for fluid expansion if
freezing occurs, which could damage
the tank if it is completely full.
Brakes
Disc brake linings have built-in wear
indicators that make a high-pitched warning
sound when the brake linings are worn and
new linings are needed. The sound can come
and go or can be heard all the time when
the vehicle is moving, except when applying
the brake pedal firmly.
{Warning
The brake wear warning sound means
that soon the brakes will not work well.
That could lead to a crash. When the
brake wear warning sound is heard, have
the vehicle serviced.
Caution
Continuing to drive with worn-out brake
linings could result in costly brake
repairs.
Some driving conditions or climates can
cause a brake squeal when the brakes are
first applied, clearing up following several
applications. This does not mean something
is wrong with the brakes.
Properly torqued wheel nuts are necessary
to help prevent brake pulsation. When tires
are rotated, inspect brake linings for wear
and evenly tighten wheel nuts in the proper
sequence to torque specifications. See
Capacities and Specifications 0426.
Brake pads should be replaced as complete
axle sets.
Brake Pedal Travel
See your dealer if the brake pedal does not
return to normal height, or if there is a
rapid increase in pedal travel. This could be
a sign that brake service may be required.
Replacing Brake System Parts
Always replace brake system parts with
new, approved replacement parts. If this is
not done, the brakes may not work
properly. The braking performance can
change in many ways if the wrong brake
parts are installed or if parts are improperly
installed.
Brake Pad Life System
When to Change Brake Pads
This vehicle has a system that estimates the
remaining life of the front and rear brake
pads. Brake pad life is displayed in the
Driver Information Center (DIC), along with
a percentage for each axle. The system must
be reset every time the brake pads are
changed.
When the system has determined that the
brake pads need to be replaced, a message
will display, which may include mileage
remaining.