2023 CHEVROLET SILVERADO 1500 clock
[x] Cancel search: clockPage 299 of 463
Chevrolet Silverado 1500 Owner Manual (GMNA-Localizing-U.S./Canada/
Mexico/Paraguay-16515119) - 2023 - CRC - 6/2/22
298 Driving and Operating
Be careful not to spill fuel. Wait five seconds
after you have finished pumping before
removing the fill nozzle. Clean fuel from
painted surfaces as soon as possible. See
Exterior Care0407. Reinstall the cap by
turning it clockwise until it clicks.
{Warning
If a fire starts while you are refueling, do
not remove the fill nozzle. Shut off the
flow of fuel by shutting off the pump or
by notifying the station attendant. Leave
the area immediately.
Caution
If a new fuel cap is needed, get the right
type of cap from your dealer. The wrong
type of fuel cap may not fit properly,
may turn on the malfunction indicator
lamp, and could damage the fuel system
and emissions system. See Malfunction
Indicator Lamp (Check Engine Light) 0116.
Filling a Portable Fuel Container
{Warning
Never fill a portable fuel container while
it is in the vehicle. Static electricity
discharge from the container can ignite
the fuel vapor. You or others could be
badly burned and the vehicle could be
damaged. To help avoid injury to you
and others:
.Dispense fuel only into approved
containers.
.Do not fill a container while it is
inside a vehicle, in a vehicle's trunk, in
a pickup bed, or on any surface other
than the ground.
.Bring the fill nozzle in contact with
the inside of the fill opening before
operating the nozzle. Maintain contact
until filling is complete.
.Keep sparks, flames, and smoking
materials away from fuel.
.Avoid using electronic devices while
pumping fuel.
(Continued)
Warning (Continued)
.When transporting a fuel container or
other material that can catch fire in
the truck bed, secure the container to
prevent spills.
Trailer Towing
General Towing Information
Only use towing equipment that has been
designed for the vehicle. Contact your dealer
or trailering dealer for assistance with
preparing the vehicle to tow a trailer. Read
the entire section before towing a trailer.
To tow a disabled vehicle, see Transporting
a Disabled Vehicle 0402. To tow the vehicle
behind another vehicle such as a motor
home, see Recreational Vehicle Towing
0 403.
Page 345 of 463
Chevrolet Silverado 1500 Owner Manual (GMNA-Localizing-U.S./Canada/
Mexico/Paraguay-16515119) - 2023 - CRC - 6/2/22
344 Vehicle Care
Warning (Continued)
the wrong mixture, the engine could get
too hot but there would not be an
overheat warning. The engine could catch
fire and you or others could be burned.
Use a 50/50 mixture of clean, drinkable
water and DEX-COOL coolant. This mixture:
.Gives freezing protection down to −37 °C
(−34 °F), outside temperature.
.Gives boiling protection up to 129 °C
(265 °F), engine temperature.
.Protects against rust and corrosion.
.Will not damage aluminum parts.
.Helps keep the proper engine
temperature.
Caution
Do not use anything other than a mix of
DEX-COOL coolant that meets GM
Standard GMW3420 and clean, drinkable
water. Anything else can cause damage
to the engine cooling system and the
vehicle, which would not be covered by
the vehicle warranty. Never dispose of engine coolant by putting
it in the trash, or by pouring it on the
ground, or into sewers, streams, or bodies of
water. Have the coolant changed by an
authorized service center, familiar with legal
requirements regarding used coolant
disposal. This will help protect the
environment and your health.
Checking Coolant
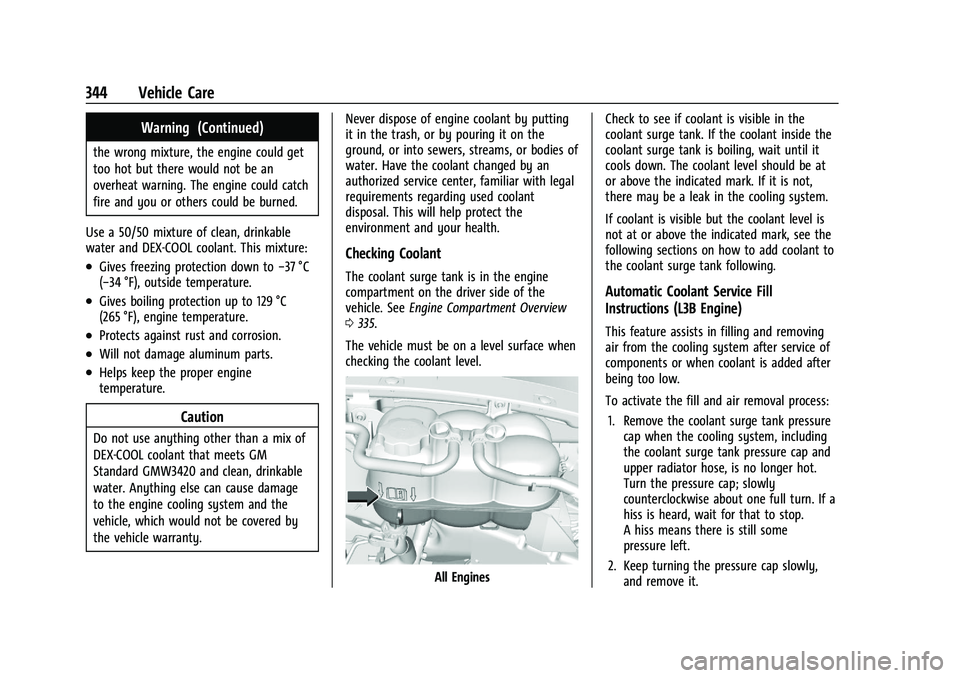
The coolant surge tank is in the engine
compartment on the driver side of the
vehicle. See
Engine Compartment Overview
0 335.
The vehicle must be on a level surface when
checking the coolant level.
All Engines Check to see if coolant is visible in the
coolant surge tank. If the coolant inside the
coolant surge tank is boiling, wait until it
cools down. The coolant level should be at
or above the indicated mark. If it is not,
there may be a leak in the cooling system.
If coolant is visible but the coolant level is
not at or above the indicated mark, see the
following sections on how to add coolant to
the coolant surge tank following.
Automatic Coolant Service Fill
Instructions (L3B Engine)
This feature assists in filling and removing
air from the cooling system after service of
components or when coolant is added after
being too low.
To activate the fill and air removal process:
1. Remove the coolant surge tank pressure cap when the cooling system, including
the coolant surge tank pressure cap and
upper radiator hose, is no longer hot.
Turn the pressure cap; slowly
counterclockwise about one full turn. If a
hiss is heard, wait for that to stop.
A hiss means there is still some
pressure left.
2. Keep turning the pressure cap slowly, and remove it.
Page 347 of 463
Chevrolet Silverado 1500 Owner Manual (GMNA-Localizing-U.S./Canada/
Mexico/Paraguay-16515119) - 2023 - CRC - 6/2/22
346 Vehicle Care
1. Remove the coolant surge tank pressurecap when the cooling system, including
the coolant surge tank pressure cap and
upper radiator hose, is no longer hot.
Turn the pressure cap slowly
counterclockwise about one full turn. If a
hiss is heard, wait for that to stop.
A hiss means there is still some
pressure left.
2. Keep turning the pressure cap slowly, and remove it.
3. Fill the coolant surge tank with the proper mixture to the full cold mark.
4. With the coolant surge tank pressure cap off, start the engine and let it run until
the engine coolant temperature gauge
indicates approximately 90 °C (195 °F).
By this time, the coolant level inside the
coolant surge tank may be lower. If the
level is lower, add more of the proper
mixture to the coolant surge tank until
the level reaches the indicated mark.
5. Replace the pressure cap tightly.
6. Verify coolant level after the engine is shut off and the coolant is cold.
If necessary, repeat coolant fill procedure
Steps 1–6.Caution
If the pressure cap is not tightly installed,
coolant loss and engine damage may
occur. Be sure the cap is properly and
tightly secured.
Engine Overheating
If the vehicle has the Duramax diesel
engine, see the Duramax diesel supplement.
Caution
Do not run the engine if there is a leak
in the engine cooling system. This can
cause a loss of all coolant and can
damage the system and vehicle. Have
any leaks fixed right away.
The vehicle has several indicators to warn of
engine overheating.
There is a coolant temperature gauge in the
vehicle's instrument cluster. See Engine
Coolant Temperature Gauge 0112.
In addition, there are ENGINE OVERHEATED
STOP ENGINE, ENGINE OVERHEATED IDLE
ENGINE, and ENGINE POWER IS REDUCED
messages in the Driver Information
Center (DIC). If the decision is made not to lift the hood
when this warning appears, get service help
right away. See
Roadside Assistance Program
0 433.
If the decision is made to lift the hood,
make sure the vehicle is parked on a level
surface.
2.7L L4, 5.3L V8, and 6.2L V8 Engines
Check to see if the engine cooling fans are
running. If the engine is overheating, the
fans should be running. If they are not, do
not continue to run the engine and have the
vehicle serviced.
If the engine or transmission detects an
impending hot fluid condition, then the
transmission may force upshifts to limit
temperatures. Downshifts may also be
prevented in this instance. Normal operation
may continue unless the display indicates
there is a hot condition and engine should
be idled.
Page 358 of 463
Chevrolet Silverado 1500 Owner Manual (GMNA-Localizing-U.S./Canada/
Mexico/Paraguay-16515119) - 2023 - CRC - 6/2/22
Vehicle Care 357
Bulb Replacement
For the proper type of replacement bulbs,
or any bulb changing procedure not listed in
this section, contact your dealer.
Caution
Do not replace incandescent bulbs with
aftermarket LED replacement bulbs. This
can cause damage to the vehicle electrical
system.
Halogen Bulbs
{Warning
Halogen bulbs have pressurized gas inside
and can burst if you drop or scratch the
bulb. You or others could be injured. Be
sure to read and follow the instructions
on the bulb package.
LED Lighting
This vehicle has several LED lamps. For
replacement of any LED lighting assembly,
contact your dealer.
Headlamps, Front Turn Signal,
Sidemarker, and Parking Lamps
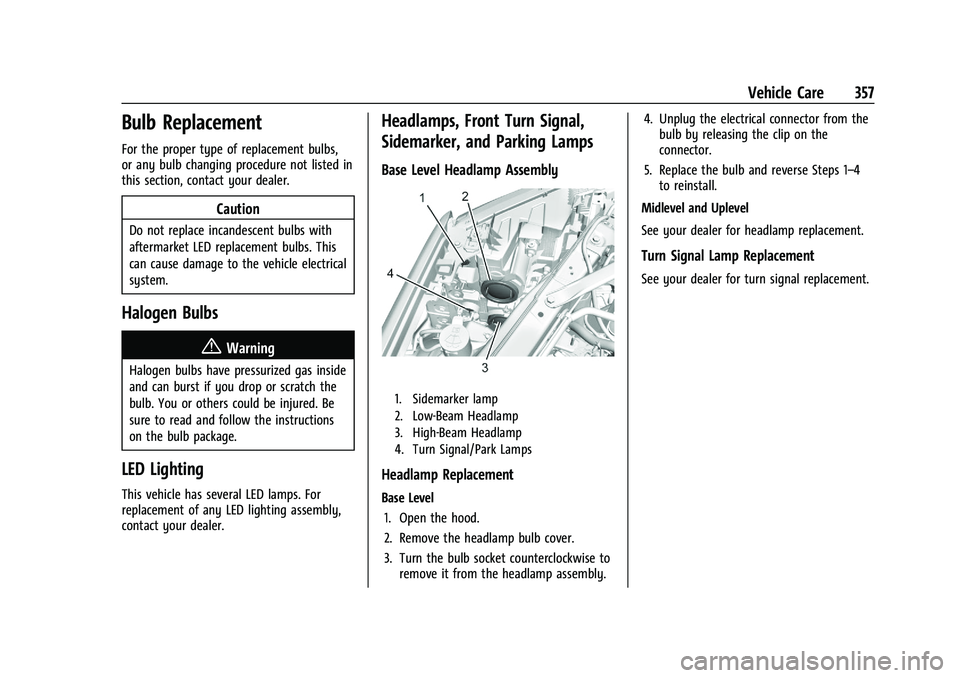
Base Level Headlamp Assembly
1. Sidemarker lamp
2. Low-Beam Headlamp
3. High-Beam Headlamp
4. Turn Signal/Park Lamps
Headlamp Replacement
Base Level1. Open the hood.
2. Remove the headlamp bulb cover.
3. Turn the bulb socket counterclockwise to remove it from the headlamp assembly. 4. Unplug the electrical connector from the
bulb by releasing the clip on the
connector.
5. Replace the bulb and reverse Steps 1–4 to reinstall.
Midlevel and Uplevel
See your dealer for headlamp replacement.
Turn Signal Lamp Replacement
See your dealer for turn signal replacement.
Page 360 of 463
Chevrolet Silverado 1500 Owner Manual (GMNA-Localizing-U.S./Canada/
Mexico/Paraguay-16515119) - 2023 - CRC - 6/2/22
Vehicle Care 359
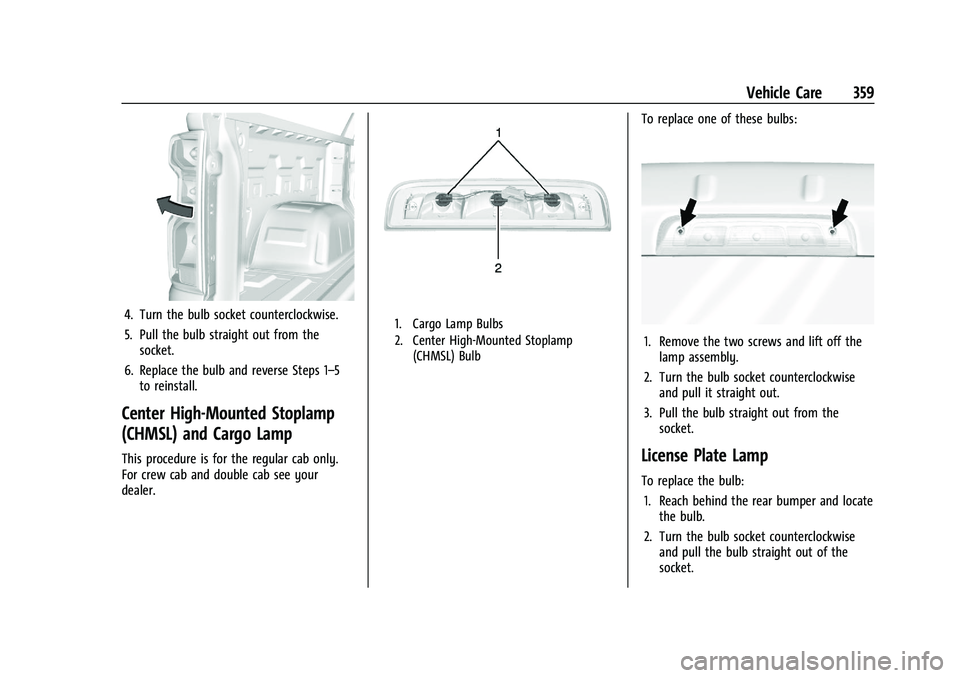
4. Turn the bulb socket counterclockwise.
5. Pull the bulb straight out from thesocket.
6. Replace the bulb and reverse Steps 1–5 to reinstall.
Center High-Mounted Stoplamp
(CHMSL) and Cargo Lamp
This procedure is for the regular cab only.
For crew cab and double cab see your
dealer.
1. Cargo Lamp Bulbs
2. Center High-Mounted Stoplamp (CHMSL) Bulb
To replace one of these bulbs:
1. Remove the two screws and lift off thelamp assembly.
2. Turn the bulb socket counterclockwise and pull it straight out.
3. Pull the bulb straight out from the socket.
License Plate Lamp
To replace the bulb:
1. Reach behind the rear bumper and locate the bulb.
2. Turn the bulb socket counterclockwise and pull the bulb straight out of the
socket.
Page 390 of 463
Chevrolet Silverado 1500 Owner Manual (GMNA-Localizing-U.S./Canada/
Mexico/Paraguay-16515119) - 2023 - CRC - 6/2/22
Vehicle Care 389
1. Wheel Block (If Equipped)
2. Flat Tire
The following information explains how to
use the jack and change a tire.
Tire Changing
Removing the Spare Tire and Tools
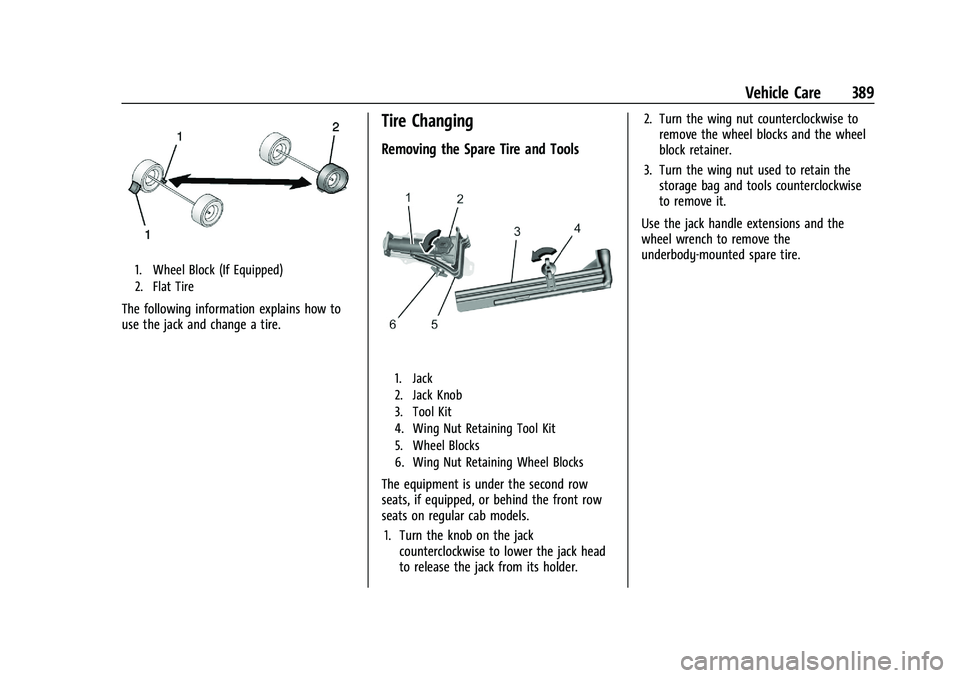
1. Jack
2. Jack Knob
3. Tool Kit
4. Wing Nut Retaining Tool Kit
5. Wheel Blocks
6. Wing Nut Retaining Wheel Blocks
The equipment is under the second row
seats, if equipped, or behind the front row
seats on regular cab models.1. Turn the knob on the jack counterclockwise to lower the jack head
to release the jack from its holder. 2. Turn the wing nut counterclockwise to
remove the wheel blocks and the wheel
block retainer.
3. Turn the wing nut used to retain the storage bag and tools counterclockwise
to remove it.
Use the jack handle extensions and the
wheel wrench to remove the
underbody-mounted spare tire.
Page 391 of 463
Chevrolet Silverado 1500 Owner Manual (GMNA-Localizing-U.S./Canada/
Mexico/Paraguay-16515119) - 2023 - CRC - 6/2/22
390 Vehicle Care
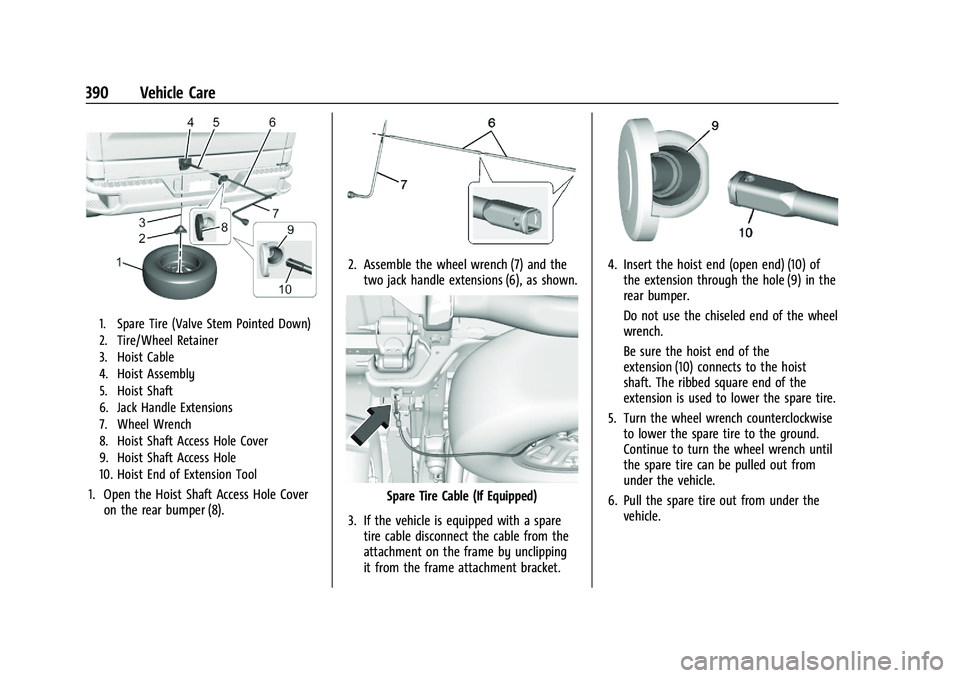
1. Spare Tire (Valve Stem Pointed Down)
2. Tire/Wheel Retainer
3. Hoist Cable
4. Hoist Assembly
5. Hoist Shaft
6. Jack Handle Extensions
7. Wheel Wrench
8. Hoist Shaft Access Hole Cover
9. Hoist Shaft Access Hole
10. Hoist End of Extension Tool
1. Open the Hoist Shaft Access Hole Coveron the rear bumper (8).
2. Assemble the wheel wrench (7) and thetwo jack handle extensions (6), as shown.
Spare Tire Cable (If Equipped)
3. If the vehicle is equipped with a spare tire cable disconnect the cable from the
attachment on the frame by unclipping
it from the frame attachment bracket.
4. Insert the hoist end (open end) (10) ofthe extension through the hole (9) in the
rear bumper.
Do not use the chiseled end of the wheel
wrench.
Be sure the hoist end of the
extension (10) connects to the hoist
shaft. The ribbed square end of the
extension is used to lower the spare tire.
5. Turn the wheel wrench counterclockwise to lower the spare tire to the ground.
Continue to turn the wheel wrench until
the spare tire can be pulled out from
under the vehicle.
6. Pull the spare tire out from under the vehicle.
Page 393 of 463
Chevrolet Silverado 1500 Owner Manual (GMNA-Localizing-U.S./Canada/
Mexico/Paraguay-16515119) - 2023 - CRC - 6/2/22
392 Vehicle Care
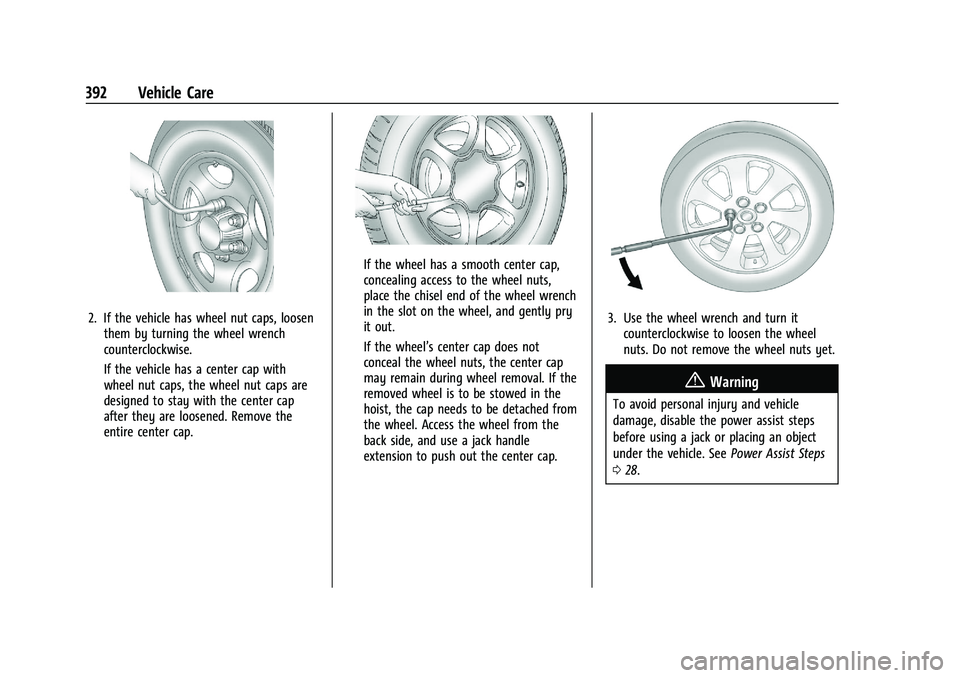
2. If the vehicle has wheel nut caps, loosenthem by turning the wheel wrench
counterclockwise.
If the vehicle has a center cap with
wheel nut caps, the wheel nut caps are
designed to stay with the center cap
after they are loosened. Remove the
entire center cap.
If the wheel has a smooth center cap,
concealing access to the wheel nuts,
place the chisel end of the wheel wrench
in the slot on the wheel, and gently pry
it out.
If the wheel’s center cap does not
conceal the wheel nuts, the center cap
may remain during wheel removal. If the
removed wheel is to be stowed in the
hoist, the cap needs to be detached from
the wheel. Access the wheel from the
back side, and use a jack handle
extension to push out the center cap.
3. Use the wheel wrench and turn itcounterclockwise to loosen the wheel
nuts. Do not remove the wheel nuts yet.
{Warning
To avoid personal injury and vehicle
damage, disable the power assist steps
before using a jack or placing an object
under the vehicle. See Power Assist Steps
0 28.