2023 CHEVROLET SILVERADO 1500 lights
[x] Cancel search: lightsPage 269 of 463
Chevrolet Silverado 1500 Owner Manual (GMNA-Localizing-U.S./Canada/
Mexico/Paraguay-16515119) - 2023 - CRC - 6/2/22
268 Driving and Operating
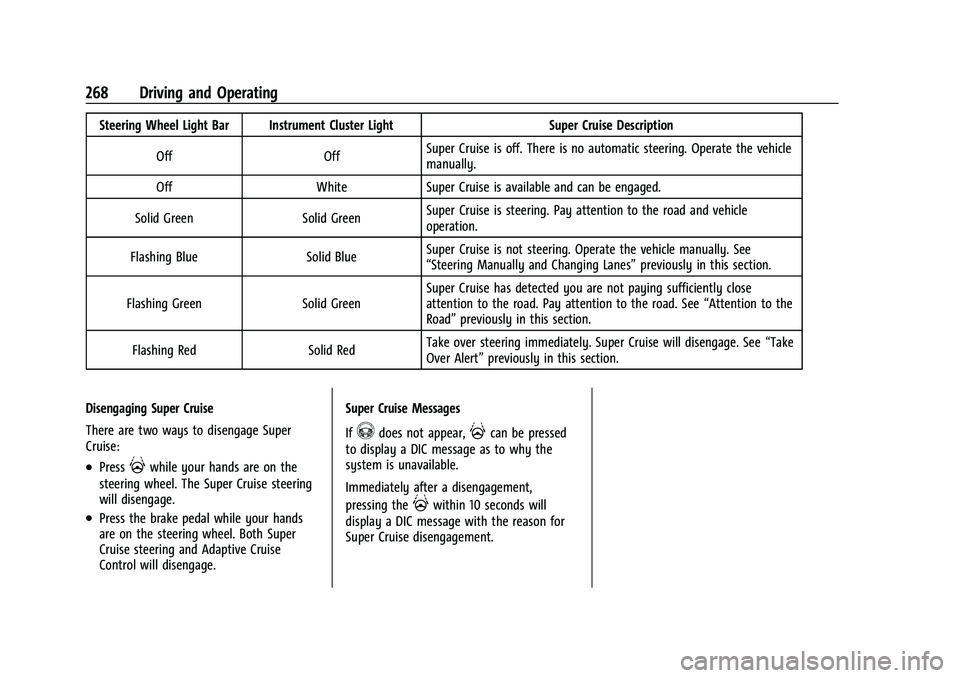
Steering Wheel Light Bar Instrument Cluster LightSuper Cruise Description
Off OffSuper Cruise is off. There is no automatic steering. Operate the vehicle
manually.
Off WhiteSuper Cruise is available and can be engaged.
Solid Green Solid GreenSuper Cruise is steering. Pay attention to the road and vehicle
operation.
Flashing Blue Solid BlueSuper Cruise is not steering. Operate the vehicle manually. See
“Steering Manually and Changing Lanes”
previously in this section.
Flashing Green Solid GreenSuper Cruise has detected you are not paying sufficiently close
attention to the road. Pay attention to the road. See
“Attention to the
Road” previously in this section.
Flashing Red Solid RedTake over steering immediately. Super Cruise will disengage. See
“Take
Over Alert” previously in this section.
Disengaging Super Cruise
There are two ways to disengage Super
Cruise:
.Press]while your hands are on the
steering wheel. The Super Cruise steering
will disengage.
.Press the brake pedal while your hands
are on the steering wheel. Both Super
Cruise steering and Adaptive Cruise
Control will disengage. Super Cruise Messages
If
^does not appear,]can be pressed
to display a DIC message as to why the
system is unavailable.
Immediately after a disengagement,
pressing the
]within 10 seconds will
display a DIC message with the reason for
Super Cruise disengagement.
Page 285 of 463
Chevrolet Silverado 1500 Owner Manual (GMNA-Localizing-U.S./Canada/
Mexico/Paraguay-16515119) - 2023 - CRC - 6/2/22
284 Driving and Operating
Warning (Continued)
To help avoid death or injury, always
check for pedestrians around the vehicle
before backing up. Be ready to take
action and apply the brakes. See
Defensive Driving0195. Keep the RVC,
taillamps, and back-up lamps clean and in
good repair.
Rear Pedestrian Alert can be set to Off or
Alert. To view available settings from the
infotainment screen, touch Settings >
Vehicle > Collision/Detection Systems.
If equipped, alerts can be set to beeps or
seat pulses. To view available settings from
the infotainment screen, touch Settings >
Vehicle > Collision/Detection Systems >
Alert Type.
Rear Cross Traffic Alert (RCTA)
System
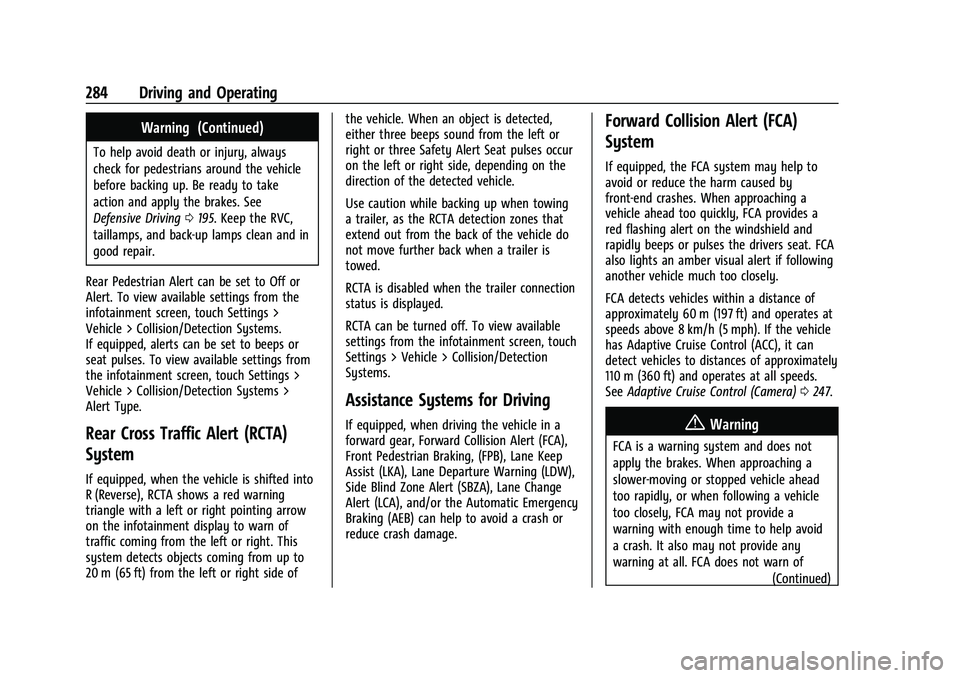
If equipped, when the vehicle is shifted into
R (Reverse), RCTA shows a red warning
triangle with a left or right pointing arrow
on the infotainment display to warn of
traffic coming from the left or right. This
system detects objects coming from up to
20 m (65 ft) from the left or right side of the vehicle. When an object is detected,
either three beeps sound from the left or
right or three Safety Alert Seat pulses occur
on the left or right side, depending on the
direction of the detected vehicle.
Use caution while backing up when towing
a trailer, as the RCTA detection zones that
extend out from the back of the vehicle do
not move further back when a trailer is
towed.
RCTA is disabled when the trailer connection
status is displayed.
RCTA can be turned off. To view available
settings from the infotainment screen, touch
Settings > Vehicle > Collision/Detection
Systems.
Assistance Systems for Driving
If equipped, when driving the vehicle in a
forward gear, Forward Collision Alert (FCA),
Front Pedestrian Braking, (FPB), Lane Keep
Assist (LKA), Lane Departure Warning (LDW),
Side Blind Zone Alert (SBZA), Lane Change
Alert (LCA), and/or the Automatic Emergency
Braking (AEB) can help to avoid a crash or
reduce crash damage.
Forward Collision Alert (FCA)
System
If equipped, the FCA system may help to
avoid or reduce the harm caused by
front-end crashes. When approaching a
vehicle ahead too quickly, FCA provides a
red flashing alert on the windshield and
rapidly beeps or pulses the drivers seat. FCA
also lights an amber visual alert if following
another vehicle much too closely.
FCA detects vehicles within a distance of
approximately 60 m (197 ft) and operates at
speeds above 8 km/h (5 mph). If the vehicle
has Adaptive Cruise Control (ACC), it can
detect vehicles to distances of approximately
110 m (360 ft) and operates at all speeds.
See
Adaptive Cruise Control (Camera) 0247.
{Warning
FCA is a warning system and does not
apply the brakes. When approaching a
slower-moving or stopped vehicle ahead
too rapidly, or when following a vehicle
too closely, FCA may not provide a
warning with enough time to help avoid
a crash. It also may not provide any
warning at all. FCA does not warn of
(Continued)
Page 292 of 463
Chevrolet Silverado 1500 Owner Manual (GMNA-Localizing-U.S./Canada/
Mexico/Paraguay-16515119) - 2023 - CRC - 6/2/22
Driving and Operating 291
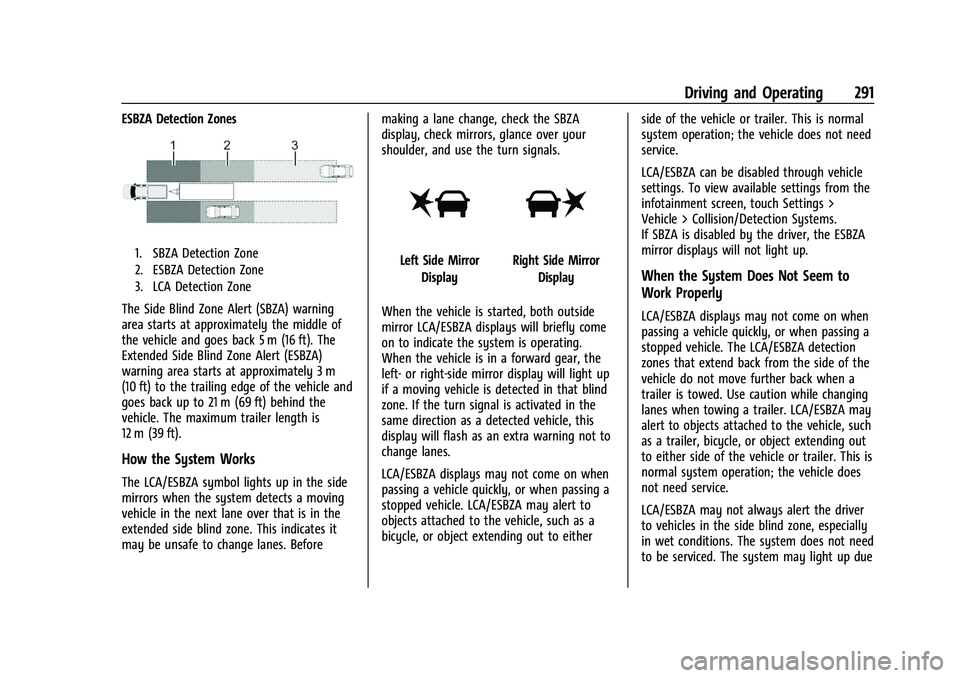
ESBZA Detection Zones
1. SBZA Detection Zone
2. ESBZA Detection Zone
3. LCA Detection Zone
The Side Blind Zone Alert (SBZA) warning
area starts at approximately the middle of
the vehicle and goes back 5 m (16 ft). The
Extended Side Blind Zone Alert (ESBZA)
warning area starts at approximately 3 m
(10 ft) to the trailing edge of the vehicle and
goes back up to 21 m (69 ft) behind the
vehicle. The maximum trailer length is
12 m (39 ft).
How the System Works
The LCA/ESBZA symbol lights up in the side
mirrors when the system detects a moving
vehicle in the next lane over that is in the
extended side blind zone. This indicates it
may be unsafe to change lanes. Beforemaking a lane change, check the SBZA
display, check mirrors, glance over your
shoulder, and use the turn signals.
Left Side Mirror
DisplayRight Side Mirror Display
When the vehicle is started, both outside
mirror LCA/ESBZA displays will briefly come
on to indicate the system is operating.
When the vehicle is in a forward gear, the
left- or right-side mirror display will light up
if a moving vehicle is detected in that blind
zone. If the turn signal is activated in the
same direction as a detected vehicle, this
display will flash as an extra warning not to
change lanes.
LCA/ESBZA displays may not come on when
passing a vehicle quickly, or when passing a
stopped vehicle. LCA/ESBZA may alert to
objects attached to the vehicle, such as a
bicycle, or object extending out to either side of the vehicle or trailer. This is normal
system operation; the vehicle does not need
service.
LCA/ESBZA can be disabled through vehicle
settings. To view available settings from the
infotainment screen, touch Settings >
Vehicle > Collision/Detection Systems.
If SBZA is disabled by the driver, the ESBZA
mirror displays will not light up.When the System Does Not Seem to
Work Properly
LCA/ESBZA displays may not come on when
passing a vehicle quickly, or when passing a
stopped vehicle. The LCA/ESBZA detection
zones that extend back from the side of the
vehicle do not move further back when a
trailer is towed. Use caution while changing
lanes when towing a trailer. LCA/ESBZA may
alert to objects attached to the vehicle, such
as a trailer, bicycle, or object extending out
to either side of the vehicle or trailer. This is
normal system operation; the vehicle does
not need service.
LCA/ESBZA may not always alert the driver
to vehicles in the side blind zone, especially
in wet conditions. The system does not need
to be serviced. The system may light up due
Page 319 of 463
Chevrolet Silverado 1500 Owner Manual (GMNA-Localizing-U.S./Canada/
Mexico/Paraguay-16515119) - 2023 - CRC - 6/2/22
318 Driving and Operating
Warning (Continued)
.If the trailer brakes are not operating
properly at any time, or if a DIC
message indicates problems with the
trailer connections or trailer brakes,
carefully pull the vehicle over to the
side of the road when traffic
conditions allow.
Trailer Tires
Special Trailer (ST) tires differ from vehicle
tires. Trailer tires are designed with stiff
sidewalls to help prevent sway and to
support heavy loads. These features can
make it difficult to determine if the trailer
tire pressures are low only based on a visual
inspection.
Always check all trailer tire pressures before
each trip when the tires are cool. Low trailer
tire pressure is a leading cause of trailer tire
blow-outs.
Trailer tires deteriorate over time. The trailer
tire sidewall will show the week and year
the tire was manufactured. Many trailer tire
manufacturers recommend replacing tires
more than six years old.Overloading is another leading cause of
trailer tire blow-outs. Never load your trailer
with more weight than the tires are
designed to support. The load rating is
located on the trailer tire sidewall.
Always know the maximum speed rating for
the trailer tires before driving. This may be
significantly lower than the vehicle tire
speed rating. The speed rating may be on
the trailer tire sidewall. If the speed rating is
not shown, the default trailer tire speed
rating is 105 km/h (65 mph).
Trailering App
Trailer Lights App
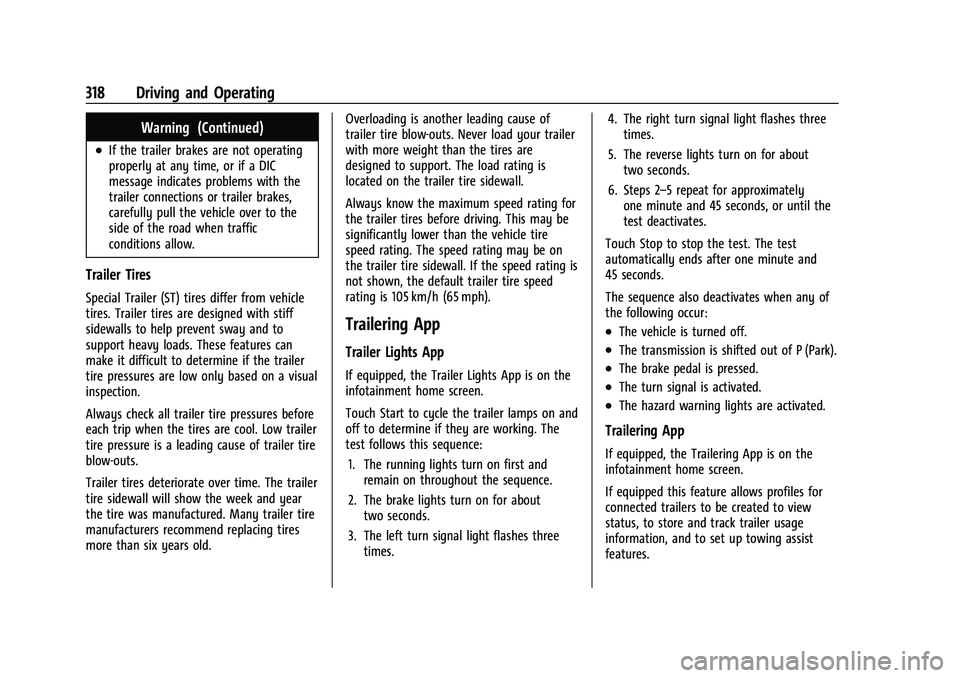
If equipped, the Trailer Lights App is on the
infotainment home screen.
Touch Start to cycle the trailer lamps on and
off to determine if they are working. The
test follows this sequence:
1. The running lights turn on first and remain on throughout the sequence.
2. The brake lights turn on for about two seconds.
3. The left turn signal light flashes three times. 4. The right turn signal light flashes three
times.
5. The reverse lights turn on for about two seconds.
6. Steps 2–5 repeat for approximately one minute and 45 seconds, or until the
test deactivates.
Touch Stop to stop the test. The test
automatically ends after one minute and
45 seconds.
The sequence also deactivates when any of
the following occur:
.The vehicle is turned off.
.The transmission is shifted out of P (Park).
.The brake pedal is pressed.
.The turn signal is activated.
.The hazard warning lights are activated.
Trailering App
If equipped, the Trailering App is on the
infotainment home screen.
If equipped this feature allows profiles for
connected trailers to be created to view
status, to store and track trailer usage
information, and to set up towing assist
features.
Page 321 of 463

Chevrolet Silverado 1500 Owner Manual (GMNA-Localizing-U.S./Canada/
Mexico/Paraguay-16515119) - 2023 - CRC - 6/2/22
320 Driving and Operating
see a tire or trailer dealer for service. The
learning process must be repeated when the
trailer tires are rotated or replaced.
Tool Method: A TTPMS activation tool can
be purchased separately to learn the sensor
locations.
Manual Method: Without the tool, the air
pressure can be increased or decreased in
each tire for 10 seconds. Do not exceed the
maximum inflation pressure found on the
tire sidewalls. Make sure to readjust tire
pressure to the recommended level when
the process is complete.
Sensor Learning Steps
To complete the sensor-to-vehicle learn
process:1. Touch Start on the Learn Sensors screen. The horn chirps twice and the Learning
Active screen appears on the
infotainment screen.
2. Start with the driver side front trailer tire.
3. Activate the tool near the valve stem or adjust the air pressure of this tire until
the horn chirps and all working vehicle
and trailer lights flash. The process stops without saving the
sensor locations if this step takes more
than two minutes.
4. Move to the next tire and repeat Step 3 for each sensor. The horn chirps twice
when all sensors are completed.
5. Return to the vehicle to complete the setup.
Maintenance Reminders
To set up maintenance reminders, touch the
Trailer Maintenance icon. Follow the
onscreen prompts. The maximum number of
reminders is 50.
Towing Assist
To set up towing assist features,
if equipped, touch the towing assist icon.
1. Select the number of axles on the trailer.
2. Enter trailer dimensions as prompted.
Follow the onscreen instructions to complete
setup for available features.
Certain trailer features require a compatible
trailer profile be configured and selected.
A compatible trailer is a box type trailer
(cargo, camper, etc.) with a conventional
hitch.
Transparent Trailer Setup
If equipped, a rear trailer camera must be
mounted on the trailer and electrically
connected to the vehicle before transparent
trailer feature can be used. See Assistance
Systems for Parking or Backing 0274.
Trailer dimensions must be in range and
transparent trailer must be calibrated prior
to use: 1. If trailer dimensions are out of range, this feature will be unavailable.
2. Ensure rear trailer camera is connected.
3. Follow instructions to drive forward to complete calibration.
.Trailer Length: 300 cm (118.1 in) –970 cm
(381.8 in). Measure from center of coupler
to furthest rear point on the trailer.
.Trailer Width: 120 cm (47.2 in) –260 cm
(102.3 in). Measure from left edge of
trailer to right edge.
.Trailer Height: 1 cm (0.39 in) –450 cm
(177.1 in). Measure from ground to tallest
point of the trailer.
.Hitching Point Length: 180 cm (70.8 in) –
970 cm (381.8 in). Measure from center of
coupler to middle of tires.
Page 322 of 463
Chevrolet Silverado 1500 Owner Manual (GMNA-Localizing-U.S./Canada/
Mexico/Paraguay-16515119) - 2023 - CRC - 6/2/22
Driving and Operating 321
.Trailer Tongue Length: 50 cm (19.6 in)–
220 cm (86.6 in). Measure from center of
coupler to trailer front wall.
.Vehicle Hitch Height: 10 cm (3.9 in) –
100 cm (39.3 in). Measure from ground to
top of coupler.
.Vehicle Hitch Length: 10 cm (3.9 in) –
100 cm (39.3 in). Measure from hitch
receiver to center of ball.
Rear Trailer Guidance Setup
If equipped, a rear trailer camera must be
mounted on the trailer and electrically
connected to the vehicle before rear trailer
guidance feature can be used. See Assistance
Systems for Parking or Backing 0274.
Trailer dimensions must be in range to
enable this feature.
.Trailer Length: 300 cm (118.1 in) –
1300 cm (511.8 in). Measure from center
of coupler to furthest rear point on the
trailer.
1. If trailer dimensions are out of range, this feature will be unavailable.
2. Ensure rear trailer camera is connected.
3. Follow instructions to drive forward to complete calibration.
Jack-Knife Alert Setup
If equipped, follow the instructions to drive
forward to complete calibration.
Trailer Length Indicator Setup
If equipped, follow the instructions to drive
forward to complete calibration.
Trailer Side Blind Zone Alert Setup
If equipped, trailer dimensions must be in
range to enable this feature.
.Trailer Length: 300 cm (118.1 in) –
1200 cm (472.4 in). Measure from center
of coupler to furthest rear point on the
trailer.
If trailer dimensions are out of range, this
feature will be unavailable.
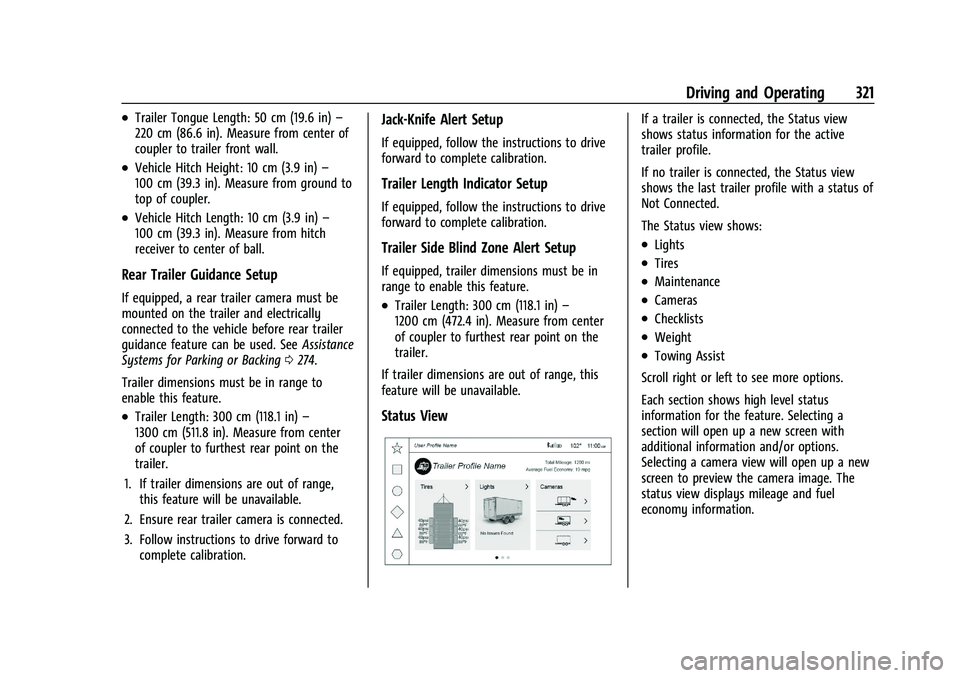
Status View
If a trailer is connected, the Status view
shows status information for the active
trailer profile.
If no trailer is connected, the Status view
shows the last trailer profile with a status of
Not Connected.
The Status view shows:
.Lights
.Tires
.Maintenance
.Cameras
.Checklists
.Weight
.Towing Assist
Scroll right or left to see more options.
Each section shows high level status
information for the feature. Selecting a
section will open up a new screen with
additional information and/or options.
Selecting a camera view will open up a new
screen to preview the camera image. The
status view displays mileage and fuel
economy information.
Page 323 of 463
Chevrolet Silverado 1500 Owner Manual (GMNA-Localizing-U.S./Canada/
Mexico/Paraguay-16515119) - 2023 - CRC - 6/2/22
322 Driving and Operating
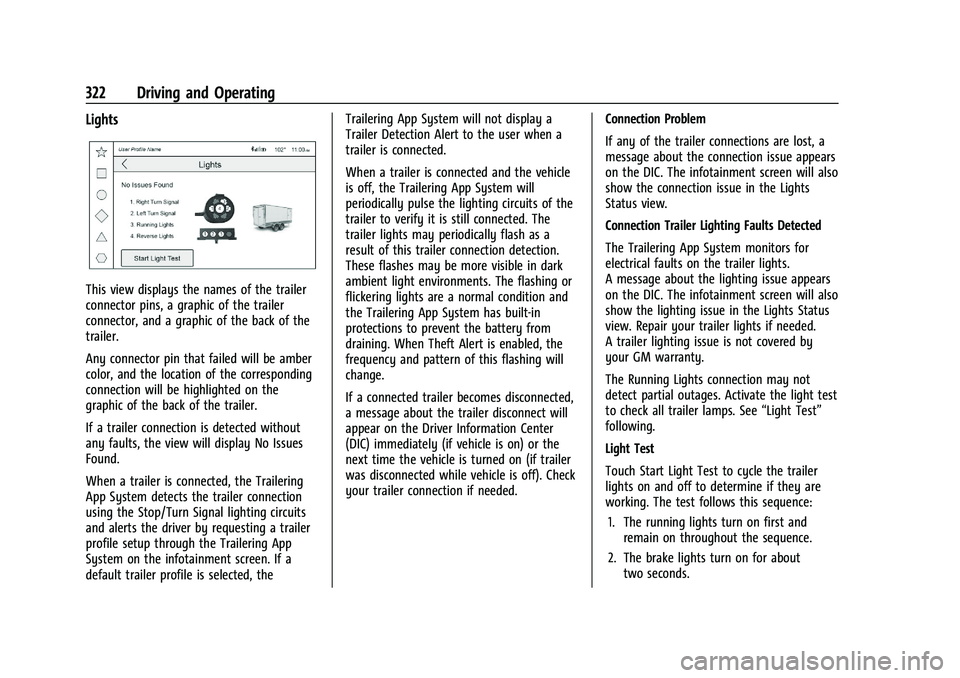
Lights
This view displays the names of the trailer
connector pins, a graphic of the trailer
connector, and a graphic of the back of the
trailer.
Any connector pin that failed will be amber
color, and the location of the corresponding
connection will be highlighted on the
graphic of the back of the trailer.
If a trailer connection is detected without
any faults, the view will display No Issues
Found.
When a trailer is connected, the Trailering
App System detects the trailer connection
using the Stop/Turn Signal lighting circuits
and alerts the driver by requesting a trailer
profile setup through the Trailering App
System on the infotainment screen. If a
default trailer profile is selected, theTrailering App System will not display a
Trailer Detection Alert to the user when a
trailer is connected.
When a trailer is connected and the vehicle
is off, the Trailering App System will
periodically pulse the lighting circuits of the
trailer to verify it is still connected. The
trailer lights may periodically flash as a
result of this trailer connection detection.
These flashes may be more visible in dark
ambient light environments. The flashing or
flickering lights are a normal condition and
the Trailering App System has built-in
protections to prevent the battery from
draining. When Theft Alert is enabled, the
frequency and pattern of this flashing will
change.
If a connected trailer becomes disconnected,
a message about the trailer disconnect will
appear on the Driver Information Center
(DIC) immediately (if vehicle is on) or the
next time the vehicle is turned on (if trailer
was disconnected while vehicle is off). Check
your trailer connection if needed.
Connection Problem
If any of the trailer connections are lost, a
message about the connection issue appears
on the DIC. The infotainment screen will also
show the connection issue in the Lights
Status view.
Connection Trailer Lighting Faults Detected
The Trailering App System monitors for
electrical faults on the trailer lights.
A message about the lighting issue appears
on the DIC. The infotainment screen will also
show the lighting issue in the Lights Status
view. Repair your trailer lights if needed.
A trailer lighting issue is not covered by
your GM warranty.
The Running Lights connection may not
detect partial outages. Activate the light test
to check all trailer lamps. See
“Light Test”
following.
Light Test
Touch Start Light Test to cycle the trailer
lights on and off to determine if they are
working. The test follows this sequence:
1. The running lights turn on first and remain on throughout the sequence.
2. The brake lights turn on for about two seconds.
Page 324 of 463
Chevrolet Silverado 1500 Owner Manual (GMNA-Localizing-U.S./Canada/
Mexico/Paraguay-16515119) - 2023 - CRC - 6/2/22
Driving and Operating 323
3. The left turn signal light flashes threetimes.
4. The right turn signal light flashes three times.
5. The reverse lights turn on for about two seconds.
6. Steps 2-5 repeat for approximately on minute and 45 seconds, or until the test
deactivates.
Touch Stop to stop the test. The test will
automatically end after one minute and
45 seconds.
The sequence also deactivates when any of
the following occur:
.The vehicle is turned off.
.The transmission is shifted out of
P (Park).
.The brake pedal is pressed.
.The turn signal is activated.
.The hazard warning lights are activated.
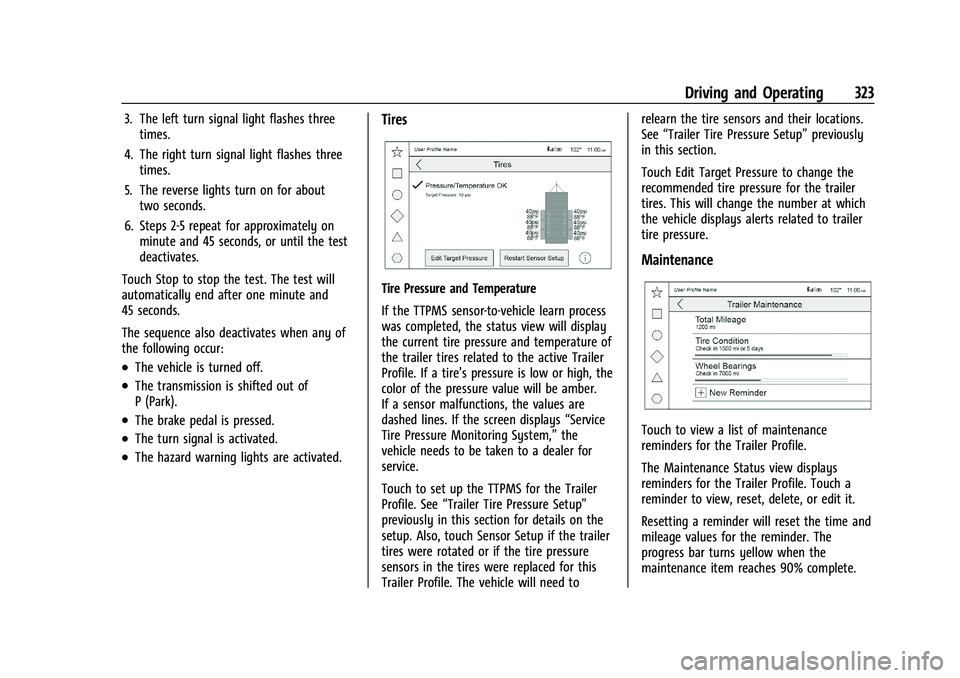
Tires
Tire Pressure and Temperature
If the TTPMS sensor-to-vehicle learn process
was completed, the status view will display
the current tire pressure and temperature of
the trailer tires related to the active Trailer
Profile. If a tire’s pressure is low or high, the
color of the pressure value will be amber.
If a sensor malfunctions, the values are
dashed lines. If the screen displays “Service
Tire Pressure Monitoring System,” the
vehicle needs to be taken to a dealer for
service.
Touch to set up the TTPMS for the Trailer
Profile. See “Trailer Tire Pressure Setup”
previously in this section for details on the
setup. Also, touch Sensor Setup if the trailer
tires were rotated or if the tire pressure
sensors in the tires were replaced for this
Trailer Profile. The vehicle will need to relearn the tire sensors and their locations.
See
“Trailer Tire Pressure Setup” previously
in this section.
Touch Edit Target Pressure to change the
recommended tire pressure for the trailer
tires. This will change the number at which
the vehicle displays alerts related to trailer
tire pressure.
Maintenance
Touch to view a list of maintenance
reminders for the Trailer Profile.
The Maintenance Status view displays
reminders for the Trailer Profile. Touch a
reminder to view, reset, delete, or edit it.
Resetting a reminder will reset the time and
mileage values for the reminder. The
progress bar turns yellow when the
maintenance item reaches 90% complete.