2023 CHEVROLET SILVERADO 1500 parking brake
[x] Cancel search: parking brakePage 7 of 463

Chevrolet Silverado 1500 Owner Manual (GMNA-Localizing-U.S./Canada/
Mexico/Paraguay-16515119) - 2023 - CRC - 6/2/22
6 Introduction
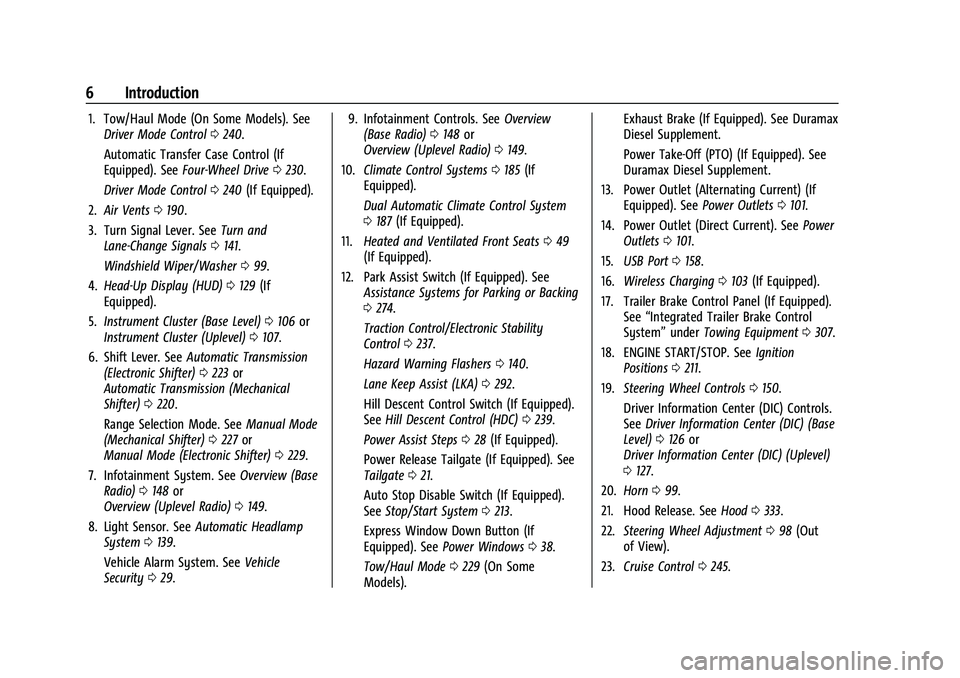
1. Tow/Haul Mode (On Some Models). SeeDriver Mode Control 0240.
Automatic Transfer Case Control (If
Equipped). See Four-Wheel Drive 0230.
Driver Mode Control 0240 (If Equipped).
2. Air Vents 0190.
3. Turn Signal Lever. See Turn and
Lane-Change Signals 0141.
Windshield Wiper/Washer 099.
4. Head-Up Display (HUD) 0129 (If
Equipped).
5. Instrument Cluster (Base Level) 0106 or
Instrument Cluster (Uplevel) 0107.
6. Shift Lever. See Automatic Transmission
(Electronic Shifter) 0223 or
Automatic Transmission (Mechanical
Shifter) 0220.
Range Selection Mode. See Manual Mode
(Mechanical Shifter) 0227 or
Manual Mode (Electronic Shifter) 0229.
7. Infotainment System. See Overview (Base
Radio) 0148 or
Overview (Uplevel Radio) 0149.
8. Light Sensor. See Automatic Headlamp
System 0139.
Vehicle Alarm System. See Vehicle
Security 029. 9. Infotainment Controls. See
Overview
(Base Radio) 0148 or
Overview (Uplevel Radio) 0149.
10. Climate Control Systems 0185 (If
Equipped).
Dual Automatic Climate Control System
0 187 (If Equipped).
11. Heated and Ventilated Front Seats 049
(If Equipped).
12. Park Assist Switch (If Equipped). See Assistance Systems for Parking or Backing
0274.
Traction Control/Electronic Stability
Control 0237.
Hazard Warning Flashers 0140.
Lane Keep Assist (LKA) 0292.
Hill Descent Control Switch (If Equipped).
See Hill Descent Control (HDC) 0239.
Power Assist Steps 028 (If Equipped).
Power Release Tailgate (If Equipped). See
Tailgate 021.
Auto Stop Disable Switch (If Equipped).
See Stop/Start System 0213.
Express Window Down Button (If
Equipped). See Power Windows 038.
Tow/Haul Mode 0229 (On Some
Models). Exhaust Brake (If Equipped). See Duramax
Diesel Supplement.
Power Take-Off (PTO) (If Equipped). See
Duramax Diesel Supplement.
13. Power Outlet (Alternating Current) (If Equipped). See Power Outlets0101.
14. Power Outlet (Direct Current). See Power
Outlets 0101.
15. USB Port 0158.
16. Wireless Charging 0103 (If Equipped).
17. Trailer Brake Control Panel (If Equipped). See“Integrated Trailer Brake Control
System” underTowing Equipment 0307.
18. ENGINE START/STOP. See Ignition
Positions 0211.
19. Steering Wheel Controls 0150.
Driver Information Center (DIC) Controls.
See Driver Information Center (DIC) (Base
Level) 0126 or
Driver Information Center (DIC) (Uplevel)
0 127.
20. Horn 099.
21. Hood Release. See Hood0333.
22. Steering Wheel Adjustment 098 (Out
of View).
23. Cruise Control 0245.
Page 8 of 463

Chevrolet Silverado 1500 Owner Manual (GMNA-Localizing-U.S./Canada/
Mexico/Paraguay-16515119) - 2023 - CRC - 6/2/22
Introduction 7
Adaptive Cruise Control (Camera)0247
(If Equipped).
Forward Collision Alert (FCA) System
0 284 (If Equipped).
Heated Steering Wheel 099 (If
Equipped).
24. Data Link Connector (DLC) (Out of View). SeeMalfunction Indicator Lamp (Check
Engine Light) 0116.
25. Electric Parking Brake 0235.
26. Fog Lamps 0141 (If Equipped).
Instrument Panel Illumination Control
0 143.
Exterior Cargo Lamps 0143.
Exterior Lamp Controls 0137.
Task Lighting 0142 (If Equipped).
Page 11 of 463

Chevrolet Silverado 1500 Owner Manual (GMNA-Localizing-U.S./Canada/
Mexico/Paraguay-16515119) - 2023 - CRC - 6/2/22
10 Introduction
Heated Steering Wheel099 (If
Equipped).
25. Fog Lamps 0141 (If Equipped).
Instrument Panel Illumination Control
0 143.
Exterior Cargo Lamps 0143.
Exterior Lamp Controls 0137.
Task Lighting 0142 (If Equipped).
26. Data Link Connector (DLC) . See Malfunction Indicator Lamp (Check
Engine Light) 0116 (Out of View).
27. Automatic Transfer Case Control. See Four-Wheel Drive 0230 (If Equipped).
Driver Mode Control 0240 (If Equipped).
Tow/Haul Mode. See Driver Mode Control
0 240 (If Equipped).
28. Electric Parking Brake 0235.
Page 19 of 463

Chevrolet Silverado 1500 Owner Manual (GMNA-Localizing-U.S./Canada/
Mexico/Paraguay-16515119) - 2023 - CRC - 6/2/22
18 Keys, Doors, and Windows
4. Pull the seal by pulling on the tab toaccess the battery.
5. Remove the old battery. Do not use a metal object.
6. Insert the new battery, positive side facing up. Replace with a CR2450 or
equivalent battery.
7. Place the seal back into the groove around the battery compartment.
8. Replace the battery cover by snapping it back into the remote key.
9. Reinsert the mechanical key.
Remote Vehicle Start
If equipped with the remote start feature,
the climate control system will come on
when the vehicle is started remotely,
depending on the outside temperature.
The rear defog and heated and ventilated
seats, if equipped, may also come on. See
Heated and Ventilated Front Seats 049. To
view available settings from the
infotainment screen, touch Settings >
Vehicle > Comfort and Convenience.
If equipped, the automatic heated steering
wheel may also come on. See Heated
Steering Wheel 099. Laws in some communities may restrict the
use of remote starters. Check local
regulations for any requirements on remote
starting of vehicles.
Do not use remote start if the vehicle is low
on fuel. The vehicle may run out of fuel.
The vehicle cannot be remote started if:
.The remote key is inside the vehicle or if
the key is in the ignition.
.The hood is not closed.
.There is an emission control system
malfunction and the lamp is on.
.The ignition is in any mode other
than off.
.The hazard warning flashers are on.
.The 30 minutes of engine run time have
been used.
.The vehicle is not in P (Park).
The engine will turn off during a remote
vehicle start if:
.The coolant temperature gets too high.
.The oil pressure gets low.
The remote key range may be reduced
while the vehicle is running.
Other conditions can affect the performance
of the remote key. See Remote Key012. Starting the Engine Using Remote Start
Press
Stwice on the remote key. The turn
signal lamps will flash. The lamps flash to
confirm the request to remote start the
vehicle has been received. During the
remote start the parking lamps will remain
on as long as the engine is running.
The engine will shut off after 15 minutes or
after the remainder of the 30 minute total
running time is used, unless you stop the
remote start before engine running has
completed or the vehicle is turned on.
Press the brake pedal and turn the ignition
on to drive the vehicle.
Total Engine Run Time
Remote start can be used for up to
30 minutes of total engine run time.
After two remote starts of 15 minutes,
or multiple shorter time starts totaling
30 minutes have been used, the vehicle
must be started and then turned off before
the remote start can be used again.
Canceling a Remote Start
To cancel a remote start, do one of the
following:
.PressS. The parking lamps will turn off.
Page 98 of 463

Chevrolet Silverado 1500 Owner Manual (GMNA-Localizing-U.S./Canada/
Mexico/Paraguay-16515119) - 2023 - CRC - 6/2/22
Instruments and Controls 97
Instruments and Controls
Controls
Steering Wheel Adjustment . . . . . . . . . . . . 98
Heated Steering Wheel . . . . . . . . . . . . . . . . . 99
Horn . . . . . . . . . . . . . . . . . . . . . . . . . . . . . . . . . . . 99
Windshield Wiper/Washer . . . . . . . . . . . . . 99
Compass . . . . . . . . . . . . . . . . . . . . . . . . . . . . . . 100
Clock . . . . . . . . . . . . . . . . . . . . . . . . . . . . . . . . . . 100
Power Outlets . . . . . . . . . . . . . . . . . . . . . . . . . 101
Wireless Charging . . . . . . . . . . . . . . . . . . . . . 103
Warning Lights, Gauges, and Indicators
Warning Lights, Gauges, andIndicators . . . . . . . . . . . . . . . . . . . . . . . . . . . . 105
Instrument Cluster (Base Level) . . . . . . . . 106
Instrument Cluster (Uplevel) . . . . . . . . . . . 107
Speedometer . . . . . . . . . . . . . . . . . . . . . . . . . . 110
Odometer . . . . . . . . . . . . . . . . . . . . . . . . . . . . . . 110
Trip Odometer . . . . . . . . . . . . . . . . . . . . . . . . . 110
Tachometer . . . . . . . . . . . . . . . . . . . . . . . . . . . . 110
Fuel Gauge . . . . . . . . . . . . . . . . . . . . . . . . . . . . 110
Engine Oil Pressure Gauge . . . . . . . . . . . . . 111
Engine Coolant Temperature Gauge . . . . 112
Transmission Temperature Gauge (Uplevel only) . . . . . . . . . . . . . . . . . . . . . . . . 113
Voltmeter Gauge . . . . . . . . . . . . . . . . . . . . . . . 113
Seat Belt Reminders . . . . . . . . . . . . . . . . . . . 114
Airbag Readiness Light . . . . . . . . . . . . . . . . . 115
Passenger Airbag Status Indicator . . . . . . 115 Charging System Light . . . . . . . . . . . . . . . . . 116
Malfunction Indicator Lamp (Check
Engine Light) . . . . . . . . . . . . . . . . . . . . . . . . . 116
Brake System Warning Light . . . . . . . . . . . 118
Electric Parking Brake Light . . . . . . . . . . . . 118
Service Electric Parking Brake Light . . . . 119
Antilock Brake System (ABS) Warning Light . . . . . . . . . . . . . . . . . . . . . . . . . . . . . . . . . 119
Four-Wheel-Drive Light . . . . . . . . . . . . . . . . . 119
Tow/Haul Mode Light . . . . . . . . . . . . . . . . . 120
Hill Descent Control Light . . . . . . . . . . . . . 120
Lane Keep Assist (LKA) Light . . . . . . . . . . . 120
Automatic Emergency Braking (AEB) Disabled Light . . . . . . . . . . . . . . . . . . . . . . . 120
Vehicle Ahead Indicator . . . . . . . . . . . . . . . . 121
Pedestrian Ahead Indicator . . . . . . . . . . . . . 121
Traction Off Light . . . . . . . . . . . . . . . . . . . . . . 121
StabiliTrak OFF Light . . . . . . . . . . . . . . . . . . . 121
Traction Control System (TCS)/ StabiliTrak Light . . . . . . . . . . . . . . . . . . . . . . 122
Engine Coolant Temperature Warning Light . . . . . . . . . . . . . . . . . . . . . . . . . . . . . . . . . 122
Driver Mode Control Light . . . . . . . . . . . . . 122
Tire Pressure Light . . . . . . . . . . . . . . . . . . . . . 123
Engine Oil Pressure Light (Uplevel Cluster) . . . . . . . . . . . . . . . . . . . . . . . . . . . . . . 123
Low Fuel Warning Light . . . . . . . . . . . . . . . 124
Security Light . . . . . . . . . . . . . . . . . . . . . . . . . . 124
High-Beam On Light . . . . . . . . . . . . . . . . . . . 124
Front Fog Lamp Light . . . . . . . . . . . . . . . . . . 125 Lamps On Reminder . . . . . . . . . . . . . . . . . . . 125
Cruise Control Light . . . . . . . . . . . . . . . . . . . . 125
Door Ajar Light . . . . . . . . . . . . . . . . . . . . . . . . 126
Information Displays
Driver Information Center (DIC) (Base
Level) . . . . . . . . . . . . . . . . . . . . . . . . . . . . . . . . 126
Driver Information Center (DIC) (Uplevel) . . . . . . . . . . . . . . . . . . . . . . . . . . . . . 127
Head-Up Display (HUD) . . . . . . . . . . . . . . . . 129
Vehicle Messages
Vehicle Messages . . . . . . . . . . . . . . . . . . . . . . 133
Engine Power Messages . . . . . . . . . . . . . . . 133
Vehicle Speed Messages . . . . . . . . . . . . . . . 134
Universal Remote System
Universal Remote System . . . . . . . . . . . . . . 134
Universal Remote System Programming . . . . . . . . . . . . . . . . . . . . . . . . 134
Universal Remote System Operation . . . 136
Page 119 of 463

Chevrolet Silverado 1500 Owner Manual (GMNA-Localizing-U.S./Canada/
Mexico/Paraguay-16515119) - 2023 - CRC - 6/2/22
118 Instruments and Controls
service the vehicle may affect vehicle
operation. SeeAdd-On Electrical Equipment
0 328. See your dealer if assistance is
needed.
The vehicle may not pass inspection if:
.The light is on when the engine is
running.
.The light does not come on when the
ignition is on while the engine is off.
.Critical emission control systems have not
been completely diagnosed. If this
happens, the vehicle would not be ready
for inspection and might require
several days of routine driving before the
system is ready for inspection. This can
happen if the 12-volt battery has recently
been replaced or run down, or if the
vehicle has been recently serviced.
See your dealer if the vehicle will not pass
or cannot be made ready for the test.
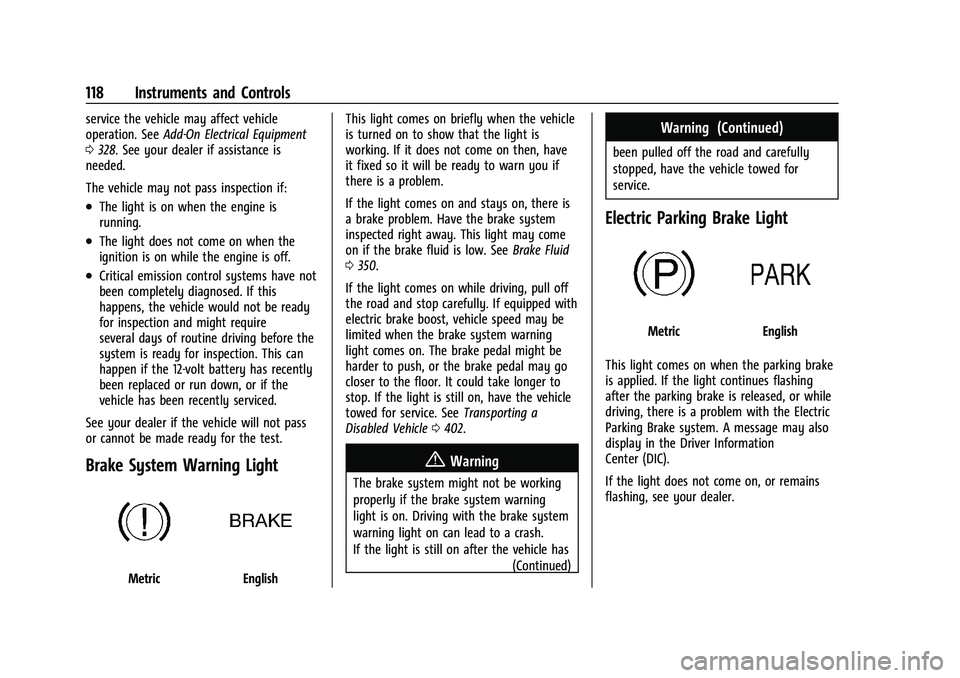
Brake System Warning Light
MetricEnglish This light comes on briefly when the vehicle
is turned on to show that the light is
working. If it does not come on then, have
it fixed so it will be ready to warn you if
there is a problem.
If the light comes on and stays on, there is
a brake problem. Have the brake system
inspected right away. This light may come
on if the brake fluid is low. See
Brake Fluid
0 350.
If the light comes on while driving, pull off
the road and stop carefully. If equipped with
electric brake boost, vehicle speed may be
limited when the brake system warning
light comes on. The brake pedal might be
harder to push, or the brake pedal may go
closer to the floor. It could take longer to
stop. If the light is still on, have the vehicle
towed for service. See Transporting a
Disabled Vehicle 0402.
{Warning
The brake system might not be working
properly if the brake system warning
light is on. Driving with the brake system
warning light on can lead to a crash.
If the light is still on after the vehicle has
(Continued)
Warning (Continued)
been pulled off the road and carefully
stopped, have the vehicle towed for
service.
Electric Parking Brake Light
MetricEnglish
This light comes on when the parking brake
is applied. If the light continues flashing
after the parking brake is released, or while
driving, there is a problem with the Electric
Parking Brake system. A message may also
display in the Driver Information
Center (DIC).
If the light does not come on, or remains
flashing, see your dealer.
Page 120 of 463

Chevrolet Silverado 1500 Owner Manual (GMNA-Localizing-U.S./Canada/
Mexico/Paraguay-16515119) - 2023 - CRC - 6/2/22
Instruments and Controls 119
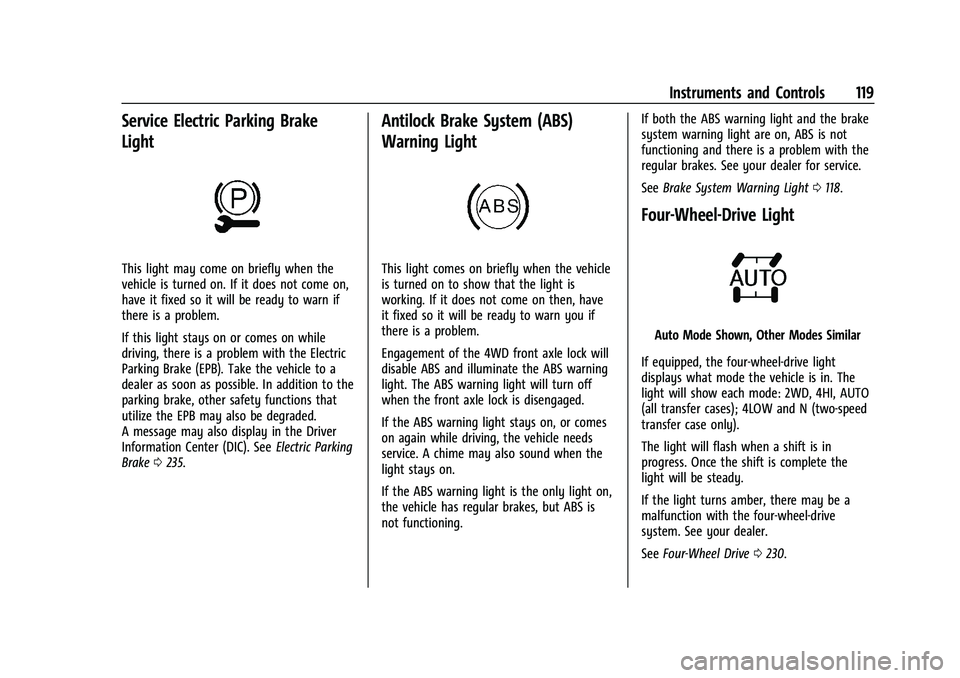
Service Electric Parking Brake
Light
This light may come on briefly when the
vehicle is turned on. If it does not come on,
have it fixed so it will be ready to warn if
there is a problem.
If this light stays on or comes on while
driving, there is a problem with the Electric
Parking Brake (EPB). Take the vehicle to a
dealer as soon as possible. In addition to the
parking brake, other safety functions that
utilize the EPB may also be degraded.
A message may also display in the Driver
Information Center (DIC). SeeElectric Parking
Brake 0235.
Antilock Brake System (ABS)
Warning Light
This light comes on briefly when the vehicle
is turned on to show that the light is
working. If it does not come on then, have
it fixed so it will be ready to warn you if
there is a problem.
Engagement of the 4WD front axle lock will
disable ABS and illuminate the ABS warning
light. The ABS warning light will turn off
when the front axle lock is disengaged.
If the ABS warning light stays on, or comes
on again while driving, the vehicle needs
service. A chime may also sound when the
light stays on.
If the ABS warning light is the only light on,
the vehicle has regular brakes, but ABS is
not functioning. If both the ABS warning light and the brake
system warning light are on, ABS is not
functioning and there is a problem with the
regular brakes. See your dealer for service.
See
Brake System Warning Light 0118.
Four-Wheel-Drive Light
Auto Mode Shown, Other Modes Similar
If equipped, the four-wheel-drive light
displays what mode the vehicle is in. The
light will show each mode: 2WD, 4HI, AUTO
(all transfer cases); 4LOW and N (two-speed
transfer case only).
The light will flash when a shift is in
progress. Once the shift is complete the
light will be steady.
If the light turns amber, there may be a
malfunction with the four-wheel-drive
system. See your dealer.
See Four-Wheel Drive 0230.
Page 180 of 463

Chevrolet Silverado 1500 Owner Manual (GMNA-Localizing-U.S./Canada/
Mexico/Paraguay-16515119) - 2023 - CRC - 6/2/22
Infotainment System 179
Legal Information
Touch to view legal and license information.
Updates
This menu allows adjustment of the vehicle
update settings.
Google
This menu allows adjustment of the Google
settings.
Teen Driver
If equipped, this allows multiple keys to be
registered for beginner drivers to encourage
safe driving habits. When the vehicle is
started with a Teen Driver key, it will
automatically activate certain safety
systems, allow setting of some features, and
limit the use of others. The Report Card will
record vehicle data about driving behavior
that can be viewed later. When the vehicle
is started with a registered key, the Driver
Information Center (DIC) displays a message
that Teen Driver is active.
To access:1. Touch Settings on the Home Page, then touch Vehicle, and then Teen Driver. 2. Create a Personal Identification Number
(PIN) by choosing a four-digit PIN.
Re-enter the PIN to confirm. To change
the PIN, touch Change PIN.
The PIN is required to:
.Set up/Add or remove keys.
.Change Teen Driver settings.
.Change or clear the Teen Driver PIN.
.Access or delete Report Card data.
Set up/Add keys to activate Teen Driver and
assign restrictions to the key:
Any vehicle key can be registered, up to a
maximum of eight keys. Label the key to
tell it apart from the other keys.
For a pushbutton start system: 1. Start the vehicle.
2. For automatic transmissions, the vehicle must be in P (Park). For manual
transmissions, the vehicle must be
stopped with the parking brake set.
3. From the Settings menu, touch Vehicle and then Teen Driver.
4. Enter the PIN.
5. Place the remote key you wish to register in the transmitter pocket. The
key does not need to be the one that started the vehicle. See
Remote Key
Operation 012 for transmitter pocket
location.
6. From the Teen Driver menu, touch Setup Keys or Add/Remove Teen Driver Keys.
.If the remote key has not previously
been registered, the option to add
the key displays. Touch Add and a
confirmation message displays. Teen
Driver restrictions will be applied
whenever this remote key is used to
operate the vehicle.
.If the remote key has already been
registered, the option to remove the
key displays. If Remove is touched,
the remote key is no longer
registered. A confirmation message
displays, and Teen Driver restrictions
will not be applied if this remote key
is used to operate the vehicle.
In vehicles with a pushbutton start system,
if a Teen Driver and a non-Teen Driver key
are both present at start up, the vehicle will
recognize the non-Teen Driver key to start
the vehicle. The Teen Driver settings will not
be active.
For a keyed ignition system: 1. Start the vehicle.