2023 CHEVROLET SILVERADO 1500 parking brake
[x] Cancel search: parking brakePage 236 of 463
Chevrolet Silverado 1500 Owner Manual (GMNA-Localizing-U.S./Canada/
Mexico/Paraguay-16515119) - 2023 - CRC - 6/2/22
Driving and Operating 235
If there is a problem with ABS, this warning
light stays on. SeeAntilock Brake System
(ABS) Warning Light 0119.
ABS does not change the time needed to
get a foot on the brake pedal and does not
always decrease stopping distance. If you
get too close to the vehicle ahead, there will
not be enough time to apply the brakes if
that vehicle suddenly slows or stops. Always
leave enough room ahead to stop, even
with ABS.
Using ABS
Do not pump the brakes. Just hold the brake
pedal down firmly. Hearing or feeling ABS
operate is normal.
Braking in Emergencies
ABS allows steering and braking at the same
time. In many emergencies, steering can
help even more than braking.
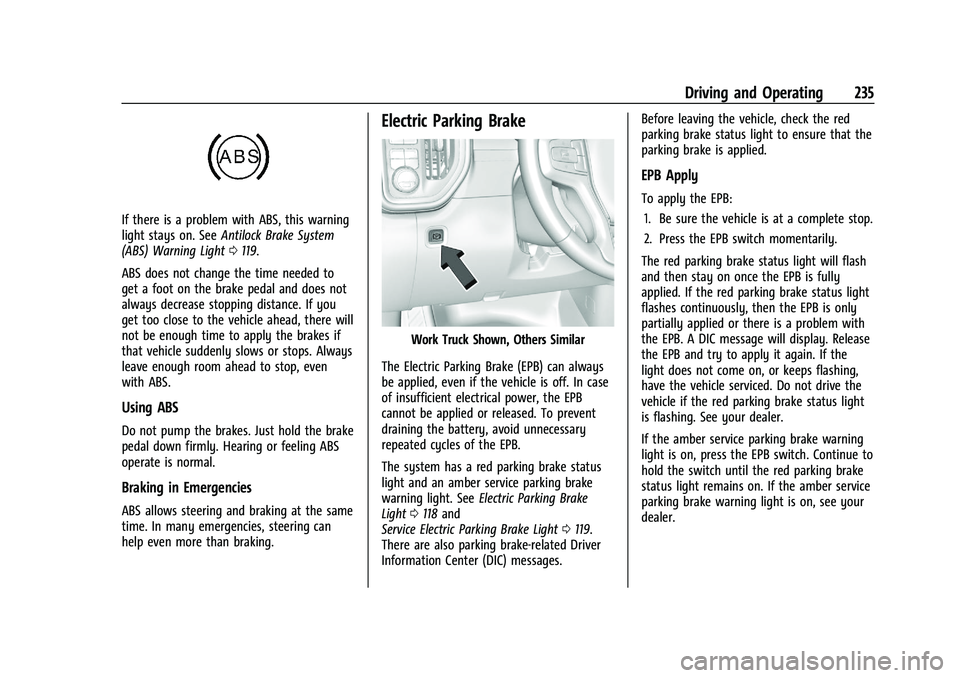
Electric Parking Brake
Work Truck Shown, Others Similar
The Electric Parking Brake (EPB) can always
be applied, even if the vehicle is off. In case
of insufficient electrical power, the EPB
cannot be applied or released. To prevent
draining the battery, avoid unnecessary
repeated cycles of the EPB.
The system has a red parking brake status
light and an amber service parking brake
warning light. See Electric Parking Brake
Light 0118 and
Service Electric Parking Brake Light 0119.
There are also parking brake-related Driver
Information Center (DIC) messages. Before leaving the vehicle, check the red
parking brake status light to ensure that the
parking brake is applied.
EPB Apply
To apply the EPB:
1. Be sure the vehicle is at a complete stop.
2. Press the EPB switch momentarily.
The red parking brake status light will flash
and then stay on once the EPB is fully
applied. If the red parking brake status light
flashes continuously, then the EPB is only
partially applied or there is a problem with
the EPB. A DIC message will display. Release
the EPB and try to apply it again. If the
light does not come on, or keeps flashing,
have the vehicle serviced. Do not drive the
vehicle if the red parking brake status light
is flashing. See your dealer.
If the amber service parking brake warning
light is on, press the EPB switch. Continue to
hold the switch until the red parking brake
status light remains on. If the amber service
parking brake warning light is on, see your
dealer.
Page 237 of 463
Chevrolet Silverado 1500 Owner Manual (GMNA-Localizing-U.S./Canada/
Mexico/Paraguay-16515119) - 2023 - CRC - 6/2/22
236 Driving and Operating
If the EPB is applied while the vehicle is
moving, the vehicle will decelerate as long
as the switch is pressed. If the switch is
pressed until the vehicle comes to a stop,
the EPB will remain applied.
The vehicle may automatically apply the EPB
in some situations when the vehicle is not
moving. This is normal, and is done to
periodically check the correct operation of
the EPB system, or at the request of other
safety functions that utilize the EPB.
If the EPB fails to apply, block the rear
wheels to prevent vehicle movement.
EPB Release
To release the EPB:1. Turn the ignition on or to accessory mode.
2. Apply and hold the brake pedal.
3. Press the EPB switch momentarily.
The EPB is released when the red parking
brake status light is off.
If the amber service parking brake warning
light is on, release the EPB by pressing and
holding the EPB switch. Continue to hold the
switch until the red parking brake status
light is off. If either light stays on after
release is attempted, see your dealer.
Caution
Driving with the parking brake on can
overheat the brake system and cause
premature wear or damage to brake
system parts. Make sure that the parking
brake is fully released and the brake
warning light is off before driving.
If you are towing a trailer and parking on a
hill, see Driving Characteristics and Towing
Tips 0299.
Automatic EPB Release
The EPB will automatically release if the
vehicle is running, placed into gear, and an
attempt is made to drive away. Avoid rapid
acceleration when the EPB is applied, to
preserve parking brake lining life.
Brake Assist
Brake Assist detects rapid brake pedal
applications due to emergency braking
situations and provides additional braking to
activate the Antilock Brake System (ABS) if
the brake pedal is not pushed hard enough
to activate ABS normally. Minor noise, brake
pedal pulsation, and/or pedal movement
during this time may occur. Continue to apply the brake pedal as the driving
situation dictates. Brake Assist disengages
when the brake pedal is released.
Hill Start Assist (HSA)
{Warning
Do not rely on the HSA feature. HSA does
not replace the need to pay attention
and drive safely. You may not hear or
feel alerts or warnings provided by this
system. Failure to use proper care when
driving may result in injury, death,
or vehicle damage. See
Defensive Driving
0 195.
When the vehicle is stopped on a grade, Hill
Start Assist (HSA) prevents the vehicle from
rolling in an unintended direction during the
transition from brake pedal release to
accelerator pedal apply. The brakes release
when the accelerator pedal is applied. If the
accelerator pedal is not applied within a few
minutes, the Electric Parking Brake will
apply. The brakes may also release under
other conditions. Do not rely on HSA to hold
the vehicle.
Page 244 of 463
Chevrolet Silverado 1500 Owner Manual (GMNA-Localizing-U.S./Canada/
Mexico/Paraguay-16515119) - 2023 - CRC - 6/2/22
Driving and Operating 243
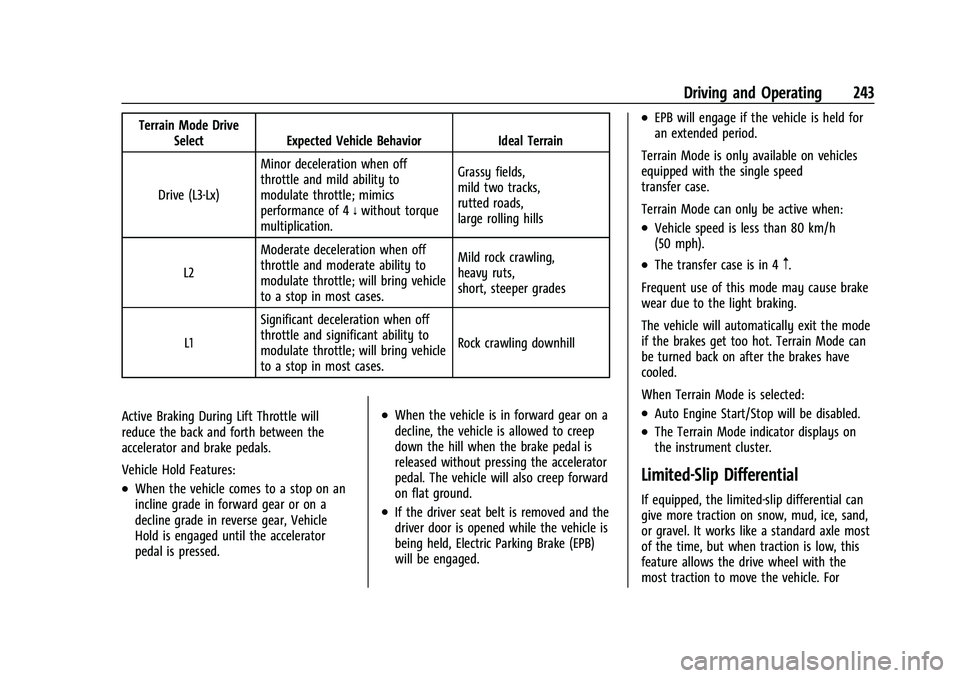
Terrain Mode DriveSelect Expected Vehicle Behavior Ideal Terrain
Drive (L3-Lx) Minor deceleration when off
throttle and mild ability to
modulate throttle; mimics
performance of 4
nwithout torque
multiplication. Grassy fields,
mild two tracks,
rutted roads,
large rolling hills
L2 Moderate deceleration when off
throttle and moderate ability to
modulate throttle; will bring vehicle
to a stop in most cases. Mild rock crawling,
heavy ruts,
short, steeper grades
L1 Significant deceleration when off
throttle and significant ability to
modulate throttle; will bring vehicle
to a stop in most cases. Rock crawling downhill
Active Braking During Lift Throttle will
reduce the back and forth between the
accelerator and brake pedals.
Vehicle Hold Features:
.When the vehicle comes to a stop on an
incline grade in forward gear or on a
decline grade in reverse gear, Vehicle
Hold is engaged until the accelerator
pedal is pressed.
.When the vehicle is in forward gear on a
decline, the vehicle is allowed to creep
down the hill when the brake pedal is
released without pressing the accelerator
pedal. The vehicle will also creep forward
on flat ground.
.If the driver seat belt is removed and the
driver door is opened while the vehicle is
being held, Electric Parking Brake (EPB)
will be engaged.
.EPB will engage if the vehicle is held for
an extended period.
Terrain Mode is only available on vehicles
equipped with the single speed
transfer case.
Terrain Mode can only be active when:
.Vehicle speed is less than 80 km/h
(50 mph).
.The transfer case is in 4m.
Frequent use of this mode may cause brake
wear due to the light braking.
The vehicle will automatically exit the mode
if the brakes get too hot. Terrain Mode can
be turned back on after the brakes have
cooled.
When Terrain Mode is selected:
.Auto Engine Start/Stop will be disabled.
.The Terrain Mode indicator displays on
the instrument cluster.
Limited-Slip Differential
If equipped, the limited-slip differential can
give more traction on snow, mud, ice, sand,
or gravel. It works like a standard axle most
of the time, but when traction is low, this
feature allows the drive wheel with the
most traction to move the vehicle. For
Page 256 of 463
Chevrolet Silverado 1500 Owner Manual (GMNA-Localizing-U.S./Canada/
Mexico/Paraguay-16515119) - 2023 - CRC - 6/2/22
Driving and Operating 255
automatically applies the Electric Parking
Brake (EPB) to hold the vehicle. The EPB
status light will turn on. SeeElectric Parking
Brake 0235. To release the EPB, press the
accelerator pedal.
A DIC warning message may display
indicating to shift to P (Park) before exiting
the vehicle. See Vehicle Messages 0133.
{Warning
If ACC has stopped the vehicle, and if ACC
is disengaged, turned off, or canceled, the
vehicle will no longer be held at a stop.
The vehicle can move. When ACC is
holding the vehicle at a stop, always be
prepared to manually apply the brakes.
{Warning
Leaving the vehicle without placing it in
P (Park) can be dangerous. Do not leave
the vehicle while it is being held at a
stop by ACC. Always place the vehicle in
P (Park) and turn off the ignition before
leaving the vehicle. ACC Override
If using the accelerator pedal while ACC is
active, the ACC indicator turns blue on the
instrument cluster and in the HUD,
if equipped, to indicate that automatic
braking will not occur. ACC will resume
operation when the accelerator pedal is not
being pressed.
{Warning
The ACC will not automatically apply the
brakes if your foot is resting on the
accelerator pedal. You could crash into a
vehicle ahead of you.
Curves in the Road
{Warning
On curves, ACC may not detect a vehicle
ahead in your lane. You could be startled
if the vehicle accelerates up to the set
speed, especially when following a vehicle
exiting or entering exit ramps. You could
lose control of the vehicle or crash. Do
not use ACC while driving on an entrance
or exit ramp. Always be ready to use the
brakes if necessary.
{Warning
On curves, ACC may respond to a vehicle
in another lane, or may not have time to
react to a vehicle in your lane. You could
crash into a vehicle ahead of you, or lose
control of your vehicle. Give extra
attention in curves and be ready to use
the brakes if necessary. Select an
appropriate speed while driving in curves.
ACC may operate differently in a sharp
curve. It may reduce the vehicle speed if the
curve is too sharp.
If equipped, the curve speed control
indicator
bmay illuminate green when
ACC is actively controlling the vehicle speed
and detects a sharp curve on the road
ahead.
ACC automatically slows the vehicle down
while navigating the curve and may increase
speed out of the curve, but will not exceed
the set speed.
Page 277 of 463
Chevrolet Silverado 1500 Owner Manual (GMNA-Localizing-U.S./Canada/
Mexico/Paraguay-16515119) - 2023 - CRC - 6/2/22
276 Driving and Operating
Camera Views
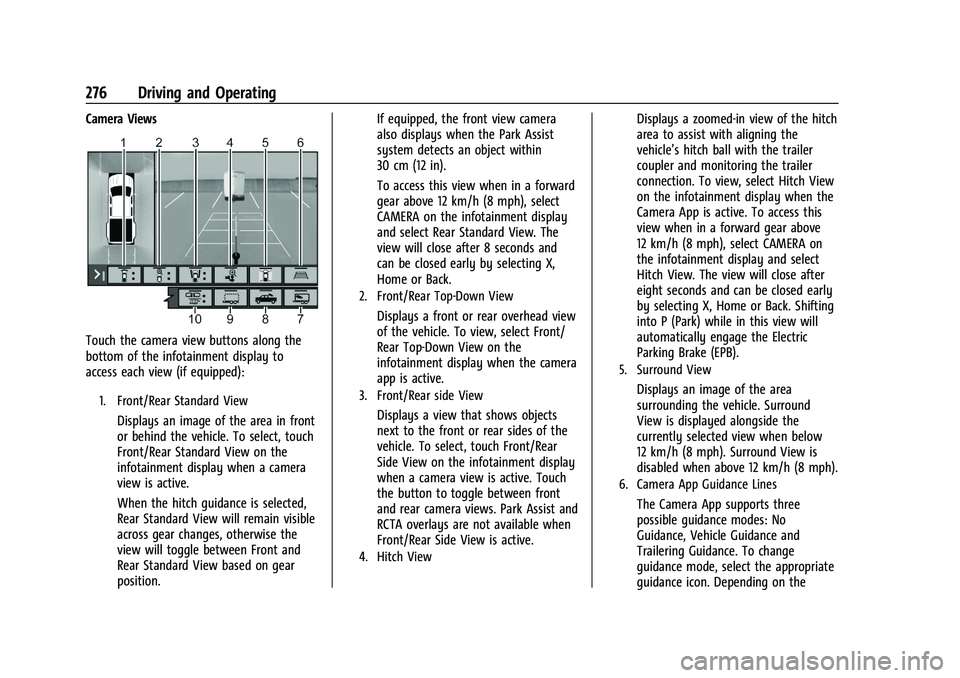
Touch the camera view buttons along the
bottom of the infotainment display to
access each view (if equipped):
1. Front/Rear Standard View
Displays an image of the area in front
or behind the vehicle. To select, touch
Front/Rear Standard View on the
infotainment display when a camera
view is active.
When the hitch guidance is selected,
Rear Standard View will remain visible
across gear changes, otherwise the
view will toggle between Front and
Rear Standard View based on gear
position.If equipped, the front view camera
also displays when the Park Assist
system detects an object within
30 cm (12 in).
To access this view when in a forward
gear above 12 km/h (8 mph), select
CAMERA on the infotainment display
and select Rear Standard View. The
view will close after 8 seconds and
can be closed early by selecting X,
Home or Back.
2. Front/Rear Top-Down View
Displays a front or rear overhead view
of the vehicle. To view, select Front/
Rear Top-Down View on the
infotainment display when the camera
app is active.
3. Front/Rear side View
Displays a view that shows objects
next to the front or rear sides of the
vehicle. To select, touch Front/Rear
Side View on the infotainment display
when a camera view is active. Touch
the button to toggle between front
and rear camera views. Park Assist and
RCTA overlays are not available when
Front/Rear Side View is active.
4. Hitch View
Displays a zoomed-in view of the hitch
area to assist with aligning the
vehicle’s hitch ball with the trailer
coupler and monitoring the trailer
connection. To view, select Hitch View
on the infotainment display when the
Camera App is active. To access this
view when in a forward gear above
12 km/h (8 mph), select CAMERA on
the infotainment display and select
Hitch View. The view will close after
eight seconds and can be closed early
by selecting X, Home or Back. Shifting
into P (Park) while in this view will
automatically engage the Electric
Parking Brake (EPB).
5. Surround View
Displays an image of the area
surrounding the vehicle. Surround
View is displayed alongside the
currently selected view when below
12 km/h (8 mph). Surround View is
disabled when above 12 km/h (8 mph).
6. Camera App Guidance Lines
The Camera App supports three
possible guidance modes: No
Guidance, Vehicle Guidance and
Trailering Guidance. To change
guidance mode, select the appropriate
guidance icon. Depending on the
Page 300 of 463
Chevrolet Silverado 1500 Owner Manual (GMNA-Localizing-U.S./Canada/
Mexico/Paraguay-16515119) - 2023 - CRC - 6/2/22
Driving and Operating 299
Driving Characteristics and
Towing Tips
{Warning
You can lose control when towing a
trailer if the correct equipment is not
used or the vehicle is not driven properly.
For example, if the trailer is too heavy or
the trailer brakes are inadequate for the
load, the vehicle may not stop as
expected. You and others could be
seriously injured. The vehicle may also be
damaged, and the repairs would not be
covered by the vehicle warranty. Pull a
trailer only if all the steps in this section
have been followed. Ask your dealer for
advice and information about towing a
trailer with the vehicle.
Driving with a Trailer
Trailering is different than just driving the
vehicle by itself. Trailering affects handling,
acceleration, braking, and durability.
Successful and safe trailering requires proper
use of the correct equipment.The following information has many
time-tested, important trailering tips and
safety rules. Many of these are important
for your safety and that of your passengers.
Read this section carefully before towing a
trailer.
When towing a trailer:
.Become familiar with, and follow all state
and local laws that apply to trailer
towing. These requirements vary from
state to state.
.State laws may require the use of
extended side view mirrors. If your
visibility is limited or restricted while
towing, install extended side view mirrors
on your vehicle, even if not required.
.Do not tow a trailer during the first
800 km (500 mi) of vehicle use to prevent
damage to the engine, axle, or other
parts.
.Perform the first oil change before heavy
towing.
.Do not drive over 800 km/h (50 mph) and
do not make starts at full throttle during
the first 800 km (500 mi) of trailer
towing.
.Tow in D (Drive). Tow/Haul Mode is
recommended for heavier trailers. See
Tow/Haul Mode
0229. If the transmission downshifts too often, a lower gear may
be selected using Manual Mode. See
Manual Mode (Mechanical Shifter)
0227
or
Manual Mode (Electronic Shifter) 0229.
If equipped, the following driver assistance
features should be turned off when towing
a trailer:
.Park Assist
.Automatic Parking Assist (APA)
.Reverse Automatic Braking (RAB)
If equipped, the following driver assistance
features should be turned to alert or off
when towing a trailer, unless equipped with
Super Cruise:
.Automatic Emergency Braking (AEB)
.Front Pedestrian Braking (FPB)
If equipped with Lane Change Alert (LCA),
the LCA detection zones that extend back
from the side of the vehicle do not move
further back when a trailer is towed. Use
caution while changing lanes when towing a
trailer.
If equipped, the Rear Cross Traffic Alert
(RCTA) feature is automatically disabled
when a trailer is attached to the vehicle.
Page 302 of 463
Chevrolet Silverado 1500 Owner Manual (GMNA-Localizing-U.S./Canada/
Mexico/Paraguay-16515119) - 2023 - CRC - 6/2/22
Driving and Operating 301
Driving on Grades
Reduce speed and shift to a lower gear
before starting down a long or steep
downhill grade. If the transmission is not
shifted down, the brakes may overheat and
result in reduced braking efficiency.
The vehicle can tow in D (Drive). Shift the
transmission to a lower gear if the
transmission shifts too often under heavy
loads and/or hilly conditions.
When towing at higher altitudes, engine
coolant will boil at a lower temperature
than at lower altitudes. If the engine is
turned off immediately after towing at high
altitude on steep uphill grades, the vehicle
could show signs similar to engine
overheating. To avoid this, let the engine
run, preferably on level ground, with the
transmission in P (Park) for a few minutes
before turning the engine off. If the
overheat warning comes on, seeEngine
Overheating 0346.
Viewing Systems
If equipped, the viewing systems on the
vehicle can improve visibility while hitching,
backing, and driving with a trailer. See
Driver Assistance Systems 0272.
Parking on Hills
{Warning
To prevent serious injury or death,
always park your vehicle and trailer on a
level surface when possible.
When parking your vehicle and your trailer
on a hill: 1. Press and hold the brake pedal, but do not shift into P (Park). Turn the wheels
toward the curb if facing downhill or
into traffic if facing uphill.
2. Have someone place chocks under the trailer wheels.
3. Gradually release the brake pedal to allow the chocks to absorb the load of
the trailer.
4. Reapply the brake pedal. Then apply the parking brake and shift into P (Park).
5. Release the brake pedal.
Leaving After Parking on a Hill
1. Apply and hold the brake pedal.
.Start the vehicle.
.Shift into the desired gear.
.Release the parking brake. 2. Let up on the brake pedal.
3. Drive slowly until the trailer is clear of
the chocks.
4. Stop and have someone pick up and store the chocks.
Launching and Retrieving a Boat
Backing the Trailer into the Water
{Warning
.Have all passengers get out of the
vehicle before backing onto the sloped
part of the ramp. Lower the driver and
passenger side windows before
backing onto the ramp. This will
provide a means of escape in the
unlikely event the vehicle slides into
the water.
.If the boat launch surface is slippery,
have the driver remain in the vehicle
with the brake pedal applied while the
boat is being launched. The boat
launch can be especially slippery at
low tide when part of the ramp was
previously submerged at high tide. Do
not back onto the ramp to launch the
boat if you are not sure the vehicle
can maintain traction.
(Continued)
Page 303 of 463
Chevrolet Silverado 1500 Owner Manual (GMNA-Localizing-U.S./Canada/
Mexico/Paraguay-16515119) - 2023 - CRC - 6/2/22
302 Driving and Operating
Warning (Continued)
.Do not move the vehicle if someone is
in the path of the trailer. Some parts
of the trailer might be underwater and
not visible to people who are assisting
in launching the boat.
Disconnect the trailer wiring before backing
the trailer into the water to prevent damage
to the electrical circuits. Reconnect the
wiring to the trailer after removing the
trailer from the water. If the trailer has
electric brakes that can function when the
trailer is submerged, it might help to leave
the electrical trailer connector attached to
maintain trailer brake functionality while on
the boat ramp.
To back the trailer into the water: 1. If equipped, place the vehicle in Four-Wheel Drive High or Automatic
Four-Wheel Drive.
2. Slowly back down the boat ramp until the boat is floating, but no further than
necessary.
3. Press and hold the brake pedal, but do not shift into P (Park) yet.
4. Have someone place chocks under the front wheels of the vehicle. 5. Gradually release the brake pedal to
allow the chocks to absorb the load of
the trailer.
6. Reapply the brake pedal. Then apply the parking brake and shift into P (Park).
7. Release the brake pedal.
Pulling the Trailer from the Water
To pull the trailer out of the water: 1. Press and hold the brake pedal.
2. Start the engine and shift into gear.
3. Release the parking brake.
4. Let up on the brake pedal.
5. Drive slowly until the tires are clear of the chocks.
6. Stop and have someone pick up and store the chocks.
7. Slowly pull the trailer from the water.
8. Once the vehicle and trailer have been driven from the sloped part of the boat
ramp, the vehicle can be shifted from
four-wheel-drive high. Shift into the drive
mode that is appropriate for the road
conditions.
Caution
If the vehicle tires begin to spin and the
vehicle begins to slide toward the water,
remove your foot from the accelerator
pedal and apply the brake pedal. Seek
help to have the vehicle towed up
the ramp.
Maintenance when Trailer Towing
The vehicle needs service more often when
used to tow trailers. See Maintenance
Schedule 0417. It is especially important to
check the engine oil, axle lubricant, belts,
cooling system, and brake system before
and during each trip.
Check periodically to see that all nuts and
bolts on the trailer hitch are tight.
Engine Cooling When Trailer Towing
The cooling system may temporarily
overheat during severe operating conditions.
See Engine Overheating 0346.
Trailer Towing
If equipped with a diesel engine, see the
Duramax diesel supplement.