Page 69 of 351

Chevrolet Corvette Owner Manual (GMNA-Localizing-U.S./Canada/Mexico-
16287457) - 2023 - CRC - 3/10/22
68 Seats and Restraints
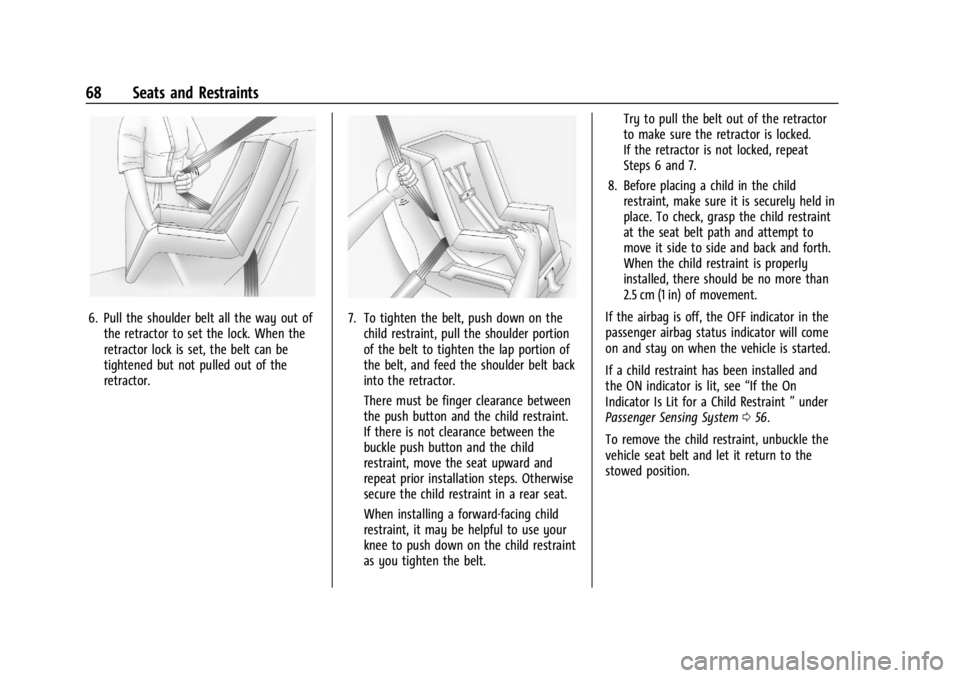
6. Pull the shoulder belt all the way out ofthe retractor to set the lock. When the
retractor lock is set, the belt can be
tightened but not pulled out of the
retractor.7. To tighten the belt, push down on thechild restraint, pull the shoulder portion
of the belt to tighten the lap portion of
the belt, and feed the shoulder belt back
into the retractor.
There must be finger clearance between
the push button and the child restraint.
If there is not clearance between the
buckle push button and the child
restraint, move the seat upward and
repeat prior installation steps. Otherwise
secure the child restraint in a rear seat.
When installing a forward-facing child
restraint, it may be helpful to use your
knee to push down on the child restraint
as you tighten the belt. Try to pull the belt out of the retractor
to make sure the retractor is locked.
If the retractor is not locked, repeat
Steps 6 and 7.
8. Before placing a child in the child restraint, make sure it is securely held in
place. To check, grasp the child restraint
at the seat belt path and attempt to
move it side to side and back and forth.
When the child restraint is properly
installed, there should be no more than
2.5 cm (1 in) of movement.
If the airbag is off, the OFF indicator in the
passenger airbag status indicator will come
on and stay on when the vehicle is started.
If a child restraint has been installed and
the ON indicator is lit, see “If the On
Indicator Is Lit for a Child Restraint ”under
Passenger Sensing System 056.
To remove the child restraint, unbuckle the
vehicle seat belt and let it return to the
stowed position.
Page 285 of 351

Chevrolet Corvette Owner Manual (GMNA-Localizing-U.S./Canada/Mexico-
16287457) - 2023 - CRC - 3/10/22
284 Vehicle Care
for damaged tires or wheels. If the
unusual wear continues after the
rotation, check the wheel alignment.
SeeWhen It Is Time for New Tires
0 285 and
Wheel Replacement 0288.
Different tire sizes should not be
rotated front to rear.
Use this rotation pattern if the vehicle
has different size tires on the front
and rear. Caution
Wheels will become scratched if not
handled properly. When laying a tire and
wheel assembly flat on the ground, place
it face up with a towel underneath it.
Move the assembly by rolling it on the
tires. Do not drag it.
Adjust the front and rear tires to the
recommended inflation pressure on the
Tire and Loading Information label after
the tires have been rotated. See
Tire
Pressure 0278 and
Vehicle Load Limits 0186.
Reset the Tire Pressure Monitor System.
See Tire Pressure Monitor Operation
0 281.
Check that all wheel nuts are properly
tightened. See “Wheel Nut Torque”
under Capacities and Specifications
0 315.
{Warning
Rust or dirt on a wheel, or on the
parts to which it is fastened, can
cause wheel nuts to become loose
over time. The wheel could come off
and cause a crash. When changing a
wheel, remove any rust or dirt from
places where the wheel attaches to
the vehicle. In an emergency, a cloth
or paper towel can be used; however,
use a scraper or wire brush later to
remove all rust or dirt.
Lightly coat the inner diameter of the
wheel hub opening with wheel bearing
grease after a wheel change or tire
rotation to prevent corrosion or rust
buildup.
{Warning
Do not apply grease to the wheel
mounting surface, wheel conical
seats, or the wheel nuts or bolts.
Grease applied to these areas could
cause a wheel to become loose or
come off, resulting in a crash.
Page 304 of 351

Chevrolet Corvette Owner Manual (GMNA-Localizing-U.S./Canada/Mexico-
16287457) - 2023 - CRC - 3/10/22
Vehicle Care 303
commercial upholstery cleaner or spot lifter.
If ring formation occurs, clean the entire
fabric or carpet.
After cleaning, use a paper towel to blot
excess moisture.
Cleaning High Gloss Surfaces and Vehicle
Information and Radio Displays
Use a microfiber cloth on high gloss surfaces
or vehicle displays. First, use a soft bristle
brush to remove dirt that can scratch the
surface. Then gently clean by rubbing with a
microfiber cloth. Never use window cleaners
or solvents. Periodically hand wash the
microfiber cloth separately, using mild soap.
Do not use bleach or fabric softener. Rinse
thoroughly and air dry before next use.
Caution
Do not attach a device with a suction cup
to the display. This may cause damage
and would not be covered by the vehicle
warranty.
Instrument Panel, Leather, Vinyl, Other
Plastic Surfaces, Low Gloss Paint
Surfaces, and Natural Open Pore Wood
Surfaces
Use a soft bristle brush to remove dust from
knobs and crevices on the instrument
cluster. Use a soft microfiber cloth
dampened with water to remove dust and
loose dirt. For a more thorough cleaning,
use a soft microfiber cloth dampened with a
mild soap and water solution.
Caution
Soaking or saturating leather, especially
perforated leather, as well as other
interior surfaces, may cause permanent
damage. Wipe excess moisture from
these surfaces after cleaning and allow
them to dry naturally. Never use heat,
steam, or spot removers. Do not use
liquids that contain alcohol or solvents on
leather seats. Do not use cleaners that
contain silicone or wax-based products.
Cleaners containing these solvents can
permanently change the appearance and
feel of leather or soft trim, and are not
recommended.Do not use cleaners that increase gloss,
especially on the instrument panel. Reflected
glare can decrease visibility through the
windshield under certain conditions.
Caution
Use of air fresheners may cause
permanent damage to plastics and
painted surfaces. If an air freshener
comes in contact with any plastic or
painted surface in the vehicle, blot
immediately and clean with a soft cloth
dampened with a mild soap solution.
Damage caused by air fresheners would
not be covered by the vehicle warranty.
Cargo Cover and Convenience Net
If equipped, wash with warm water and
mild detergent. Do not use chlorine bleach.
Rinse with cold water, and then dry
completely.
Care of Seat Belts
Keep belts clean and dry.