2023 CHEVROLET CORVETTE remove seats
[x] Cancel search: remove seatsPage 10 of 351
Chevrolet Corvette Owner Manual (GMNA-Localizing-U.S./Canada/Mexico-
16287457) - 2023 - CRC - 3/10/22
Keys, Doors, and Windows 9
Convertible Top
.Do not try to start the vehicle while using
the remote key to open the convertible
top. Release both the remote key button
and ENGINE START/STOP and wait a few
seconds before starting the vehicle
normally.
Keyless Access Operation
This Keyless Access system allows you to
unlock and unlatch the doors and hatch/
trunk without removing the remote key
from your pocket, purse, briefcase, etc. The
remote key must be within 1 m (3 ft) of the
trunk or door being opened. A touchpad is
located on the door handle.
The Keyless Access system can be
programmed to unlock both doors on the
first door handle touchpad press from the
driver door. Keyless Access can also be
turned Off. To view available settings from
the infotainment screen, touch Settings >
Vehicle > Remote Lock, Unlock, Start.
If equipped with memory seats, remote keys
1 and 2 are linked to seating positions of
memory 1 or 2. SeeMemory Seats040. Keyless Unlocking
Press the door handle touchpad to unlock
and open the doors if the remote key is
within 1 m (3 ft). See
Door Locks014. To
view available settings from the
infotainment screen, touch Settings >
Vehicle > Remote Lock, Unlock, Start.
Disable/Enable Keyless Unlocking of Exterior
Door Handles and Trunk
If equipped, keyless unlocking of the exterior
door handles and trunk can be disabled and
enabled.
Disabling Keyless Unlocking:
With the vehicle off, press and hold
Qand
Kon the remote key at the same time for
approximately three seconds. The turn signal
lamps will flash four times quickly to
indicate access is disabled. Using any
exterior handle to unlock the doors or open
the hood or hatch/trunk will cause the turn
signal lamps to flash four times quickly,
indicating access is disabled. If disabled,
disarm the alarm system before starting the
vehicle. Disabling Keyless Unlocking may
also be configured under Vehicle
Personalization. Enabling Keyless Unlocking:
With the vehicle off, press and hold
Qand
Kon the remote key at the same time for
approximately three seconds. The turn signal
lamps will flash twice quickly to indicate
access is enabled. Enabling Keyless
Unlocking may also be configured under
Vehicle Personalization.
Passive Locking
Keyless Access will lock several seconds after
all doors are closed if the vehicle is off and
at least one remote key has been removed
or none remain in the vehicle.
The fuel door will also lock.
If other electronic devices interfere with the
remote key signal, the vehicle may not
detect the remote key inside the vehicle.
If passive locking is enabled, the doors may
lock with the remote key inside the vehicle.
Do not leave the remote key in an
unattended vehicle.
If the vehicle is locked with a remote key
inside the vehicle, that remote key will be
disabled for starting the vehicle and other
keyless access operations. To re-enable that
remote key, press any button on that
remote key. The remote key will also be
Page 13 of 351

Chevrolet Corvette Owner Manual (GMNA-Localizing-U.S./Canada/Mexico-
16287457) - 2023 - CRC - 3/10/22
12 Keys, Doors, and Windows
1. Press the button on the side of theremote key and pull the mechanical key
out. Never pull the mechanical key out
without pressing the button.
2. Use the mechanical key blade in the slotto remove the battery cover by hand.
3. Remove the seal by pulling on the tab toaccess the battery.
4. Remove the old battery. Do not use a metal object.
5. Insert the new battery, negative side facing down. Replace with a CR2450 or
equivalent battery.
6. Replace the seal, pushing it into the groove around the battery compartment.
7. Replace the battery cover by snapping it back into the remote key.
8. Reinsert the mechanical key.
Remote Vehicle Start
This feature allows the engine to be started
from outside the vehicle.
S: This button on the remote key is for
remote start.
The climate control system will use the
previous settings during a remote start. The
rear window defogger may come on during
remote start based on cold ambient
conditions. The rear window defogger
indicator light does not come on during
remote start.
If equipped, the heated and ventilated front
seats may also come on when the vehicle
personalization setting is enabled. See
Heated and Ventilated Front Seats 043.
If equipped with a remote start heated
steering wheel, it may come on during a
remote start. See Heated Steering Wheel
0 73.
Laws in some local communities may restrict
the use of remote starters. For example,
some laws may require a person using
remote start to have the vehicle in view.
Check local regulations for any
requirements.
Page 40 of 351
Chevrolet Corvette Owner Manual (GMNA-Localizing-U.S./Canada/Mexico-
16287457) - 2023 - CRC - 3/10/22
Seats and Restraints 39
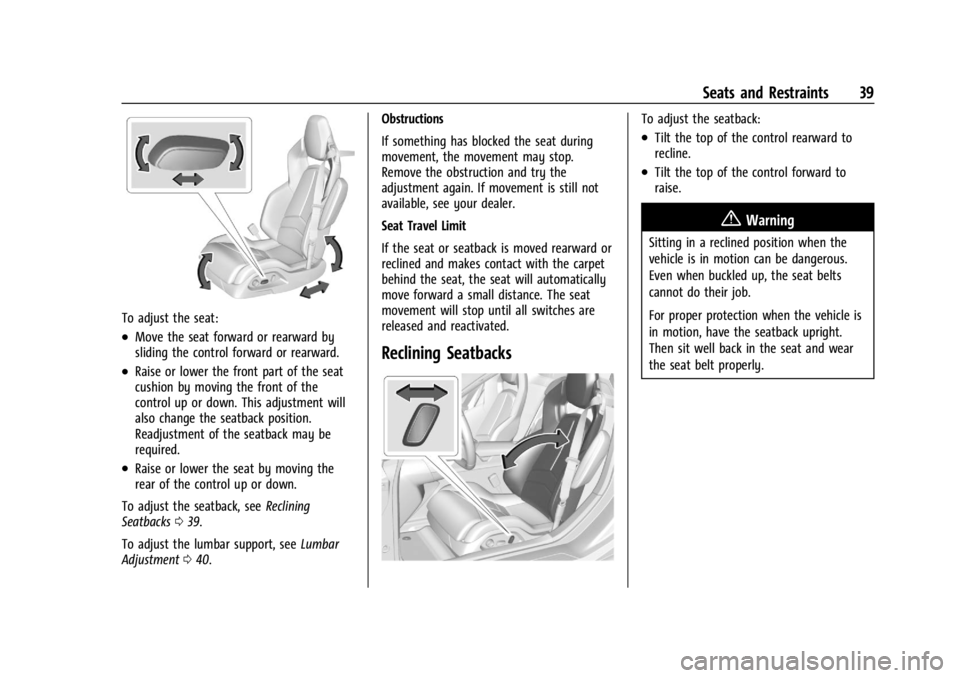
To adjust the seat:
.Move the seat forward or rearward by
sliding the control forward or rearward.
.Raise or lower the front part of the seat
cushion by moving the front of the
control up or down. This adjustment will
also change the seatback position.
Readjustment of the seatback may be
required.
.Raise or lower the seat by moving the
rear of the control up or down.
To adjust the seatback, see Reclining
Seatbacks 039.
To adjust the lumbar support, see Lumbar
Adjustment 040. Obstructions
If something has blocked the seat during
movement, the movement may stop.
Remove the obstruction and try the
adjustment again. If movement is still not
available, see your dealer.
Seat Travel Limit
If the seat or seatback is moved rearward or
reclined and makes contact with the carpet
behind the seat, the seat will automatically
move forward a small distance. The seat
movement will stop until all switches are
released and reactivated.
Reclining Seatbacks
To adjust the seatback:
.Tilt the top of the control rearward to
recline.
.Tilt the top of the control forward to
raise.
{Warning
Sitting in a reclined position when the
vehicle is in motion can be dangerous.
Even when buckled up, the seat belts
cannot do their job.
For proper protection when the vehicle is
in motion, have the seatback upright.
Then sit well back in the seat and wear
the seat belt properly.
Page 42 of 351
Chevrolet Corvette Owner Manual (GMNA-Localizing-U.S./Canada/Mexico-
16287457) - 2023 - CRC - 3/10/22
Seats and Restraints 41
recalls may be cancelled at any time during
the recall. See“Cancel Memory Seating
Recalls” later in this section.
Identifying Driver Number
The vehicle identifies the current driver by
their remote key number 1–8. The current
remote key number may be identified by
Driver Information Center (DIC) welcome
message, “You are driver x for memory
recalls.” This message is displayed the first
few times the vehicle is turned on when a
different remote key is used. For Seat Entry
Memory to work properly, save positions to
the 1 or 2 memory button matching the
driver number of this welcome message. To
aid in identifying remote key IDs, it is
recommended to only carry one remote key
when entering the vehicle. Perform the
following if the welcome message is not
displayed:
1. Move all remote keys away from the vehicle.
2. Start the vehicle with another remote key. A DIC welcome message should
display indicating the driver number of
the other remote key. Turn the vehicle
off and remove the other remote key
from the vehicle. 3. Start the vehicle with the initial remote
key. The DIC welcome message should
display the driver number of the initial
remote key.
Saving Seating Positions
Read these instructions completely before
saving memory positions.
To save preferred driving positions to
1 and 2: 1. Turn the vehicle on. A DIC welcome message may indicate the driver number
of the current remote key. See
“Identifying Driver Number” previously in
this section.
2. Adjust all available memory features to the desired driving position.
3. Press and release SET; a beep will sound.
4. Immediately upon releasing SET, press and hold memory button 1 or 2 matching
the current Driver’s remote key number
until two beeps sound. If too much time
passes between releasing SET and
pressing 1 or 2, the two beeps will not
sound indicating memory position were
not saved. Repeat Steps 3 and 4 to try
again. 5. Repeat Steps 1–4 for the other remote
key 1 or 2 using the other 1 or 2 memory
button.
It is recommended to save the preferred
driving positions to both 1 and 2 if you are
the only driver.
To save the common exit seating position to
Bthat is used by all drivers for Manually
Recalling Seating Positions and Auto Seat
Exit Memory Recall features, repeat Steps 1–
4 using
B, the exit button.
Manually Recalling Seating Positions
Press and hold 1, 2, or
Bbutton until the
recall is complete, to recall the positions
previously saved to that button.
Manual Memory recall movement for 1, 2 or
Bbuttons may be initiated and will
complete to the saved memory position if
the vehicle is in or out of P (Park).
Enabling Automatic Recalls
.Seat Entry Memory moves the driver seat
to the selected 1 or 2 position when the
vehicle is started. Select Settings > Vehicle
> Seating Position > Seat Entry Memory >
ON or OFF. See “Auto Seat Entry Memory
Recall” later in this section.
Page 44 of 351
Chevrolet Corvette Owner Manual (GMNA-Localizing-U.S./Canada/Mexico-
16287457) - 2023 - CRC - 3/10/22
Seats and Restraints 43
Obstructions
If something has blocked the seat while
recalling a memory position, the recall may
stop. Remove the obstruction and try the
recall again. If the memory position still
does not recall, see your dealer.
Heated and Ventilated Front
Seats
{Warning
If temperature change or pain to the skin
cannot be felt, the seat heater may cause
burns. To reduce the risk of burns, use
care when using the seat heater,
especially for long periods of time. Do
not place anything on the seat that
insulates against heat, such as a blanket,
cushion, cover, or similar item. This may
cause the seat heater to overheat. An
overheated seat heater may cause a burn
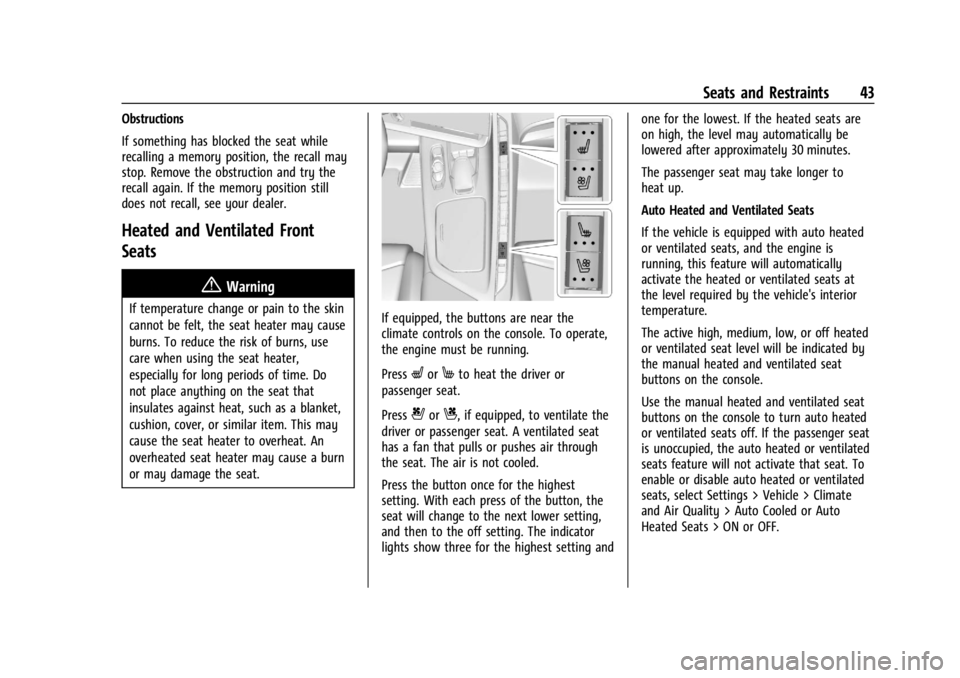
or may damage the seat.If equipped, the buttons are near the
climate controls on the console. To operate,
the engine must be running.
Press
LorMto heat the driver or
passenger seat.
Press
{orC, if equipped, to ventilate the
driver or passenger seat. A ventilated seat
has a fan that pulls or pushes air through
the seat. The air is not cooled.
Press the button once for the highest
setting. With each press of the button, the
seat will change to the next lower setting,
and then to the off setting. The indicator
lights show three for the highest setting and one for the lowest. If the heated seats are
on high, the level may automatically be
lowered after approximately 30 minutes.
The passenger seat may take longer to
heat up.
Auto Heated and Ventilated Seats
If the vehicle is equipped with auto heated
or ventilated seats, and the engine is
running, this feature will automatically
activate the heated or ventilated seats at
the level required by the vehicle's interior
temperature.
The active high, medium, low, or off heated
or ventilated seat level will be indicated by
the manual heated and ventilated seat
buttons on the console.
Use the manual heated and ventilated seat
buttons on the console to turn auto heated
or ventilated seats off. If the passenger seat
is unoccupied, the auto heated or ventilated
seats feature will not activate that seat. To
enable or disable auto heated or ventilated
seats, select Settings > Vehicle > Climate
and Air Quality > Auto Cooled or Auto
Heated Seats > ON or OFF.
Page 46 of 351
Chevrolet Corvette Owner Manual (GMNA-Localizing-U.S./Canada/Mexico-
16287457) - 2023 - CRC - 3/10/22
Seats and Restraints 45
Questions and Answers About Seat Belts
Q: Will I be trapped in the vehicle after acrash if I am wearing a seat belt?
A: You could be— whether you are
wearing a seat belt or not. Your chance
of being conscious during and after a
crash, so you canunbuckle and get out,
is much greater if you are belted.
Q: If my vehicle has airbags, why should I have to wear seat belts?
A: Airbags are supplemental systems only.
They work withseat belts —not instead
of them. Whether or not an airbag is
provided, all occupants still have to
buckle up to get the most protection.
Also, in nearly all states and in all
Canadian provinces, the law requires
wearing seat belts.
Buckle To Drive
If equipped, this feature prevents the vehicle
from shifting out of P (Park) when the driver
seat belt is not buckled. The Buckle to Drive
feature must be turned ON in the
infotainment system to work. To turn the
Buckle to Drive feature on or off, select
Settings > Vehicle > Buckle to Drive. See
Teen Driver 0153, if equipped. If the vehicle is on and the brake pedal is
pressed with the vehicle in P (Park) but the
driver seat belt is not buckled, a message
displays in the Driver Information
Center (DIC) and the vehicle will be
prevented from shifting out of P (Park).
Buckle the driver seat belt to clear the
message and shift out of P (Park). Shifting
from P (Park) will be prevented once for
each time the vehicle is started.
For some fleet vehicles, the feature is
always ON and cannot be turned OFF in the
infotainment system. The vehicle will be
prevented from shifting from P (Park) each
time the driver attempts to do so while the
driver seat belt is not buckled. Turning the
vehicle off then on will not change this
condition.
On some models, Buckle to Drive may also
prevent shifting out of P (Park) if a front
passenger seat belt is unbuckled. A message
displays in the DIC. Buckle the front
passenger seat belt to shift out of P (Park).
This feature may not allow the vehicle to
shift out of P (Park) if an object, such as a
briefcase, handbag, grocery bag, laptop,
or other electronic device, is on the front
passenger seat. If this happens, remove the
object from the seat or buckle the seat belt
to shift out of P (Park).
If the driver, or on some vehicles, the
present front passenger remains unbuckled,
the DIC message will turn off after several
seconds and the vehicle can be shifted out
of P (Park). See
“Seat Belts”and“Child
Restraints” in the Index for information
about the importance of proper
restraint use.
If the driver seat belt or the front passenger
seat belt is unbuckled when driving, the seat
belt reminder chime and light(s) will come
on. See Seat Belt Reminders 084. This
feature may not function properly if the
airbag readiness light is on. See Airbag
Readiness Light 084.
How to Wear Seat Belts Properly
Follow these rules for everyone's protection.
There are additional things to know about
seat belts and children, including smaller
children and infants. If a child will be riding
in the vehicle, see Older Children061 or
Infants and Young Children 062. Review
and follow the rules for children in addition
to the following rules.
Page 59 of 351
Chevrolet Corvette Owner Manual (GMNA-Localizing-U.S./Canada/Mexico-
16287457) - 2023 - CRC - 3/10/22
58 Seats and Restraints
2. Remove the child restraint from thevehicle.
3. Remove any additional items from the seat such as blankets, cushions, seat
covers, seat heaters, or seat massagers.
4. Reinstall the child restraint following the directions provided by the child restraint
manufacturer and refer to Securing Child
Restraints 066.
Make sure the seat belt retractor is
locked by pulling the shoulder belt all
the way out of the retractor when
installing the child restraint, even if the
child restraint is equipped with a seat
belt lock-off. When the retractor lock is
set, the belt can be tightened but not
pulled out of the retractor.
5. If, after reinstalling the child restraint and restarting the vehicle, the ON
indicator is still lit, turn the vehicle off.
Then slightly recline the vehicle seatback
and adjust the seat cushion,
if adjustable, to make sure that the
vehicle seatback is not pushing the child
restraint into the seat cushion.
6. Restart the vehicle. The passenger sensing system may or may
not turn off the airbag for a child in a child
restraint depending upon the child’s size.
It is better to secure child restraints in a
rear seat. Consider using another vehicle to
transport the child when a rear seat is not
available. Never put a rear-facing child
restraint in the front seat, even if the ON
indicator is not lit.
If the Off Indicator Is Lit for an
Adult-Sized Occupant
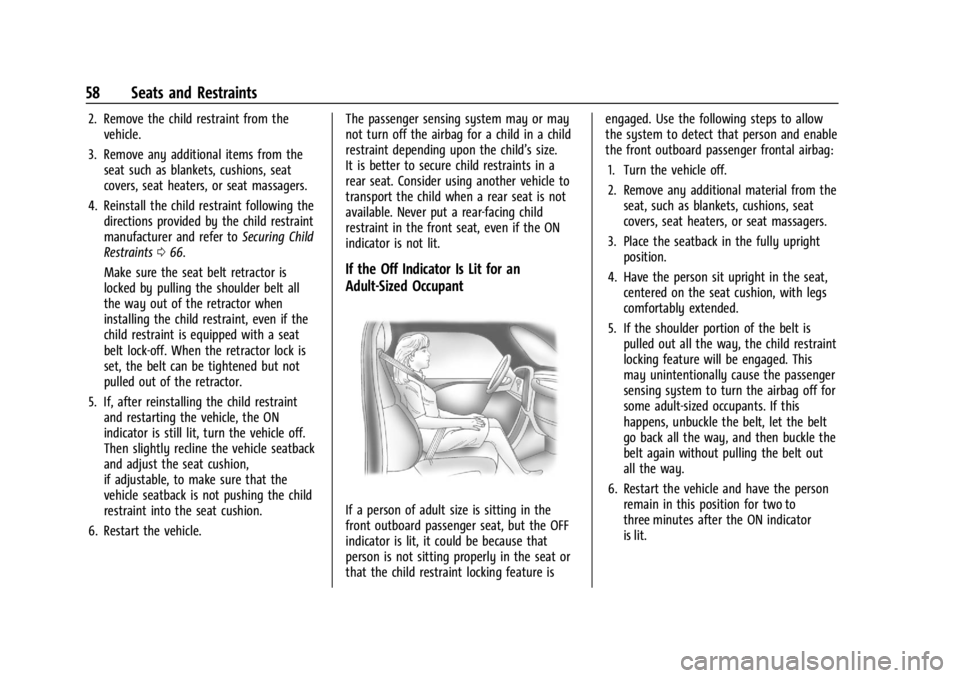
If a person of adult size is sitting in the
front outboard passenger seat, but the OFF
indicator is lit, it could be because that
person is not sitting properly in the seat or
that the child restraint locking feature is engaged. Use the following steps to allow
the system to detect that person and enable
the front outboard passenger frontal airbag:
1. Turn the vehicle off.
2. Remove any additional material from the seat, such as blankets, cushions, seat
covers, seat heaters, or seat massagers.
3. Place the seatback in the fully upright position.
4. Have the person sit upright in the seat, centered on the seat cushion, with legs
comfortably extended.
5. If the shoulder portion of the belt is pulled out all the way, the child restraint
locking feature will be engaged. This
may unintentionally cause the passenger
sensing system to turn the airbag off for
some adult-sized occupants. If this
happens, unbuckle the belt, let the belt
go back all the way, and then buckle the
belt again without pulling the belt out
all the way.
6. Restart the vehicle and have the person remain in this position for two to
three minutes after the ON indicator
is lit.
Page 60 of 351

Chevrolet Corvette Owner Manual (GMNA-Localizing-U.S./Canada/Mexico-
16287457) - 2023 - CRC - 3/10/22
Seats and Restraints 59
{Warning
If the front outboard passenger airbag is
turned off for an adult-sized occupant,
the airbag will not be able to inflate and
help protect that person in a crash,
resulting in an increased risk of serious
injury or even death. An adult-sized
occupant should not ride in the front
outboard passenger seat, if the passenger
airbag OFF indicator is lit.
Additional Factors Affecting System
Operation
Seat belts help keep the passenger in
position on the seat during vehicle
maneuvers and braking, which helps the
passenger sensing system maintain the
passenger airbag status. See“Seat Belts”
and “Child Restraints” in the Index for
additional information about the importance
of proper restraint use.
A thick layer of additional material, such as
a blanket or cushion, or aftermarket
equipment such as seat covers, seat heaters,
and seat massagers can affect how well the
passenger sensing system operates. We
recommend that you not use seat covers or
other aftermarket equipment except when approved by GM for your specific vehicle.
See
Adding Equipment to the
Airbag-Equipped Vehicle 059 for more
information about modifications that can
affect how the system operates.
The ON indicator may be lit if an object,
such as a briefcase, handbag, grocery bag,
laptop, or other electronic device, is put on
an unoccupied seat. If this is not desired,
remove the object from the seat.
{Warning
Stowing articles under the passenger seat
or between the passenger seat cushion
and seatback may interfere with the
proper operation of the passenger
sensing system.
Servicing the Airbag-Equipped
Vehicle
Airbags affect how the vehicle should be
serviced. There are parts of the airbag
system in several places around the vehicle.
Your dealer and the service manual have
information about servicing the vehicle and
the airbag system. To purchase a service
manual, see Publication Ordering
Information 0327.
{Warning
For up to 10 seconds after the vehicle is
turned off and the battery is
disconnected, an airbag can still inflate
during improper service. You can be
injured if you are close to an airbag
when it inflates. Avoid yellow connectors.
They are probably part of the airbag
system. Be sure to follow proper service
procedures, and make sure the person
performing work for you is qualified to
do so.
Adding Equipment to the
Airbag-Equipped Vehicle
Adding accessories that change the vehicle's
frame, bumper system, height, front end,
or side sheet metal may keep the airbag
system from working properly.
The operation of the airbag system can also
be affected by changing, including
improperly repairing or replacing, any parts
of the following:
.Airbag system, including airbag modules,
front or side impact sensors, sensing and
diagnostic module, or airbag wiring