2023 CHEVROLET CORVETTE warning light
[x] Cancel search: warning lightPage 2 of 351

Chevrolet Corvette Owner Manual (GMNA-Localizing-U.S./Canada/Mexico-
16287457) - 2023 - CRC - 3/10/22
Contents
Introduction . . . . . . . . . . . . . . . . . . . . . . . . . . . . . . 1
Keys, Doors, and Windows . . . . . . . . . . . . . . . 6
Seats and Restraints . . . . . . . . . . . . . . . . . . . . . 38
Storage . . . . . . . . . . . . . . . . . . . . . . . . . . . . . . . . . 69
Instruments and Controls . . . . . . . . . . . . . . . . 72
Lighting . . . . . . . . . . . . . . . . . . . . . . . . . . . . . . . . 102
Infotainment System . . . . . . . . . . . . . . . . . . . 108
Climate Controls . . . . . . . . . . . . . . . . . . . . . . . . 163
Driving and Operating . . . . . . . . . . . . . . . . . . 168
Vehicle Care . . . . . . . . . . . . . . . . . . . . . . . . . . . . 231
Service and Maintenance . . . . . . . . . . . . . . . 305
Technical Data . . . . . . . . . . . . . . . . . . . . . . . . . . 314
Customer Information . . . . . . . . . . . . . . . . . . 319
Reporting Safety Defects . . . . . . . . . . . . . . . 327
OnStar . . . . . . . . . . . . . . . . . . . . . . . . . . . . . . . . . . 331
Connected Services . . . . . . . . . . . . . . . . . . . . . 336
Index . . . . . . . . . . . . . . . . . . . . . . . . . . 339
Introduction
California Proposition 65 Warning
Litho in U.S.A.
Part No. 84795300 A First Printing©2022 General Motors LLC. All Rights Reserved.
Page 4 of 351

Chevrolet Corvette Owner Manual (GMNA-Localizing-U.S./Canada/Mexico-
16287457) - 2023 - CRC - 3/10/22
Introduction 3
A circle with a slash through it is a safety
symbol which means“Do not,” “Do not do
this,” or“Do not let this happen.”
Symbols
The vehicle has components and labels that
use symbols instead of text. Symbols are
shown along with the text describing the
operation or information relating to a
specific component, control, message, gauge,
or indicator.
M:Shown when the owner’s manual has
additional instructions or information.
*: Shown when the service manual has
additional instructions or information.
0: Shown when there is more information
on another page — “see page.” Vehicle Symbol Chart
Here are some additional symbols that may
be found on the vehicle and what they
mean. See the features in this manual for
information.
u:
Air Conditioning System
G:Air Conditioning Refrigerant Oil
9:Airbag Readiness Light
!:Antilock Brake System (ABS)
$:Brake System Warning Light
z: Carbon Monoxide
9:Dispose of Used Components Properly
P:Do Not Apply High Pressure Water
B:Engine Coolant Temperature
_:Flame/Fire Prohibited
H: Flammable
R:Fuse Block Cover Lock Location
+:Fuses
j:ISOFIX/LATCH System Child Restraints
Q:Keep Fuse Block Covers Properly
Installed
A: Lane Keep Assist
*: Malfunction Indicator Lamp
::Oil Pressure
X:Park Assist
O:Power
7:Rear Cross Traffic Alert
I:Registered Technician
/:Remote Vehicle Start
h:Risk of Electrical Fire
>:Seat Belt Reminders
I:Side Blind Zone Alert
7:Tire Pressure Monitor
d:Traction Control/StabiliTrak/Electronic
Stability Control (ESC)
a: Under Pressure
Page 15 of 351

Chevrolet Corvette Owner Manual (GMNA-Localizing-U.S./Canada/Mexico-
16287457) - 2023 - CRC - 3/10/22
14 Keys, Doors, and Windows
Door Locks
{Warning
Unlocked doors can be dangerous.
.Passengers, especially children, can
easily open the doors and fall out of a
moving vehicle. The doors can be
unlocked and opened while the vehicle
is moving. The chance of being thrown
out of the vehicle in a crash is
increased if the doors are not locked.
So, all passengers should wear seat
belts properly and the doors should be
locked whenever the vehicle is driven.
.Young children who get into unlocked
vehicles may be unable to get out.
A child can be overcome by extreme
heat and can suffer permanent injuries
or even death from heat stroke.
Always lock the vehicle whenever
leaving it.
.Outsiders can easily enter through an
unlocked door when you slow down
or stop the vehicle. Locking the doors
can help prevent this from happening.To lock or unlock a door from the outside,
press
HorIon the remote key.
For Keyless Access, hold the remote key
within 1 m (3 ft) of the door handle. Grip
and press the door handle touchpad. See
Remote Key Operation
07. This feature can
be programmed. To view available settings
from the infotainment screen, touch Settings
> Vehicle > Remote Lock, Unlock, Start.
Convertible Shown, Coupe Similar
To lock or unlock the doors from the inside,
use the driver power door lock switch.
H: Press to lock the doors. The indicator
light in the switch will illuminate when
locked.
I: Press to unlock the doors.
Page 18 of 351

Chevrolet Corvette Owner Manual (GMNA-Localizing-U.S./Canada/Mexico-
16287457) - 2023 - CRC - 3/10/22
Keys, Doors, and Windows 17
number of remote keys inside has not
reduced, the driver door will unlock and the
horn will chirp three times.
Lockout Protection can be manually
overridden with the driver door open by
pressing and holding
Qon the power door
lock switch.
Doors
Hood
Hood Release
{Warning
Do not drive the vehicle if the hood is
not latched completely. The hood could
open fully, block your vision, and cause a
crash. You or others could be injured.
Always close the hood completely before
driving. When the hood is not closed, the
vehicle will not exceed 42 km/h
(26 mph). Close the hood to drive faster
than 42 km/h (26 mph).
The hood compartment can be accessed in
several ways. Ensure the hood is clear of any objects
before opening.
This vehicle prevents from shifting out of
P (Park) when the hood is not closed. Close
the hood to shift out of P (Park). Confirm
the hood is closed by checking that the
hood is flush with the surrounding
components.
If the hood is closed but the ajar message is
still present, then the transmission lockout
can be overridden by holding the brake for
20 seconds and then shifting into D (Drive).
In this case, the vehicle will not exceed
42 km/h (26 mph). See your dealer for
service.
Driver Door Hood Latch Release Button
1. With the transmission in P (Park), press
Eon the bottom of the driver door
to release the hood.
2. From the front of the vehicle, lift the hood slightly until the gas strut system
automatically raises and holds it in the
fully open position.
3. The hood light and Open Hood message will display in the Driver Information
Center (DIC) when the hood is open.
Using the Remote Key
1. Press
Etwice on the remote key to
release the hood.
2. From the front of the vehicle, lift the hood slightly until the gas strut system
automatically raises and holds it in the
fully open position.
3. The hood light and Open Hood message will display in the Driver Information
Center (DIC) when the hood is open.
Page 19 of 351

Chevrolet Corvette Owner Manual (GMNA-Localizing-U.S./Canada/Mexico-
16287457) - 2023 - CRC - 3/10/22
18 Keys, Doors, and Windows
Front Fascia TouchPad
1. Locate the touchpad in the grill openingnear the driver side headlamp.
2. Press the touchpad once to release the hood. The remote key must be within
1 m (3 ft) of the hood.
3. From the front of the vehicle, lift the hood slightly until the gas strut system
automatically raises and holds it in the
fully open position.
4. The hood light and Open Hood message will display in the Driver Information
Center (DIC) when the hood is open. Opening The Hood When There Is No
Electrical Power
The manual release cable should only be
used for service and/or emergency use, such
as a loss of vehicle electrical power.
To enter the vehicle in the event electrical
power has been lost, see
“Loss of Vehicle
Electrical Power” underDoor Locks 014.
1. Locate the manual release cable loop to
the left of the brake pedal.
2. Pull the manual release cable twice to release the hood.
3. From the front of the vehicle, lift the hood slightly until the gas strut system
automatically raises and holds it in the
fully open position. Emergency Hood Release Button
The underhood compartment is equipped
with a glow-in-the-dark emergency hood
release button. This button will glow
following exposure to light. Press the button
to open the hood from inside the underhood
compartment.
Closing the Hood
{Warning
Do not drive the vehicle if the hood is
not latched completely. The hood could
open fully, block your vision, and cause a
crash. You or others could be injured.
Always close the hood completely before
(Continued)
Page 25 of 351

Chevrolet Corvette Owner Manual (GMNA-Localizing-U.S./Canada/Mexico-
16287457) - 2023 - CRC - 3/10/22
24 Keys, Doors, and Windows
Exterior Mirrors
Convex Mirrors
{Warning
A convex mirror can make things, like
other vehicles, look farther away than
they really are. If you cut too sharply
into the right lane, you could hit a
vehicle on the right. Check the inside
mirror or glance over your shoulder
before changing lanes.
The passenger side mirror is convex shaped.
A convex mirror surface is curved so more
can be seen from the driver seat.
Power Mirrors
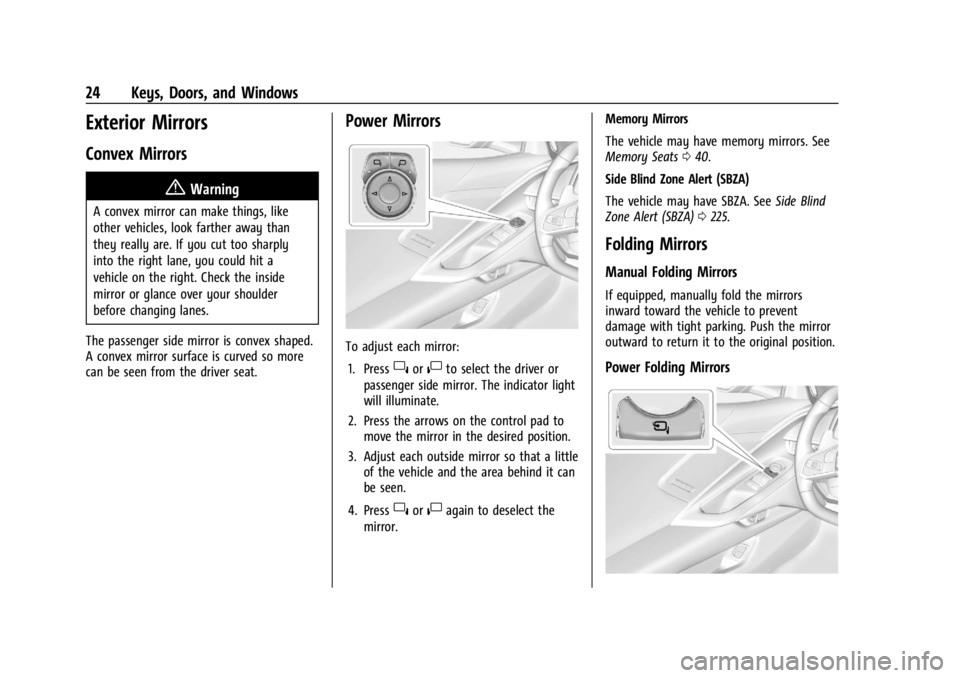
To adjust each mirror: 1. Press
}or|to select the driver or
passenger side mirror. The indicator light
will illuminate.
2. Press the arrows on the control pad to move the mirror in the desired position.
3. Adjust each outside mirror so that a little of the vehicle and the area behind it can
be seen.
4. Press
}or|again to deselect the
mirror. Memory Mirrors
The vehicle may have memory mirrors. See
Memory Seats
040.
Side Blind Zone Alert (SBZA)
The vehicle may have SBZA. See Side Blind
Zone Alert (SBZA) 0225.
Folding Mirrors
Manual Folding Mirrors
If equipped, manually fold the mirrors
inward toward the vehicle to prevent
damage with tight parking. Push the mirror
outward to return it to the original position.
Power Folding Mirrors
Page 44 of 351

Chevrolet Corvette Owner Manual (GMNA-Localizing-U.S./Canada/Mexico-
16287457) - 2023 - CRC - 3/10/22
Seats and Restraints 43
Obstructions
If something has blocked the seat while
recalling a memory position, the recall may
stop. Remove the obstruction and try the
recall again. If the memory position still
does not recall, see your dealer.
Heated and Ventilated Front
Seats
{Warning
If temperature change or pain to the skin
cannot be felt, the seat heater may cause
burns. To reduce the risk of burns, use
care when using the seat heater,
especially for long periods of time. Do
not place anything on the seat that
insulates against heat, such as a blanket,
cushion, cover, or similar item. This may
cause the seat heater to overheat. An
overheated seat heater may cause a burn
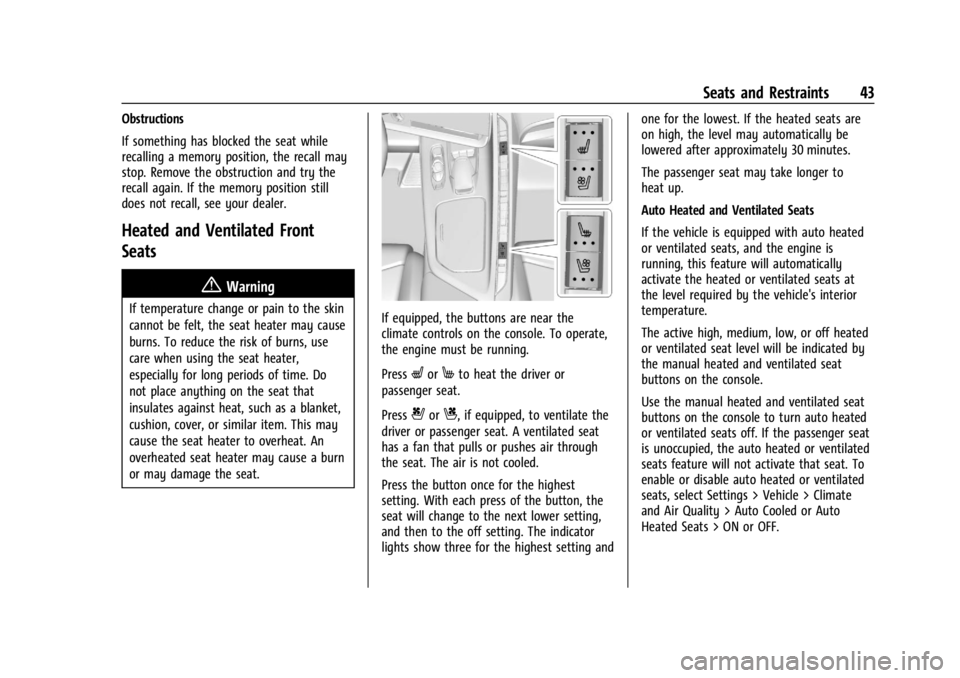
or may damage the seat.If equipped, the buttons are near the
climate controls on the console. To operate,
the engine must be running.
Press
LorMto heat the driver or
passenger seat.
Press
{orC, if equipped, to ventilate the
driver or passenger seat. A ventilated seat
has a fan that pulls or pushes air through
the seat. The air is not cooled.
Press the button once for the highest
setting. With each press of the button, the
seat will change to the next lower setting,
and then to the off setting. The indicator
lights show three for the highest setting and one for the lowest. If the heated seats are
on high, the level may automatically be
lowered after approximately 30 minutes.
The passenger seat may take longer to
heat up.
Auto Heated and Ventilated Seats
If the vehicle is equipped with auto heated
or ventilated seats, and the engine is
running, this feature will automatically
activate the heated or ventilated seats at
the level required by the vehicle's interior
temperature.
The active high, medium, low, or off heated
or ventilated seat level will be indicated by
the manual heated and ventilated seat
buttons on the console.
Use the manual heated and ventilated seat
buttons on the console to turn auto heated
or ventilated seats off. If the passenger seat
is unoccupied, the auto heated or ventilated
seats feature will not activate that seat. To
enable or disable auto heated or ventilated
seats, select Settings > Vehicle > Climate
and Air Quality > Auto Cooled or Auto
Heated Seats > ON or OFF.
Page 52 of 351

Chevrolet Corvette Owner Manual (GMNA-Localizing-U.S./Canada/Mexico-
16287457) - 2023 - CRC - 3/10/22
Seats and Restraints 51
Seat Belt Extender
If the vehicle's seat belt will fasten around
you, you should use it.
But if a seat belt is not long enough, your
dealer will order you an extender. Only a
GM dealer issued extender should be used.
When you go in to order it, take the
heaviest coat you will wear, so the extender
will be long enough for you. To help avoid
personal injury, do not let someone else use
it, and use it only for the seat it is made to
fit. The extender has been designed for
adults. Never use it for securing child
restraints. For more information on the
proper use and fit of seat belt extenders see
the instruction sheet that comes with the
extender.
Safety System Check
Periodically check the seat belt reminder,
seat belts, buckles, latch plates, retractors,
shoulder belt height adjusters (if equipped),
and seat belt anchorages to make sure they
are all in working order. Look for any other
loose or damaged seat belt system parts
that might keep a seat belt system from
performing properly. See your dealer to
have it repaired. Torn, frayed, or twisted
seat belts may not protect you in a crash.Torn or frayed seat belts can rip apart under
impact forces. If a belt is torn or frayed,
have it replaced immediately. If a belt is
twisted, it may be possible to untwist by
reversing the latch plate on the webbing.
If the twist cannot be corrected, ask your
dealer to fix it.
Make sure the seat belt reminder light is
working. See
Seat Belt Reminders 084.
Keep seat belts clean and dry. See Seat Belt
Care 051.
Seat Belt Care
Keep belts clean and dry.
Seat belts should be properly cared for and
maintained.
Seat belt hardware should be kept dry and
free of dust or debris. As necessary, exterior
hard surfaces and seat belt webbing may be
lightly cleaned with mild soap and water.
Ensure there is not excessive dust or debris
in the mechanism. If dust or debris exists in
the system please see the dealer. Parts may
need to be replaced to ensure proper
functionality of the system.
{Warning
Do not bleach or dye seat belt webbing.
It may severely weaken the webbing. In
a crash, they might not be able to
provide adequate protection. Clean and
rinse seat belt webbing only with mild
soap and lukewarm water. Allow the
webbing to dry.
Replacing Seat Belt System Parts
after a Crash
{Warning
A crash can damage the seat belt system
in the vehicle. A damaged seat belt
system may not properly protect the
person using it, resulting in serious injury
or even death in a crash. To help make
sure the seat belt systems are working
properly after a crash, have them
inspected and any necessary
replacements made as soon as possible.
After a minor crash, replacement of seat
belts may not be necessary. But the seat
belt assemblies that were used during any
crash may have been stressed or damaged.