2023 ALFA ROMEO GIULIA child restraint
[x] Cancel search: child restraintPage 10 of 248

8
READ THIS CAREFULLY
Warnings And Cautions.............................. 2
Respecting The Environment .................... 2
Rollover Warning ........................................ 3
VEHICLE CHANGES /
ALTERATIONS
Accessories Purchased By The Owner ...... 4
Installing Electrical/Electronic Devices .... 4
Radio Transmitters And Mobile Phones ... 4
HOW TO USE THIS MANUAL
Operating Instructions ............................... 5
Symbols Key ............................................... 5
Symbols ...................................................... 6
Symbols Glossary .....................................14
GETTING TO KNOW YOUR
VEHICLE
KEYS..........................................................19
Key Fob .................................................. 19
ENGINE IMMOBILIZER SYSTEM ..............21
IGNITION SWITCH .....................................22
Keyless Push Button Ignition ................ 22
REMOTE START — IF EQUIPPED ..............23
How To Use Remote Start ..................... 23
To Exit Remote Start Mode ................... 23
Remote Start Comfort Systems —
If Equipped ............................................. 23
VEHICLE SECURITY
SYSTEM — IF EQUIPPED .......................... 24
To Arm The System................................ 24
To Disarm The System .......................... 24
Volumetric/Anti-Lift Protection —
If Equipped ............................................. 25
DOORS ...................................................... 25
Power Door Locks.................................. 25
Locking The Doors With A Depleted
Battery .................................................... 26 Passive Entry System ........................... 26
Automatic Door Locks — If Equipped .. 28
Child-Protection Door Lock
System — Rear Doors ............................ 28
STEERING WHEEL.................................... 29
Manual Tilt/Telescoping Steering
Column ................................................... 29 Heated Steering Wheel —
If Equipped ............................................. 30
DRIVER MEMORY SETTINGS —
IF EQUIPPED ............................................ 30
Programming The Memory Feature ..... 30
Memory Position Recall ........................ 31
SEATS ....................................................... 31
Sparco Racing Seats
(Quadrifoglio Vehicles) — If Equipped .. 31 Manual Adjustment (Rear Seats) ......... 32
Power Adjustment (Front Seats)........... 34
Heated Seats — If Equipped ................ 35
Head Restraints .................................... 36
MIRRORS ..................................................37
Automatic Dimming Mirror ....................37
Vanity Mirror ...........................................38
Outside Power Mirrors ...........................38
Power Folding Outside Mirrors ..............39
Outside Automatic Dimming Mirrors —
If Equipped .............................................39 Heated Mirrors ......................................39
UNIVERSAL GARAGE DOOR OPENER
(HOMELINK®)
S ...................................39
Before You Begin Programming
HomeLink® ............................................40 Erasing All The HomeLink® Channels ..40
Identifying Whether You Have A
Rolling Code Or Non-Rolling Code
Device .....................................................40 Programming HomeLink® To A
Garage Door Opener ..............................40 Programming HomeLink® To A
Miscellaneous Device ............................ 41 Reprogramming A Single HomeLink®
Button .....................................................41 Canadian/Gate Operator
Programming .......................................... 41 Security ...................................................42
Troubleshooting Tips..............................42
23_GA_OM_EN_USC_t.book Page 8
Page 13 of 248

11
LANE KEEPING ASSIST (LKA) SYSTEM —
IF EQUIPPED .......................................... 120
Turning Lane Keeping Assist On
Or Off .................................................... 120 Lane Keeping Assist Warning
Message ...............................................121
REAR BACK UP CAMERA / DYNAMIC
GRIDLINES ............................................. 123 REFUELING THE VEHICLE ..................... 124
Refueling Procedure ...........................124
VEHICLE LOADING ................................. 125
Certification Label................................ 125
TRAILER TOWING................................... 126
SUGGESTIONS FOR DRIVING................ 126
Saving Fuel ...........................................126
Driving Style .........................................127
Conditions Of Use ................................ 127
Transporting Passengers ....................127
Transporting Animals...........................127
Exhaust Gas .........................................128
Performance — Quadrifoglio ...............128
SAFETY
ACTIVE SAFETY SYSTEMS ..................... 129
Anti-Lock Brake System (ABS) ........... 129
Active Torque Vectoring (ATV) —
If Equipped ...........................................129 Dynamic Steering Torque (DST) .........130
Drive Train Control (DTC) System —
If Equipped ...........................................130 Electronic Stability Control (ESC) ........130
Hill Start Assist (HSA)...........................131
Panic Brake Assist (PBA) .....................131
Traction Control System (TCS) ............131
AUXILIARY DRIVING SYSTEMS .............. 132
Blind Spot Monitoring (BSM)
System — If Equipped ........................ 132 Active Blind Spot Assist (ABSA)
System — If Equipped ........................ 134 Driver Attention Assist (DAA)
System — If Equipped ......................... 137 Forward Collision Warning Plus
(FCW+) System — If Equipped ............ 138 Tire Pressure Monitoring System
(TPMS).................................................. 142
OCCUPANT RESTRAINT SYSTEMS ....... 144
Occupant Restraint Systems
Features .............................................. 144 Important Safety Precautions ............ 144
Seat Belt Systems .............................. 144
Supplemental Restraint Systems
(SRS) .................................................... 149 Child Restraints ................................... 158
SAFETY TIPS........................................... 166
Transporting Passengers .................... 166
Transporting Pets ................................ 166
Connected Vehicles ............................ 166
Safety Checks You Should Make
Inside The Vehicle .............................. 167 Periodic Safety Checks You Should
Make Outside The Vehicle .................. 168 Exhaust Gas ........................................ 168
Carbon Monoxide Warnings ............... 168
IN CASE OF EMERGENCY
HAZARD WARNING FLASHERS ............ 169
SOS EMERGENCY CALL —
IF EQUIPPED ......................................... 169TIRE SERVICE KIT .................................. 171
Description ........................................... 171
Inflation Procedure .............................. 172
Checking And Restoring Tire
Pressure ............................................... 174 Sealant Cartridge Replacement ......... 174
Run Flat Tires — If Equipped ................. 174
JUMP STARTING ................................... 175
Remote Battery Connection Posts ..... 175
Jump Starting Procedure .................... 177
Bump Starting...................................... 178
IF YOUR ENGINE OVERHEATS ............... 178
MANUAL PARK RELEASE....................... 179
TOWING A DISABLED VEHICLE ............. 179
Rear Wheel Drive (RWD) Models ........ 179
All Wheel Drive (AWD) Models ............ 180
TOW EYES ............................................. 180
ENHANCED ACCIDENT RESPONSE
SYSTEM (EARS) .................................... 181 EVENT DATA RECORDER (EDR) ............ 181
SERVICING AND MAINTENANCE
SCHEDULED SERVICING ....................... 182
Periodic Checks ................................... 182
Heavy Usage Of The Vehicle ............... 182
Maintenance Plan — 2.0L Engine ...... 183
Maintenance Plan — 2.9L Engine ...... 185
23_GA_OM_EN_USC_t.book Page 11
Page 34 of 248
GETTING TO KNOW YOUR VEHICLE
32
MANUAL ADJUSTMENT (REAR SEATS)
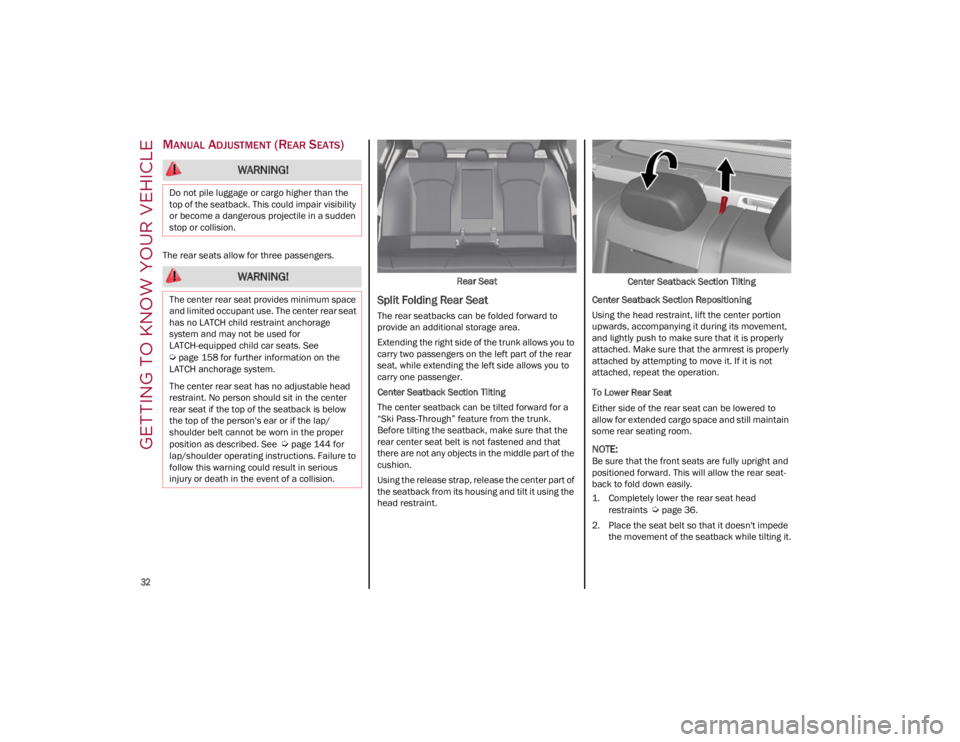
The rear seats allow for three passengers.Rear Seat
Split Folding Rear Seat
The rear seatbacks can be folded forward to
provide an additional storage area.
Extending the right side of the trunk allows you to
carry two passengers on the left part of the rear
seat, while extending the left side allows you to
carry one passenger.
Center Seatback Section Tilting
The center seatback can be tilted forward for a
“Ski Pass-Through” feature from the trunk.
Before tilting the seatback, make sure that the
rear center seat belt is not fastened and that
there are not any objects in the middle part of the
cushion.
Using the release strap, release the center part of
the seatback from its housing and tilt it using the
head restraint.Center Seatback Section Tilting
Center Seatback Section Repositioning
Using the head restraint, lift the center portion
upwards, accompanying it during its movement,
and lightly push to make sure that it is properly
attached. Make sure that the armrest is properly
attached by attempting to move it. If it is not
attached, repeat the operation.
To Lower Rear Seat
Either side of the rear seat can be lowered to
allow for extended cargo space and still maintain
some rear seating room.
NOTE:
Be sure that the front seats are fully upright and
positioned forward. This will allow the rear seat -
back to fold down easily.
1. Completely lower the rear seat head
restraints
Ú
page 36.
2. Place the seat belt so that it doesn't impede the movement of the seatback while tilting it.
WARNING!
Do not pile luggage or cargo higher than the
top of the seatback. This could impair visibility
or become a dangerous projectile in a sudden
stop or collision.
WARNING!
The center rear seat provides minimum space
and limited occupant use. The center rear seat
has no LATCH child restraint anchorage
system and may not be used for
LATCH-equipped child car seats. See
Ú
page 158 for further information on the
LATCH anchorage system.
The center rear seat has no adjustable head
restraint. No person should sit in the center
rear seat if the top of the seatback is below
the top of the person's ear or if the lap/
shoulder belt cannot be worn in the proper
position as described. See
Ú
page 144 for
lap/shoulder operating instructions. Failure to
follow this warning could result in serious
injury or death in the event of a collision.
23_GA_OM_EN_USC_t.book Page 32
Page 35 of 248
33
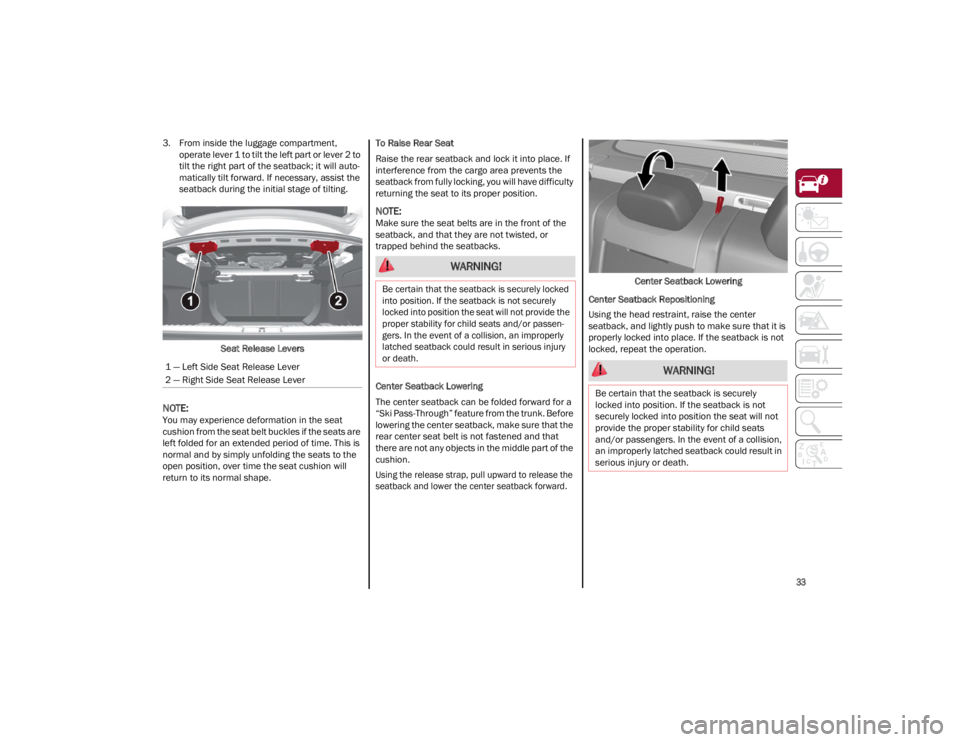
3. From inside the luggage compartment, operate lever 1 to tilt the left part or lever 2 to
tilt the right part of the seatback; it will auto -
matically tilt forward. If necessary, assist the
seatback during the initial stage of tilting.
Seat Release Levers
NOTE:
You may experience deformation in the seat
cushion from the seat belt buckles if the seats are
left folded for an extended period of time. This is
normal and by simply unfolding the seats to the
open position, over time the seat cushion will
return to its normal shape. To Raise Rear Seat
Raise the rear seatback and lock it into place. If
interference from the cargo area prevents the
seatback from fully locking, you will have difficulty
returning the seat to its proper position.
NOTE:
Make sure the seat belts are in the front of the
seatback, and that they are not twisted, or
trapped behind the seatbacks.
Center Seatback Lowering
The center seatback can be folded forward for a
“Ski Pass-Through” feature from the trunk. Before
lowering the center seatback, make sure that the
rear center seat belt is not fastened and that
there are not any objects in the middle part of the
cushion.
Using the release strap, pull upward to release the
seatback and lower the center seatback forward.
Center Seatback Lowering
Center Seatback Repositioning
Using the head restraint, raise the center
seatback, and lightly push to make sure that it is
properly locked into place. If the seatback is not
locked, repeat the operation.
1 — Left Side Seat Release Lever
2 — Right Side Seat Release Lever
WARNING!
Be certain that the seatback is securely locked
into position. If the seatback is not securely
locked into position the seat will not provide the
proper stability for child seats and/or passen -
gers. In the event of a collision, an improperly
latched seatback could result in serious injury
or death.
WARNING!
Be certain that the seatback is securely
locked into position. If the seatback is not
securely locked into position the seat will not
provide the proper stability for child seats
and/or passengers. In the event of a collision,
an improperly latched seatback could result in
serious injury or death.
23_GA_OM_EN_USC_t.book Page 33
Page 40 of 248

GETTING TO KNOW YOUR VEHICLE
38
You can turn the feature on or off by pushing the
button at the base of the mirror.Electrochromic Mirror Power Button
VANITY MIRROR
On the driver and passenger sun visor, there is a
light which illuminates the sun visor mirror when
folded down. Sun Visor Mirror
The courtesy light turns on automatically by lifting
the cover.
Sun Visors
The sun visors are located at the sides of the
interior rearview mirror. They can be adjusted
forward and toward the side window.
To direct the visor toward the side window,
detach the visor from the interior rearview mirror
side hook and turn it towards the side window.
From this position, the sun visor can also be
extended toward the rear of the vehicle for
additional blockage of sunlight.
There are courtesy mirrors with lights on the back
of the sun visors. Rotate Sun Visor Toward Passenger Window
NOTE:
A rear facing child restraint system should never
be fitted in the front passenger seat. Always
comply with the instructions on the sun visor
Ú
page 158.
OUTSIDE POWER MIRRORS
The power mirror switch is located on the driver’s
side door trim panel.
To adjust the power mirrors, first select the
desired mirror using the power mirror control.
To adjust the selected mirror, push the knob in
the direction desired.
NOTE:
Once adjustment is complete, rotate the knob
to the neutral position to prevent accidental
movements.
The power mirrors can be adjusted with the
ignition in the ACC or ON/RUN position.
CAUTION!
To avoid damage to the mirror during cleaning,
never spray any cleaning solution directly onto
the mirror. Apply the solution onto a clean
cloth and wipe the mirror clean.
1 — Sun Visor Mirror Cover
23_GA_OM_EN_USC_t.book Page 38
Page 129 of 248
127
Unnecessary Loads
Do not travel with an overloaded trunk. The
weight of the vehicle and its arrangement greatly
affect fuel consumption and stability.
Electric Devices
Use electrical systems only for the amount of time
needed. The rear window defroster, additional
headlights, windshield wipers and heater blower
fan require a considerable amount of energy;
increasing the current uptake increases fuel
consumption (by up to +25% when city driving).
Climate Control System
Using the climate control system will increase
consumption: use standard ventilation when the
temperature outside permits.
Devices for Aerodynamic Control
The use of non-certified devices for aerodynamic
control may adversely affect air drag and
consumption levels.
DRIVING STYLE
Starting
Do not warm up the engine at low or high revs
when the vehicle is stationary; this causes the
engine to warm up more slowly, thereby
increasing fuel consumption and emissions. It is
therefore advisable to drive off immediately,
slowly, avoiding high speeds: by doing this the
engine will warm up more quickly.
Unnecessary Actions
Avoid revving up when starting at traffic lights or
before stopping the engine. This action is
unnecessary and causes increased fuel
consumption and pollution.Gear Selection
Use a high gear when traffic and road conditions
allow it. Using a low gear for faster acceleration
will increase fuel consumption. Improper use of a
high gear increases consumption, emissions and
engine wear.
Maximum Speed
Fuel consumption considerably increases as
speed increases. Maintain a constant speed,
avoiding unnecessary braking and acceleration,
which cost in terms of both fuel consumption and
emissions.
Acceleration
Accelerating violently severely affects
consumption and emissions: acceleration should
be gradual and should not exceed the maximum
torque.
CONDITIONS OF USE
Cold Starting
Short trips and frequent cold starts will not allow
the engine to reach optimum operating
temperature. This results in a significant increase
in consumption levels (from +15 to +30% in city
driving) and emissions.
Traffic And Road Conditions
High fuel consumption is caused by heavy traffic,
for instance when traveling in traffic with frequent
use of low gears or in cities with many traffic
lights. Winding mountain roads and rough road
surfaces also adversely affect consumption.
Stops In Traffic
During prolonged stops (e.g. railway crossings),
turn off the engine.
TRANSPORTING PASSENGERS
TRANSPORTING ANIMALS
The intervention of the airbags may be dangerous
for an animal on the front seat. It is therefore
advised to arrange animals on the rear seat
inside dedicated cages restrained by the
vehicle’s seat belts.
Keep in mind that, in the event of a sudden
braking or an accident, an inadequately
restrained animal may be projected within the
passenger compartment, risking injury to the
animal itself and the other occupants of the
vehicle.
WARNING!
It is extremely dangerous to leave children in
a parked vehicle when the temperature
outside is very high. The heat inside the
passenger compartment may have serious,
or even fatal, consequences.
Never travel in the trunk of the vehicle. In the
event of an accident, anyone inside the trunk
would be at greater risk of serious or even
fatal injury.
Ensure that all the occupants of the vehicle
wear their seat belts correctly and that any
children are positioned correctly on the
dedicated child restraint systems.
23_GA_OM_EN_USC_t.book Page 127
Page 146 of 248
SAFETY
144
The TPMS should not be used as a tire
pressure gauge while adjusting your tire
pressure.
Driving on a significantly underinflated tire will
cause the tire to overheat, and can lead to tire
failure. Underinflation also reduces fuel
efficiency and tire tread life, and may affect the
vehicle’s handling and stopping ability.
The TPMS is not a substitute for proper tire
maintenance, and it is the driver’s responsi-
bility to maintain correct tire pressure using an
accurate tire pressure gauge, even if underin -
flation has not reached the level to trigger
illumination of the Tire Pressure Monitoring
System Warning Light.
Seasonal temperature changes will affect tire
pressure, and the TPMS will monitor the actual
tire pressure in the tire
Ú
page 239.
OCCUPANT RESTRAINT
SYSTEMS
Some of the most important safety features in
your vehicle are the restraint systems:
OCCUPANT RESTRAINT SYSTEMS
F
EATURES
Seat Belt Systems
Supplemental Restraint Systems (SRS) Air
Bags
Child Restraints
Some of the safety features described in this
section may be standard equipment on some
models, or may be optional equipment on others.
If you are not sure, ask an authorized dealer.
IMPORTANT SAFETY PRECAUTIONS
Please pay close attention to the information in
this section. It tells you how to use your restraint
system properly, to keep you and your
passengers as safe as possible.
Here are some simple steps you can take to
minimize the risk of harm from a deploying air
bag:
1. Children 12 years old and under should always ride buckled up in the rear seat of a
vehicle with a rear seat.
2. A child who is not big enough to wear the vehicle seat belt properly must be secured in
the appropriate child restraint or belt-posi -
tioning booster seat in a rear seating position
Ú
page 158.
3. If a child from 2 to 12 years old (not in a rear-facing child restraint) must ride in the
front passenger seat, move the seat as far
back as possible and use the proper child
restraint
Ú
page 158.
4. Never allow children to slide the shoulder belt behind them or under their arm.
5. You should read the instructions provided with your child restraint to make sure that you
are using it properly.
6. All occupants should always wear their lap and shoulder belts properly.
7. The driver and front passenger seats should be moved back as far as practical to allow the
front air bags room to inflate.
8. Do not lean against the door or window. If your vehicle has side air bags, and deploy -
ment occurs, the side air bags will inflate forcefully into the space between occupants
and the door and occupants could be injured.
9. If the air bag system in this vehicle needs to be modified to accommodate a disabled
person, see
Ú
page 236 for customer
service contact information.
SEAT BELT SYSTEMS
Buckle up even though you are an excellent
driver, even on short trips. Someone on the road
may be a poor driver and could cause a collision
that includes you. This can happen far away from
home or on your own street.
Research has shown that seat belts save lives,
and they can reduce the seriousness of injuries in
a collision. Some of the worst injuries happen
when people are thrown from the vehicle. Seat
belts reduce the possibility of ejection and the
risk of injury caused by striking the inside of the
vehicle. Everyone in a motor vehicle should be
belted at all times.
WARNING!
Never place a rear-facing child restraint in
front of an air bag. A deploying passenger
front air bag can cause death or serious
injury to a child 12 years or younger,
including a child in a rear-facing child
restraint.
Never install a rear-facing child restraint in
the front seat of a vehicle. Only use a
rear-facing child restraint in the rear seat. If
the vehicle does not have a rear seat, do not
transport a rear-facing child restraint in that
vehicle.
23_GA_OM_EN_USC_t.book Page 144
Page 150 of 248
SAFETY
148
(Continued)
8. Position the shoulder belt on your chest so
that it is comfortable and not resting on your
neck. The retractor will withdraw any slack in
the seat belt.
9. To release the seat belt, push the red button on the buckle.
10. To disengage the mini-latch plate from the mini-buckle for storage, insert the regular
latch plate into the black button on the top of
the mini-buckle. The seat belt will automati -
cally retract to its stowed position. If neces -
sary, slide the latch plate down the webbing
to allow the seat belt to retract fully. Insert
the mini-latch plate and regular latch plate
into its stowed position.
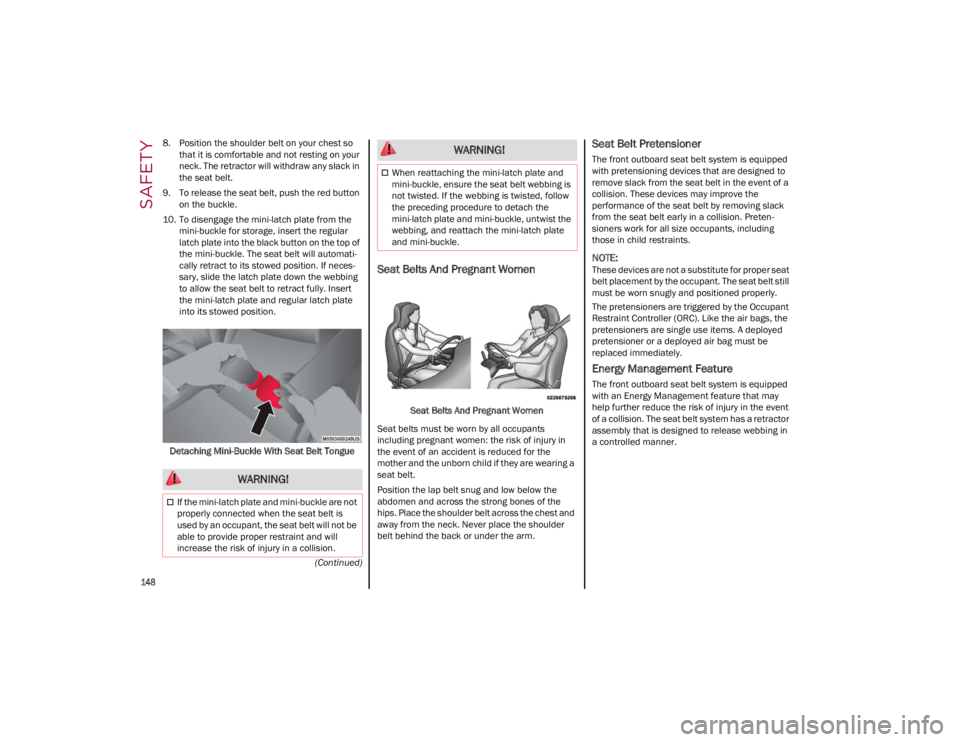
Detaching Mini-Buckle With Seat Belt Tongue
Seat Belts And Pregnant Women
Seat Belts And Pregnant Women
Seat belts must be worn by all occupants
including pregnant women: the risk of injury in
the event of an accident is reduced for the
mother and the unborn child if they are wearing a
seat belt.
Position the lap belt snug and low below the
abdomen and across the strong bones of the
hips. Place the shoulder belt across the chest and
away from the neck. Never place the shoulder
belt behind the back or under the arm.
Seat Belt Pretensioner
The front outboard seat belt system is equipped
with pretensioning devices that are designed to
remove slack from the seat belt in the event of a
collision. These devices may improve the
performance of the seat belt by removing slack
from the seat belt early in a collision. Preten -
sioners work for all size occupants, including
those in child restraints.
NOTE:
These devices are not a substitute for proper seat
belt placement by the occupant. The seat belt still
must be worn snugly and positioned properly.
The pretensioners are triggered by the Occupant
Restraint Controller (ORC). Like the air bags, the
pretensioners are single use items. A deployed
pretensioner or a deployed air bag must be
replaced immediately.
Energy Management Feature
The front outboard seat belt system is equipped
with an Energy Management feature that may
help further reduce the risk of injury in the event
of a collision. The seat belt system has a retractor
assembly that is designed to release webbing in
a controlled manner.
WARNING!
If the mini-latch plate and mini-buckle are not
properly connected when the seat belt is
used by an occupant, the seat belt will not be
able to provide proper restraint and will
increase the risk of injury in a collision.
When reattaching the mini-latch plate and
mini-buckle, ensure the seat belt webbing is
not twisted. If the webbing is twisted, follow
the preceding procedure to detach the
mini-latch plate and mini-buckle, untwist the
webbing, and reattach the mini-latch plate
and mini-buckle.
WARNING!
23_GA_OM_EN_USC_t.book Page 148