2023 ALFA ROMEO GIULIA seats
[x] Cancel search: seatsPage 149 of 248

147
5. Position the shoulder belt across theshoulder and chest with minimal, if any slack
so that it is comfortable and not resting on
your neck. The retractor will withdraw any
slack in the shoulder belt.
6. To release the seat belt, push the red button on the buckle. The seat belt will automatically
retract to its stowed position. If necessary,
slide the latch plate down the webbing to
allow the seat belt to retract fully.
Lap/Shoulder Belt Untwisting Procedure
Use the following procedure to untwist a twisted
lap/shoulder belt.
1. Position the latch plate as close as possible to the anchor point.
2. At about 6 to 12 inches (15 to 30 cm) above the latch plate, grab and twist the seat belt
webbing 180 degrees to create a fold that
begins immediately above the latch plate.
3. Slide the latch plate upward over the folded webbing. The folded webbing must enter the
slot at the top of the latch plate.
4. Continue to slide the latch plate up until it clears the folded webbing and the seat belt is
no longer twisted.
Second Row Center Seat Belt Operating
Instructions
Second Row Seat Belts The second row center seat belt features a seat
belt with a mini-latch plate and buckle, which
allows the seat belt to detach from the lower
anchor when the seat is folded. The mini-latch
plate and regular latch plate can then be stored
out of the way in the parcel tray for added
convenience to open up utilization of the storage
areas behind the front seats when the seat is not
occupied.
1. Remove the mini-latch plate and regular latch
plate from its stowed position in the right rear
side trim panel.
2. Grab the mini-latch plate and pull the seat belt over the seat.
3. Route the shoulder belt to the inside of the right head restraint.
4. When the seat belt is long enough to fit, insert the mini-latch plate into the mini-buckle until
you hear a “click.”
5. Sit back in seat. Slide the regular latch plate up the webbing as far as necessary to allow
the seat belt to go around your lap.
6. When the seat belt is long enough to fit, insert the latch plate into the buckle until you hear
a “click.”
7. Position the lap belt so that it is snug and lies low across your hips, below your abdomen. To
remove slack in the lap belt portion, pull up
on the shoulder belt. To loosen the lap belt if
it is too tight, pull on the lap belt. A snug seat
belt reduces the risk of sliding under the seat
belt in a collision.
1 — Seat Belt Buckle
2 — Seat Belt Latch Plate
3 — Mini Latch Plate
4 — Mini Seat Belt Buckle
5 — Mini Buckle Release
23_GA_OM_EN_USC_t.book Page 147
Page 151 of 248
149
Switchable Automatic Locking Retractors
(ALR)
The seat belts in the passenger seating positions
are equipped with a Switchable Automatic
Locking Retractor (ALR) which is used to secure a
child restraint system. For additional information
on ALR, see
Ú
page 163. The figure below
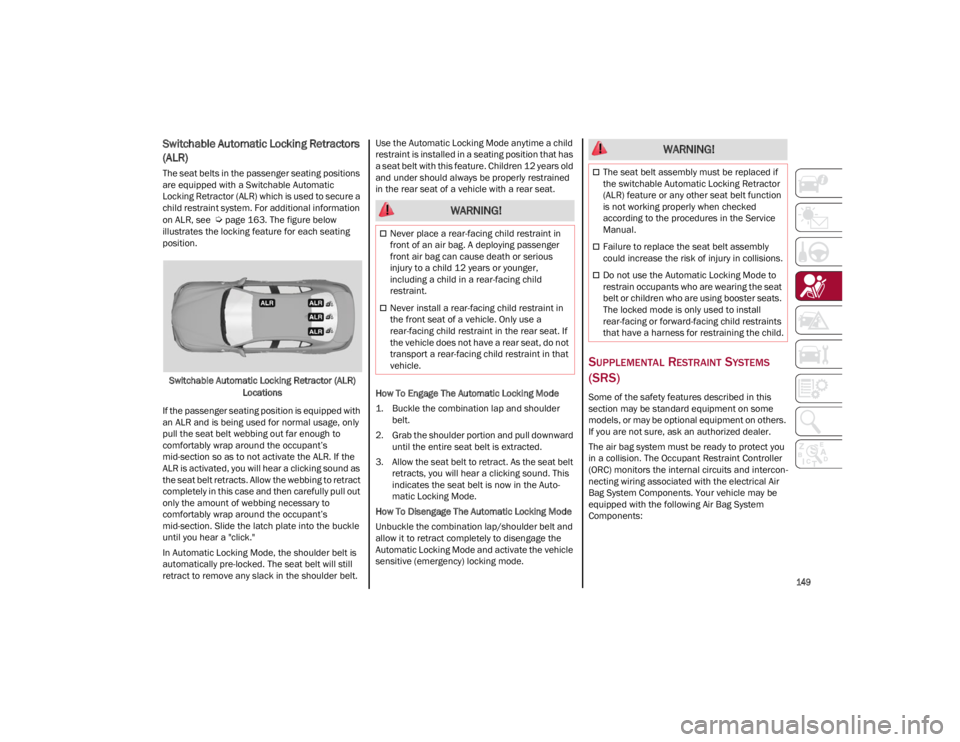
illustrates the locking feature for each seating
position.
Switchable Automatic Locking Retractor (ALR) Locations
If the passenger seating position is equipped with
an ALR and is being used for normal usage, only
pull the seat belt webbing out far enough to
comfortably wrap around the occupant’s
mid-section so as to not activate the ALR. If the
ALR is activated, you will hear a clicking sound as
the seat belt retracts. Allow the webbing to retract
completely in this case and then carefully pull out
only the amount of webbing necessary to
comfortably wrap around the occupant’s
mid-section. Slide the latch plate into the buckle
until you hear a "click."
In Automatic Locking Mode, the shoulder belt is
automatically pre-locked. The seat belt will still
retract to remove any slack in the shoulder belt. Use the Automatic Locking Mode anytime a child
restraint is installed in a seating position that has
a seat belt with this feature. Children 12 years old
and under should always be properly restrained
in the rear seat of a vehicle with a rear seat.
How To Engage The Automatic Locking Mode
1. Buckle the combination lap and shoulder
belt.
2. Grab the shoulder portion and pull downward until the entire seat belt is extracted.
3. Allow the seat belt to retract. As the seat belt retracts, you will hear a clicking sound. This
indicates the seat belt is now in the Auto -
matic Locking Mode.
How To Disengage The Automatic Locking Mode
Unbuckle the combination lap/shoulder belt and
allow it to retract completely to disengage the
Automatic Locking Mode and activate the vehicle
sensitive (emergency) locking mode.
SUPPLEMENTAL RESTRAINT SYSTEMS
(SRS)
Some of the safety features described in this
section may be standard equipment on some
models, or may be optional equipment on others.
If you are not sure, ask an authorized dealer.
The air bag system must be ready to protect you
in a collision. The Occupant Restraint Controller
(ORC) monitors the internal circuits and intercon -
necting wiring associated with the electrical Air
Bag System Components. Your vehicle may be
equipped with the following Air Bag System
Components:
WARNING!
Never place a rear-facing child restraint in
front of an air bag. A deploying passenger
front air bag can cause death or serious
injury to a child 12 years or younger,
including a child in a rear-facing child
restraint.
Never install a rear-facing child restraint in
the front seat of a vehicle. Only use a
rear-facing child restraint in the rear seat. If
the vehicle does not have a rear seat, do not
transport a rear-facing child restraint in that
vehicle.
WARNING!
The seat belt assembly must be replaced if
the switchable Automatic Locking Retractor
(ALR) feature or any other seat belt function
is not working properly when checked
according to the procedures in the Service
Manual.
Failure to replace the seat belt assembly
could increase the risk of injury in collisions.
Do not use the Automatic Locking Mode to
restrain occupants who are wearing the seat
belt or children who are using booster seats.
The locked mode is only used to install
rear-facing or forward-facing child restraints
that have a harness for restraining the child.
23_GA_OM_EN_USC_t.book Page 149
Page 155 of 248
153
Supplemental Side Air Bags
Supplemental Seat-Mounted Side Air Bags
(SABs)
This vehicle is equipped with Supplemental
Seat-Mounted Side Air Bags (SABs).
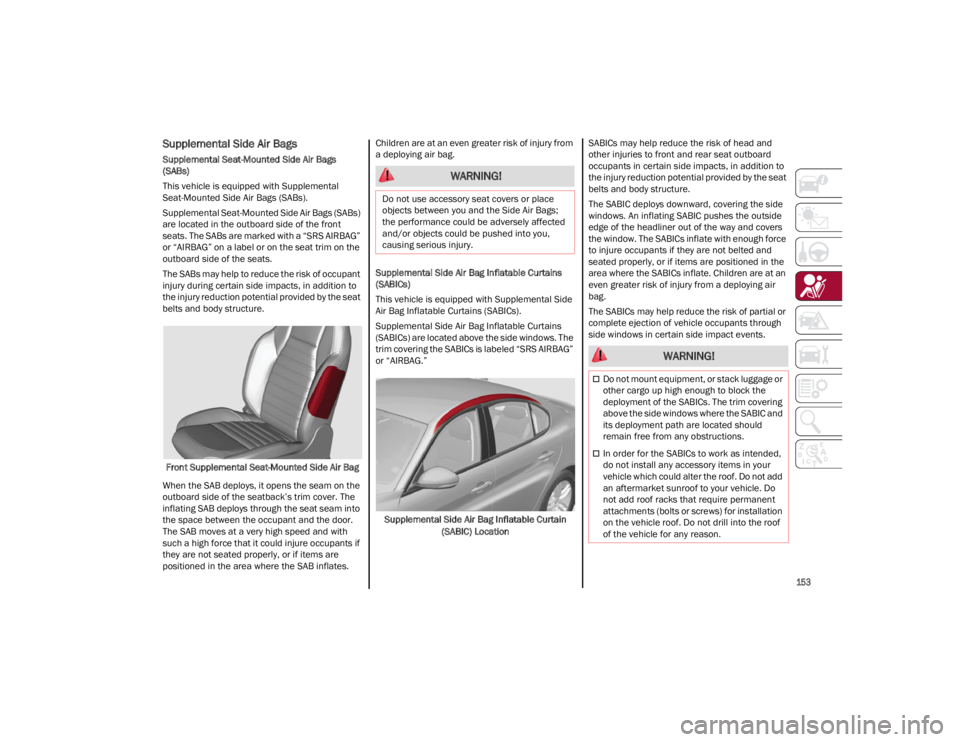
Supplemental Seat-Mounted Side Air Bags (SABs)
are located in the outboard side of the front
seats. The SABs are marked with a “SRS AIRBAG”
or “AIRBAG” on a label or on the seat trim on the
outboard side of the seats.
The SABs may help to reduce the risk of occupant
injury during certain side impacts, in addition to
the injury reduction potential provided by the seat
belts and body structure.Front Supplemental Seat-Mounted Side Air Bag
When the SAB deploys, it opens the seam on the
outboard side of the seatback’s trim cover. The
inflating SAB deploys through the seat seam into
the space between the occupant and the door.
The SAB moves at a very high speed and with
such a high force that it could injure occupants if
they are not seated properly, or if items are
positioned in the area where the SAB inflates. Children are at an even greater risk of injury from
a deploying air bag.
Supplemental Side Air Bag Inflatable Curtains
(SABICs)
This vehicle is equipped with Supplemental Side
Air Bag Inflatable Curtains (SABICs).
Supplemental Side Air Bag Inflatable Curtains
(SABICs) are located above the side windows. The
trim covering the SABICs is labeled “SRS AIRBAG”
or “AIRBAG.”
Supplemental Side Air Bag Inflatable Curtain (SABIC) Location SABICs may help reduce the risk of head and
other injuries to front and rear seat outboard
occupants in certain side impacts, in addition to
the injury reduction potential provided by the seat
belts and body structure.
The SABIC deploys downward, covering the side
windows. An inflating SABIC pushes the outside
edge of the headliner out of the way and covers
the window. The SABICs inflate with enough force
to injure occupants if they are not belted and
seated properly, or if items are positioned in the
area where the SABICs inflate. Children are at an
even greater risk of injury from a deploying air
bag.
The SABICs may help reduce the risk of partial or
complete ejection of vehicle occupants through
side windows in certain side impact events.
WARNING!
Do not use accessory seat covers or place
objects between you and the Side Air Bags;
the performance could be adversely affected
and/or objects could be pushed into you,
causing serious injury.
WARNING!
Do not mount equipment, or stack luggage or
other cargo up high enough to block the
deployment of the SABICs. The trim covering
above the side windows where the SABIC and
its deployment path are located should
remain free from any obstructions.
In order for the SABICs to work as intended,
do not install any accessory items in your
vehicle which could alter the roof. Do not add
an aftermarket sunroof to your vehicle. Do
not add roof racks that require permanent
attachments (bolts or screws) for installation
on the vehicle roof. Do not drill into the roof
of the vehicle for any reason.
23_GA_OM_EN_USC_t.book Page 153
Page 156 of 248

SAFETY
154
(Continued)
Side Impacts
The Side Air Bags are designed to activate in
certain side impacts. The Occupant Restraint
Controller (ORC) determines whether the
deployment of the Side Air Bags in a particular
impact event is appropriate, based on the
severity and type of collision. The side impact
sensors aid the ORC in determining the
appropriate response to impact events. The
system is calibrated to deploy the Side Air Bags
on the impact side of the vehicle during impacts
that require Side Air Bag occupant protection. In
side impacts, the Side Air Bags deploy
independently; a left side impact deploys the left
Side Air Bags only and a right-side impact deploys
the right Side Air Bags only. Vehicle damage by
itself is not a good indicator of whether or not
Side Air Bags should have deployed.
The Side Air Bags will not deploy in all side
collisions, including some collisions at certain
angles, or some side collisions that do not impact
the area of the passenger compartment. The Side
Air Bags may deploy during angled or offset
frontal collisions where the front air bags deploy.
Side Air Bags are a supplement to the seat belt
restraint system. Side Air Bags deploy in less time
than it takes to blink your eyes.
NOTE:
Air bag covers may not be obvious in the interior
trim, but they will open during air bag deploy
-
ment. Rollover Events
Side Air Bags and seat belt pretensioners are
designed to activate in certain rollover events.
The Occupant Restraint Controller (ORC)
determines whether deployment in a particular
rollover event is appropriate, based on the
severity and type of collision. Vehicle damage by
itself is not a good indicator of whether or not
Side Air Bags and seat belt pretensioners should
have deployed.
The Side Air Bags and seat belt pretensioners will
not deploy in all rollover events. The rollover
sensing system determines if a rollover event
may be in progress and whether deployment is
appropriate. In the event the vehicle experiences
a rollover or near rollover event, and deployment
is appropriate, the rollover sensing system will
deploy the side air bags and seat belt preten
-
sioners on both sides of the vehicle.
The SABICs may help reduce the risk of partial or
complete ejection of vehicle occupants through
side windows in certain rollover or side impact
events.
Air Bag System Components
NOTE:
The Occupant Restraint Controller (ORC) moni -
tors the internal circuits and interconnecting
wiring associated with electrical Air Bag System
Components listed below:
Occupant Restraint Controller (ORC)
Air Bag Warning Light
Steering Wheel and Column
Instrument Panel
Knee Impact Bolsters
WARNING!
Occupants, including children, who are up
against or very close to Side Air Bags can be
seriously injured or killed. Occupants,
including children, should never lean on or
sleep against the door, side windows, or area
where the side air bags inflate, even if they
are in an infant or child restraint.
Seat belts (and child restraints where
appropriate) are necessary for your
protection in all collisions. They also help
keep you in position, away from an inflating
Side Air Bag. To get the best protection from
the Side Air Bags, occupants must wear their
seat belts properly and sit upright with their
backs against the seats. Children must be
properly restrained in a child restraint or
booster seat that is appropriate for the size
of the child.
WARNING!
Side Air Bags need room to inflate. Do not
lean against the door or window. Sit upright
in the center of the seat.
Being too close to the Side Air Bags during
deployment could cause you to be severely
injured or killed.
Relying on the Side Air Bags alone could lead
to more severe injuries in a collision. The
Side Air Bags work with your seat belt to
restrain you properly. In some collisions, Side
Air Bags won’t deploy at all. Always wear your
seat belt even though you have Side Air Bags.
WARNING!
23_GA_OM_EN_USC_t.book Page 154
Page 160 of 248

SAFETY
158
To read data recorded by an EDR, special
equipment is required, and access to the vehicle
or the EDR is needed. In addition to the vehicle
manufacturer, other parties, such as law
enforcement, that have the special equipment,
can read the information if they have access to
the vehicle or the EDR.
CHILD RESTRAINTS
Everyone in your vehicle needs to be buckled up
at all times, including babies and children. Every
state in the United States, and every Canadian
province, requires that small children ride in
proper restraint systems. This is the law, and you
can be prosecuted for ignoring it.
Children 12 years or younger should ride properly
buckled up in a rear seat, if available. According
to crash statistics, children are safer when
properly restrained in the rear seats rather than
in the front.
There are different sizes and types of restraints
for children from newborn size to the child almost
large enough for an adult safety belt. Always
check the child seat Owner’s Manual to make
sure you have the correct seat for your child. Carefully read and follow all the instructions and
warnings in the child restraint Owner’s Manual
and on all the labels attached to the child
restraint.
Before buying any restraint system, make sure
that it has a label certifying that it meets all
applicable Safety Standards. You should also
make sure that you can install it in the vehicle
where you will use it.
NOTE:
For additional information, refer to
http://
www.nhtsa.gov/parents-and-caregivers
or call:
1–888–327–4236
Canadian residents should refer to Transport
Canada’s website for additional information:
http://www.tc.gc.ca/en/services/road/
child-car-seat-safety.html
Summary Of Recommendations For Restraining Children In Vehicles
WARNING!
In a collision, an unrestrained child can
become a projectile inside the vehicle. The
force required to hold even an infant on your
lap could become so great that you could not
hold the child, no matter how strong you are.
The child and others could be badly injured or
killed. Any child riding in your vehicle should
be in a proper restraint for the child’s size.
Child Size, Height, Weight Or AgeRecommended Type Of Child Restraint
Infants and Toddlers Children who are two years old or younger and
who have not reached the height or weight limits
of their child restraint Either an Infant Carrier or a Convertible Child
Restraint, facing rearward in a rear seat of the
vehicle
Small Children Children who are at least two years old or who
have outgrown the height or weight limit of their
rear-facing child restraint Forward-Facing Child Restraint with a five-point
Harness, facing forward in a rear seat of the
vehicle
Larger Children Children who have outgrown their forward-facing
child restraint, but are too small to properly fit
the vehicle’s seat belt Belt Positioning Booster Seat and the vehicle
seat belt, seated in a rear seat of the vehicle
Children Too Large for Child Restraints Children 12 years old or younger, who have
outgrown the height or weight limit of their
booster seat Vehicle Seat Belt, seated in a rear seat of the
vehicle
23_GA_OM_EN_USC_t.book Page 158
Page 161 of 248
159
(Continued)
Infant And Child Restraints
Safety experts recommend that children ride
rear-facing in the vehicle until they are two years
old or until they reach either the height or weight
limit of their rear-facing child restraint. Two types
of child restraints can be used rear-facing: infant
carriers and convertible child seats.
The infant carrier is only used rear-facing in the
vehicle. It is recommended for children from birth
until they reach the weight or height limit of the
infant carrier. Convertible child seats can be used
either rear-facing or forward-facing in the vehicle.
Convertible child seats often have a higher weight
limit in the rear-facing direction than infant
carriers do, so they can be used rear-facing by
children who have outgrown their infant carrier
but are still less than at least two years old.
Children should remain rear-facing until they
reach the highest weight or height allowed by
their convertible child seat.
Older Children And Child Restraints
Children who are two years old or who have
outgrown their rear-facing convertible child seat
can ride forward-facing in the vehicle.
Forward-facing child seats and convertible child
seats used in the forward-facing direction are for
children who are over two years old or who have
outgrown the rear-facing weight or height limit of
their rear-facing convertible child seat. Children
should remain in a forward-facing child seat with
a harness for as long as possible, up to the
highest weight or height allowed by the child seat.
All children whose weight or height is above the
forward-facing limit for the child seat should use
a belt-positioning booster seat until the vehicle’s
seat belts fit properly. If the child cannot sit with
knees bent over the vehicle’s seat cushion while
the child’s back is against the seatback, they
should use a belt-positioning booster seat. The
child and belt-positioning booster seat are held in
the vehicle by the seat belt.
Children Too Large For Booster Seats
Children who are large enough to wear the
shoulder belt comfortably, and whose legs are
long enough to bend over the front of the seat
when their back is against the seatback, should
use the seat belt in a rear seat. Use this simple
5-step test to decide whether the child can use
the vehicle’s seat belt alone:
1. Can the child sit all the way back against the back of the vehicle seat?
2. Do the child’s knees bend comfortably over the front of the vehicle seat while the child is
still sitting all the way back?
WARNING!
Never place a rear-facing child restraint in
front of an air bag. A deploying passenger
front air bag can cause death or serious
injury to a child 12 years or younger,
including a child in a rear-facing child
restraint.
Never install a rear-facing child restraint in
the front seat of a vehicle. Only use a
rear-facing child restraint in the rear seat. If
the vehicle does not have a rear seat, do not
transport a rear-facing child restraint in that
vehicle.
WARNING!
Improper installation can lead to failure of an
infant or child restraint. It could come loose
in a collision. The child could be badly injured
or killed. Follow the child restraint
manufacturer’s directions exactly when
installing an infant or child restraint.
After a child restraint is installed in the
vehicle, do not move the vehicle seat forward
or rearward because it can loosen the child
restraint attachments. Remove the child
restraint before adjusting the vehicle seat
position. When the vehicle seat has been
adjusted, reinstall the child restraint.
When your child restraint is not in use,
secure it in the vehicle with the seat belt or
LATCH anchorages, or remove it from the
vehicle. Do not leave it loose in the vehicle. In
a sudden stop or accident, it could strike the
occupants or seatbacks and cause serious
personal injury.
WARNING!
23_GA_OM_EN_USC_t.book Page 159
Page 163 of 248

161
Lower Anchors And Tethers For CHildren
(LATCH) Restraint System
LATCH LabelYour vehicle is equipped with the child restraint
anchorage system called LATCH, which stands for
Lower Anchors and Tethers for CHildren. The
LATCH system has three vehicle anchor points for
installing LATCH-equipped child seats. There are
two lower anchorages located at the back of the
seat cushion where it meets the seatback and
one top tether anchorage located behind the
seating position. These anchorages are used to
install LATCH-equipped child seats without using
the vehicle’s seat belts. Some seating positions
may have a top tether anchorage but no lower
anchorages. In these seating positions, the seat
belt must be used with the top tether anchorage
to install the child restraint. Please see the
following table for more information.
LATCH Positions For Installing Child
Restraints In This Vehicle
LATCH Positions
Lower Anchorage Symbol
(2 Anchorages Per Seating Position)
Top Tether Anchorage Symbol
Frequently Asked Questions About Installing Child Restraints With LATCH
What is the weight limit (child’s weight + weight of the child
restraint) for using the LATCH anchorage system to attach the
child restraint? 65 lbs
(29.5 kg) Use the LATCH anchorage system until the combined weight of
the child and the child restraint is 65 lbs (29.5 kg). Use the
seat belt and tether anchor instead of the LATCH system once
the combined weight is more than 65 lbs (29.5 kg).
Can the LATCH anchorages and the seat belt be used together
to attach a rear-facing or forward-facing child restraint? NoDo not use the seat belt when you use the LATCH anchorage
system to attach a rear-facing or forward-facing child restraint. Booster seats may be attached to the LATCH anchorages if
allowed by the booster seat manufacturer. See your booster
seat owner’s manual for more information.
Can a child seat be installed in the center position using the
inner LATCH lower anchorages from the outboard seating
positions? No
Use the seat belt and tether anchor to install a child seat in the
center seating position.
23_GA_OM_EN_USC_t.book Page 161
Page 164 of 248

SAFETY
162
(Continued)
Locating The LATCH Anchorages
The lower anchorages are round bars
that are found at the rear of the seat
cushion where it meets the seatback.
Each anchorage is under a cover with
the anchorage symbol on it. Lift the cover to
access the lower anchorage.
LATCH Anchorage Locations
Locating The Upper Tether Anchorages
There are tether strap anchorages
behind each rear seating position
located in the panel between the rear
seatback and the rear window. They are
found under a plastic cover with the tether
anchorage symbol on it.
Upper Tether Anchorage Location LATCH-compatible child restraint systems will be
equipped with a rigid bar or a flexible strap on
each side. Each will have a hook or connector to
attach to the lower anchorage and a way to
tighten the connection to the anchorage.
Forward-facing child restraints and some
rear-facing child restraints will also be equipped
with a tether strap. The tether strap will have a
hook at the end to attach to the top tether
anchorage and a way to tighten the strap after it
is attached to the anchorage.
Center Seat LATCH
Can two child restraints be attached using a common lower
LATCH anchorage? NoNever “share” a LATCH anchorage with two or more child
restraints. If the center position does not have dedicated LATCH
lower anchorages, use the seat belt to install a child seat in the
center position next to a child seat using the LATCH anchorages
in an outboard position.
Can the rear-facing child restraint touch the back of the front
passenger seat? YesThe child seat may touch the back of the front passenger seat
if the child restraint manufacturer also allows contact. See your
child restraint owner’s manual for more information.
Can the rear head restraints be removed? YesThe head restraints can be removed in every rear seating
position if they interfere with the installation of the child
restraint
Ú
page 36.
Frequently Asked Questions About Installing Child Restraints With LATCH
1 — LATCH Anchorage Bar
2 — LATCH Anchorage Locations
WARNING!
Do not install a child restraint in the center
position using the LATCH system. This
position is not approved for installing child
seats using the LATCH attachments. You
must use the seat belt and tether anchor to
install a child seat in the center seating
position.
23_GA_OM_EN_USC_t.book Page 162