2023 ALFA ROMEO GIULIA check engine light
[x] Cancel search: check engine lightPage 184 of 248

182
SERVICING AND MAINTENANCE
Correct servicing permits the performance of the
vehicle to be maintained over time, as well as
limited running costs and safeguarding the
efficiency of the safety systems.
This chapter explains how.
SCHEDULED SERVICING
Correct servicing is crucial for guaranteeing a
long life for the vehicle under the best conditions.
For this reason, Alfa Romeo has planned a series
of checks and services for your vehicle at fixed
intervals based on distance and time, as
described in the Scheduled Servicing Plan.
Before each service, it is always necessary to
carefully follow the instructions in the Scheduled
Servicing Plan (e.g. periodically check level of
fluids, tire pressure, etc.).
Scheduled Servicing is offered by an authorized
dealer according to a set time schedule. If, during
each operation, in addition to the ones
scheduled, the need arises for further
replacements or repairs, these may be carried
out with the owner’s explicit consent only.
NOTE:
Scheduled Servicing intervals are required by the
manufacturer. Failure to have them carried out
may invalidate the New Vehicle Limited Warranty.
You are advised to inform an authorized dealer of
any small operating irregularities without waiting
for the next service.
PERIODIC CHECKS
Every month or every 600 miles (1,000 km) or
before long trips check and, if necessary, top off:
Engine coolant level.
Brake fluid level (if insufficient, see an
authorized dealer as soon as possible).
Windshield washer fluid level.
Tire inflation pressure and condition.
Operation of lighting system (headlights,
direction indicators, hazard warning lights,
etc.).
Operation of windshield washing/wiping
system and positioning/wear of wiper blades.
Inspect the CV/Universal joints.
Oil consumption of the engine depends on
conditions and driving style. For this reason, the
engine oil level must be checked every
1,860 miles (3,000 km), and top off if necessary
Ú
page 188.
HEAVY USAGE OF THE VEHICLE
If the vehicle is used under one of the following
conditions:
Dusty roads.
Short, repeated journeys less than 4 miles
(7 km) at sub-zero outside temperatures.
Engine often idling or driving long distances at
low speeds or long periods of inactivity.
In the event of a long period of inactivity. The following checks must be carried out more
often than indicated in the Scheduled Servicing
Plan:
Check cleanliness of hood and trunk locks,
cleanliness and lubrication of linkage.
Visually inspect conditions of: engine,
transmission, pipes and hoses (exhaust/fuel
system/brakes) and rubber elements
(sleeves/bushes, etc.).
Check battery charge and battery fluid level
(electrolyte).
Visually inspect conditions of the accessory
drive belts.
Check and, if necessary, change engine oil and
replace oil filter.
Check and, if necessary, replace cabin air
filter.
Check and, if necessary, replace engine air
cleaner.
Severe Duty All Models
Vehicles that are operated in a dusty and off-road
environment, or predominately at idle or very low
engine RPM are known as Severe Duty vehicles.
It is recommended that you change engine oil at
4,000 miles (6,500 km) or 350 hours of engine
run time.
23_GA_OM_EN_USC_t.book Page 182
Page 185 of 248
183
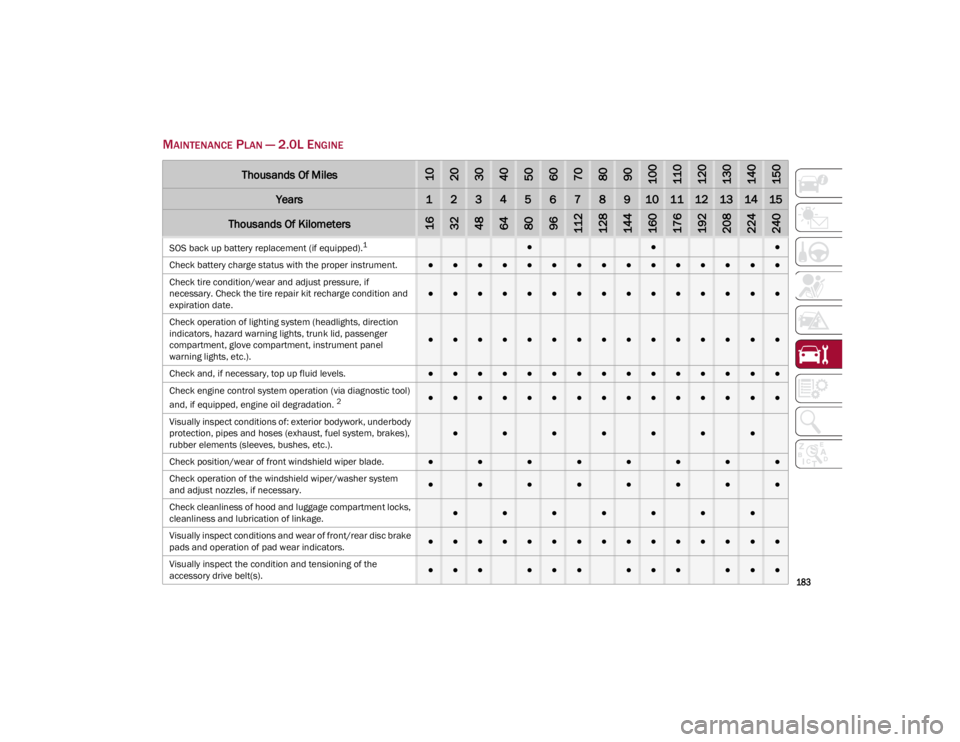
MAINTENANCE PLAN — 2.0L ENGINE
Thousands Of Miles102030405060708090100110120130140150
Years123456789101112131415
Thousands Of Kilometers163248648096112128144160176192208224240
SOS back up battery replacement (if equipped).1●●●
Check battery charge status with the proper instrument.
●●●●●●●●●●●●●●●
Check tire condition/wear and adjust pressure, if
necessary. Check the tire repair kit recharge condition and
expiration date.
●●●●●●●●●●●●●●●
Check operation of lighting system (headlights, direction
indicators, hazard warning lights, trunk lid, passenger
compartment, glove compartment, instrument panel
warning lights, etc.).
●●●●●●●●●●●●●●●
Check and, if necessary, top up fluid levels.
●●●●●●●●●●●●●●●
Check engine control system operation (via diagnostic tool)
and, if equipped, engine oil degradation.
2●●●●●●●●●●●●●●●
Visually inspect conditions of: exterior bodywork, underbody
protection, pipes and hoses (exhaust, fuel system, brakes),
rubber elements (sleeves, bushes, etc.).
●●●●●●●
Check position/wear of front windshield wiper blade.●●●●●●●●
Check operation of the windshield wiper/washer system
and adjust nozzles, if necessary.
●●●●●●●●
Check cleanliness of hood and luggage compartment locks,
cleanliness and lubrication of linkage.
●●●●●●●
Visually inspect conditions and wear of front/rear disc brake
pads and operation of pad wear indicators.●●●●●●●●●●●●●●●
Visually inspect the condition and tensioning of the
accessory drive belt(s).
●●●●●●●●●●●●
23_GA_OM_EN_USC_t.book Page 183
Page 187 of 248
185
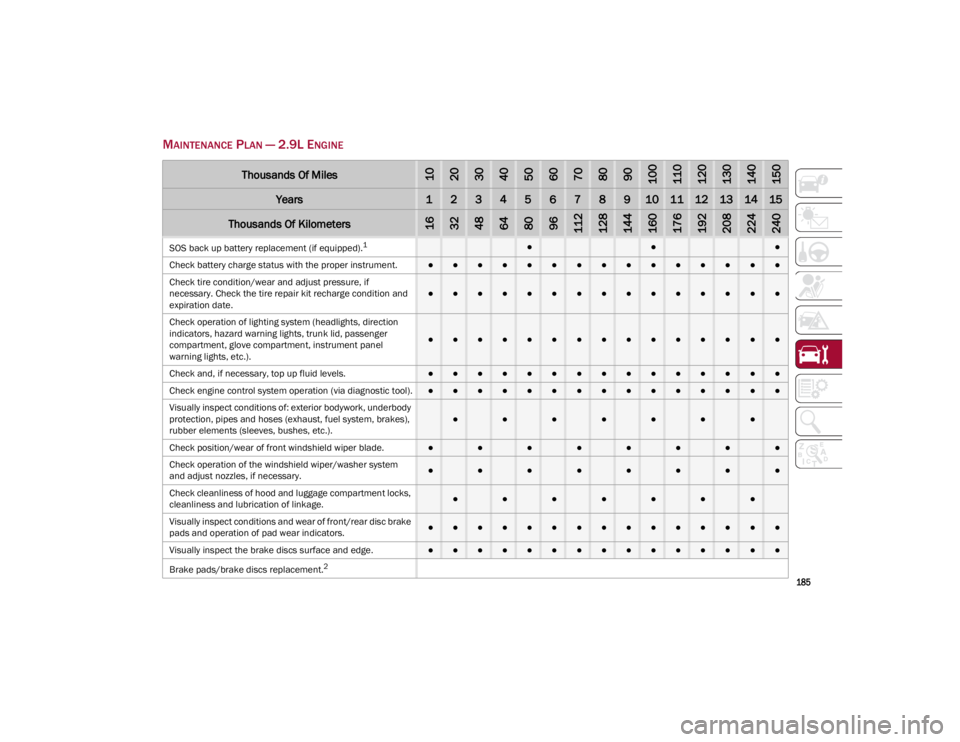
MAINTENANCE PLAN — 2.9L ENGINE
Thousands Of Miles102030405060708090100110120130140150
Years123456789101112131415
Thousands Of Kilometers163248648096112128144160176192208224240
SOS back up battery replacement (if equipped).1●●●
Check battery charge status with the proper instrument.
●●●●●●●●●●●●●●●
Check tire condition/wear and adjust pressure, if
necessary. Check the tire repair kit recharge condition and
expiration date.
●●●●●●●●●●●●●●●
Check operation of lighting system (headlights, direction
indicators, hazard warning lights, trunk lid, passenger
compartment, glove compartment, instrument panel
warning lights, etc.).
●●●●●●●●●●●●●●●
Check and, if necessary, top up fluid levels.
●●●●●●●●●●●●●●●
Check engine control system operation (via diagnostic tool).
●●●●●●●●●●●●●●●
Visually inspect conditions of: exterior bodywork, underbody
protection, pipes and hoses (exhaust, fuel system, brakes),
rubber elements (sleeves, bushes, etc.).
●●●●●●●
Check position/wear of front windshield wiper blade.●●●●●●●●
Check operation of the windshield wiper/washer system
and adjust nozzles, if necessary.
●●●●●●●●
Check cleanliness of hood and luggage compartment locks,
cleanliness and lubrication of linkage.
●●●●●●●
Visually inspect conditions and wear of front/rear disc brake
pads and operation of pad wear indicators.●●●●●●●●●●●●●●●
Visually inspect the brake discs surface and edge.
●●●●●●●●●●●●●●●
Brake pads/brake discs replacement.
2
23_GA_OM_EN_USC_t.book Page 185
Page 189 of 248
187
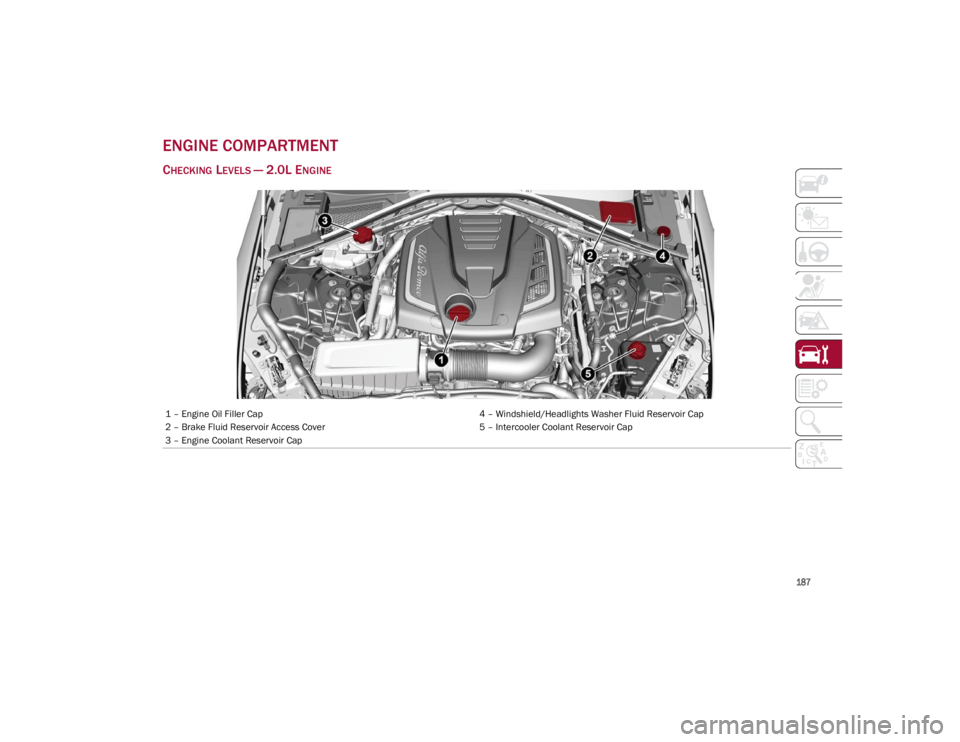
ENGINE COMPARTMENT
CHECKING LEVELS — 2.0L ENGINE
1 – Engine Oil Filler Cap4 – Windshield/Headlights Washer Fluid Reservoir Cap
2 – Brake Fluid Reservoir Access Cover 5 – Intercooler Coolant Reservoir Cap
3 – Engine Coolant Reservoir Cap
23_GA_OM_EN_USC_t.book Page 187
Page 190 of 248
SERVICING AND MAINTENANCE
188
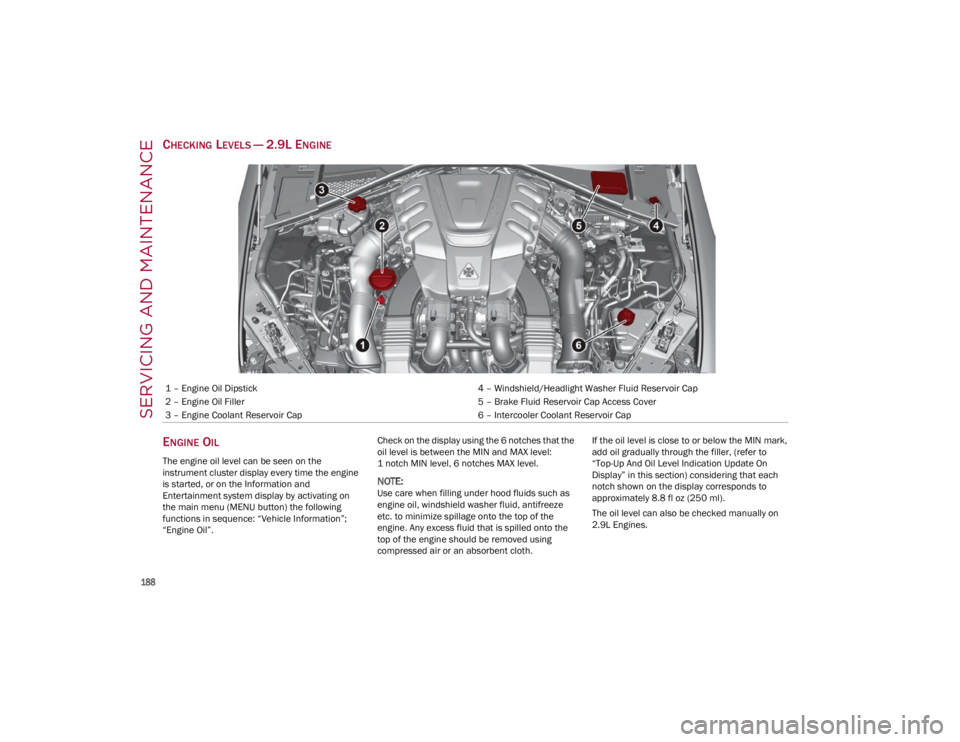
CHECKING LEVELS — 2.9L ENGINE
E
NGINE OIL
The engine oil level can be seen on the
instrument cluster display every time the engine
is started, or on the Information and
Entertainment system display by activating on
the main menu (MENU button) the following
functions in sequence: “Vehicle Information”;
“Engine Oil”. Check on the display using the 6 notches that the
oil level is between the MIN and MAX level:
1 notch MIN level, 6 notches MAX level.
NOTE:
Use care when filling under hood fluids such as
engine oil, windshield washer fluid, antifreeze
etc. to minimize spillage onto the top of the
engine. Any excess fluid that is spilled onto the
top of the engine should be removed using
compressed air or an absorbent cloth.If the oil level is close to or below the MIN mark,
add oil gradually through the filler, (refer to
“Top-Up And Oil Level Indication Update On
Display” in this section) considering that each
notch shown on the display corresponds to
approximately 8.8 fl oz (250 ml).
The oil level can also be checked manually on
2.9L Engines.
1 – Engine Oil Dipstick
4 – Windshield/Headlight Washer Fluid Reservoir Cap
2 – Engine Oil Filler 5 – Brake Fluid Reservoir Cap Access Cover
3 – Engine Coolant Reservoir Cap 6 – Intercooler Coolant Reservoir Cap
23_GA_OM_EN_USC_t.book Page 188
Page 191 of 248
189
NOTE:
Always reinstall the oil cap and tighten to proper
torque whenever it is removed to add oil to
engine. Never run the engine with cap removed
as this could cause oil to leak from engine.
Manual Oil Level Checking Procedure —
2.9L Engine
Check that the oil level is between the MIN and
MAX marks on dipstick, clean it with a lint-free
cloth and reinsert it. Extract the dipstick again
and check that the level is between the MIN and
MAX marks.
Top-Up And Oil Level Indication Update On
Display — 2.9L Engine
If an engine oil top-off is needed, in order to
ensure the correct indication of the oil level on
the display, proceed with the following process:
Leave the car on flat ground with the engine
running for approximately five minutes
(temperature higher than 198°F (90°C) and
shut the engine off.
Wait for five minutes, turn the ignition to the
ON mode without starting the engine and wait
for a few seconds.
NOTE:
If the level indication is not updated after the
previously described procedure, repeat the
engine adjustment, shut the engine off and wait
another five minutes before starting it again. If
the indication is not updated after the second
start, contact an authorized dealer.
Top-Up And Oil Level Indication Update On
Display — 2.0L Engine
If an engine oil top-off is needed, in order to
ensure the correct indication of the oil level on
the display, proceed with the following process:
Leave the car on flat ground with the engine
running for approximately five minutes
(temperature higher than 176°F (80°C) and
shut the engine off.
Start the engine again and idle it for about two
minutes.
NOTE:
If you have added the specified amount of oil and
the indicator is not reading “Full”, please contact
an authorized dealer.
ENGINE COOLANT
If the level is too low, remove the cap of reservoir
and add the fluid described on
Ú
page 233.
WASHER FLUID FOR WINDSHIELD/
H
EADLIGHTS
The windshield and headlights washer fluid
reservoir has a telescopic filler.
If the level is too low, remove reservoir cap and lift
the filler. Then, add the fluid described on
Ú
page 233.
NOTE:
Use care when filling under hood fluids such as
engine oil, windshield washer fluid, antifreeze
etc. to minimize spillage onto the top of the
engine. Any excess fluid that is spilled onto the
top of the engine should be removed using
compressed air or an absorbent cloth.
CAUTION!
Make sure not to add too much oil when
topping off the engine. Engine oil in excess
may damage the engine. Have the vehicle
checked. Never exceed the MAX level when
topping off engine oil. It is advisable to check
the oil level in intermediate steps using the oil
dipstick (2.9L Engine Only).
CAUTION!
The oil level is not refreshed immediately on
the display after topping off. Consequently,
wait for the oil level to be refreshed on the
display and see the following procedures.
WARNING!
If the engine oil is being topped up, wait for the
engine to cool down before loosening the filler
cap, particularly for vehicles with aluminum
cap (if equipped). WARNING: risk of burns!
CAUTION!
The oil level must never exceed the MAX mark.
If the MAX mark is exceeded (last notch on the
right turns red) after the fill-up, go to an
authorized dealer as soon as possible to have
the oil in excess removed.
Do not add oil with specifications different
from those of the oil already in the engine.
Used engine oil and oil filters contain
substances which are harmful to the
environment. To change the oil and filters, we
advise you to contact an authorized dealer.
23_GA_OM_EN_USC_t.book Page 189
Page 192 of 248
SERVICING AND MAINTENANCE
190
NOTE:
The headlight washing system will not work if the
liquid level is low (as indicated by the symbol on
the instrument cluster display). On vehicles
equipped with headlight washers, there is a refer-
ence notch on the dipstick: ONLY the windshield/
rear window washer operates with the level below
this reference.
BRAKE FLUID
Check that the fluid is at the maximum level. If
the fluid level in the tank is low, contact an
authorized dealer to have the system checked.
AUTOMATIC TRANSMISSION ACTIVATION
S
YSTEM OIL
The transmission control oil level should only be
checked at an authorized dealer.
USEFUL ADVICE FOR EXTENDING THE
L
IFE OF YOUR BATTERY
To avoid draining your battery and make it last
longer, observe the following instructions:
When you park the car, ensure that the doors
and trunk are closed properly to prevent any
lights from remaining on inside the
passenger's compartment.
Do not keep accessories (e.g. radio, hazard
warning lights, etc.) switched on for a long time
when the engine is not running.
Before performing any operation on the
electrical system, disconnect the negative
battery cable. If you wish to install electrical accessories after
purchasing the car that require permanent
electrical supply (e.g. alarm, etc.), or accessories
which influence the electrical supply
requirements, contact an authorized dealer,
whose qualified staff will evaluate the overall
electrical consumption.
NOTE:
After the battery is disconnected, the steering
must be initialized. The warning light on the
instrument panel switches on to indicate this. To
carry out this procedure, simply turn the steering
wheel all the way from one end to the other, and
then turn it back to the central position.
BATTERY
The battery does not require the electrolyte to be
topped up with distilled water. A periodic check
carried out at an authorized dealer, however, is
necessary to check efficiency.
Follow the battery manufacturer's instructions for
maintenance.
Replacing The Battery
If necessary, replace the battery with another
original battery with the same specifications.
Follow the battery manufacturer’s instructions for
maintenance.
NOTE:
It will not be possible to open the trunk with a key
or by pushing the button in the passenger
compartment when the battery is disconnected.
So, always position the manual trunk opening
strap on the trunk lock before disconnecting the
battery
Ú
page 220.
CAUTION!
If the charge level remains under 50% for a
long time, the battery may be damaged by
sulphation, reducing its capacity and
efficiency during a vehicle start. The battery is
also more prone to the risk of freezing (at
temperatures as high as 14°F (-10°C).
WARNING!
Battery acid is a corrosive solution and can
burn or even blind you. Do not allow battery
acid to contact your eyes, skin, or clothing.
Do not lean over a battery when attaching
clamps
Ú
page 177. If acid splashes in eyes
or on skin, flush the area immediately with
large amounts of water.
Battery gas is flammable and explosive.
Keep flame or sparks away from the battery.
Do not use a booster battery or any other
booster source with an output greater than
12 Volts. Do not allow cable clamps to touch
each other.
Battery posts, terminals, and related
accessories contain lead and lead
compounds. Wash hands after handling.
23_GA_OM_EN_USC_t.book Page 190
Page 222 of 248
SERVICING AND MAINTENANCE
220
actual conditions of their use, however,
and may depart significantly from the
norm due to variations in driving habits,
service practices, and differences in
road characteristics and climate.
TRACTION GRADES
The Traction grades, from highest to
lowest, are AA, A, B, and C. These
grades represent the tire's ability to
stop on wet pavement, as measured
under controlled conditions on
specified government test surfaces of
asphalt and concrete. A tire marked C
may have poor traction performance.
TEMPERATURE GRADES
The temperature grades are A (the
highest), B, and C, representing the
tire's resistance to the generation of
heat and its ability to dissipate heat,
when tested under controlled
conditions on a specified indoor
laboratory test wheel. Sustained high
temperature can cause the material of
the tire to degenerate and reduce tire life, and excessive temperature can
lead to sudden tire failure. The grade C
corresponds to a level of performance,
which all passenger vehicle tires must
meet under the Federal Motor Vehicle
Safety Standard No. 109. Grades B and
A represent higher levels of
performance on the laboratory test
wheel, than the minimum required by
law.
STORING THE VEHICLE
If the vehicle is left inactive for longer than a
month, the following precautions should be
observed:
Park the vehicle in an area that is covered and
dry, and well-ventilated if possible. Slightly
open the windows.
Check that the Electric Park Brake is not
activated.
Carry out the procedure: “manual trunk
opening device” procedure described in this
paragraph.
Disconnect the negative battery terminal and
check the battery charge. Repeat this check
once every three months during storage.
If the battery is not disconnected from the
electrical system, check its state of charge
every 30 days.
Clean and protect the painted parts using
protective wax.
Clean and protect the shiny metal parts using
special compounds available commercially.
Sprinkle talcum powder on the windshield wiper
rubber blades, and lift them off the glass.
Cover the vehicle with a fabric or perforated
plastic sheet, paying particular care not to
damage the painted surface by dragging any
dust that may have accumulated on it. Do not
use compact plastic sheets, as they do not
allow humidity to evaporate from the surface
of the vehicle.
Inflate tires to +7.25 psi (+0.5 bar) above the
standard prescribed pressure and check it
periodically.
Do not drain the engine cooling system.
Any time the vehicle is left inactive for two
weeks or more, operate the air conditioning
system with engine idling for at least five
minutes, setting external air and with fan set to
maximum speed. This operation will ensure
appropriate lubrication for the system, thus
minimizing the possibility of damage to the
compressor when the system is operated again.
NOTE:
After placing the ignition in STOP and having
closed the driver side door, wait at least one
minute before disconnecting the electrical supply
from the battery. When reconnecting the elec
-
trical supply to the battery, make sure that the
ignition is in the STOP position and the driver side
door is closed.
WARNING!
The traction grade assigned to this tire is
based on straight-ahead braking traction
tests, and does not include acceleration,
cornering, hydroplaning, or peak traction
characteristics.
WARNING!
The temperature grade for this tire is
established for a tire that is properly inflated
and not overloaded. Excessive speed,
underinflation, or excessive loading, either
separately or in combination, can cause heat
buildup and possible tire failure.
23_GA_OM_EN_USC_t.book Page 220