2023 ALFA ROMEO GIULIA transmission
[x] Cancel search: transmissionPage 43 of 248
41
Rolling Code Garage Door Opener Final Steps
NOTE:
You have 30 seconds in which to initiate rolling
code final step 2, after completing rolling code
final step 1.
1. At the garage door opener motor (in the garage), locate the “LEARN” or “TRAIN”
button. This can usually be found where the
hanging antenna wire is attached to the
garage door opener motor. Firmly push and
release the “LEARN” or “TRAIN” button.
2. Return to the vehicle and push the programmed HomeLink® button three times
(holding the button for two seconds each
time). If the garage door opener motor oper-
ates, programming is complete.
3. Push the programmed HomeLink® button to confirm that the garage door opener motor
operates. If the garage door opener motor
does not operate, repeat the final steps for
the rolling code procedure.
Non-Rolling Code Garage Door Opener Final
Steps
1. Push and hold the programmed HomeLink® button and observe the HomeLink® indicator
light. If the HomeLink® indicator light stays
on constantly, programming is complete.
2. Push the programmed HomeLink® button to confirm that the garage door opener motor
operates. If the garage door opener motor
does not operate, repeat the steps from the
beginning.
PROGRAMMING HOMELINK® TO A
M
ISCELLANEOUS DEVICE
The procedure on how to program HomeLink® to
a miscellaneous device follows the same
procedure as programming to a garage door
opener
Ú
page 40. Be sure to determine if the
device has a rolling code, or non-rolling code
before beginning the programming process.
NOTE:
Canadian Radio Frequency (RF) laws require
transmitter signals to time-out (or quit) after
several seconds of transmission, which may not
be long enough for HomeLink® to pick up the
signal during programming. Similar to this Cana -
dian law, some U.S. gate operators are designed
to time-out in the same manner. The procedure
may need to be performed multiple times to
successfully pair the device to your HomeLink®
buttons.
REPROGRAMMING A SINGLE
H
OMELINK® BUTTON
To reprogram a single HomeLink® button that
has been previously trained, without erasing all
the channels, proceed as follows. Be sure to
determine whether the new device you want to
program the HomeLink® button to has a rolling
code, or non-rolling code.
1. Place the ignition in the ON/RUN position,
without starting the engine.
2. Push and hold the desired HomeLink® button until the HomeLink® indicator light
begins to flash after 20 seconds. Do not
release the button.
3. Without releasing the button , proceed with
Step 2 in “Programming HomeLink® To A
Garage Door Opener” and follow all
remaining steps.
CANADIAN/GATE OPERATOR
P
ROGRAMMING
For programming transmitters in Canada/United
States that require the transmitter signals to
“time-out” after several seconds of transmission:
Canadian Radio Frequency (RF) laws require
transmitter signals to time-out (or quit) after
several seconds of transmission, which may not
be long enough for HomeLink® to pick up the
signal during programming. Similar to this
Canadian law, some U.S. gate operators are
designed to time-out in the same manner.
WARNING!
Your motorized door or gate will open and
close while you are programming the
universal transmitter. Do not program the
transmitter if people or pets are in the path
of the door or gate.
Do not run your vehicle in a closed garage or
confined area while programming the
transmitter. Exhaust gas from your vehicle
contains Carbon Monoxide (CO) which is
odorless and colorless. Carbon Monoxide is
poisonous when inhaled and can cause you
and others to be severely injured or killed.
23_GA_OM_EN_USC_t.book Page 41
Page 76 of 248

GETTING TO KNOW YOUR INSTRUMENT PANEL
74
The operation of the indicator light may be
checked by the traffic police using specific
devices. Comply with the laws and regulations of
the country where you are driving.
Under these conditions, the vehicle can continue
traveling at moderate speed but without
demanding excessive effort from the engine or
high speed. Prolonged use of the vehicle with the
indicator light on constantly may cause damage.
Contact an authorized dealer as soon as
possible.
Forward Collision Warning (FCW) System
This indicator light informs the driver
that the frontal collision alarm function
is not enabled.
Drive carefully and contact an authorized dealer
as soon as possible.
Fuel Reserve/Limited Range
The indicator light (or the symbol in the
display) illuminates when about
2.4 gallons (9 liters) of fuel is left in the
tank.
GREEN INDICATOR LIGHTS
Automatic High Beam Indicator Light —
If Equipped
This indicator light will illuminate when
the automatic high beam headlights are
activated.
Left Turn Signal Indicator Light
The instrument cluster directional arrow
will flash independently for the left turn
signal as selected, as well as the
exterior turn signal lamp(s) (front and
rear) as selected when the multifunction lever is
moved down (left). This directional arrow will
flash in conjunction with the right directional
arrow when the hazard warning light button is
pushed.
Parking/Headlights On Indicator Light
This indicator will illuminate when the
parking lights or headlights are turned
on.
Right Turn Signal Indicator Light
The instrument cluster directional arrow
will flash independently for the right
turn signal as selected, as well as the
exterior turn signal lamp(s) (front and
rear) as selected when the multifunction lever is
moved up (right). This directional arrow will flash
in conjunction with the left directional arrow
when the hazard warning light button is pushed.
BLUE INDICATOR LIGHTS
High Beam Indicator Light — If Equipped
This indicator shows that the high beam
headlights are on. Push the
multifunction control lever away from
you to switch the headlights to high
beam. Push the lever a second time to switch the
headlights back to low beam. Pull the lever
toward you for a temporary high beam on, “flash
to pass” scenario.
RED SYMBOLS
Alfa Steering Torque (AST) Failure
The switching on of the telltale signals a
failure in the automatic steering
correction system.
Contact an authorized dealer to have the system
checked.
Alternator Failure
The switching on of the telltale with
engine on corresponds to an alternator
failure.
Contact an authorized dealer as soon as
possible.
Automatic Transmission Failure
The telltale turns on, together with a
buzzer warning, to indicate that the
automatic transmission is faulty.
Contact an authorized dealer as soon as
possible.
CAUTION!
If, turning the ignition device to ON, the warning light does not turn on or if it turns on steadily
or flashing while driving (on some versions
together with the message on the display), imme -
diate service is required. Prolonged driving with
the MIL on could cause damage to the vehicle.
WARNING!
If the warning light flashes while driving,
contact an authorized dealer.
23_GA_OM_EN_USC_t.book Page 74
Page 79 of 248

77
Forward Collision Warning (FCW) System
Failure — If Equipped
The telltale will illuminate in the case of
failure of the Forward Collision Warning
system.
Contact an authorized dealer as soon as possible.
Stop/Start System Failure
This telltale will illuminate to report a
Stop/Start system failure.
Contact an authorized dealer as soon as possible
to have the failure eliminated.
Rain Sensor Failure
The telltale will illuminate in the case of
failure of the automatic windshield
wiper.
Contact an authorized dealer as soon as possible.
Dusk Sensor Failure
The telltale will illuminate in the case of
failure of the automatic low beam
alignment.
Contact an authorized dealer as soon as possible.
Blind Spot Monitoring System Failure —
If Equipped
The telltale will illuminate in the event of
a Blind Spot Monitoring system failure.
Contact an authorized dealer as soon as possible.
Fuel Level Sensor Failure
The telltale will illuminate in the event of
fuel level sensor failure.
Contact an authorized dealer as soon as possible.
Exterior Lights Failure
The telltale will illuminate to indicate a
failure on the following lights: daytime
running lights (DRLs) / parking lights /
trailer turn signal indicators (if present) /
trailer lights (if present) / side lights / turn signal
indicators / rear fog light / reversing light / brake
lights / license plate lights.
The failure may be caused by a blown bulb, a
blown protection fuse, or an interruption of the
electrical connection.
Replace the bulb or the relevant fuse. Contact an
authorized dealer.
Keyless System Failure
The telltale will illuminate in the event of
keyless system failure.
Contact an authorized dealer as soon as possible.
Fuel Cut-Off System Failure
The telltale will illuminate in the event of
fuel cut-off system failure.
Contact an authorized dealer as soon as possible.
Lane Departure Warning (LDW) System
Failure — If Equipped
The telltale will illuminate in the event of
a fault in the Lane Departure Warning
system.
Contact an authorized dealer as soon as possible.
Automatic High Beam Headlights
Failure — If Equipped
The telltale will illuminate to report a
failure of the automatic high beam
headlights.
Contact an authorized dealer as soon as possible
to have the failure eliminated.
Automatic Transmission Fluid
Overheating
The telltale will illuminate in the case of
transmission overheating, after a partic -
ularly demanding use. In this case an
engine performance limitation is carried
out.
Wait for the telltale to turn off with the engine off
or idling.
Audio System Failure
The telltale will illuminate to report a
failure of the audio system.
Contact an authorized dealer as soon as possible
to have the failure eliminated.
23_GA_OM_EN_USC_t.book Page 77
Page 83 of 248
81
STARTING THE ENGINE
Before starting the engine, be sure to adjust the
seat, the interior rearview mirror, the door
mirrors, and fasten the seat belt correctly.
Never press the accelerator pedal before starting
the engine.
If necessary, messages indicating the starting
procedure will be shown in the display.
STARTING PROCEDURE
Proceed as follows:
1. Apply the Electric Park Brake and set the gear selector to PARK (P) or NEUTRAL (N).
2. Fully press the brake pedal without touching the accelerator.
3. Briefly push the ignition button.
4. If the engine doesn't start within a few seconds, you need to repeat the procedure. If
the problem persists, contact an authorized
dealer.
REMOTE STARTING SYSTEM
This system uses the key fob to start the engine
conveniently from outside the vehicle while still
maintaining security. The system has a range of
at least 300 feet (91 meters).
The remote starting system also activates the
climate control, the heated seats (if equipped),
and the heated steering wheel (if equipped),
depending on temperatures outside and inside of
the vehicle.
NOTE:
Obstructions between the vehicle and key fob
may reduce this range.
How to use Remote Start
All of the following conditions must be met before
the engine will remote start:
Gear selector in PARK (P).
Doors closed.
Hood closed.
Trunk closed.
Hazard switch off.
Brake switch inactive (brake pedal not
pressed).
WARNING!
When leaving the vehicle, always remove the
key fob from the vehicle and lock your
vehicle.
Never leave children alone in a vehicle, or
with access to an unlocked vehicle.
Allowing children to be in a vehicle
unattended is dangerous for a number of
reasons. A child or others could be seriously
or fatally injured. Children should be warned
not to touch the parking brake, brake pedal
or the transmission gear selector.
Do not leave the key fob in or near the
vehicle, or in a location accessible to
children. A child could operate power
windows, other controls, or move the vehicle.
Do not leave children or animals inside
parked vehicles in hot weather. Interior heat
buildup may cause serious injury or death.
WARNING!
Never pour fuel or other flammable liquid
into the throttle body air inlet opening in an
attempt to start the vehicle. This could result
in flash fire causing serious personal injury.
Do not attempt to push or tow your vehicle to
get it started. Vehicles equipped with an
automatic transmission cannot be started
this way. Unburned fuel could enter the
catalytic converter and once the engine has
started, ignite and damage the converter and
vehicle.
If the vehicle has a discharged battery,
booster cables may be used to obtain a start
from a booster battery or the battery in
another vehicle
Ú
page 177. This type of
start can be dangerous if done improperly.
CAUTION!
To prevent damage to the starter, do not
continuously crank the engine for more than
25 seconds at a time. Wait 60 seconds before
trying again.
23_GA_OM_EN_USC_t.book Page 81
Page 84 of 248

STARTING AND OPERATING
82
Battery at an acceptable charge level.
PANIC button not pushed.
System not disabled from previous remote
start event.
Vehicle alarm system indicator flashing.
Ignition in the OFF position.
Fuel level meets minimum requirement.
Remote Start Comfort Systems — If Equipped
When Remote Start is activated, the heated
steering wheel and driver heated seat features
will automatically turn on in cold weather.
These features will stay on through the duration
of remote start until the ignition is placed in the
ON/RUN position.
Remote Start Windshield Wiper De–Icer
Activation — If Equipped
When remote start is active and the outside
ambient temperature is less than 39°F (4°C),
the Windshield Wiper De-Icer will be enabled.
Exiting remote start will resume previous
operation, except if the Windshield Wiper De-Icer
is active.
The Windshield Wiper De-Icer timer and
operation will continue.
COLD WEATHER OPERATION
To prevent possible engine damage while starting
at low temperatures, this vehicle will inhibit
engine cranking when the ambient temperature
is less than –22°F (–30°C) and the oil
temperature sensor reading indicates an engine
block heater has not been used. An
externally-powered electric engine block heater is
available as optional equipment or from an
authorized dealer. The message “Plug In Engine Heater” will be
displayed in the instrument cluster when the
ambient temperature is below 5°F (–15°C) at
the time the engine is shut off as a reminder to
avoid possible crank delays at the next cold start.
EXTENDED PARK STARTING
If the vehicle has not been started or driven for at
least 30 days, see the following instructions:
To start the engine, proceed as follows:
1. Install a battery charger or jumper cables to
the battery to ensure a full battery charge
during the crank cycle
Ú
page 177.
2. Briefly push the ignition button.
3. If the engine does not start, wait five seconds and let the starter cool down and then repeat
the starting procedure.
4. If the engine does not start after eight attempts, let the starter cool down for at least
10 seconds, and then repeat the starting
procedure. If the problem persists, contact
an authorized dealer.
IF ENGINE FAILS TO START
Starting the Engine with Key Fob Battery Run
Down or Drained
If the ignition does not respond when the button
is pushed, the key fob battery might be run down or drained. Therefore, the system does not detect
the presence of the key fob in the vehicle, and will
display a dedicated message.
For more information on starting with a
discharged key fob battery
Ú
page 22.
CAUTION!
Use of the recommended oil and adhering to
the prescribed oil change intervals is
important to prevent engine damage and
ensure satisfactory starting in cold conditions.
WARNING!
Never pour fuel or other flammable liquid
into the throttle body air inlet opening in an
attempt to start the vehicle. This could result
in flash fire causing serious personal injury.
Do not attempt to push or tow your vehicle to
get it started. Vehicles equipped with an
automatic transmission cannot be started
this way. Unburned fuel could enter the
catalytic converter and once the engine has
started, ignite and damage the converter
and vehicle.
If the vehicle has a discharged battery,
booster cables may be used to obtain a start
from a booster battery or the battery in
another vehicle
Ú
page 177. This type of
start can be dangerous if done improperly.
CAUTION!
To prevent damage to the starter, do not
continuously crank the engine for more than
25 seconds at a time. Wait 60 seconds before
trying again.
23_GA_OM_EN_USC_t.book Page 82
Page 87 of 248
85
In addition to engaging the EPB, along with
steering and positioning chocks in front of the
wheels (when on a steep slope), you must always
place the vehicle in the PARK (P) mode before
leaving.
Should the vehicle battery be faulty, the battery
must be replaced in order to unlock the EPB.
Engaging The EPB Manually
Briefly pull the switch located on the center
console to manually engage the EPB when the
vehicle is stationary.
Noise may be heard from the rear of the vehicle
when engaging the EPB.
A slight movement of the brake pedal may be
detected when engaging the EPB with the brake
pedal pressed.
With the EPB engaged, the Brake Warning Light
on the instrument panel and the switch will
illuminate.
If, under exceptional circumstances, the use of
the brake is required with the vehicle in motion,
keep the switch on the center console pulled as
long as the brake action is necessary.
The Brake Warning Light may turn on with the
hydraulic system temporarily unavailable; in this
case braking is controlled by the motors.The brake lights will also automatically turn on in
the same way as for normal braking with the use
of the brake pedal.
Release the switch on the center console to stop
the braking action with the vehicle in motion.
If, through this procedure, the vehicle is braked
until a speed below 1.9 mph (3 km/h) is reached
and the switch is kept pulled, the parking brake
will definitively engage.
Disengaging The EPB Manually
In order to manually release the parking brake,
the ignition should be in the ACC position. Press
the brake pedal, and then push the switch on the
center console briefly.
Noise may be heard from the rear of the vehicle,
and a slight movement of the brake pedal may be
detected during disengagement.
After disengaging the Electric Park Brake, the
Brake Warning Light on the instrument panel and
the light on the switch will turn off.
If the Brake Warning Light on the instrument
panel remains on with the EPB disengaged, this
indicates a fault: in this case, contact an
authorized dealer.
CAUTION!
With the EPB failure warning light on, some
functions of the EPB are deactivated. In this
case the driver is responsible for engaging the
EPB manually to ensure the vehicle is safely
and properly parked.
WARNING!
Driving the vehicle with the parking brake
engaged, or repeated use of the parking brake
to slow the vehicle may cause serious damage
to the brake system. Be sure the parking brake
is fully disengaged before driving; failure to do
so can lead to brake failure and a collision.
WARNING!
Never use the PARK position as a substitute
for the parking brake. Always apply the
parking brake fully when parked to guard
against vehicle movement and possible
injury or damage.
When exiting the vehicle, always turn the
ignition OFF, secure the key fob, and lock
your vehicle.
Never leave children alone in a vehicle, or
with access to an unlocked vehicle. Allowing
children to be in a vehicle unattended is
dangerous for a number of reasons. A child
or others could be seriously or fatally injured.
Children should be warned not to touch the
parking brake, brake pedal or the gear
selector.
Do not leave the key fob in or near the
vehicle, or in a location accessible to
children, and do not leave a vehicle
equipped with a keyless ignition system in
the ON/RUN position. A child could operate
power windows, other controls, or move the
vehicle.
Be sure the parking brake is fully disengaged
before driving; failure to do so can lead to
brake failure and a collision.
Always fully apply the parking brake when
leaving your vehicle, or it may roll and cause
damage or injury. Also be certain to leave the
transmission in PARK. Failure to do so may
allow the vehicle to roll and cause damage or
injury.
23_GA_OM_EN_USC_t.book Page 85
Page 88 of 248
STARTING AND OPERATING
86
(Continued)
ELECTRIC PARK BRAKE (EPB)
O
PERATING MODES
The EPB may operate as follows:
“Dynamic Operating Mode”: this mode is
activated by pulling the switch repeatedly
while driving.
“Static Engagement and Release Mode”: with
the vehicle stationary, the EPB can be
activated by pulling the switch on the center
console once. Push the switch and the brake
pedal at the same time to disengage the
brake.
“Drive Away Release”: the EPB will automat -
ically disengage with the driver side seat belt
fastened and the detection of an action
performed by the driver to move the vehicle
(forward gear or reverse gear). This feature can
be turned on or off in the Information and
Entertainment System.
“Safe Hold”: engages if the gear selector is not
in PARK (P) position and the driver's intention
of leaving the vehicle is detected. The EPB will
automatically engage the EPB.
SAFE HOLD
Safe Hold is a safety function that automatically
engages the EPB if the driver attempts to leave
the vehicle while the ignition is in ON/RUN.
The EPB engages automatically to prevent
vehicle movement if:
The vehicle speed is below 2 mph (3 km/h).
A transmission operating mode different from
PARK (P) is activated.
The driver's seat belt is not fastened.
The driver side door is open.
No attempts to apply pressure on the brake
pedal have been detected.
The vehicle is parked on roads with a slope of
more than 4%.
The “Safe Hold” function can be temporarily
disabled by pushing the switch located on the
center console and the brake pedal at the same
time, with the vehicle stationary and the driver
side door open.
Once disabled, the function will activate again
when the vehicle speed reaches 12 mph (20 km/h)
or the ignition is cycled to OFF and then to ACC.
AUTOMATIC
TRANSMISSION
The vehicle is equipped with an electronically
controlled 8-speed automatic transmission
where gear shifting automatically takes place,
depending on the vehicle usage instantaneous
parameters (vehicle speed, grade, and
accelerator pedal position).
Manual gear shifting can still occur thanks to the
“sequential mode” position for the gear selector.
WARNING!
It is dangerous to shift out of PARK or
NEUTRAL if the engine speed is higher than
idle speed. If your foot is not firmly pressing
the brake pedal, the vehicle could accelerate
quickly forward or in reverse. You could lose
control of the vehicle and hit someone or
something. Only shift into gear when the
engine is idling normally and your foot is
firmly pressing the brake pedal.
Unintended movement of a vehicle could
injure those in or near the vehicle. As with all
vehicles, you should never exit a vehicle
while the engine is running. Before exiting a
vehicle, always apply the parking brake, shift
the transmission into PARK, and turn the
ignition OFF. When the ignition is in the OFF
position, the transmission is locked in PARK,
securing the vehicle against unwanted
movement.
When leaving the vehicle, always make sure
the ignition is in the OFF position, remove the
key fob from the vehicle, and lock the
vehicle.
Never leave children alone in a vehicle, or
with access to an unlocked vehicle. Allowing
children to be in a vehicle unattended is
dangerous for a number of reasons. A child
or others could be seriously or fatally injured.
Children should be warned not to touch the
parking brake, brake pedal or the
transmission gear selector.
23_GA_OM_EN_USC_t.book Page 86
Page 89 of 248
87
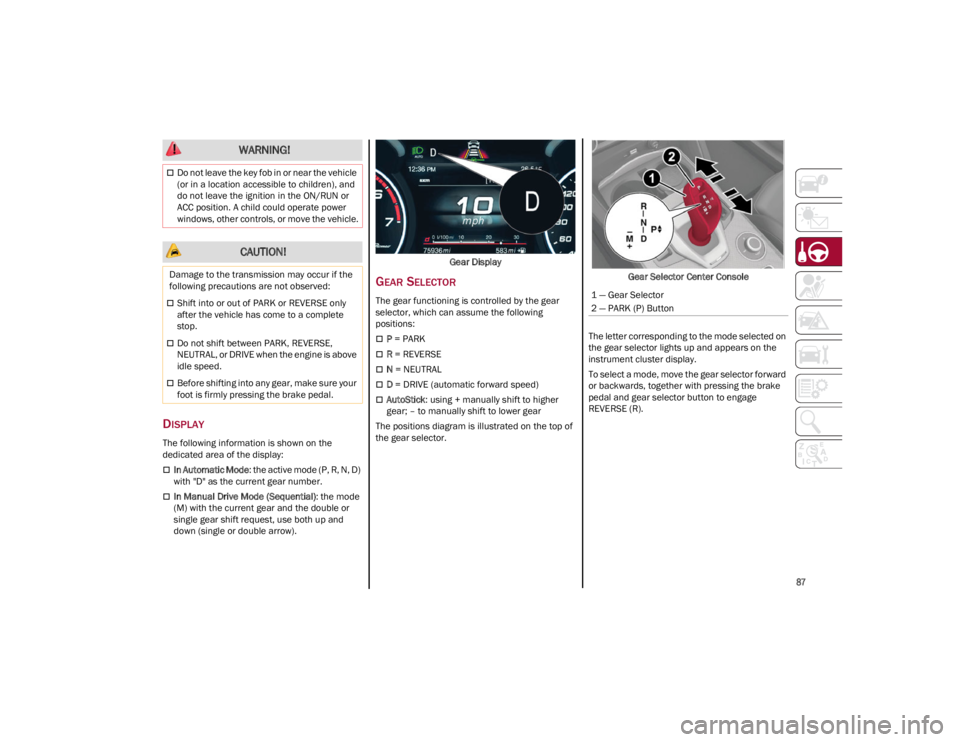
DISPLAY
The following information is shown on the
dedicated area of the display:
In Automatic Mode: the active mode (P, R, N, D)
with "D" as the current gear number.
In Manual Drive Mode (Sequential) : the mode
(M) with the current gear and the double or
single gear shift request, use both up and
down (single or double arrow). Gear Display
GEAR SELECTOR
The gear functioning is controlled by the gear
selector, which can assume the following
positions:
P
= PARK
R = REVERSE
N = NEUTRAL
D = DRIVE (automatic forward speed)
AutoStick : using + manually shift to higher
gear; – to manually shift to lower gear
The positions diagram is illustrated on the top of
the gear selector. Gear Selector Center Console
The letter corresponding to the mode selected on
the gear selector lights up and appears on the
instrument cluster display.
To select a mode, move the gear selector forward
or backwards, together with pressing the brake
pedal and gear selector button to engage
REVERSE (R).
Do not leave the key fob in or near the vehicle
(or in a location accessible to children), and
do not leave the ignition in the ON/RUN or
ACC position. A child could operate power
windows, other controls, or move the vehicle.
CAUTION!
Damage to the transmission may occur if the
following precautions are not observed:
Shift into or out of PARK or REVERSE only
after the vehicle has come to a complete
stop.
Do not shift between PARK, REVERSE,
NEUTRAL, or DRIVE when the engine is above
idle speed.
Before shifting into any gear, make sure your
foot is firmly pressing the brake pedal.
WARNING!
1 — Gear Selector
2 — PARK (P) Button
23_GA_OM_EN_USC_t.book Page 87