Page 105 of 174
9-10
9
To install the panel
Place the panel in the original position. Panel B
To remove the panel
1. Remove panel A.
2. Remove the front carrier by removing the
bolts.
1. Panel A
1
1. Front carrier
2. Carrier bolt (upper)
1
2
2
UB5K64E0.book Page 10 Thursday, September 16, 2021 9:00 AM
Page 106 of 174
9-11
93. Remove the quick fasteners, and then pull the
panel upward to remove it. To install the panel
1. Place the panel in the original position, and
then install the quick fasteners.
1. Carrier bolt (under the fenders)
2. Carrier bolt (lower)
1
2
2
1
1. Panel B
2. Quick fastener
12
2
UB5K64E0.book Page 11 Thursday, September 16, 2021 9:00 AM
Page 107 of 174
9-12
9
2. Install the front carrier by installing the bolts
and tightening them to the specified torques.
3. Install panel A. Panel C
To remove the panel
1. Remove the seat. (See page 5-24.)
2. Remove panel A.
3. Remove the hoses from panel C.
4. Remove the quick fasteners and bolts.
Tightening torques:
Carrier bolt (upper):34 N·m (3.4 kgf·m, 25 lb·ft)
Carrier bolt (lower): 34 N·m (3.4 kgf·m, 25 lb·ft)
Carrier bolt (under the fenders): 7 N·m (0.7 kgf·m, 5.2 lb·ft)1. Hose
1
1
UB5K64E0.book Page 12 Thursday, September 16, 2021 9:00 AM
Page 108 of 174
9-13
95. Remove the screws under the storage com-
partment lid, and then pull the panel upward
to remove it.
TIPTo ease removal of panel C, shift the drive select
lever into the reverse position.
To install the panel1. Place the panel in the original position.
1. Bolt
2. Quick fastener
1
1
2
1. Screw
1
1
UB5K64E0.book Page 13 Thursday, September 16, 2021 9:00 AM
Page 109 of 174
9-14
9
2. Install the screws, quick fasteners, bolts, and
hoses.
TIPMake sure that the hoses are properly connected
and routed, and are not pinched. 3. Install panel A.
4. Install the seat.
Panels D and E
To remove a panel1. Remove panels A and C.
2. Remove the bolt, and then pull the panel up- ward to remove it.
1. Panel D
2. Bolt
1. Panel E
2. Bolt
1
2
1
2
UB5K64E0.book Page 14 Thursday, September 16, 2021 9:00 AM
Page 110 of 174
9-15
9To install a panel
1. Place the panel in the original position, and
then install the bolt.
2. Install panels A and C. Panels F and G
To remove a panel
1. Remove the panel bolts, footboard bolt, and
footboard nut.1. Panel F
2. Footboard nut
3. Footboard bolt
4. Panel bolt
5. Projection
UB5K64E0.book Page 15 Thursday, September 16, 2021 9:00 AM
Page 111 of 174
9-16
9
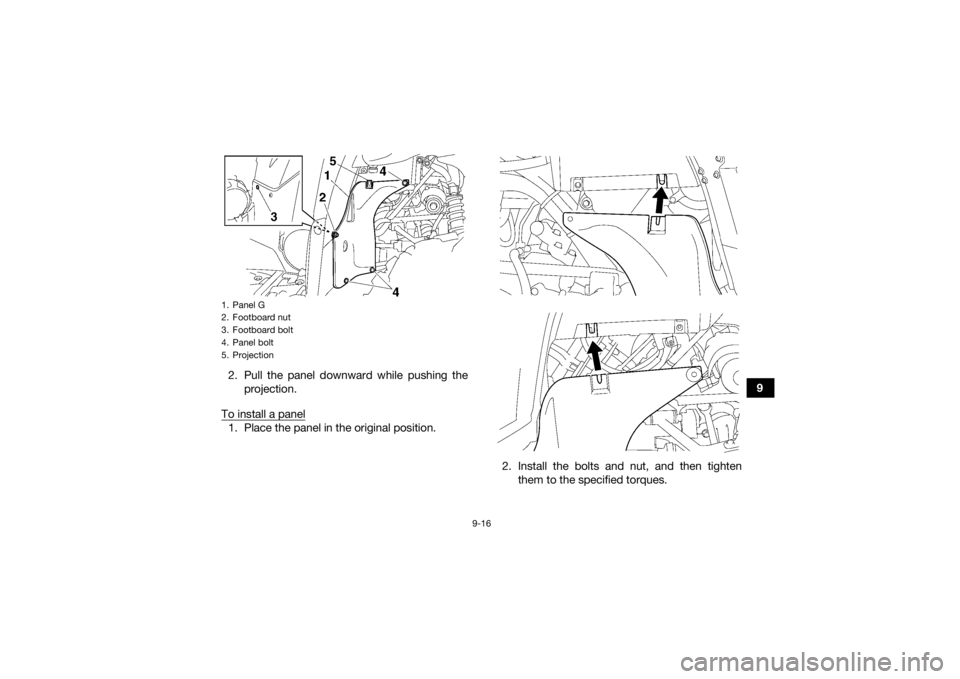
2. Pull the panel downward while pushing the
projection.
To install a panel
1. Place the panel in the original position.
2. Install the bolts and nut, and then tightenthem to the specified torques.1. Panel G
2. Footboard nut
3. Footboard bolt
4. Panel bolt
5. ProjectionUB5K64E0.book Page 16 Thursday, September 16, 2021 9:00 AM
Page 112 of 174
9-17
9
EBU38133Checking the spark plugThe spark plug is an important engine component,
which is easy to check. Since heat and deposits
will cause any spark plug to slowly erode, the
spark plug should be removed and checked in ac-
cordance with the periodic maintenance chart. In
addition, the condition of the spark plug can reveal
the condition of the engine.
To remove the spark plug1. Remove panels A, C, and E. (See page 9-9.)
2. Remove the spark plug cap. 3. Remove the spark plug with a spark plug
wrench as shown.
Tightening torques:
Panel bolt:4.0 N·m (0.40 kgf·m, 3.0 lb·ft)
Footboard nut: 4.0 N·m (0.40 kgf·m, 3.0 lb·ft)
1. Spark plug cap
1. Spark plug wrench
11
UB5K64E0.book Page 17 Thursday, September 16, 2021 9:00 AM