2022 TOYOTA VENZA HYBRID change time
[x] Cancel search: change timePage 262 of 548
2624-5. Using the driving support systems
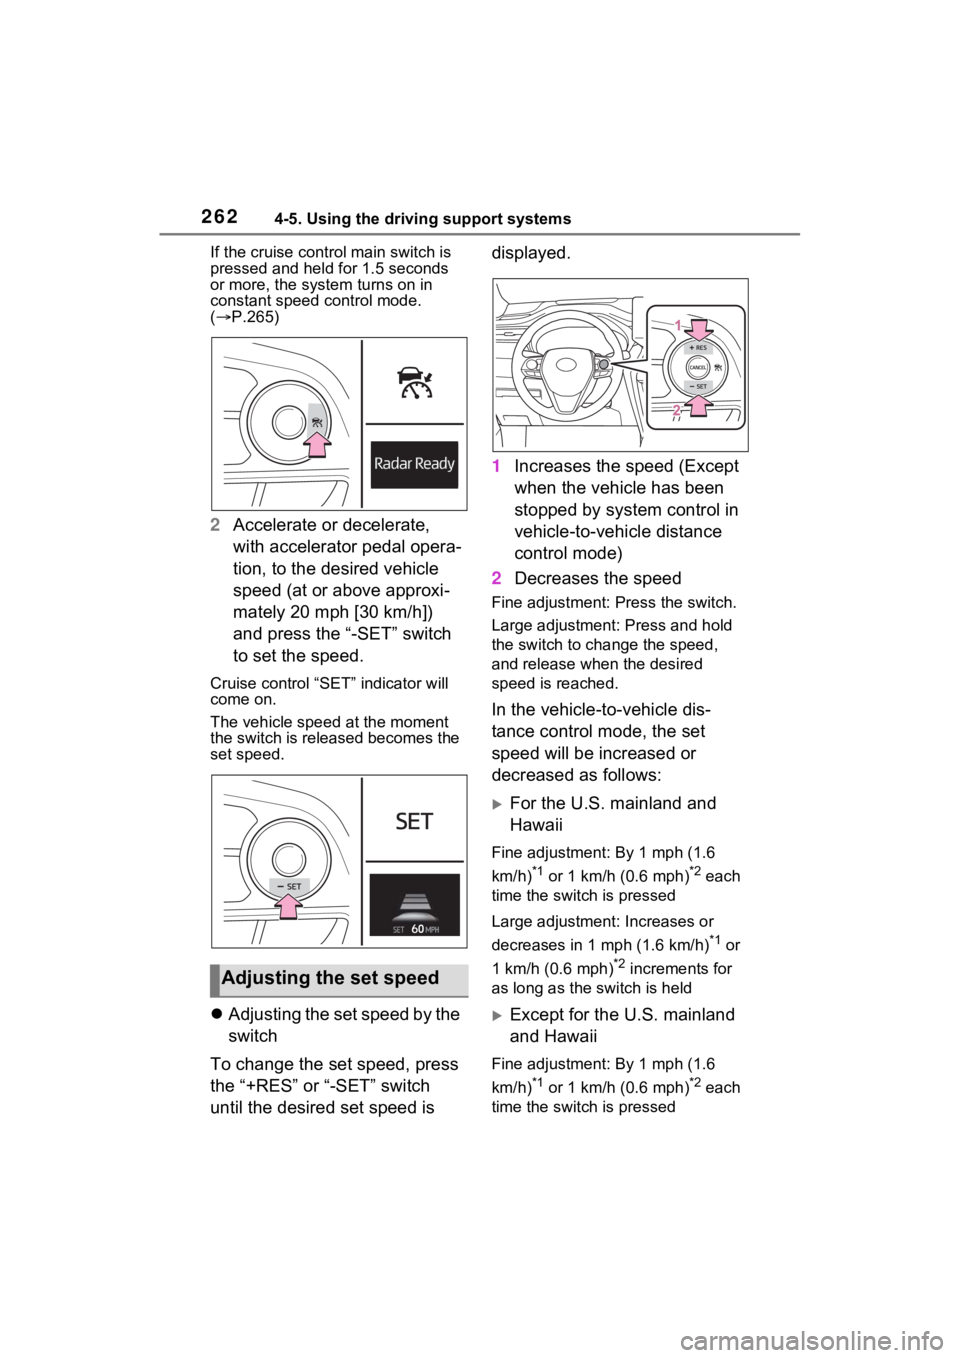
If the cruise control main switch is
pressed and held for 1.5 seconds
or more, the syste m turns on in
constant speed control mode.
( P.265)
2 Accelerate or decelerate,
with accelerator pedal opera-
tion, to the desired vehicle
speed (at or above approxi-
mately 20 mph [30 km/h])
and press the “-SET” switch
to set the speed.
Cruise control “SET” indicator will
come on.
The vehicle speed at the moment
the switch is released becomes the
set speed.
Adjusting the set speed by the
switch
To change the set speed, press
the “+RES” or “-SET” switch
until the desired set speed is displayed.
1
Increases the speed (Except
when the vehicle has been
stopped by system control in
vehicle-to-vehicle distance
control mode)
2 Decreases the speed
Fine adjustment: Press the switch.
Large adjustment: Press and hold
the switch to cha nge the speed,
and release when the desired
speed is reached.
In the vehicle-to-vehicle dis-
tance control mode, the set
speed will be increased or
decreased as follows:
For the U.S. mainland and
Hawaii
Fine adjustment: By 1 mph (1.6
km/h)
*1 or 1 km/h (0.6 mph)*2 each
time the switch is pressed
Large adjustment: Increases or
decreases in 1 mph (1.6 km/h)
*1 or
1 km/h (0.6 mph)
*2 increments for
as long as the switch is held
Except for the U.S. mainland
and Hawaii
Fine adjustment: By 1 mph (1.6
km/h)
*1 or 1 km/h (0.6 mph)*2 each
time the switch is pressed
Adjusting the set speed
Page 263 of 548
2634-5. Using the driving support systems
4
Driving
Large adjustment: Increases or
decreases in 5 mph (8 km/h)
*1 or 5
km/h (3.1 mph)
*2 increments for as
long as the switch is held
In the constant speed control
mode ( P.265), the set speed
will be increased or decreased
as follows:
Fine adjustment: By 1 mph (1.6
km/h)
*1 or 1 km/h (0.6 mph)*2 each
time the switch is pressed
Large adjustment: The speed will
continue to change while the switch
is held.
*1: When the set speed is shown in “MPH”
*2: When the set speed is shown in “km/h”
Increasing the set speed by
the accelerator pedal
1 Accelerate with accelerator
pedal operation to the
desired vehicle speed
2 Press the “-SET” switch
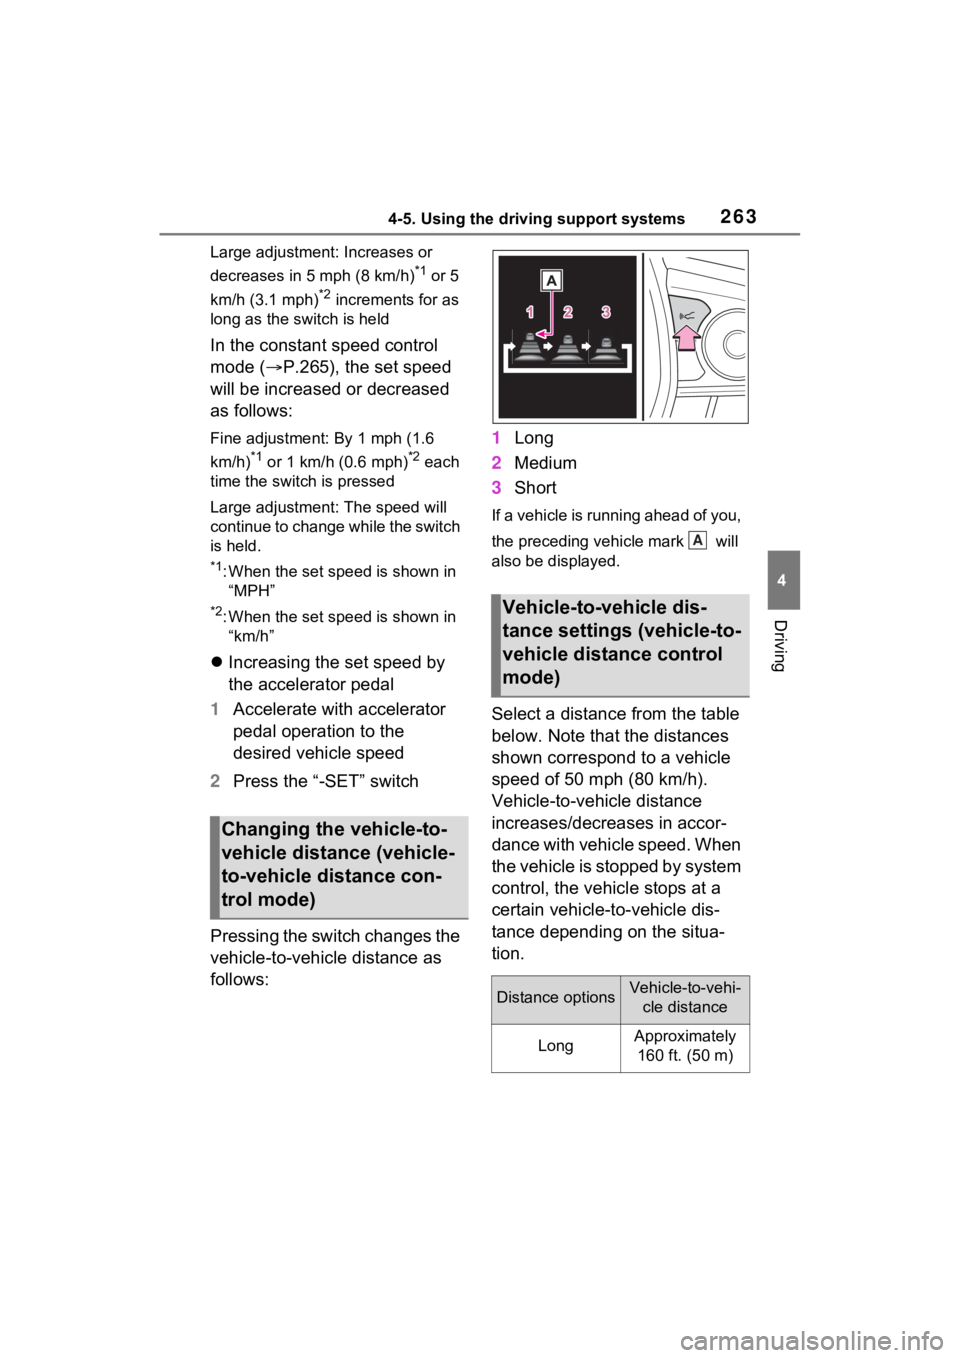
Pressing the switch changes the
vehicle-to-vehicle distance as
follows: 1
Long
2 Medium
3 Short
If a vehicle is running ahead of you,
the preceding vehicle mark will
also be displayed.
Select a distance from the table
below. Note that the distances
shown correspond to a vehicle
speed of 50 mph (80 km/h).
Vehicle-to-vehicle distance
increases/decreases in accor-
dance with vehicle speed. When
the vehicle is stopped by system
control, the vehicle stops at a
certain vehicle-to-vehicle dis-
tance depending on the situa-
tion.
Changing the vehicle-to-
vehicle distance (vehicle-
to-vehicle distance con-
trol mode)
Vehicle-to-vehicle dis-
tance settings (vehicle-to-
vehicle distance control
mode)
Distance optionsVehicle-to-vehi-
cle distance
LongApproximately 160 ft. (50 m)
A
Page 267 of 548
2674-5. Using the driving support systems
4
Driving
●TRAC is activated for a period of
time.
●When the VSC or TRAC system is
turned off.
●When the brake control or output
restriction control of a driving sup-
port system operates.
(For example: Pre- Collision System,
Drive-Start Control)
●The parking brake is operated.
If constant speed control mode is
automatically canceled for any rea-
sons other than the above, there
may be a malfunction in the system.
Contact your Toyota dealer.
■Brake operation
A brake operation sound may be
heard and the brake pedal response
may change, but the se are not mal-
functions.
■Warning messages and buzzers
for dynamic radar cruise con-
trol with full-speed range
Warning messages and buzzers are
used to indicate a system malfunc-
tion or to inform the driver of the
need for caution while driving. If a
warning message is shown on the
multi-information display, read the
message and follow the instructions.
( P.234, 449)
■When the sensor may not be
correctly detecting the vehicle
ahead
In the case of the following and
depending on the conditions, oper-
ate the brake pedal when decelera-
tion of the system is insufficient or
operate the accelerator pedal when
acceleration is required.
As the sensor may not be able to
correctly detect these types of vehi-
cles, the approach warning
( P.264) may not be activated.
●Vehicles that cut in suddenly
●Vehicles traveling at low speeds
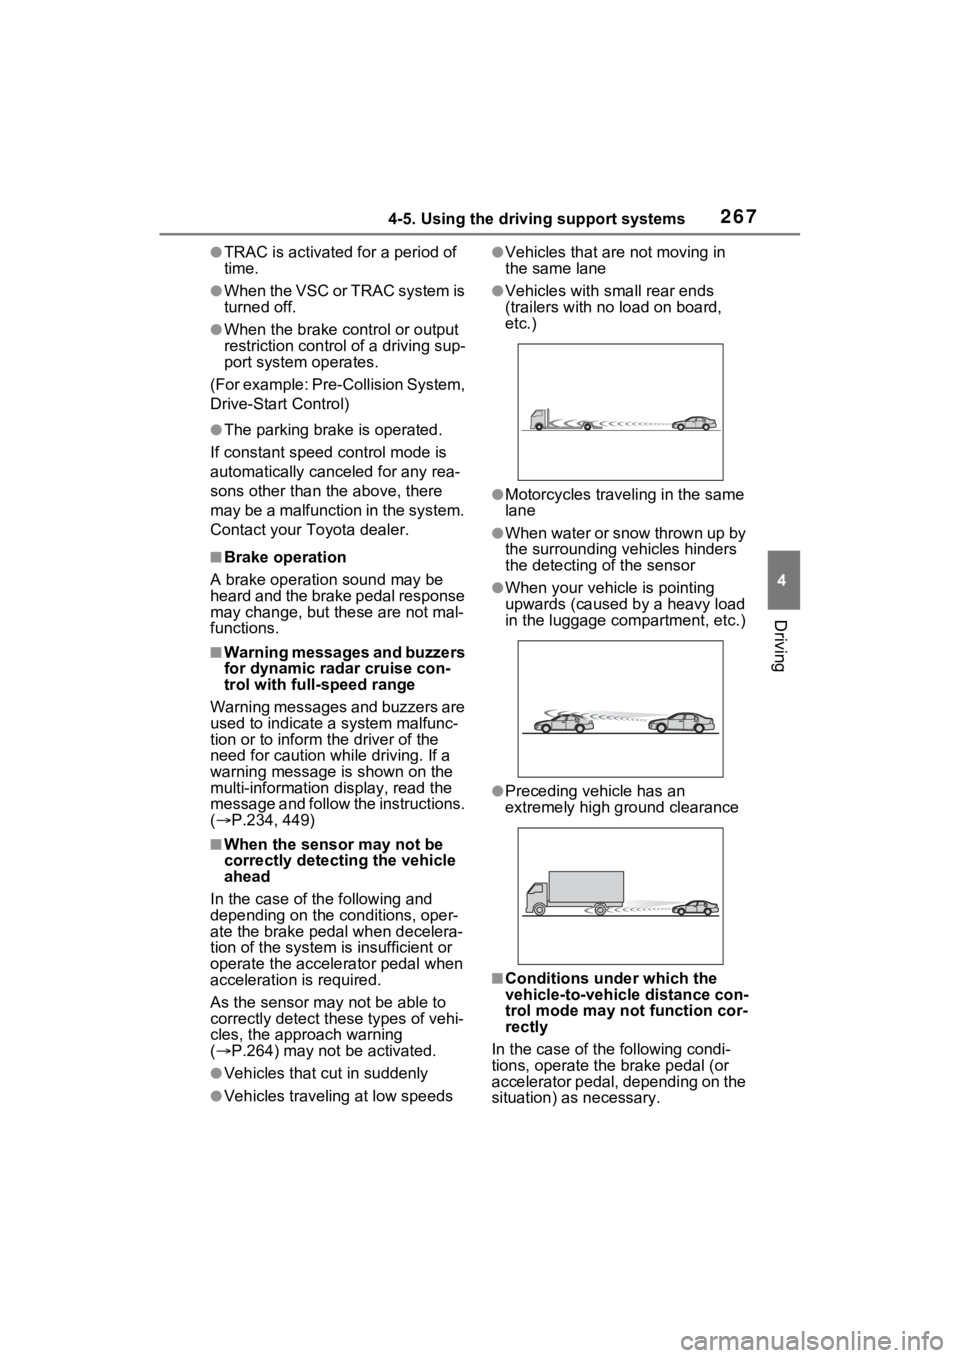
●Vehicles that are not moving in
the same lane
●Vehicles with small rear ends
(trailers with no load on board,
etc.)
●Motorcycles traveling in the same
lane
●When water or snow thrown up by
the surrounding vehicles hinders
the detecting of the sensor
●When your vehicle is pointing
upwards (caused by a heavy load
in the luggage compartment, etc.)
●Preceding vehicle has an
extremely high ground clearance
■Conditions under which the
vehicle-to-vehic le distance con-
trol mode may not function cor-
rectly
In the case of the following condi-
tions, operate the brake pedal (or
accelerator pedal, depending on the
situation) as necessary.
Page 283 of 548
2834-5. Using the driving support systems
4
Driving
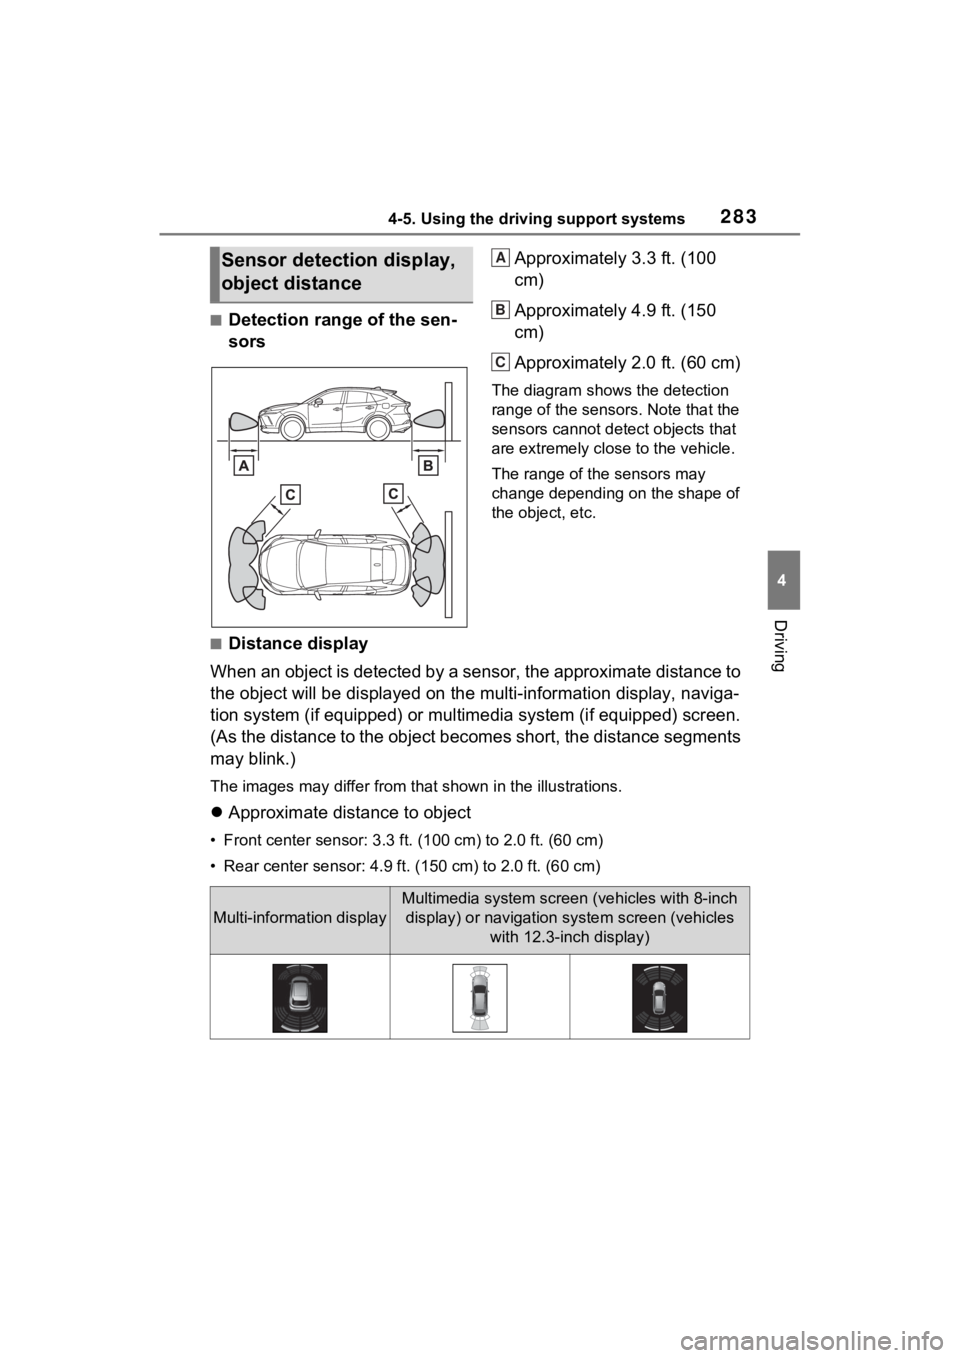
■Detection range of the sen-
sorsApproximately 3.3 ft. (100
cm)
Approximately 4.9 ft. (150
cm)
Approximately 2.0 ft. (60 cm)
The diagram shows the detection
range of the sensors. Note that the
sensors cannot detect objects that
are extremely clos
e to the vehicle.
The range of the sensors may
change depending on the shape of
the object, etc.
■Distance display
When an object is detected by a sensor, the approximate distance to
the object will be displayed on the multi-information display, naviga-
tion system (if equipped) or multimedia system (if equipped) sc reen.
(As the distance to the object becomes short, the distance segm ents
may blink.)
The images may differ from that shown in the illustrations.
Approximate distance to object
• Front center sensor: 3.3 ft . (100 cm) to 2.0 ft. (60 cm)
• Rear center sensor : 4.9 ft. (150 cm) to 2.0 ft. (60 cm)
Sensor detection display,
object distanceA
B
C
Multi-information display
Multimedia system screen (vehicles with 8-inch
display) or navigation system screen (vehicles with 12.3-inch display)
Page 287 of 548
2874-5. Using the driving support systems
4
Driving
The Parking Support Brake can
be enabled/disabled on the
screen of the multi-information
display. All of the Parking Sup-
port Brake functions (static
objects and rear-crossing vehi-
cles) are enabled/disabled
simultaneously. (P.102, 113)
When the Parking Support Brake is
disabled, the PKSB OFF indicator
( P.87) illuminates on the multi-
information display.
To re-enable the system, select
on the multi-information display,
select and turn it on.
If the system is disabled, it will
remain off even if the power switch
is turned to ON after the power
switch has been turned to OFF.
WARNING
●When inspecting the vehicle
using a chassis roller, chassis
dynamo or free roller
●When loading the vehicle onto a
boat, truck or other transport
vessel
●If the suspension has been
modified or tires of a size other
than specified are installed
●If the front of the vehicle is
raised or lowered due to the
carried load
●When equipment that may
obstruct a sensor is installed,
such as a towing eyelet, bumper
protector (an additional trim
strip, etc.), bicycle carrier, or
snow plow
●When using automatic car
washing devices
●If the vehicle cannot be driven in
a stable manner, such as when
the vehicle has been in an acci-
dent or is malfunctioning
●When the vehicle is driven in a
sporty manner or off-road
●When the tires are not properly
inflated
●When the tires are very worn
●When tire chains, a compact
spare tire or an emergency tire
puncture repair kit are used.
NOTICE
■If “PKSB Unavailable” is dis-
played on the multi-informa-
tion display and the PKSB
OFF indicator illuminates
If this message is displayed
immediately after the power
switch is changed to ON, operate
the vehicle carefully, paying atten-
tion to your surroundings. It may
be necessary to drive the vehicle
for a certain amount of time
before the system returns to nor-
mal. (If the system does not return
to normal after dr iving for a while,
clean the sensors and their sur-
rounding area on the bumpers.)
Enabling/Disabling the
Parking Support Brake
Page 301 of 548
3014-5. Using the driving support systems
4
Driving
WARNING
●When driving over bumps in the
road
●When driving over roads with
potholes or uneven surfaces
■TRAC/VSC may not operate
effectively when
Directional control and power may
not be achievable while driving on
slippery road surfaces, even if the
TRAC/VSC system is operating.
Drive the vehicle carefully in con-
ditions where stability and power
may be lost.
■Active Cornering Assist does
not operate effectively when
●Do not overly rely on Active
Cornering Assist. Active Corner-
ing Assist may not operate
effectively when accelerating
down slopes or driving on slip-
pery road surfaces.
●When Active Cornering Assist
frequently operates, Active Cor-
nering Assist may temporarily
stop operating to ensure proper
operation of the brakes, TRAC
and VSC.
■Hill-start assist control does
not operate effectively when
●Do not overly rely on hill-start
assist control. Hill-start assist
control may not operate effec-
tively on steep inclines and
roads covered with ice.
●Unlike the parking brake, hill-
start assist control is not
intended to hold the vehicle sta-
tionary for an extended period
of time. Do not attempt to use
hill-start assist control to hold
the vehicle on an incline, as
doing so may lead to an acci-
dent.
■When the TRAC/ABS/VSC is
activated
The slip indicator light flashes.
Always drive carefully. Reckless
driving may cause an accident.
Exercise particula r care when the
indicator light flashes.
■When the TRAC/VSC systems
are turned off
Be especially careful and drive at
a speed appropriate to the road
conditions. As these are the sys-
tems to help ensure vehicle stabil-
ity and driving force, do not turn
the TRAC/VSC systems off
unless necessary.
■Replacing tires
Make sure that all tires are of the
specified size, brand, tread pat-
tern and total load capacity. In
addition, make sure that the tires
are inflated to the recommended
tire inflation p ressure level.
The ABS, TRAC and VSC sys-
tems will not functi on correctly if
different tires are installed on the
vehicle.
Contact your Toyota dealer for
further information when replacing
tires or wheels.
■Handling of tires and the sus-
pension
Using tires with any kind of prob-
lem or modifying the suspension
will affect the driving assist sys-
tems, and may cause a system to
malfunction.
■Secondary Collision Brake
Do not rely solely upon the Sec-
ondary Collision Brake. This sys-
tem is designed to help reduce
the possibility of further damage
due to a secondary collision, how-
ever, that effect changes accord-
ing to various conditions. Overly
relying on the system may result
in death or serious injury.
Page 313 of 548
3135-1. Using the air conditioning system and defogger
5
Interior features
ture.
If the “A/C” switch is not pressed,
the system will blow ambient tem-
perature air or heated air.
■Setting the fan speed
Press the fan speed increase
switch to increase the fan speed
and the fan speed decrease
switch to decrease the fan
speed.
Press the “OFF” switch to turn the
fan off.
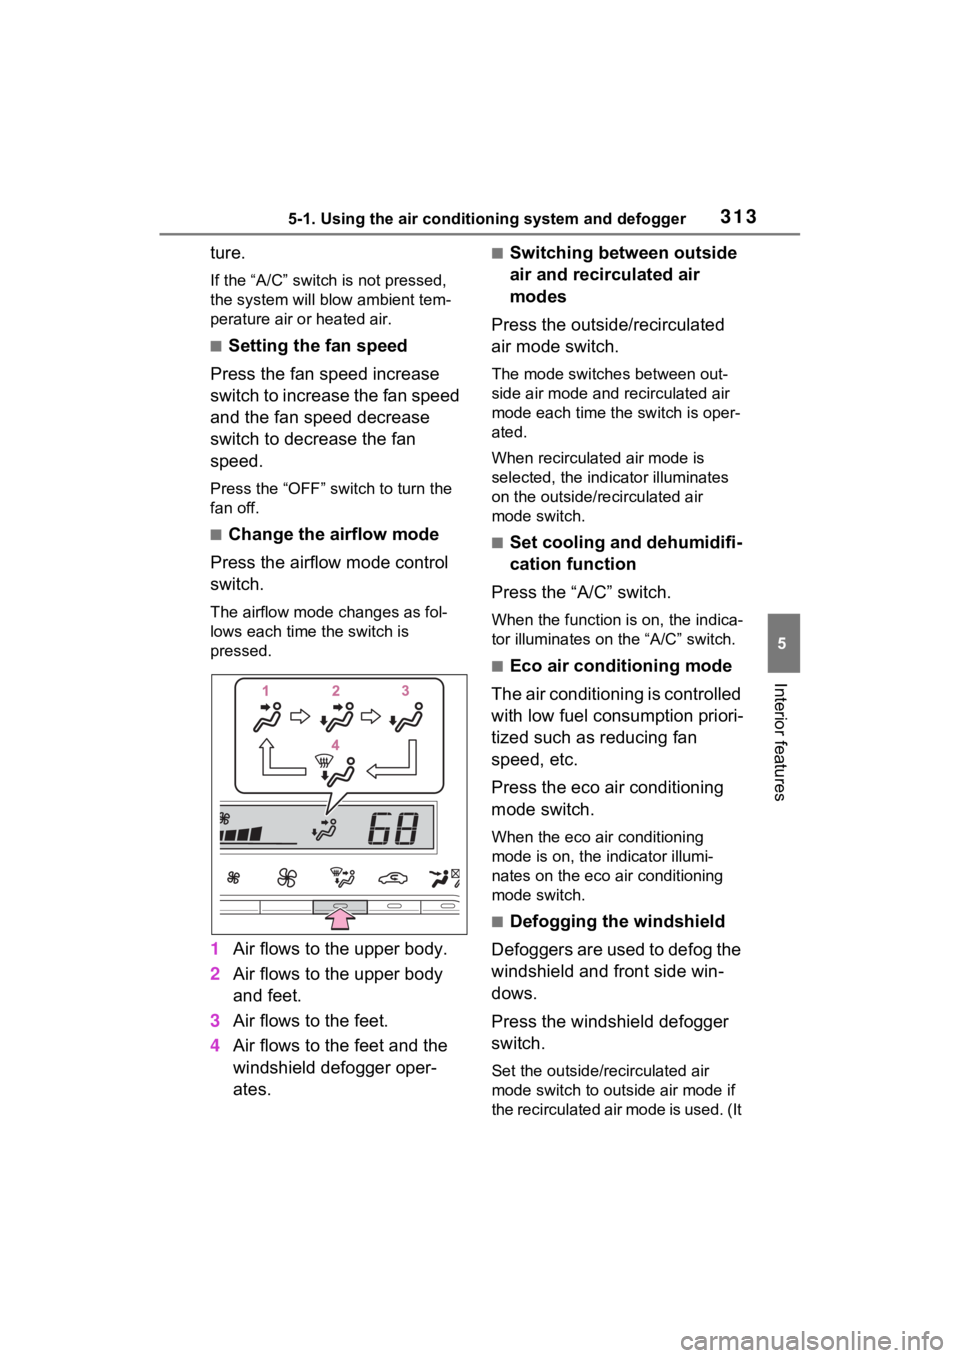
■Change the airflow mode
Press the airflow mode control
switch.
The airflow mode changes as fol-
lows each time the switch is
pressed.
1 Air flows to the upper body.
2 Air flows to the upper body
and feet.
3 Air flows to the feet.
4 Air flows to the feet and the
windshield defogger oper-
ates.
■Switching between outside
air and recirculated air
modes
Press the outside/recirculated
air mode switch.
The mode switches between out-
side air mode and recirculated air
mode each time the switch is oper-
ated.
When recirculated air mode is
selected, the indicator illuminates
on the outside/recirculated air
mode switch.
■Set cooling and dehumidifi-
cation function
Press the “A/C” switch.
When the function is on, the indica-
tor illuminates on the “A/C” switch.
■Eco air conditioning mode
The air conditioning is controlled
with low fuel consumption priori-
tized such as reducing fan
speed, etc.
Press the eco air conditioning
mode switch.
When the eco air conditioning
mode is on, the indicator illumi-
nates on the eco air conditioning
mode switch.
■Defogging the windshield
Defoggers are used to defog the
windshield and front side win-
dows.
Press the windshield defogger
switch.
Set the outside/recirculated air
mode switch to outside air mode if
the recirculated air mode is used. (It
Page 315 of 548
3155-1. Using the air conditioning system and defogger
5
Interior features
• Engine speed and compressor operation controlled to restrict
heating/cooling capacity
• Fan speed restr icted when auto-
matic mode is selected
●To improve air conditioning perfor-
mance, perform the following
operations:
• Adjust the fan speed
• Turn off Eco drive mode ( P.295)
• Turn off Eco air conditioning mode
●When the driving mode is set to
Eco drive mode, the Eco air condi-
tioning mode will be turned on
automatically. Even in this case,
the Eco air conditioning mode can
be turned off by pressing the Eco
air conditioning mode switch.
■Ventilation and air conditioning
odors
●To let fresh air in, set the air condi-
tioning system to the outside air
mode.
●During use, various odors from
inside and outside the vehicle may
enter into and a ccumulate in the
air conditioning system. This may
then cause odor to be emitted
from the vents.
●In order to suppress odors that
occur when the a ir conditioning
system starts, the air flow mode
may change to blow air to the feet
or air may stop blowing for a short
period of time immediately after
the air conditioning system is
started in automatic mode.
●When parking, the system auto-
matically switches to outside air
mode to encourage better air cir-
culation throughout the vehicle,
helping to reduce odors that occur
when starting the vehicle.
■Air conditioning filter
P.413
■Air conditioning system refrig-
erant
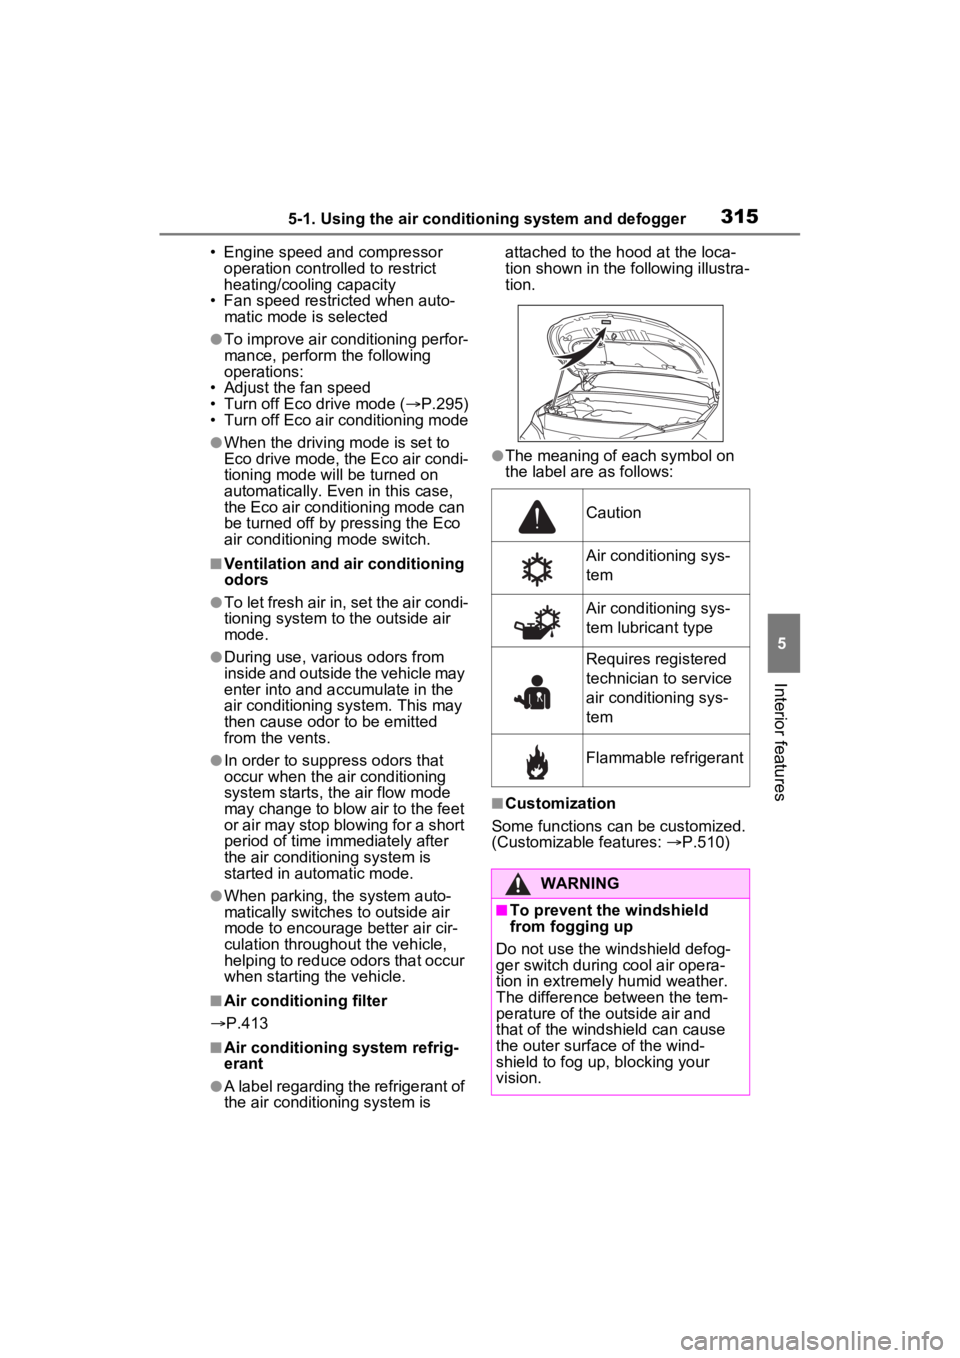
●A label regarding the refrigerant of
the air conditioning system is attached to the h
ood at the loca-
tion shown in the following illustra-
tion.
●The meaning of each symbol on
the label are as follows:
■Customization
Some functions can be customized.
(Customizable features: P.510)
Caution
Air conditioning sys-
tem
Air conditioning sys-
tem lubricant type
Requires registered
technician to service
air conditioning sys-
tem
Flammable refrigerant
WARNING
■To prevent the windshield
from fogging up
Do not use the windshield defog-
ger switch during cool air opera-
tion in extremely humid weather.
The difference between the tem-
perature of the outside air and
that of the windshield can cause
the outer surface of the wind-
shield to fog up, blocking your
vision.