2022 TOYOTA TUNDRA HYBRID buttons
[x] Cancel search: buttonsPage 23 of 618
23Pictorial index
Owners Manual_USA_M0C031_en
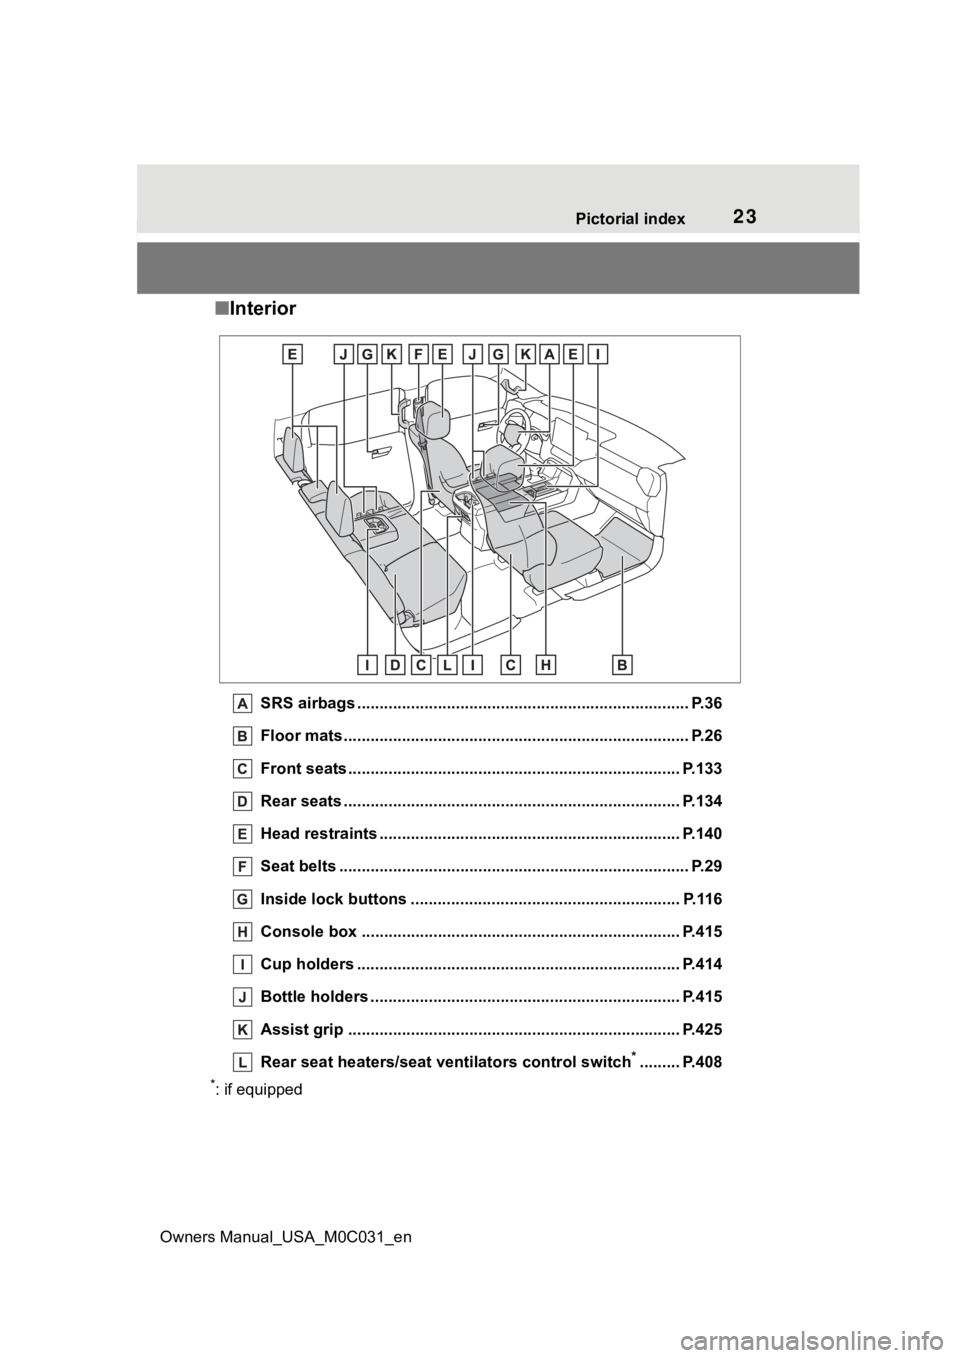
■ Interior
SRS airbags .................................................... ...................... P.36
Floor mats..................................................... ........................ P.26
Front seats .................................................... ...................... P.133
Rear seats ..................................................... ...................... P.134
Head restraints ................................................ ................... P.140
Seat belts ..................................................... ......................... P.29
Inside lock buttons ............................................ ................ P.116
Console box ....................................................................... P.415
Cup holders .................................................... .................... P.414
Bottle holders ................................................. .................... P.415
Assist grip .................................................... ...................... P.425
Rear seat heaters/seat ventilators control switch
*......... P.408
*: if equipped
Page 24 of 618
24Pictorial index
Owners Manual_USA_M0C031_en
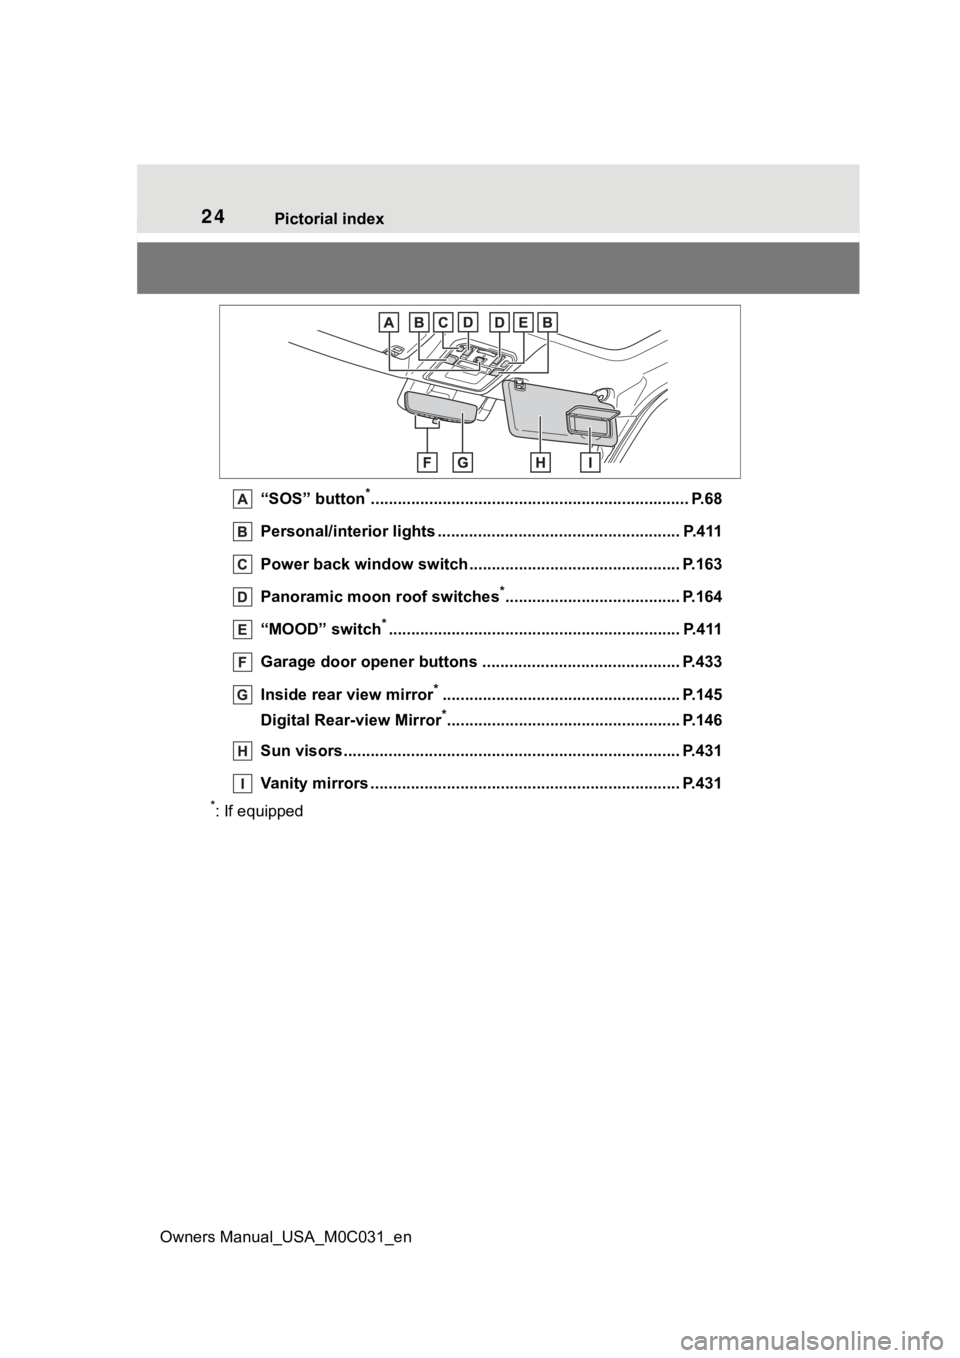
“SOS” button*............................................................... ........ P.68
Personal/interior lights ....................................... ............... P.411
Power back window switch .. ............................................. P.163
Panoramic moon roof switches
*....................................... P.164
“MOOD” switch
*............................................................... .. P.411
Garage door opener buttons ..................................... ....... P.433
Inside rear view mirror
*..................................................... P.145
Digital Rear-view Mirror
*.................................................... P.146
Sun visors..................................................... ...................... P.431
Vanity mirrors ................................................. .................... P.431
*: If equipped
Page 110 of 618
1103-1. Key information
Owners Manual_USA_M0C031_en
3-1.Key information
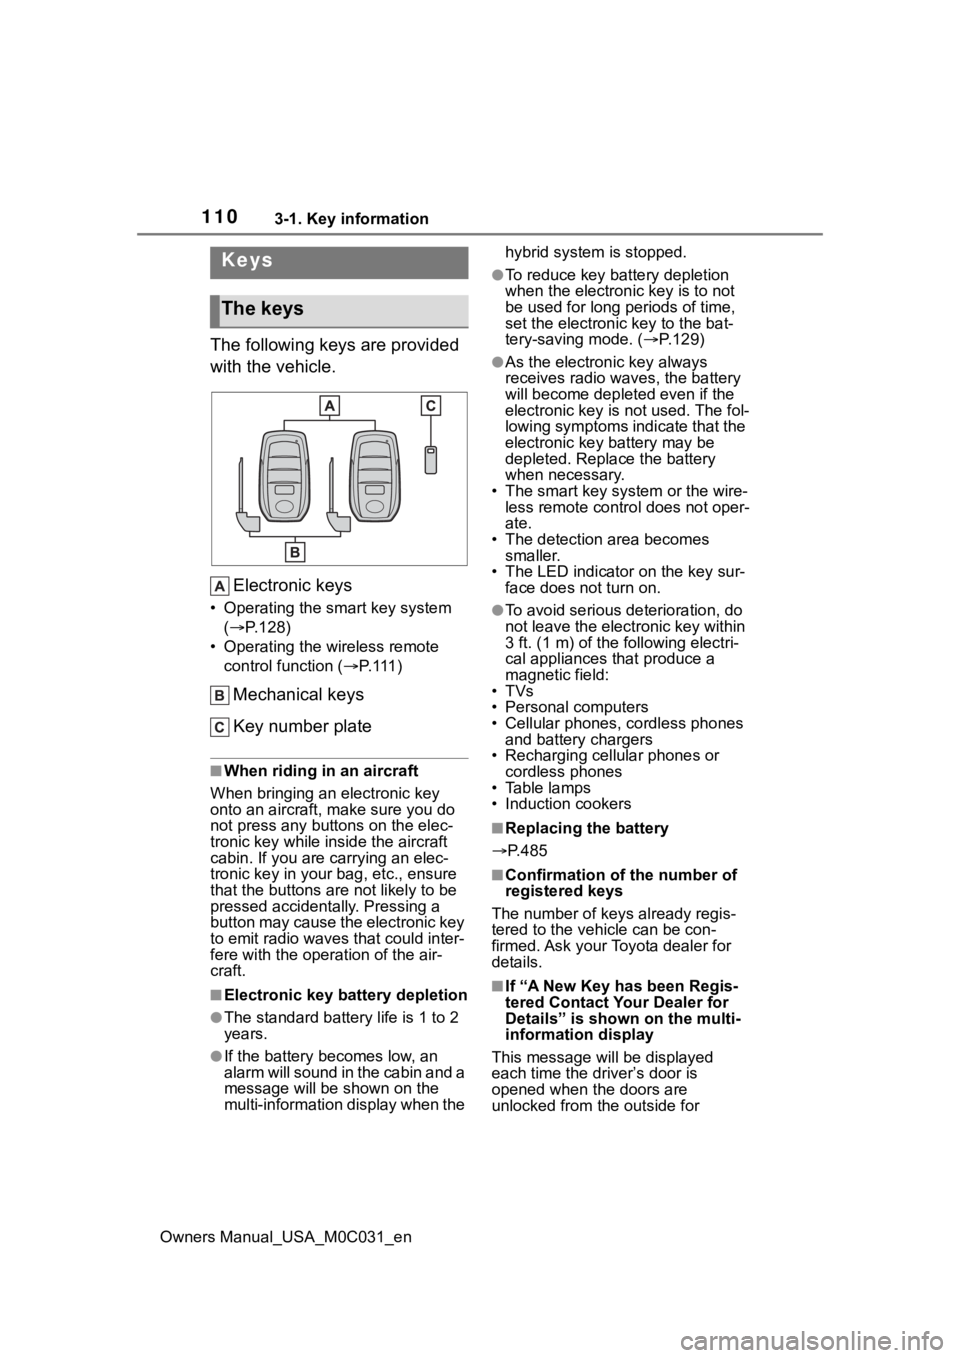
The following keys are provided
with the vehicle.Electronic keys
• Operating the smart key system ( P.128)
• Operating the wireless remote control function ( P. 111 )
Mechanical keys
Key number plate
■When riding in an aircraft
When bringing an electronic key
onto an aircraft, make sure you do
not press any buttons on the elec-
tronic key while inside the aircraft
cabin. If you are carrying an elec-
tronic key in your bag, etc., ensure
that the buttons are not likely to be
pressed accidentally. Pressing a
button may cause the electronic key
to emit radio waves that could inter-
fere with the oper ation of the air-
craft.
■Electronic key battery depletion
●The standard battery life is 1 to 2
years.
●If the battery becomes low, an
alarm will sound in the cabin and a
message will be s hown on the
multi-information display when the hybrid system is stopped.
●To reduce key battery depletion
when the electronic key is to not
be used for long periods of time,
set the electronic key to the bat-
tery-saving mode. (
P.129)
●As the electronic key always
receives radio waves, the battery
will become depleted even if the
electronic key is not used. The fol-
lowing symptoms indicate that the
electronic key battery may be
depleted. Replace the battery
when necessary.
• The smart key system or the wire- less remote contro l does not oper-
ate.
• The detection area becomes smaller.
• The LED indicator on the key sur- face does not turn on.
●To avoid serious deterioration, do
not leave the electronic key within
3 ft. (1 m) of the following electri-
cal appliances that produce a
magnetic field:
•TVs
• Personal computers
• Cellular phones, cordless phones and battery chargers
• Recharging cellular phones or cordless phones
• Table lamps
• Induction cookers
■Replacing the battery
P.485
■Confirmation of the number of
registered keys
The number of keys already regis-
tered to the vehi cle can be con-
firmed. Ask your Toyota dealer for
details.
■If “A New Key has been Regis-
tered Contact Your Dealer for
Details” is shown on the multi-
information display
This message will be displayed
each time the driver’s door is
opened when the doors are
unlocked from the outside for
Keys
The keys
Page 114 of 618

1143-2. Opening, closing and locking the doors and tailgate
Owners Manual_USA_M0C031_encontinuously, release the buttons,
wait for at least 5 seconds, and
repeat step
2.)
To prevent unintended triggering of
the alarm, unlock the doors using
the wireless remote control and
open and close a door once after
the settings have been changed. (If
a door is not opened within 60 sec-
onds after is pressed, the doors
will be locked again and the alarm
will automatically be set.)
In a case that the alarm is triggered,
immediately stop the alarm. ( P. 8 2 )
■Impact detection door lock
release system
In the event that t he vehicle is sub-
ject to a strong impact, all the doors
are unlocked. Depending on the
force of the impact or the type of
accident, however, the system may
not operate.
■Operation signals
A buzzer sounds and the emer-
gency flashers flash to indicate that
the doors have been
locked/unlocked. (Locked: once;
Unlocked: twice)
A buzzer sounds to indicate that the
windows are operating.
■Security feature
If a door is not opened within
approximately 60 s econds after the
vehicle is unlocked, the security fea-
ture automatically locks the vehicle
again.
■When the doors cannot be
locked by the lock sensor on
the upper part of the door han-
dle
If the door will not lock even when
the topside sensor area is touched,
try touching both the topside and
underside sensor areas at the same
time.
■Open door warning buzzer
If an attempt to lock the doors is
made when a door is not fully
closed, a buzzer sounds continu-
ously for 5 seconds. Fully close the
door to stop the buzzer, and lock the
vehicle once more.
■Setting the alarm
Locking the doors will set the alarm
system. ( P. 8 2 )
■Conditions affecting the opera-
tion of the smart key system or
wireless remote control
P.130
Multi-informa-
tion display/BeepUnlocking func- tion
Exterior: Beeps 3 times
Interior: Pings once
Holding the
driver’s door
handle unlocks
only the driver’s
door.
Holding the front
passenger door
handles unlocks
all the doors and
tailgate.
Exterior: Beeps twice
Interior: Pings once
Holding either
front door handle
unlocks all the
doors and tail-
gate.
Page 116 of 618
1163-2. Opening, closing and locking the doors and tailgate
Owners Manual_USA_M0C031_en
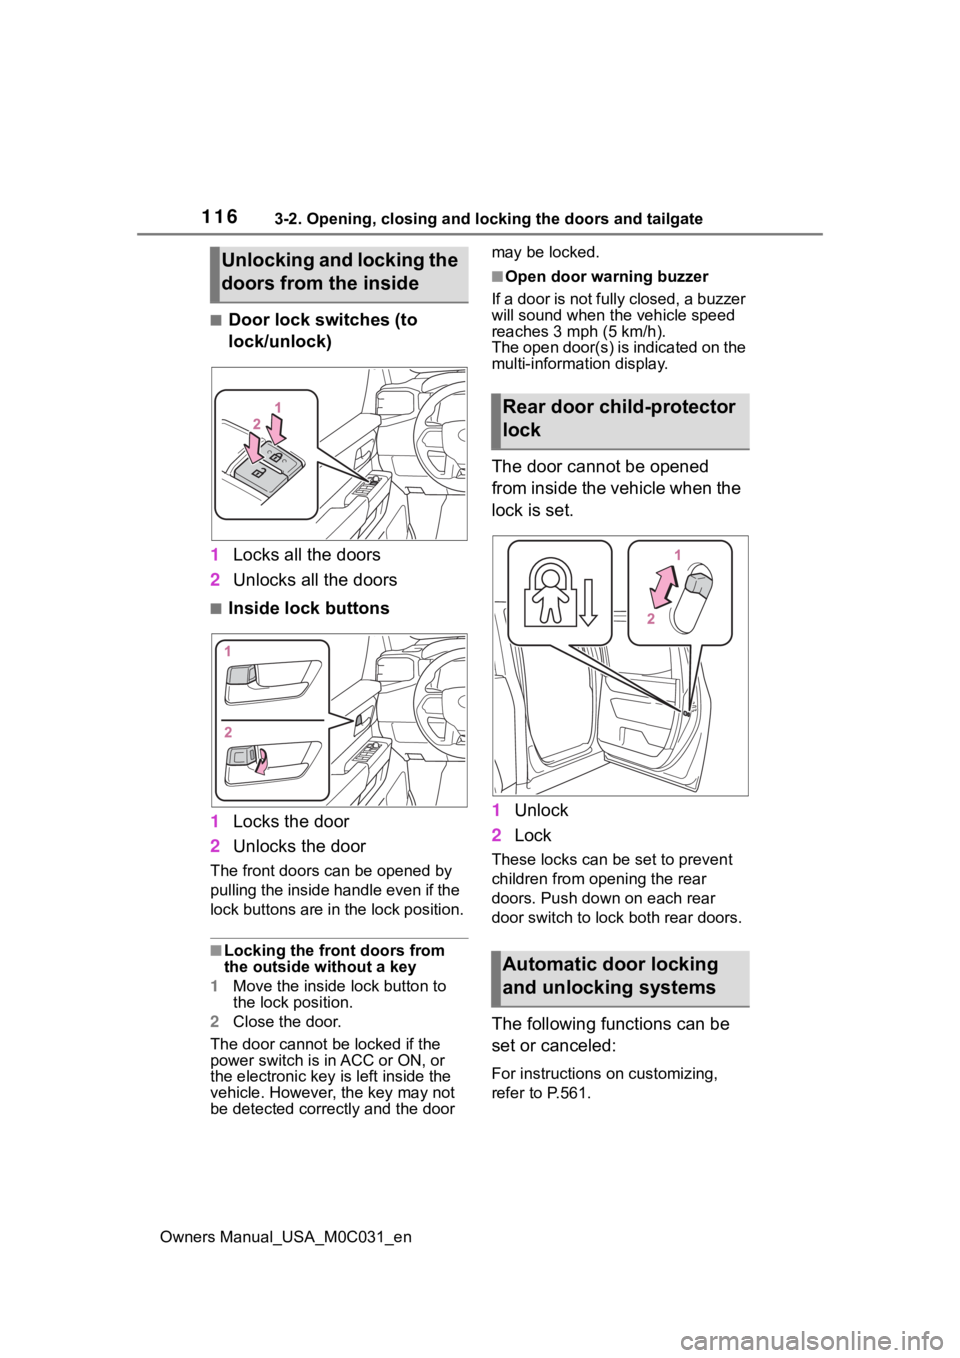
■Door lock switches (to
lock/unlock)
1 Locks all the doors
2 Unlocks all the doors
■Inside lock buttons
1 Locks the door
2 Unlocks the door
The front doors can be opened by
pulling the inside ha ndle even if the
lock buttons are in the lock position.
■Locking the front doors from
the outside without a key
1 Move the inside lock button to
the lock position.
2 Close the door.
The door cannot be locked if the
power switch is in ACC or ON, or
the electronic key is left inside the
vehicle. However, the key may not
be detected correctly and the door may be locked.
■Open door warning buzzer
If a door is not fully closed, a buzzer
will sound when the vehicle speed
reaches 3 mp h (5 km/h).
The open door(s) is indicated on the
multi-information display.
The door cannot be opened
from inside the vehicle when the
lock is set.
1 Unlock
2 Lock
These locks can be set to prevent
children from opening the rear
doors. Push down on each rear
door switch to lock both rear doors.
The following functions can be
set or canceled:
For instructions on customizing,
refer to P.561.
Unlocking and locking the
doors from the inside
Rear door child-protector
lock
Automatic door locking
and unlocking systems
Page 129 of 618
1293-2. Opening, closing and locking the doors and tailgate
Owners Manual_USA_M0C031_en
3
Before driving
●When an interior alarm sounds
continuously
■If “Smart Key System Malfunc-
tion See Owner’s Manual” is
displayed on the multi-informa-
tion display
The system may be malfunctioning.
Have the vehicle inspected by Toy-
ota dealer immediately.
■If “Key Detected in Vehicle” is
shown on the multi-information
display
An attempt was m ade to lock the
doors using the smart key system
while the electronic key was still
inside the vehicle. Retrieve the elec-
tronic key from the vehicle and lock
the doors again.
■Battery-saving function
The battery-saving function will be
activated in order to prevent the
electronic key battery and the 12-
volt battery from being discharged while the vehicle is not in operation
for a long time.
●In the following situations, the
smart key system
may take some
time to unlock the doors.
• The electronic key has been left in an area of approxi mately 6 ft. (2
m) of the outside of the vehicle for
10 minutes or longer.
• The smart key system has not been used for 5 days or longer.
●If the smart key system has not
been used for 14 days or longer,
the doors cannot be unlocked at
any doors except the driver’s door.
In this case, take hold of the
driver’s door handle, or use the
wireless remote c ontrol or the
mechanical key, to unlock the
doors.
■Turning an electronic key to
battery-saving mode
●When battery-saving mode is set,
battery depletion is minimized by
stopping the electronic key from
receiving radio waves.
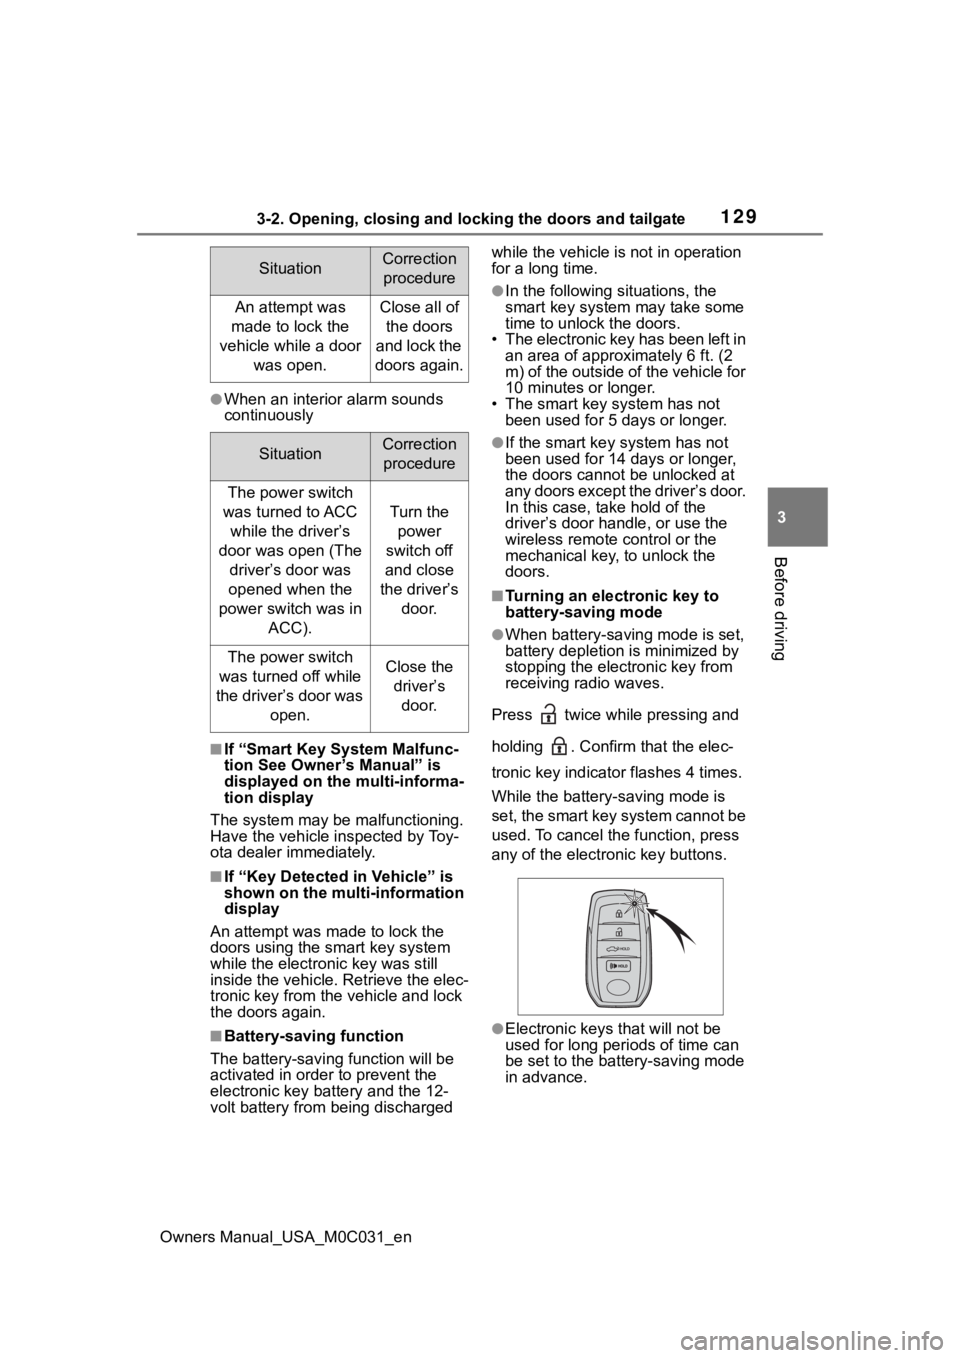
Press twice while pressing and
holding . Confirm that the elec-
tronic key indicator flashes 4 times.
While the battery-saving mode is
set, the smart key system cannot be
used. To cancel the function, press
any of the electronic key buttons.
●Electronic keys that will not be
used for long periods of time can
be set to the battery-saving mode
in advance.
SituationCorrection procedure
An attempt was
made to lock the
vehicle while a door was open.Close all of the doors
and lock the
doors again.
SituationCorrection procedure
The power switch
was turned to ACC while the driver’s
door was open (The driver’s door was
opened when the
power switch was in ACC).
Turn the power
switch off
and close
the driver’s door.
The power switch
was turned off while
the driver’s door was open.Close the driver’s door.
Page 138 of 618
1383-3. Adjusting the seats
Owners Manual_USA_M0C031_en
view mirrors to the desired
positions.
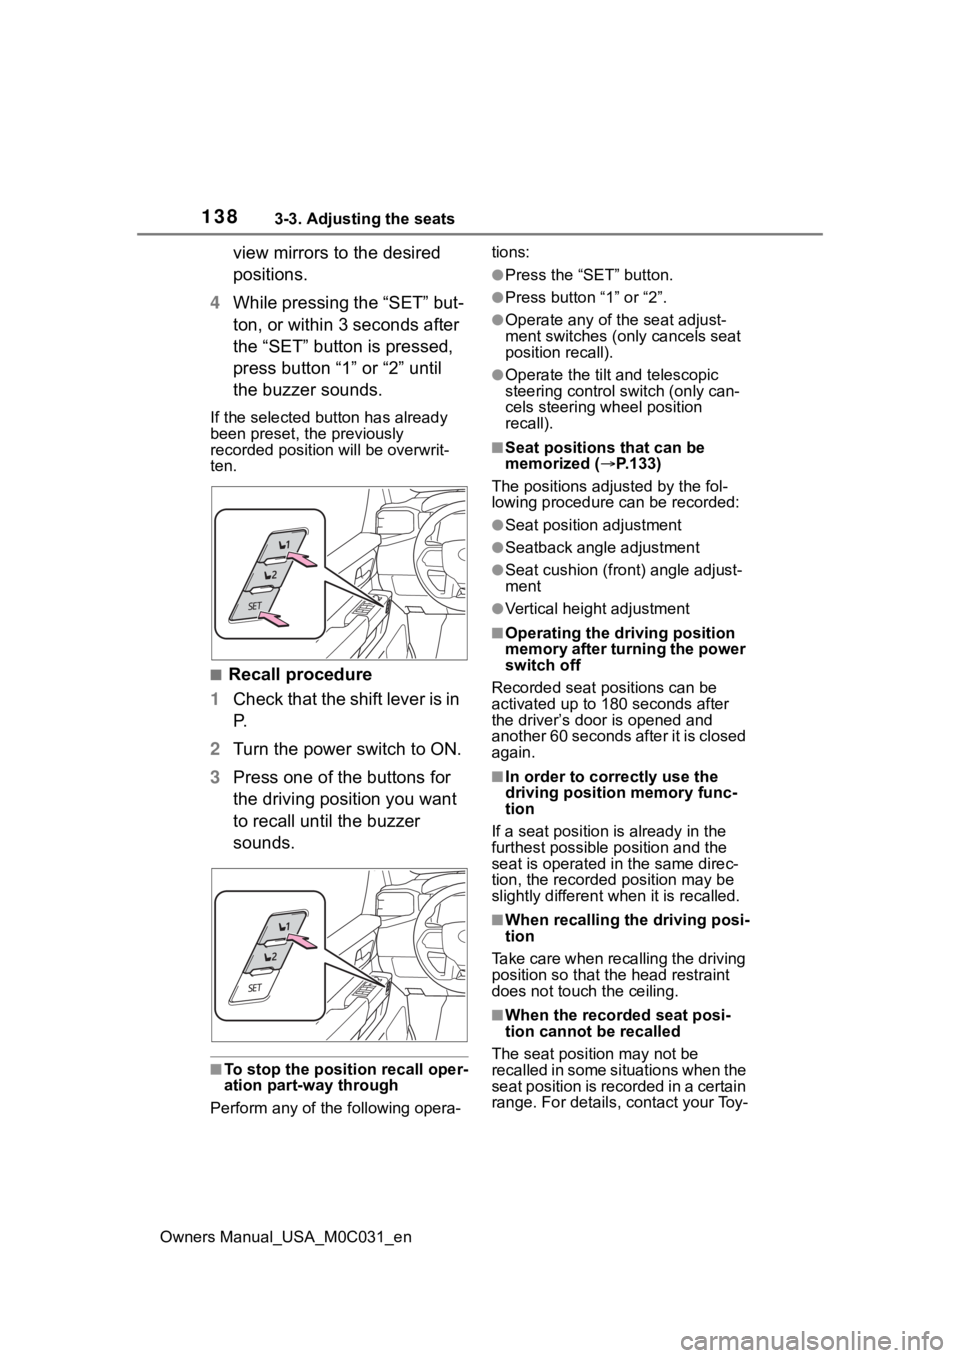
4 While pressing the “SET” but-
ton, or within 3 seconds after
the “SET” button is pressed,
press button “1” or “2” until
the buzzer sounds.
If the selected button has already
been preset, the previously
recorded position will be overwrit-
ten.
■Recall procedure
1 Check that the shift lever is in
P.
2 Turn the power switch to ON.
3 Press one of the buttons for
the driving position you want
to recall until the buzzer
sounds.
■To stop the position recall oper-
ation part-way through
Perform any of the following opera- tions:
●Press the “SET” button.
●Press button “1” or “2”.
●Operate any of t
he seat adjust-
ment switches (only cancels seat
position recall).
●Operate the tilt and telescopic
steering control switch (only can-
cels steering wheel position
recall).
■Seat positions that can be
memorized ( P.133)
The positions adjusted by the fol-
lowing procedure can be recorded:
●Seat position adjustment
●Seatback angle adjustment
●Seat cushion (front) angle adjust-
ment
●Vertical height adjustment
■Operating the driving position
memory after turning the power
switch off
Recorded seat positions can be
activated up to 180 seconds after
the driver’s door is opened and
another 60 seconds after it is closed
again.
■In order to corre ctly use the
driving position memory func-
tion
If a seat position is already in the
furthest possible position and the
seat is operated in the same direc-
tion, the recorded position may be
slightly different w hen it is recalled.
■When recalling the driving posi-
tion
Take care when recalling the driving
position so that the head restraint
does not touch the ceiling.
■When the recorded seat posi-
tion cannot be recalled
The seat positi on may not be
recalled in some situations when the
seat position is recorded in a certain
range. For details, contact your Toy-
Page 202 of 618
2024-2. Driving procedures
Owners Manual_USA_M0C031_encover the tip of the screwdriver
with a rag.
5 Press and hold the shift lock
override button and then push
the button on the shift knob.
The shift lever can be shifted
while both buttons are pressed.
■Drive mode
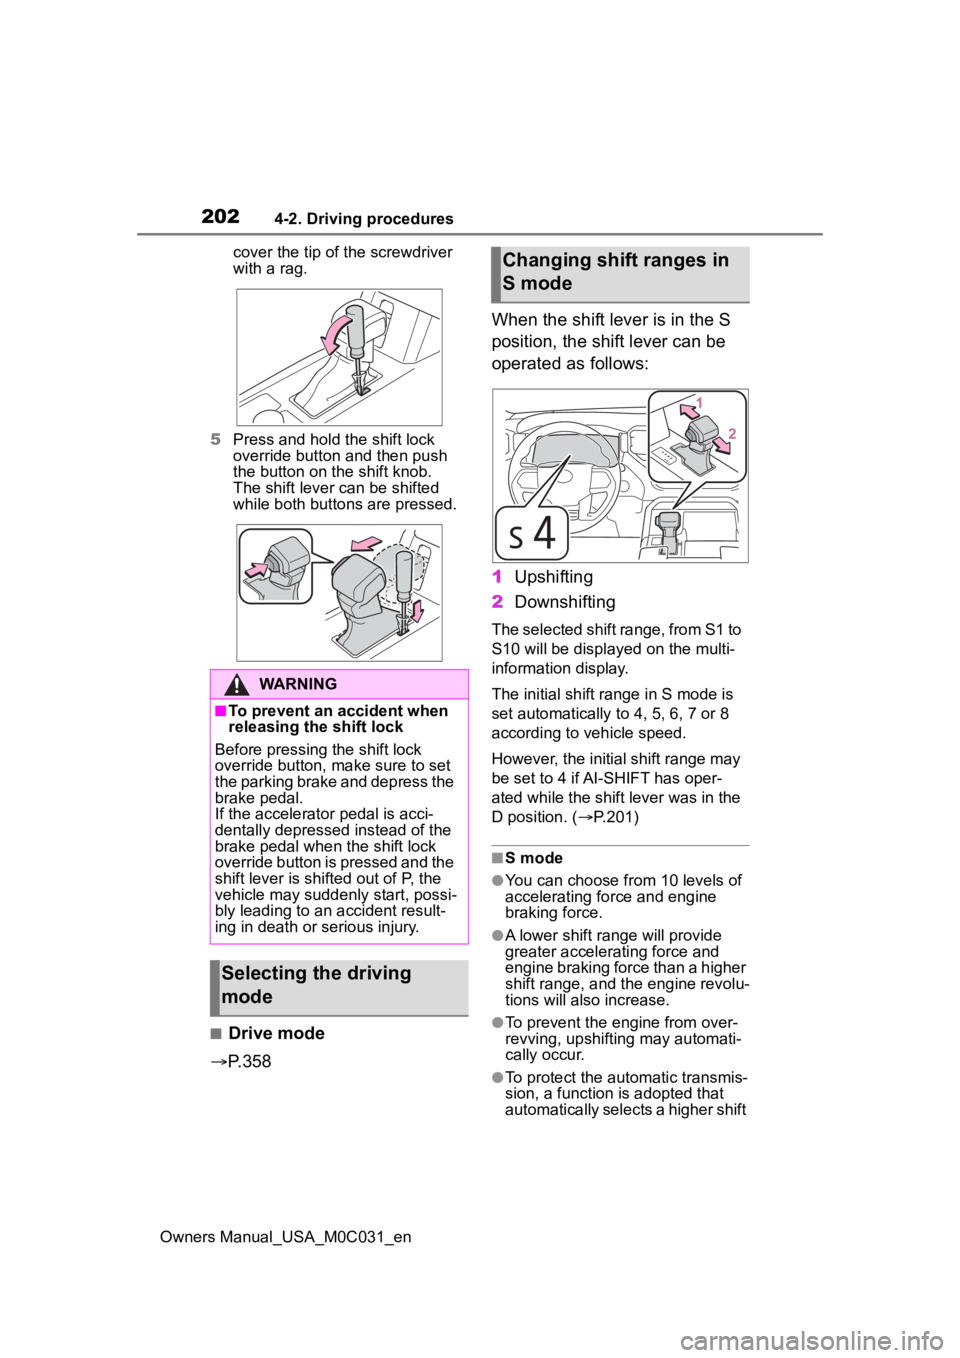
P.358 When the shift lever is in the S
position, the shift lever can be
operated as follows:
1
Upshifting
2 Downshifting
The selected shift range, from S1 to
S10 will be displayed on the multi-
information display.
The initial shift range in S mode is
set automatically to 4, 5, 6, 7 or 8
according to vehicle speed.
However, the initial shift range may
be set to 4 if AI-SHIFT has oper-
ated while the shift lever was in the
D position. ( P.201)
■S mode
●You can choose from 10 levels of
accelerating force and engine
braking force.
●A lower shift range will provide
greater accelerating force and
engine braking force than a higher
shift range, and t he engine revolu-
tions will also increase.
●To prevent the engine from over-
revving, upshifting may automati-
cally occur.
●To protect the automatic transmis-
sion, a function is adopted that
automatically selects a higher shift
WARNING
■To prevent an accident when
releasing the shift lock
Before pressing the shift lock
override button, make sure to set
the parking brake and depress the
brake pedal.
If the accelerator pedal is acci-
dentally depressed instead of the
brake pedal when the shift lock
override button is pressed and the
shift lever is shifted out of P, the
vehicle may suddenly start, possi-
bly leading to an accident result-
ing in death or serious injury.
Selecting the driving
mode
Changing shift ranges in
S mode