2022 TOYOTA TUNDRA HYBRID Adjustment procedure
[x] Cancel search: Adjustment procedurePage 1 of 618

1
2
3
4
5
6
8 7
9
10
Owners Manual_USA_M0C031_en
Pictorial indexSearch by illustration
For safety
and securityMake sure to read through them
(Main topics: Child seat, theft deterrent system)
Vehicle status
information and
indicatorsReading driving-related information
(Main topics: Meters, multi-information display)
Before driving
Opening and closing the doors and windows,
adjustment before driving
(Main topics: Keys, doors, seats)
Driving
Operations and advice which are necessary for
driving
(Main topics: Starting hybrid system, refueling)
Interior featuresUsage of the interior features
(Main topics: Air conditioner, storage features)
Maintenance
and careCaring for your vehicle and maintenance
procedures
(Main topics: Interior and exterior, light bulbs)
When trouble
arisesWhat to do in case of malfunction and emergency
(Main topics: 12-volt battery discharge, flat tire)
Vehicle
specificationsVehicle specifications, customizable features
(Main topics: Fuel, oil, tire inflation pressure)
For ownersReporting safety defects for U.S. owners, seat belt
and SRS airbag instructions for Canadian owners
IndexSearch by symptom
Search alphabetically
Page 133 of 618
1333-3. Adjusting the seats
Owners Manual_USA_M0C031_en
3
Before driving
3-3.Adjusting the seats
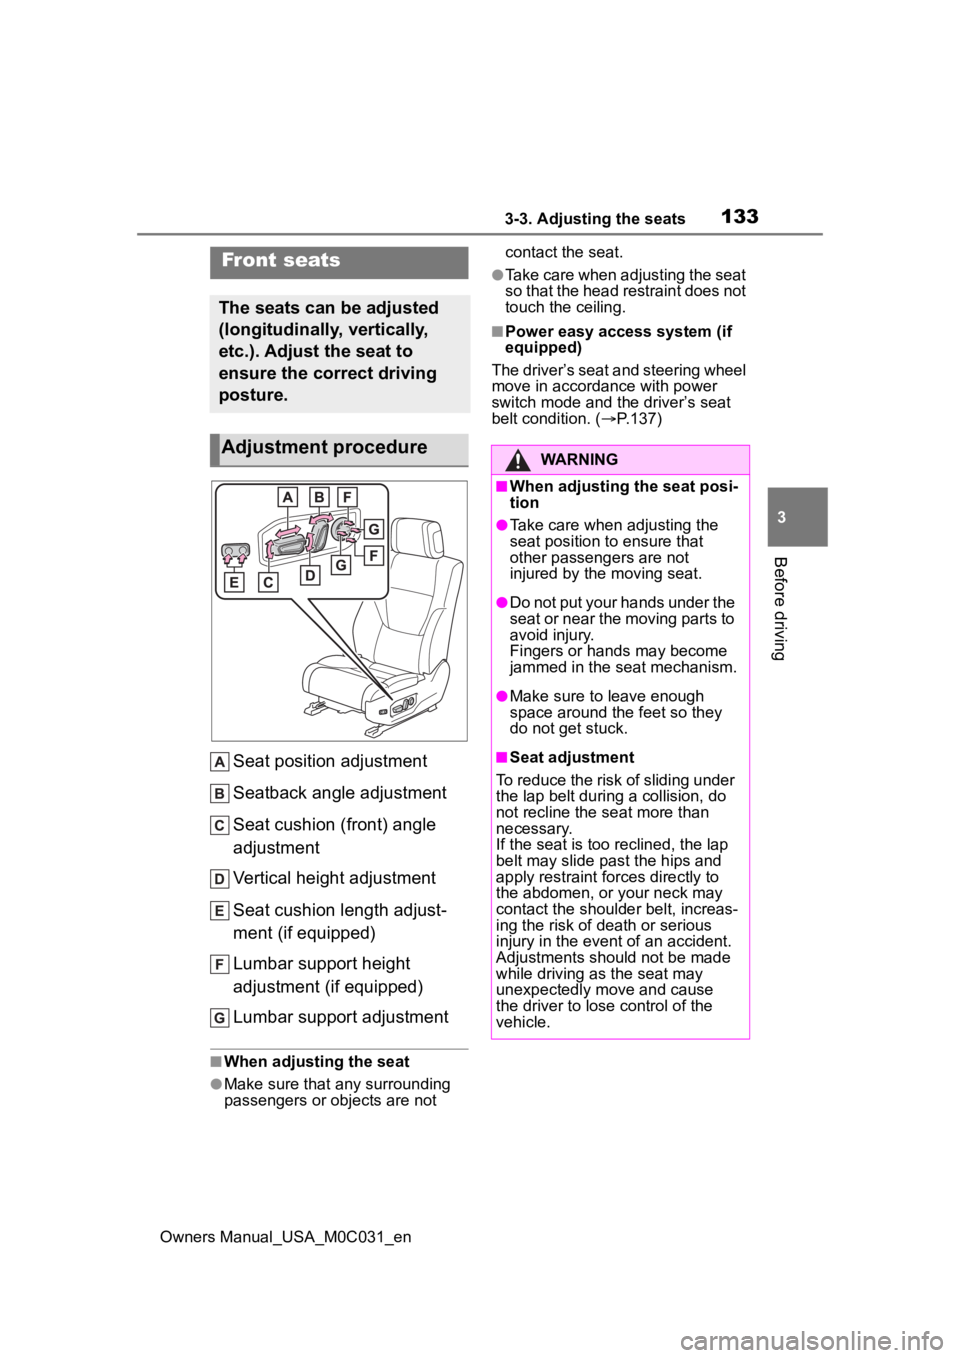
Seat position adjustment
Seatback angle adjustment
Seat cushion (front) angle
adjustment
Vertical height adjustment
Seat cushion length adjust-
ment (if equipped)
Lumbar support height
adjustment (if equipped)
Lumbar support adjustment
■When adjusting the seat
●Make sure that any surrounding
passengers or ob jects are not contact the seat.
●Take care when adjusting the seat
so that the head restraint does not
touch the ceiling.
■Power easy access system (if
equipped)
The driver’s seat and steering wheel
move in accordance with power
switch mode and th e driver’s seat
belt condition. ( P.137)
Front seats
The seats can be adjusted
(longitudinally, vertically,
etc.). Adjust the seat to
ensure the correct driving
posture.
Adjustment procedureWARNING
■When adjusting the seat posi-
tion
●Take care when adjusting the
seat position to ensure that
other passengers are not
injured by the moving seat.
●Do not put your hands under the
seat or near the moving parts to
avoid injury.
Fingers or hands may become
jammed in the seat mechanism.
●Make sure to leave enough
space around the feet so they
do not get stuck.
■Seat adjustment
To reduce the risk of sliding under
the lap belt during a collision, do
not recline the se at more than
necessary.
If the seat is too reclined, the lap
belt may slide past the hips and
apply restraint for ces directly to
the abdomen, or your neck may
contact the shoulder belt, increas-
ing the risk of death or serious
injury in the event of an accident.
Adjustments should not be made
while driving as the seat may
unexpectedly move and cause
the driver to lose control of the
vehicle.
Page 137 of 618
1373-3. Adjusting the seats
Owners Manual_USA_M0C031_en
3
Before driving
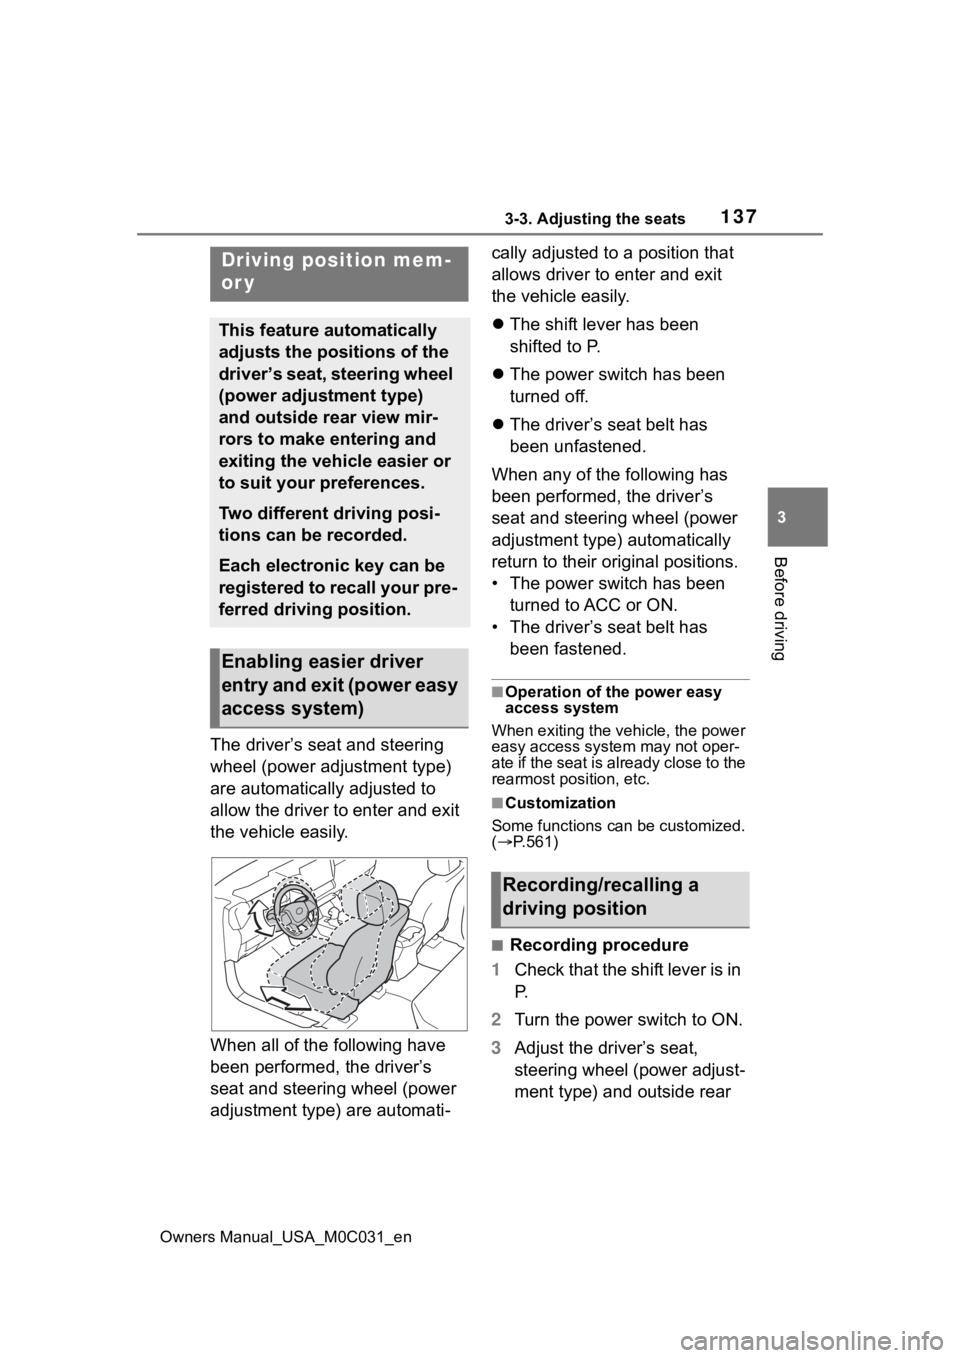
The driver’s seat and steering
wheel (power adjustment type)
are automatically adjusted to
allow the driver to enter and exit
the vehicle easily.
When all of the following have
been performed, the driver’s
seat and steering wheel (power
adjustment type) are automati- cally adjusted to a position that
allows driver to enter and exit
the vehicle easily.
The shift lever has been
shifted to P.
The power switch has been
turned off.
The driver’s seat belt has
been unfastened.
When any of the following has
been performed, the driver’s
seat and steering wheel (power
adjustment type) automatically
return to their original positions.
• The power switch has been turned to ACC or ON.
• The driver’s seat belt has been fastened.
■Operation of the power easy
access system
When exiting the vehicle, the power
easy access syste m may not oper-
ate if the seat is already close to the
rearmost position, etc.
■Customization
Some functions can be customized.
( P.561)
■Recording procedure
1 Check that the shift lever is in
P.
2 Turn the power switch to ON.
3 Adjust the driver’s seat,
steering wheel (power adjust-
ment type) and outside rear
Driving position mem-
or y
This feature automatically
adjusts the positions of the
driver’s seat, steering wheel
(power adjustment type)
and outside rear view mir-
rors to make entering and
exiting the vehicle easier or
to suit your preferences.
Two different driving posi-
tions can be recorded.
Each electronic key can be
registered to recall your pre-
ferred driving position.
Enabling easier driver
entry and exit (power easy
access system)
Recording/recalling a
driving position
Page 138 of 618
1383-3. Adjusting the seats
Owners Manual_USA_M0C031_en
view mirrors to the desired
positions.
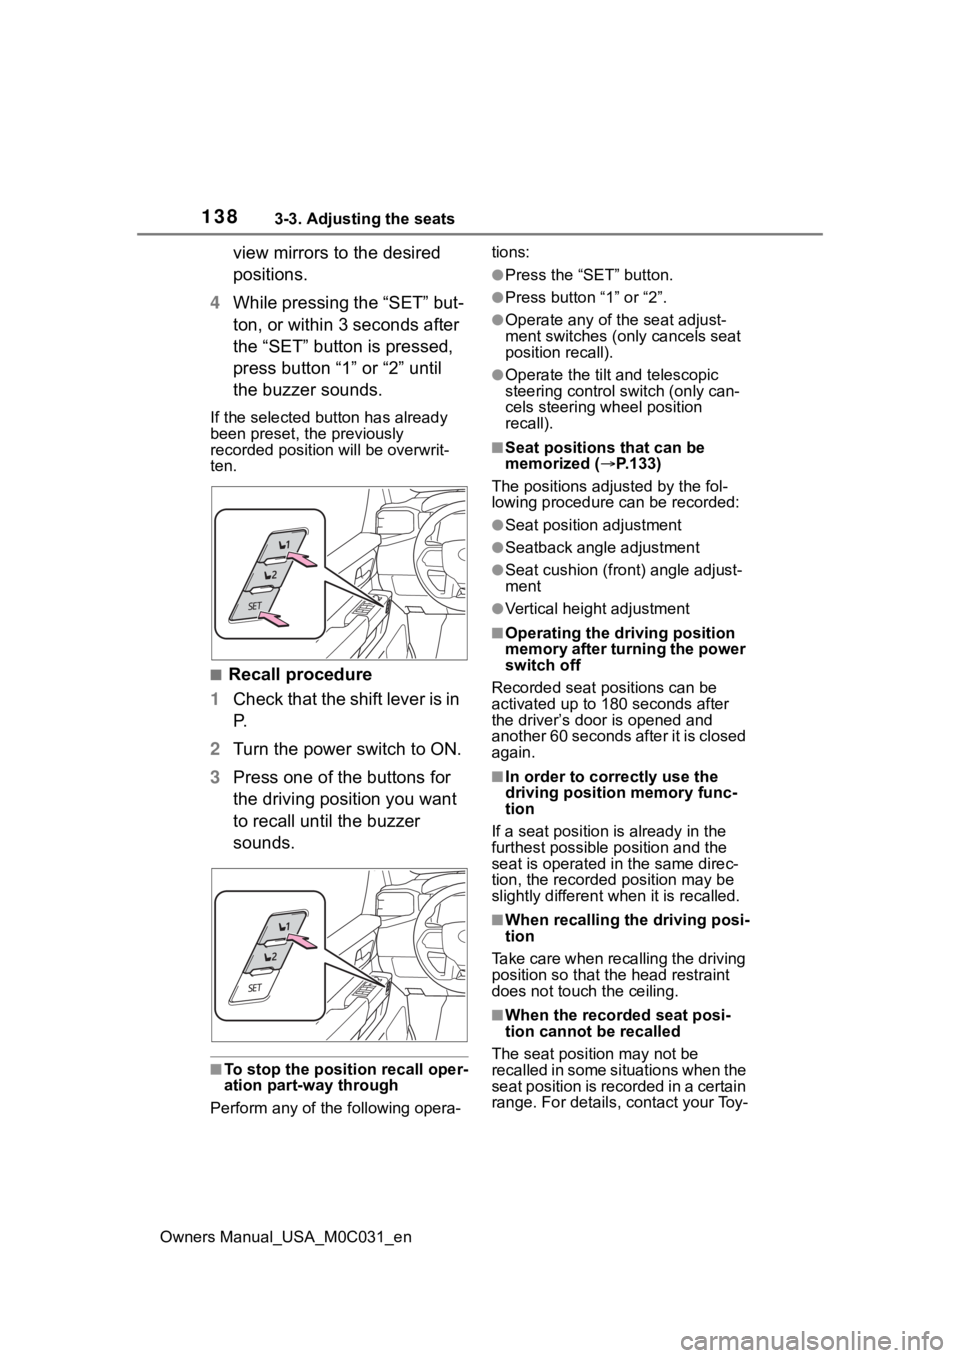
4 While pressing the “SET” but-
ton, or within 3 seconds after
the “SET” button is pressed,
press button “1” or “2” until
the buzzer sounds.
If the selected button has already
been preset, the previously
recorded position will be overwrit-
ten.
■Recall procedure
1 Check that the shift lever is in
P.
2 Turn the power switch to ON.
3 Press one of the buttons for
the driving position you want
to recall until the buzzer
sounds.
■To stop the position recall oper-
ation part-way through
Perform any of the following opera- tions:
●Press the “SET” button.
●Press button “1” or “2”.
●Operate any of t
he seat adjust-
ment switches (only cancels seat
position recall).
●Operate the tilt and telescopic
steering control switch (only can-
cels steering wheel position
recall).
■Seat positions that can be
memorized ( P.133)
The positions adjusted by the fol-
lowing procedure can be recorded:
●Seat position adjustment
●Seatback angle adjustment
●Seat cushion (front) angle adjust-
ment
●Vertical height adjustment
■Operating the driving position
memory after turning the power
switch off
Recorded seat positions can be
activated up to 180 seconds after
the driver’s door is opened and
another 60 seconds after it is closed
again.
■In order to corre ctly use the
driving position memory func-
tion
If a seat position is already in the
furthest possible position and the
seat is operated in the same direc-
tion, the recorded position may be
slightly different w hen it is recalled.
■When recalling the driving posi-
tion
Take care when recalling the driving
position so that the head restraint
does not touch the ceiling.
■When the recorded seat posi-
tion cannot be recalled
The seat positi on may not be
recalled in some situations when the
seat position is recorded in a certain
range. For details, contact your Toy-
Page 139 of 618
1393-3. Adjusting the seats
Owners Manual_USA_M0C031_en
3
Before driving
ota dealer.
■Registering procedure
Record your driving position to
button “1” or “2” before perform-
ing the following:
Carry only the key you want to
register, and then close the
driver’s door.
If 2 or more keys are in the vehi-
cle, the driving position cannot
be recorded properly.
1 Check that the shift lever is in
P.
2 Turn the power switch to ON.
3 Recall the driving position
that you want to record.
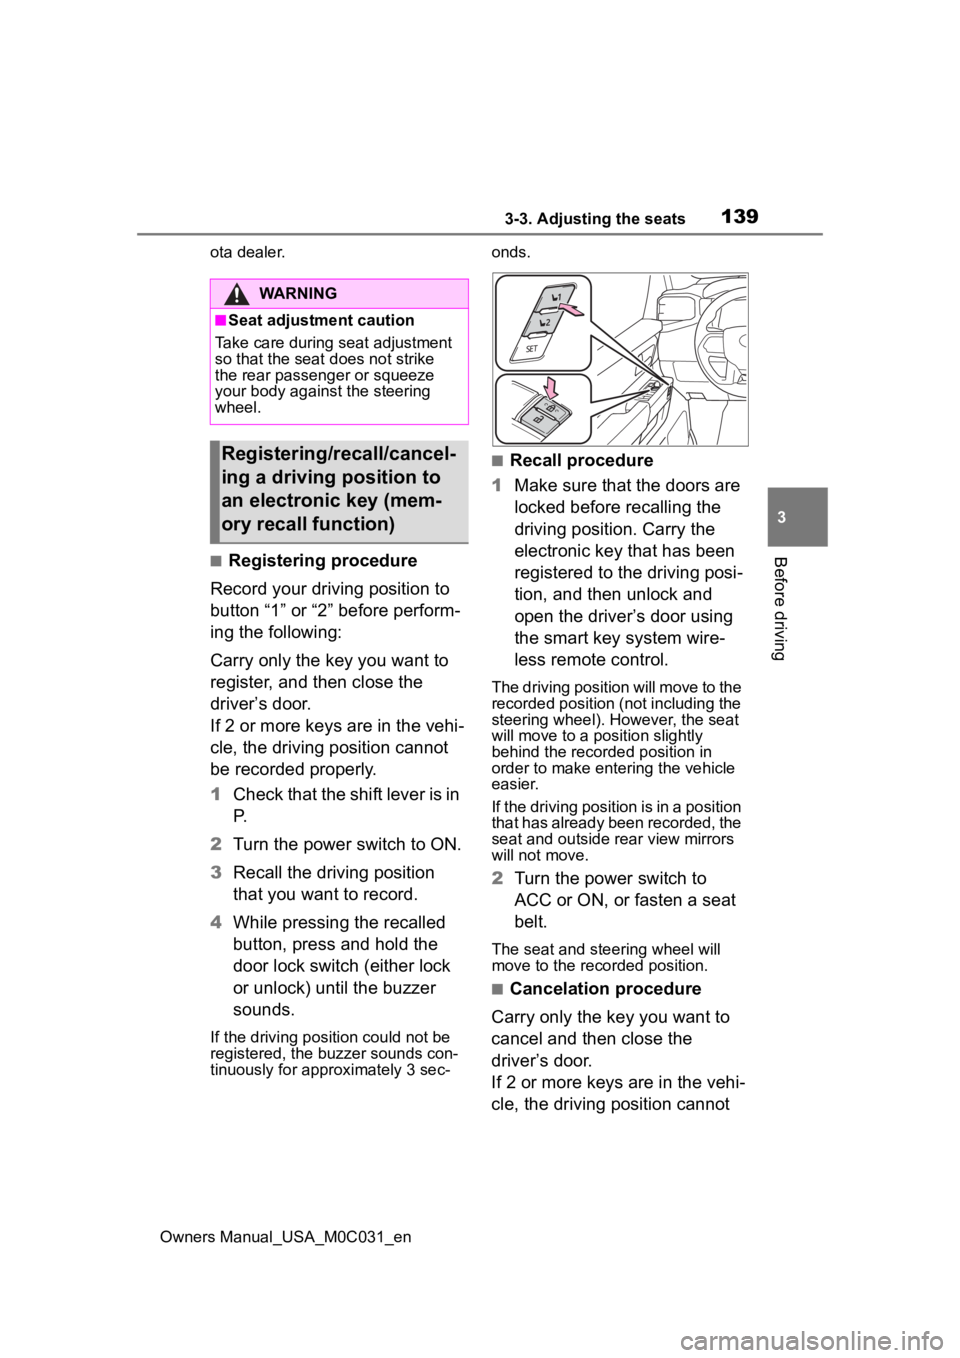
4 While pressing the recalled
button, press and hold the
door lock switch (either lock
or unlock) until the buzzer
sounds.
If the driving position could not be
registered, the buzzer sounds con-
tinuously for approximately 3 sec- onds.
■Recall procedure
1 Make sure that the doors are
locked before recalling the
driving position. Carry the
electronic key that has been
registered to the driving posi-
tion, and then unlock and
open the driver’s door using
the smart key system wire-
less remote control.
The driving position will move to the
recorded position (not including the
steering wheel). However, the seat
will move to a position slightly
behind the recorded position in
order to make entering the vehicle
easier.
If the driving position is in a position
that has already been recorded, the
seat and outside rear view mirrors
will not move.
2Turn the power switch to
ACC or ON, or fasten a seat
belt.
The seat and steering wheel will
move to the recorded position.
■Cancelation procedure
Carry only the key you want to
cancel and then close the
driver’s door.
If 2 or more keys are in the vehi-
cle, the driving position cannot
WARNING
■Seat adjustment caution
Take care during seat adjustment
so that the seat d oes not strike
the rear passenger or squeeze
your body again st the steering
wheel.
Registering/recall/cancel-
ing a driving position to
an electronic key (mem-
ory recall function)
Page 143 of 618
1433-4. Adjusting the steering wheel and mirrors
Owners Manual_USA_M0C031_en
3
Before driving
3-4.Adjusting the steering wheel and mirrors
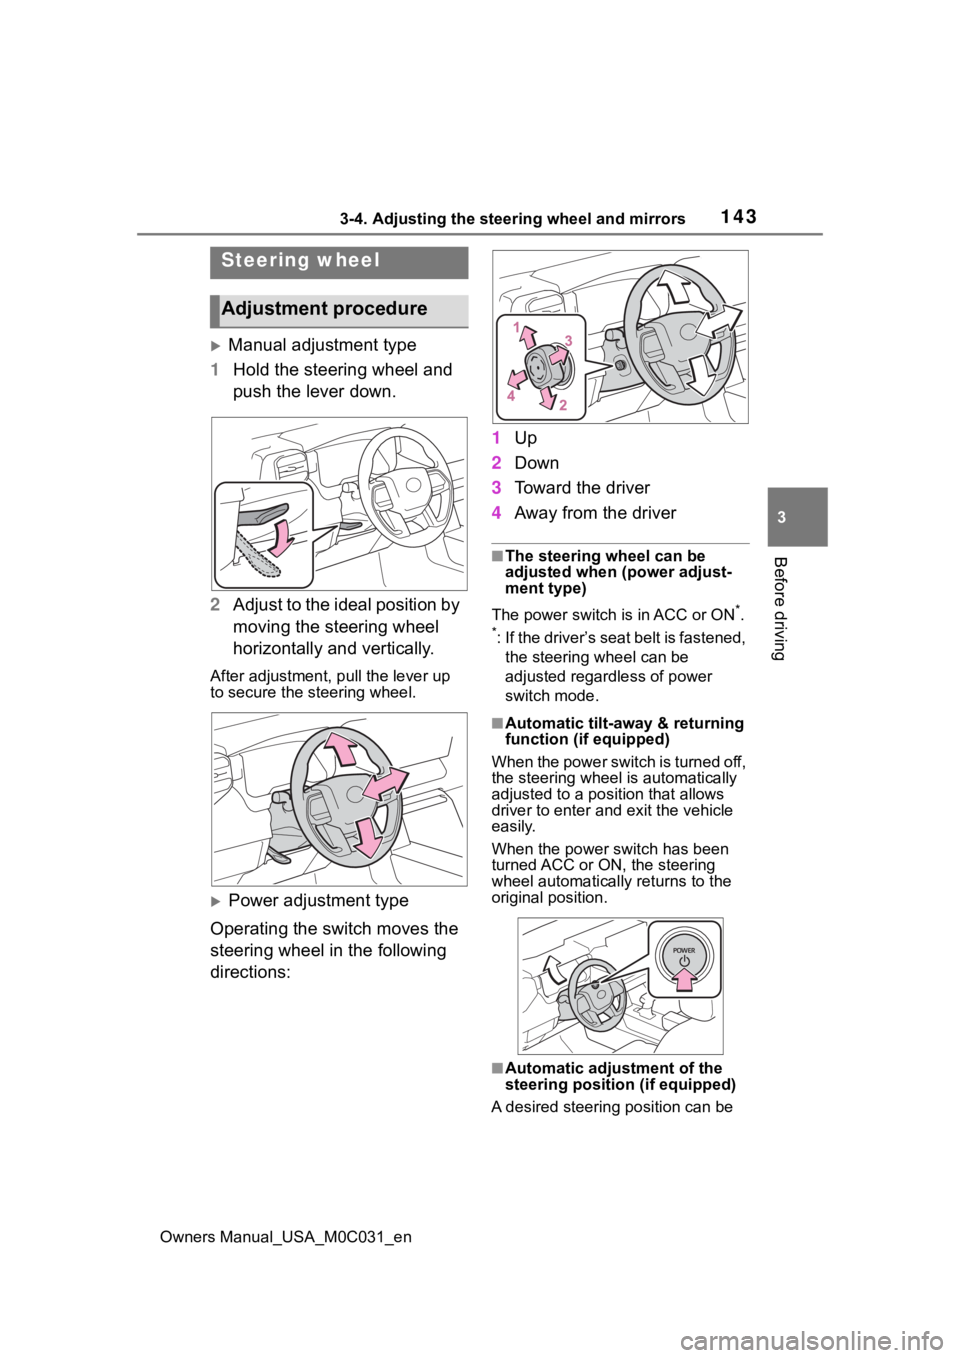
Manual adjustment type
1 Hold the steering wheel and
push the lever down.
2 Adjust to the ideal position by
moving the steering wheel
horizontally and vertically.
After adjustment, pull the lever up
to secure the steering wheel.
Power adjustment type
Operating the switch moves the
steering wheel in the following
directions: 1
Up
2 Down
3 Toward the driver
4 Away from the driver
■The steering wheel can be
adjusted when (power adjust-
ment type)
The power switch is in ACC or ON
*.
*: If the driver’s seat belt is fastened, the steering wheel can be
adjusted regardless of power
switch mode.
■Automatic tilt-away & returning
function (if equipped)
When the power switch is turned off,
the steering wheel is automatically
adjusted to a posit ion that allows
driver to enter and exit the vehicle
easily.
When the power switch has been
turned ACC or ON, the steering
wheel automatically returns to the
original position.
■Automatic adjustment of the
steering positi on (if equipped)
A desired steering position can be
Steering wheel
Adjustment procedure
Page 156 of 618
1563-4. Adjusting the steering wheel and mirrors
Owners Manual_USA_M0C031_en
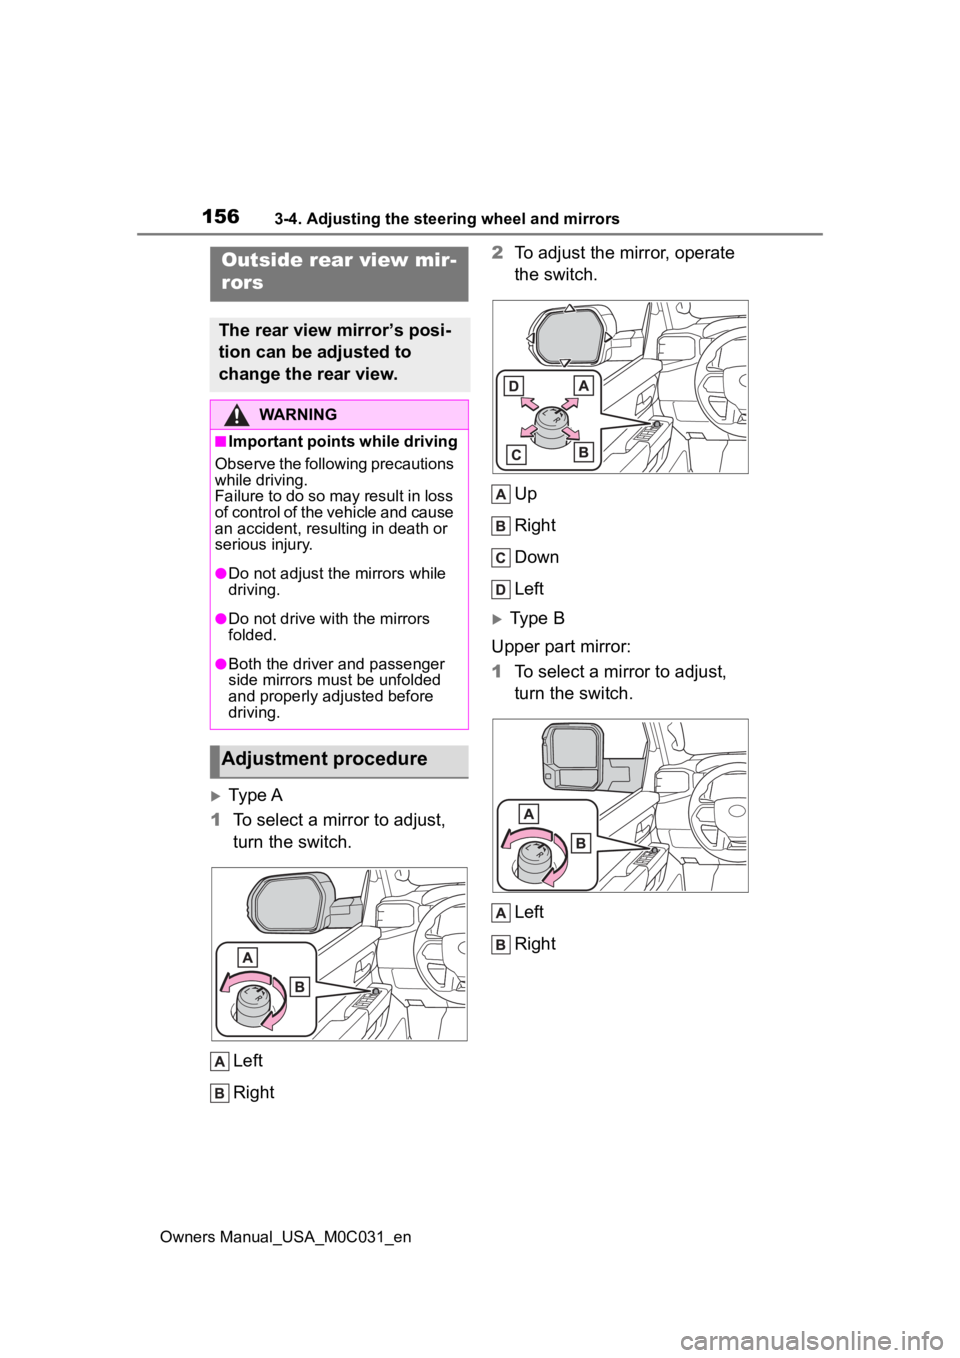
Ty p e A
1 To select a mirror to adjust,
turn the switch.
Left
Right 2
To adjust the mirror, operate
the switch.
Up
Right
Down
Left
Type B
Upper part mirror:
1 To select a mirror to adjust,
turn the switch.
Left
Right
Outside rear view mir-
rors
The rear view mirror’s posi-
tion can be adjusted to
change the rear view.
WARNING
■Important points while driving
Observe the following precautions
while driving.
Failure to do so may result in loss
of control of the vehicle and cause
an accident, resul ting in death or
serious injury.
●Do not adjust the mirrors while
driving.
●Do not drive with the mirrors
folded.
●Both the driver and passenger
side mirrors must be unfolded
and properly adjusted before
driving.
Adjustment procedure
Page 303 of 618
3034-5. Using the driving support systems
Owners Manual_USA_M0C031_en
4
Driving
• The area around both corners of the bumper will no t be displayed.
●The image adjustment procedure
for the parking assist monitor
screen is the same as the proce-
dure for adjusting the screen dis-
play. (Refer to the “MULTIMEDIA
OWNER’S MANUAL”.)
●The area displayed on the screen
may vary according to vehicle ori-
entation conditions.
●Objects which are close to either
corner of the bumper or under the
bumper cannot be displayed.
●The camera uses a special lens.
The distance of the image that
appears on the screen differs from
the actual distance.
●Items which are located higher
than the camera may not be dis-
played on the monitor.
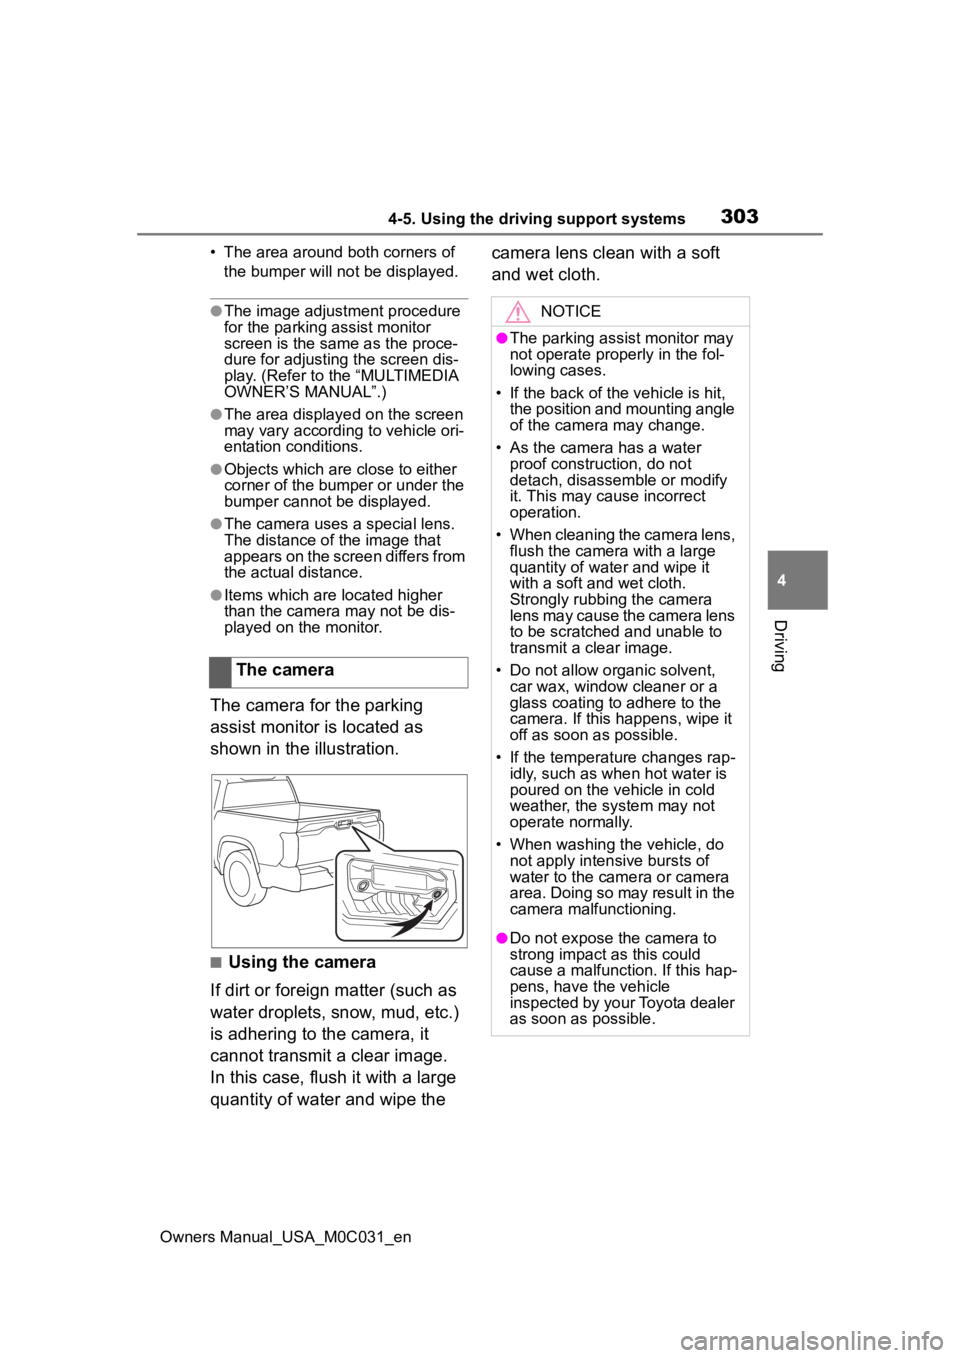
The camera for the parking
assist monitor is located as
shown in the illustration.
■Using the camera
If dirt or foreign matter (such as
water droplets, snow, mud, etc.)
is adhering to the camera, it
cannot transmit a clear image.
In this case, flush it with a large
quantity of water and wipe the camera lens clean with a soft
and wet cloth.
The camera
NOTICE
●The parking assist monitor may
not operate properly in the fol-
lowing cases.
• If the back of the vehicle is hit, the position and mounting angle
of the camera may change.
• As the camera has a water proof construction, do not
detach, disassemble or modify
it. This may cause incorrect
operation.
• When cleaning the camera lens, flush the camera with a large
quantity of water and wipe it
with a soft and wet cloth.
Strongly rubbing the camera
lens may cause the camera lens
to be scratched and unable to
transmit a clear image.
• Do not allow organic solvent, car wax, window cleaner or a
glass coating to adhere to the
camera. If this happens, wipe it
off as soon as possible.
• If the temperature changes rap- idly, such as when hot water is
poured on the vehicle in cold
weather, the system may not
operate normally.
• When washing the vehicle, do not apply intensive bursts of
water to the came ra or camera
area. Doing so may result in the
camera malfunctioning.
●Do not expose the camera to
strong impact as this could
cause a malfunction. If this hap-
pens, have the vehicle
inspected by your Toyota dealer
as soon as possible.