2022 TOYOTA TUNDRA HYBRID headlights
[x] Cancel search: headlightsPage 307 of 618

3074-5. Using the driving support systems
Owners Manual_USA_M0C031_en
4
Driving
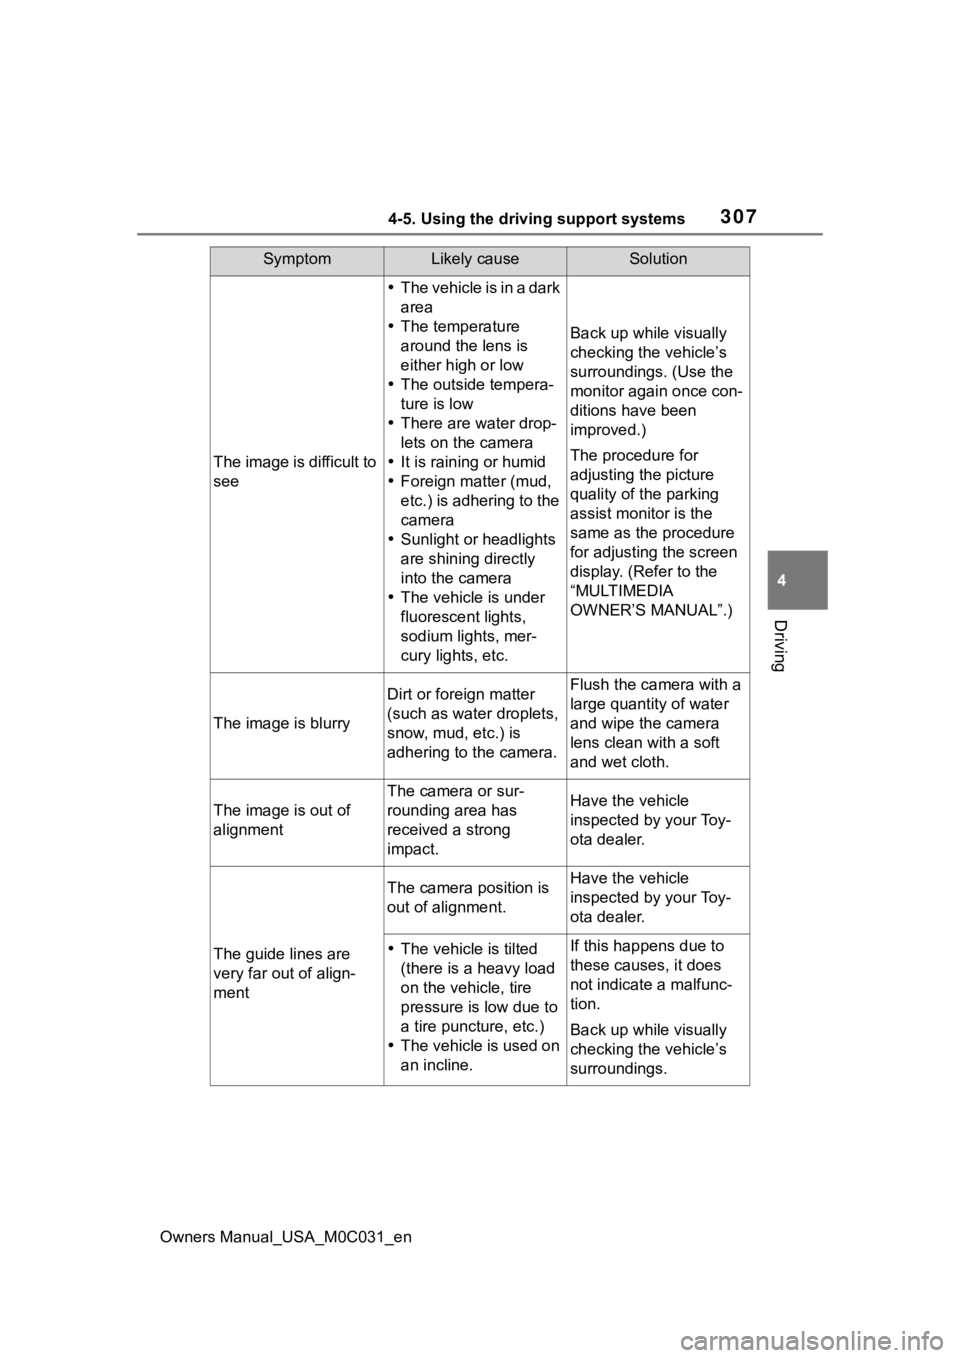
SymptomLikely causeSolution
The image is difficult to
see
The vehicle is in a dark
area
The temperature
around the lens is
either high or low
The outside tempera-
ture is low
There are water drop-
lets on the camera
It is raining or humid
Foreign matter (mud,
etc.) is adhering to the
camera
Sunlight or headlights
are shining directly
into the camera
The vehicle is under
fluorescent lights,
sodium lights, mer-
cury lights, etc.
Back up while visually
checking the vehicle’s
surroundings. (Use the
monitor again once con-
ditions have been
improved.)
The procedure for
adjusting the picture
quality of the parking
assist monitor is the
same as the procedure
for adjusting the screen
display. (Refer to the
“MULTIMEDIA
OWNER’S MANUAL”.)
The image is blurry
Dirt or foreign matter
(such as water droplets,
snow, mud, etc.) is
adhering to the camera.Flush the camera with a
large quantity of water
and wipe the camera
lens clean with a soft
and wet cloth.
The image is out of
alignment
The camera or sur-
rounding area has
received a strong
impact.Have the vehicle
inspected by your Toy-
ota dealer.
The guide lines are
very far out of align-
ment
The camera position is
out of alignment.Have the vehicle
inspected by your Toy-
ota dealer.
The vehicle is tilted
(there is a heavy load
on the vehicle, tire
pressure is low due to
a tire puncture, etc.)
The vehicle is used on
an incline.If this happens due to
these causes, it does
not indicate a malfunc-
tion.
Back up while visually
checking the vehicle’s
surroundings.
Page 341 of 618

3414-5. Using the driving support systems
Owners Manual_USA_M0C031_en
4
Driving
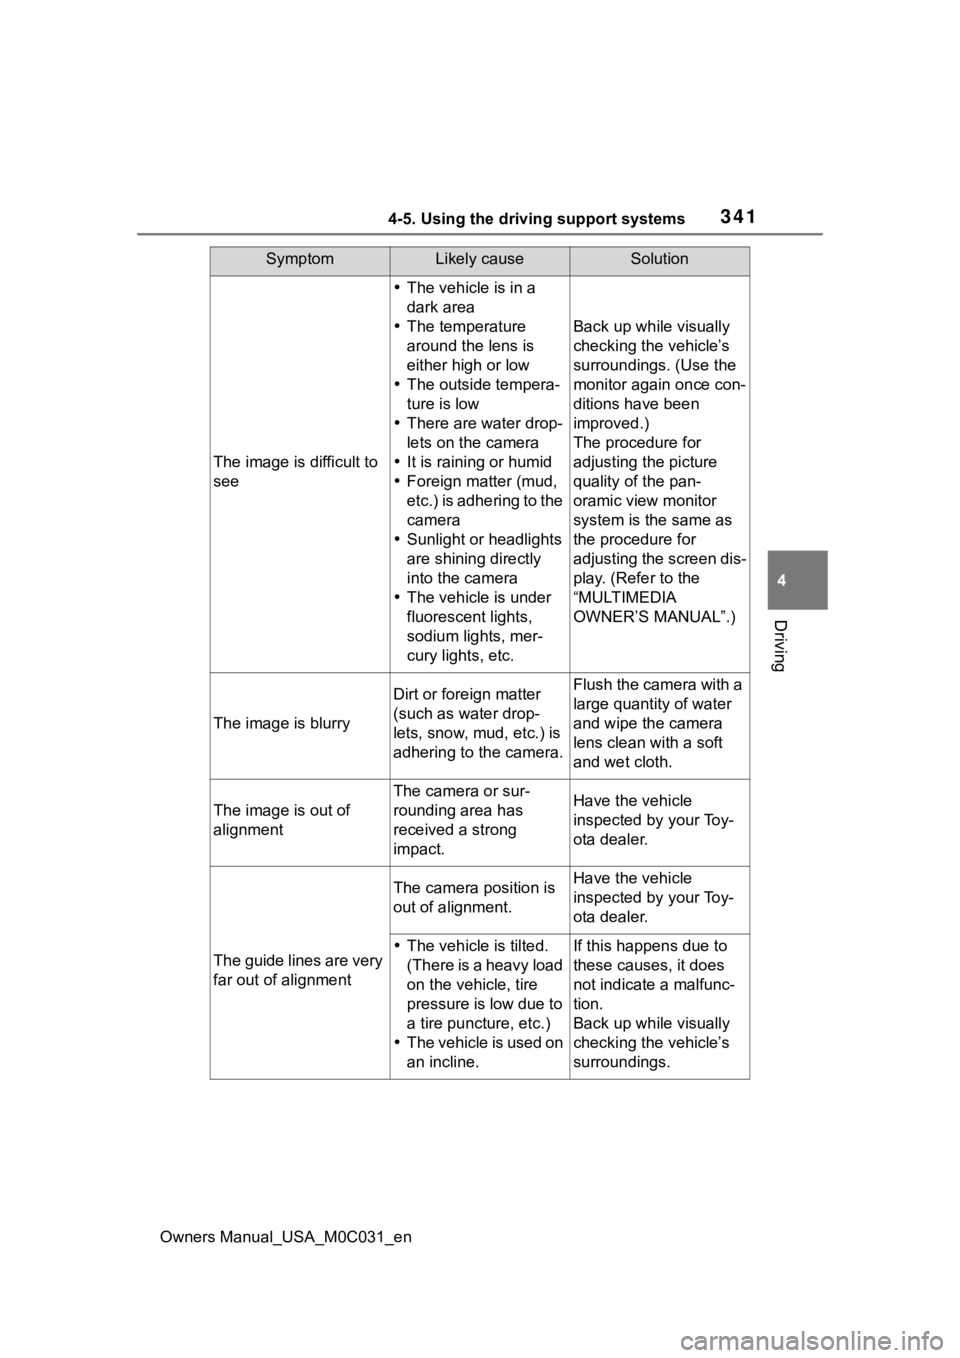
SymptomLikely causeSolution
The image is difficult to
see
The vehicle is in a
dark area
The temperature
around the lens is
either high or low
The outside tempera-
ture is low
There are water drop-
lets on the camera
It is raining or humid
Foreign matter (mud,
etc.) is adhering to the
camera
Sunlight or headlights
are shining directly
into the camera
The vehicle is under
fluorescent lights,
sodium lights, mer-
cury lights, etc.
Back up while visually
checking the vehicle’s
surroundings. (Use the
monitor again once con-
ditions have been
improved.)
The procedure for
adjusting the picture
quality of the pan-
oramic view monitor
system is the same as
the procedure for
adjusting the screen dis-
play. (Refer to the
“MULTIMEDIA
OWNER’S MANUAL”.)
The image is blurry
Dirt or fore ign matter
(such as water drop-
lets, snow, mud, etc.) is
adhering to the camera.Flush the camera with a
large quantity of water
and wipe the camera
lens clean with a soft
and wet cloth.
The image is out of
alignment
The camera or sur-
rounding area has
received a strong
impact.Have the vehicle
inspected by your Toy-
ota dealer.
The guide lines are very
far out of alignment
The camera position is
out of alignment.Have the vehicle
inspected by your Toy-
ota dealer.
The vehicle is tilted.
(There is a heavy load
on the vehicle, tire
pressure is low due to
a tire puncture, etc.)
The vehicle is used on
an incline.If this happens due to
these causes, it does
not indicate a malfunc-
tion.
Back up while visually
checking the vehicle’s
surroundings.
Page 488 of 618

4906-3. Do-it-yourself maintenance
Owners Manual_USA_M0C031_en
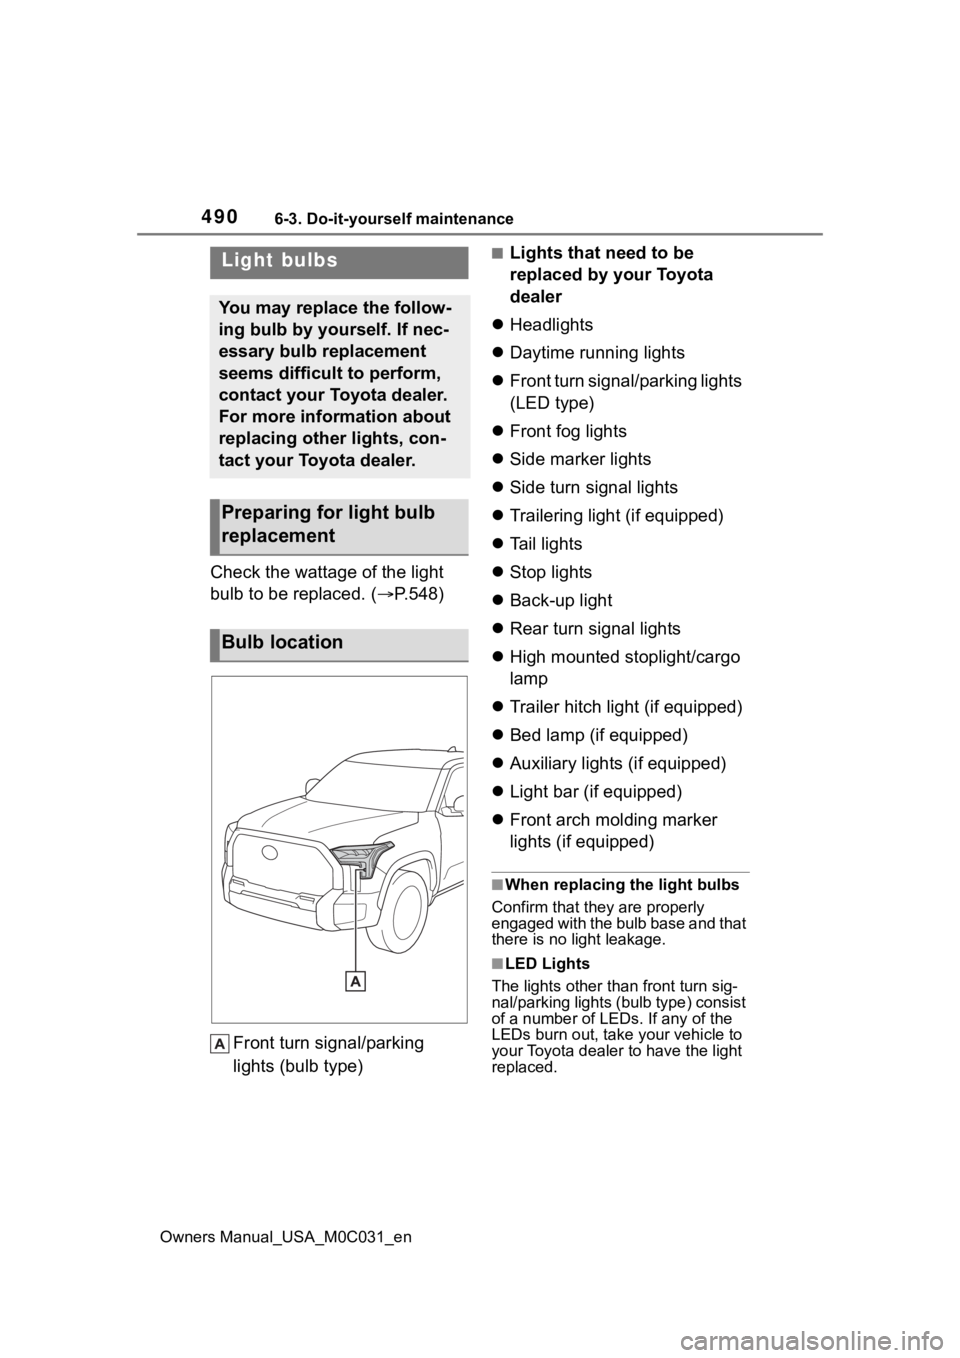
Check the wattage of the light
bulb to be replaced. ( P.548)
Front turn signal/parking
lights (bulb type)
■Lights that need to be
replaced by your Toyota
dealer
Headlights
Daytime running lights
Front turn signal/parking lights
(LED type)
Front fog lights
Side marker lights
Side turn signal lights
Trailering light (if equipped)
Tail lights
Stop lights
Back-up light
Rear turn signal lights
High mounted stoplight/cargo
lamp
Trailer hitch light (if equipped)
Bed lamp (if equipped)
Auxiliary lights (if equipped)
Light bar (if equipped)
Front arch molding marker
lights (if equipped)
■When replacing the light bulbs
Confirm that they are properly
engaged with the bulb base and that
there is no light leakage.
■LED Lights
The lights other than front turn sig-
nal/parking lights (b ulb type) consist
of a number of LEDs. If any of the
LEDs burn out, take your vehicle to
your Toyota dealer to have the light
replaced.
Light bulbs
You may replace the follow-
ing bulb by yourself. If nec-
essary bulb replacement
seems difficult to perform,
contact your Toyota dealer.
For more information about
replacing other lights, con-
tact your Toyota dealer.
Preparing for light bulb
replacement
Bulb location
Page 523 of 618
![TOYOTA TUNDRA HYBRID 2022 Owners Manual 5257-2. Steps to take in an emergency
Owners Manual_USA_M0C031_en
7
When trouble arises
approximately -31°F [-35°C]).
( P.195)
One of the following may be the
cause of the problem:
The 12-v TOYOTA TUNDRA HYBRID 2022 Owners Manual 5257-2. Steps to take in an emergency
Owners Manual_USA_M0C031_en
7
When trouble arises
approximately -31°F [-35°C]).
( P.195)
One of the following may be the
cause of the problem:
The 12-v](/manual-img/14/68801/w960_68801-522.png)
5257-2. Steps to take in an emergency
Owners Manual_USA_M0C031_en
7
When trouble arises
approximately -31°F [-35°C]).
( P.195)
One of the following may be the
cause of the problem:
The 12-volt battery may be
discharged. ( P.529)
The 12-volt battery terminal
connections may be loose or
corroded. ( P.463)
One of the following may be the
cause of the problem:
The 12-volt battery may be
discharged. ( P.529)
One or both of the 12-volt bat-
tery terminals may be discon-
nected. ( P.463)
Contact your Toyot a dealer if the
problem cannot be repaired, or if
repair procedures are unknown.
When the hybrid system does
not start, the following steps can
be used as an interim measure
to start the hybrid system if the
power switch is functioning nor- mally.
Do not use this starting proce-
dure except in case of emer-
gency.
1
Pull the parking brake switch
to check that the parking
brake is set. ( P.205)
Parking brake indicator will come
on.
2 Shift the shift lever to P.
3 Turn the power switch to
ACC.
4 Press and hold the power
switch for about 15 seconds
while depressing the brake
pedal firmly.
Even if the hybrid system can be
started using the above steps, the
system may be malfunctioning.
Have the vehicle inspected by your
Toyota dealer.
The interior lights and
headlights are dim, or the
horn does not sound or
sounds at a low volume.
The interior lights and
headlights do not turn on,
or the horn does not
sound.
Emergency start function
Page 529 of 618

5317-2. Steps to take in an emergency
Owners Manual_USA_M0C031_en
7
When trouble arises
Exclusive jump starting terminal (your vehicle)
Positive (+) battery terminal (second vehicle)
Negative (-) battery term inal (second vehicle)
Solid, stationary, unpainted metallic point away from the batte ry
and any moving parts as shown in the illustration
6 Start the engine of the sec-
ond vehicle. Increase the
engine speed slightly and
maintain at that level for
approximately 5 minutes to
recharge the 12-volt battery
of your vehicle.
7 Open and close any of the
doors of your vehicle with the
power switch OFF.
8 Maintain the engine speed of
the second vehicle and start
the hybrid system of your
vehicle by turning the power
switch to ON.
9 Once the vehicle’s hybrid
system has started, remove
the jumper cables in the
exact reverse order from
which they were connected.
10 When the engine cover
installing, reverse the step
removed.
11 Close the exclusive jump
starting terminal cover, and
reinstall the fuse box cover to
its original position.
Once the engine starts, have the
vehicle inspected at your Toyota
dealer as soon as possible.
■Starting the hybrid system
when the battery is discharged
The hybrid system cannot be started
by push-starting.
■To prevent 12-volt battery dis-
charge
●Turn off the headlights and the
audio system while the hybrid sys-
tem is off.
●Turn off any unnecessary electri-
cal components when the vehicle
is running at a low speed for an
extended period, such as in heavy
traffic.
■When the 12-volt battery is
removed or discharged
●Information stored in the ECU is
cleared. When the 12-volt battery
is depleted, have the vehicle
inspected at your Toyota dealer.
●Some systems may require initial-
ization. ( P.571)
■When removing the 12-volt bat-
tery terminals
When the 12-volt battery terminals
are removed, the information stored
in the ECU is cleared. Before
removing the 12-vo lt battery termi-
nals, contact you r Toyota dealer.
■Charging the 12-volt battery
The electricity stored in the 12-volt
battery will discha rge gradually even
when the vehicle i s not in use, due
to natural dischar ge and the drain-
ing effects of certain electrical appli-
ances. If the vehicle is left for a long
time, the 12-volt battery may dis-
charge, and the hybrid system may
be unable to start. (The 12-volt bat-
Page 543 of 618

5458-1. Specifications
Owners Manual_USA_M0C031_en
8
Vehicle specifications
*: The fluid capacity is a reference quantity. If replacement is necessary, contact your Toyota dealer.
Your Toyota vehicle is filled with “Toyota Genuine ATF WS” at the
factory.
Use Toyota approved “Toyota Genuine ATF WS” or an equivalent of
matching quality to satisfy the above specification. Please contact
your Toyota dealer for further details.
NOTICE
■Iridium-tipped spark plugs
Use only iridium-tipped spark plugs. Do not adjust the spark pl ug gap.
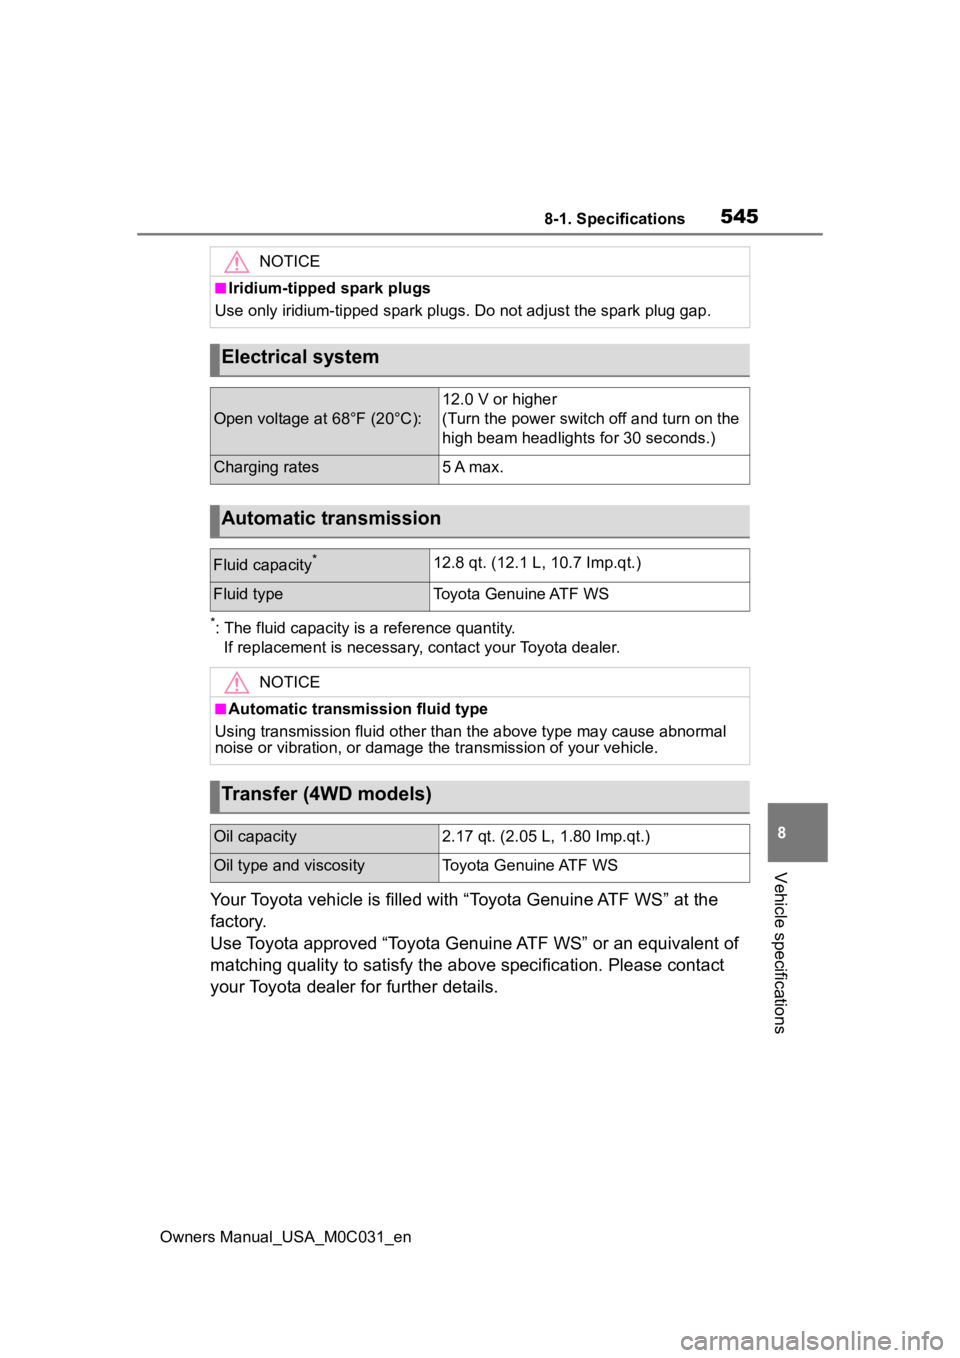
Electrical system
Open voltage at 68°F (20°C):
12.0 V or higher
(Turn the power switch off and turn on the
high beam headlights for 30 seconds.)
Charging rates5 A max.
Automatic transmission
Fluid capacity*12.8 qt. (12.1 L, 10.7 Imp.qt.)
Fluid typeToyota Genuine ATF WS
NOTICE
■Automatic transm ission fluid type
Using transmission fluid other than the above type may cause ab normal
noise or vibration, or damage th e transmission of your vehicle.
Transfer (4WD models)
Oil capacity2.17 qt. (2.05 L, 1.80 Imp.qt.)
Oil type and viscosityToyota Genuine ATF WS
Page 598 of 618

600Alphabetical Index
Owners Manual_USA_M0C031_en
H
Head restraints ....................... 140
Head-up display ..................... 102 Driving support system display area .................................... 104
HUD (Head-up display) switch ........................................... 103
Hybrid System Indicator ....... 105
Navigation system-linked dis- play area ............................ 104
Outside temperature ............ 102
Pop-up display ..................... 104
Settings ................................ 103
Headlights Automatic High Beam system........................................... 214
Light switch .......................... 211
Replacing light bulbs ............ 490
Heated steering wheel ........... 407
Heaters Automatic air conditioning sys-tem ..................................... 400
Heated steering wheel ......... 407
Outside rear view mirrors ..... 401
Seat heaters ......................... 407
High mounted stoplight Replacing light bulbs ............ 490
High-voltage components ....... 76
Hill-start assist control .......... 375
Hood ........................................ 456 Open .................................... 456
Hooks Coat hooks ........................... 426
Retaining hooks (floor mat) .... 26
Horn ......................................... 144
HUD (Head-up display) switch ............................................... 103
Hybrid battery (tr action battery)
Location.................................. 76
Warning message .................. 79 Hybrid battery (traction battery)
air intake vents .......................79Cleaning ...............................481
Hybrid Electric Vehicle driving tips .........................................390
Hybrid Power Meter ..................94
Hybrid system .... .......................73
Acoustic vehicle alerting system .............................................75
Emergency shut off system ....79
High voltage components .......76
Hybrid system precautions .....76
If the hybrid sys tem will not start
...........................................524
Power (ignition) switch .........195
Regenerative braking .............74
Starting the hybrid system ....195
Warning lights .......................502
Hybrid System Indicator ..97, 105
I
Identification Vehicle ..................................541
Ignition switch (power switch) ...............................................195Auto power off fun ction .........198
Changing the power switch modes.................................198
If your vehicle has to be stopped in an emergency .................494
Starting the hybrid system ....195
Immobilizer system ..................81
Indicators ..................................89
Initialization Items to initialize ...................571
Parking Support Brake .........292
Power windows ....................160
Tire pressure w arning system
...........................................470
Inside rear view m irror ...........145