2022 TOYOTA TUNDRA HYBRID lock
[x] Cancel search: lockPage 206 of 618

2064-2. Driving procedures
Owners Manual_USA_M0C031_enswitch if an emergency occurs and
it is necessary to operate the park-
ing brake while driving.
2
Push the switch to release
the parking brake.
• Operate the parking brake switch
while depressing the brake pedal
or the accelerator pedal. When
using this function, slowly
depress the accelerator pedal.
• Parking brake automatic release function ( P.207)
Make sure that t he parking brake
indicator light turn off.
If the parking brake indicator
light flashes, operate the switch
again. ( P.506)
■Turning the automatic
mode on
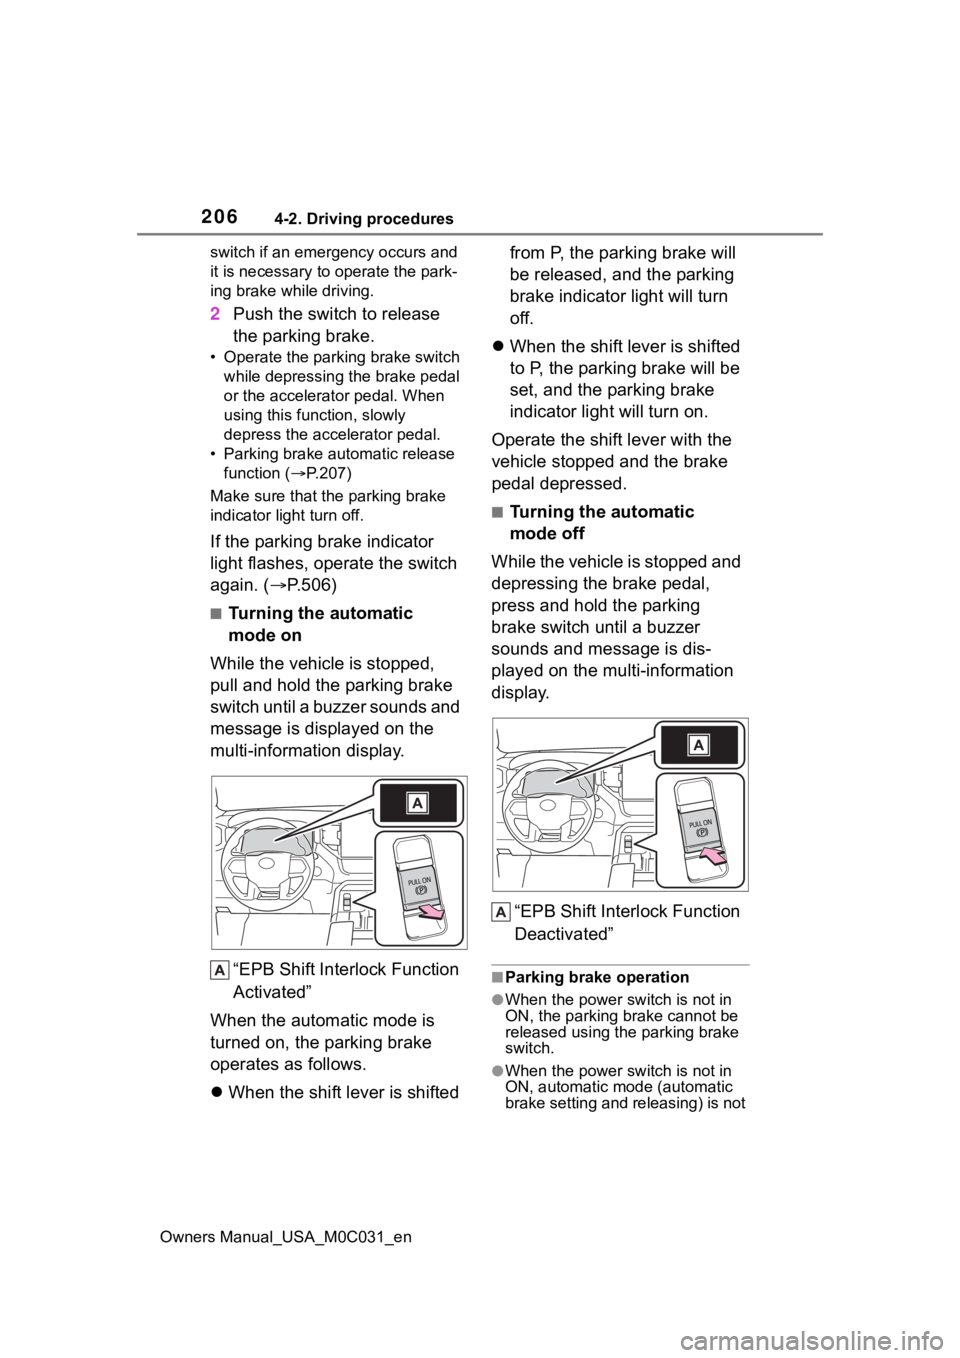
While the vehicle is stopped,
pull and hold the parking brake
switch until a buzzer sounds and
message is displayed on the
multi-information display.
“EPB Shift Inte rlock Function
Activated”
When the automatic mode is
turned on, the parking brake
operates as follows.
When the shift lever is shifted from P, the parking brake will
be released, and the parking
brake indicator light will turn
off.
When the shift lever is shifted
to P, the parking brake will be
set, and the parking brake
indicator light will turn on.
Operate the shift lever with the
vehicle stopped and the brake
pedal depressed.
■Turning the automatic
mode off
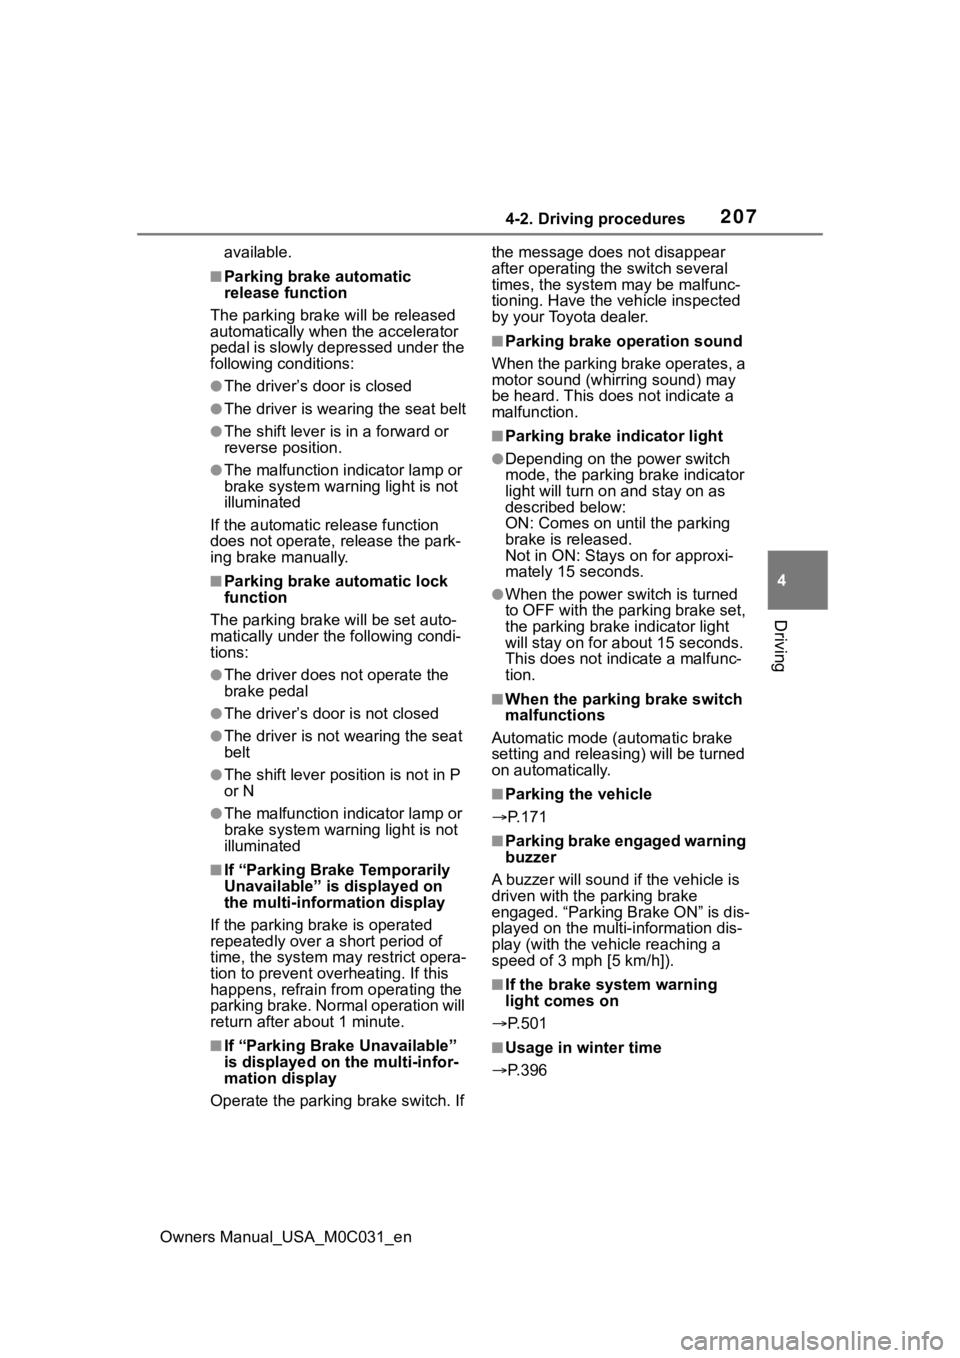
While the vehicle is stopped and
depressing the brake pedal,
press and hold the parking
brake switch until a buzzer
sounds and message is dis-
played on the multi-information
display.
“EPB Shift Interlock Function
Deactivated”
■Parking brake operation
●When the power switch is not in
ON, the parking brake cannot be
released using the parking brake
switch.
●When the power switch is not in
ON, automatic mode (automatic
brake setting and releasing) is not
Page 207 of 618

2074-2. Driving procedures
Owners Manual_USA_M0C031_en
4
Driving
available.
■Parking brake automatic
release function
The parking brake will be released
automatically when the accelerator
pedal is slowly depressed under the
following conditions:
●The driver’s door is closed
●The driver is wearing the seat belt
●The shift lever is in a forward or
reverse position.
●The malfunction in dicator lamp or
brake system warning light is not
illuminated
If the automatic release function
does not operate, release the park-
ing brake manually.
■Parking brake automatic lock
function
The parking brake will be set auto-
matically under the following condi-
tions:
●The driver does not operate the
brake pedal
●The driver’s doo r is not closed
●The driver is not wearing the seat
belt
●The shift lever position is not in P
or N
●The malfunction in dicator lamp or
brake system warning light is not
illuminated
■If “Parking Brake Temporarily
Unavailable” i s displayed on
the multi-information display
If the parking brake is operated
repeatedly over a short period of
time, the system may restrict opera-
tion to prevent overheating. If this
happens, refrain from operating the
parking brake. Nor mal operation will
return after about 1 minute.
■If “Parking Brake Unavailable”
is displayed on the multi-infor-
mation display
Operate the parking brake switch. If the message does not disappear
after operating the switch several
times, the system may be malfunc-
tioning. Have the vehicle inspected
by your Toyota dealer.
■Parking brake operation sound
When the parking brake operates, a
motor sound (whirr ing sound) may
be heard. This does not indicate a
malfunction.
■Parking brake indicator light
●Depending on the power switch
mode, the parking brake indicator
light will turn on and stay on as
described below:
ON: Comes on until the parking
brake is released.
Not in ON: Stays on for approxi-
mately 15 seconds.
●When the power switch is turned
to OFF with the parking brake set,
the parking brake indicator light
will stay on for abo ut 15 seconds.
This does not indicate a malfunc-
tion.
■When the parking brake switch
malfunctions
Automatic mode (automatic brake
setting and releas ing) will be turned
on automatically.
■Parking the vehicle
P.171
■Parking brake engaged warning
buzzer
A buzzer will sound if the vehicle is
driven with the parking brake
engaged. “Parking Brake ON” is dis-
played on the multi-information dis-
play (with the vehicle reaching a
speed of 3 mph [5 km/h]).
■If the brake system warning
light comes on
P.501
■Usage in winter time
P.396
Page 211 of 618

2114-3. Operating the lights and wipers
Owners Manual_USA_M0C031_en
4
Driving
4-3.Operating the lights and wipers
Operating the switch turns
on the lights as follows: U.S.A.
Canada
1 The side marker, park-
ing, tail, license plate, instru-
ment panel lights, and
daytime running lights
( P.211) turn on.
2 The headlights and all
lights listed above (except
daytime running lights) turn
on.
3 The headlights, day- time running lights (
P.211)
and all the lights listed above
turn on and off automatically.
4 (if equipped) Off
■AUTO mode can be used when
The power switch is in ON.
■Daytime running light system
●On some models: The daytime
running lights illu minate using the
same lights as the headlights but
at a lower intensity.
●To make your vehicle more visible
to other drivers during daytime
driving, the daytime running lights
turn on automatically when all of
the following conditions are met.
(The daytime running lights are
not designed for use at night.)
• The hybrid system is started
• The parking brake is released
• The headlight switch is in the
or
* position
*: When the surroundings are bright
●The daytime running lights remain
on after they illuminate, even if the
parking brake is set again.
●For the U.S.A.: Daytime running
lights can be turned off by operat-
ing the switch.
■Headlight control sensor
The sensor may not function prop-
erly if an object is placed on the sen-
sor, or anything that blocks the
sensor is affixed to the windshield.
Doing so interferes with the sensor
detecting the level of ambient light
Headlight switch
The headlights can be oper-
ated manually or automati-
cally.
Operating instructions
Page 212 of 618

2124-3. Operating the lights and wipers
Owners Manual_USA_M0C031_enand may cause the automatic head-
light system to malfunction.
■Automatic light off system
●When the headlights are on: The
headlights and tail
lights turn off
30 seconds after the driver’s door
is opened and clos ed if the power
switch is turned to ACC or off.
(The lights turn off immediately if
on the key is pressed after all
the doors are closed.)
●When only the tail lights are on:
The tail lights tu rn off automati-
cally if the power switch is turned
to ACC or OFF and the driver’s
door is opened.
To turn the lights on again, turn the
power switch to ON, or turn the light
switch off once and then back to or .
■Light reminder buzzer
A buzzer sounds when the power
switch is turned to ACC or OFF and
the driver’s door is opened while the
lights are turned on.
■When unlock the doors (wel-
come lamp) (If equipped)
When the doors are unlocked using
the entry function or wireless remote
control, the front parking lights and
tail lights turn o n automatically.
When the light switch is in the AUTO
position and the surrounding area is
dark, this function will operate.
■Automatic headlight leveling
system (if equipped)
The level of the headlights is auto-
matically adjusted according to the
number of passengers and the load-
ing condition of the vehicle to
ensure that the headlights do not
interfere with other road users.
■Windshield wiper linked head-
light illumination
When driving during daytime with
the headlight swit ch turned to , if the windshield wipers are
used, the headlights will turn on
automatically after several seconds
to help enhance the visibility of your
vehicle.
■12-volt battery-saving function
In order to prevent the 12-volt bat-
tery of the vehicle from discharging,
if the headlights and/or tail lights are
on when the power switch is turned
to OFF the 12-volt battery-saving
function will operate and automati-
cally turn off all the lights after
approximately 20 minutes. When
the power switch is turned to ON,
the 12-volt battery-saving function
will be disabled.
When any of the following are per-
formed, the 12-volt battery-saving
function is canceled once and then
reactivated. All the lights will turn off
automatically 20 minutes after the
12-volt battery-saving function has
been reactivated:
●When the headlight switch is oper-
ated
●When a door is opened or closed
■Customization
Some functions can be customized.
( P.561)
NOTICE
■To prevent 12-volt battery dis-
charge
Do not leave the lights on longer
than necessary when the hybrid
system is not operating.
Page 221 of 618

2214-3. Operating the lights and wipers
Owners Manual_USA_M0C031_en
4
Driving
mode while the powe r switch is in
ON, the wipers will operate once
to show that AUTO mode is acti-
vated.
●If the temperature of the raindrop
sensor is 185°F (85°C) or higher,
or 5°F (-15°C) or lower, automatic
operation may not occur. In this
case, operate the wipers in any
mode other than AUTO mode.
■If no windshield washer fluid
sprays
Check that the wash er nozzles are
not blocked if there is washer fluid in
the windshield washer fluid reser-
v oi r.
WARNING
■Caution regarding the use of
windshield wipers in AUTO
mode (vehicles with rain-
sensing windshield wipers)
The windshield wipers may oper-
ate unexpectedly if the sensor is
touched or the windshield is sub-
ject to vibration in AUTO mode.
Take care that your fingers or any-
thing else do not become caught
in the windshield wipers.
■Caution regarding the use of
washer fluid
When it is cold, do not use the
washer fluid until the windshield
becomes warm. The fluid may
freeze on the windshield and
cause low visibility. This may lead
to an accident, resulting in death
or serious injury.
NOTICE
■When there is no washer fluid
spray from the nozzle
Damage to the washer fluid pump
may be caused if the lever is
pulled toward you and held con-
tinually.
■When a nozzle becomes
blocked
In this case, contact your Toyota
dealer.
Do not try to clear it with a pin or
other object. The nozzle will be
damaged.
■To prevent 12-volt battery dis-
charge
Do not leave the wipers on longer
than necessary when the hybrid
system is off.
Page 223 of 618

2234-4. Refueling
Owners Manual_USA_M0C031_en
4
Driving
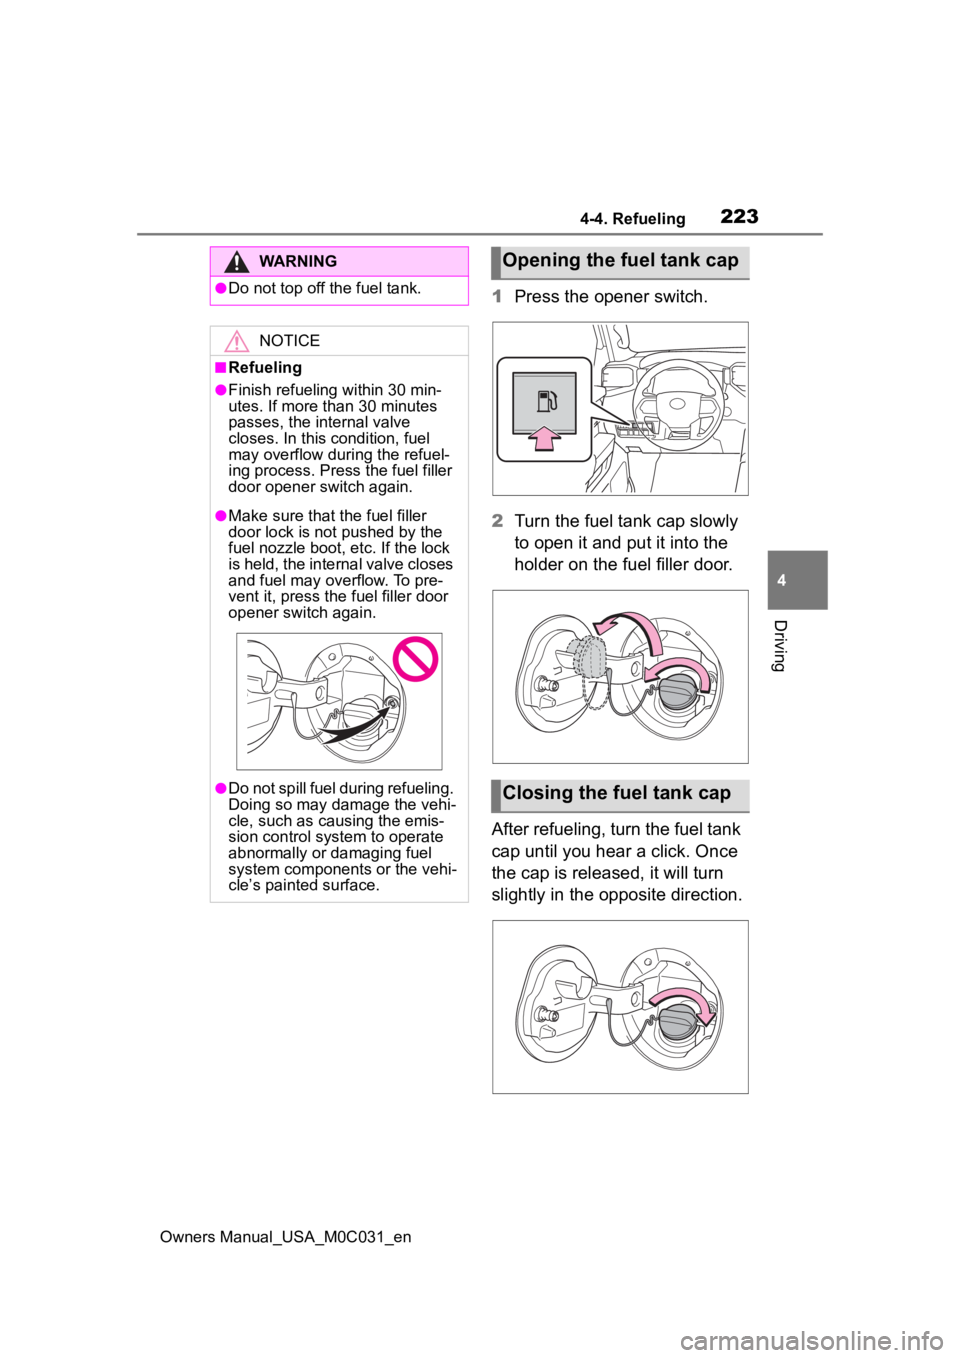
1 Press the opener switch.
2 Turn the fuel tank cap slowly
to open it and put it into the
holder on the fuel filler door.
After refueling, turn the fuel tank
cap until you hear a click. Once
the cap is released, it will turn
slightly in the opposite direction.
WARNING
●Do not top off the fuel tank.
NOTICE
■Refueling
●Finish refueling within 30 min-
utes. If more than 30 minutes
passes, the internal valve
closes. In this condition, fuel
may overflow during the refuel-
ing process. Press the fuel filler
door opener switch again.
●Make sure that the fuel filler
door lock is not pushed by the
fuel nozzle boot, etc. If the lock
is held, the internal valve closes
and fuel may overflow. To pre-
vent it, press the fuel filler door
opener switch again.
●Do not spill fuel during refueling.
Doing so may damage the vehi-
cle, such as causing the emis-
sion control system to operate
abnormally or damaging fuel
system components or the vehi-
cle’s painted surface.
Opening the fuel tank cap
Closing the fuel tank cap
Page 240 of 618

2404-5. Using the driving support systems
Owners Manual_USA_M0C031_en• If a vehicle ahead is carrying a
load which protrudes past its rear
bumper
• If a vehicle ahead is irregularly shaped, such as a tractor or side
car
• If a vehicle ahead is a child sized bicycle, a bicycle that is carrying a
large load, a bicycle ridden by
more than one person, or a
uniquely shaped bicycle (bicycle
with a child seat, tandem bicycle,
etc.)
• If a pedestrian/or t he riding height
of a bicyclist ahead is shorter than
approximately 3.2 ft. (1 m) or taller
than approximately 6.5 ft. (2 m)
• If a pedestrian/bicyclist is wearing
oversized clothing (a rain coat,
long skirt, etc.), making their sil-
houette obscure
• If a pedestrian is bending forward or squatting or bicyclist is bending
forward
• If a pedestrian/bicyclist is moving fast
• If a pedestrian is pushing a
stroller, wheelchair, bicycle or
other vehicle
• When driving in inclement weather
such as heavy rain, fog, snow or a
sandstorm
• When driving through steam or
smoke
• When the surrounding area is dim, such as at dawn or dusk, or while
at night or in a t unnel, making a
detectable object appear to be
nearly the same color as its sur-
roundings
• When driving in a place where the surrounding brightness changes
suddenly, such as at the entrance
or exit of a tunnel
• After the hybrid system has started the vehicle has not been
driven for a certa
in amount of time
• While making a left/right turn and
for a few seconds after making a
left/right turn
• While driving on a curve and for a
few seconds afte r driving on a
curve
• If your vehicle is skidding
• If the front of the v ehicle is raised
or lowered
• If the wheels are misaligned
• If a wiper blade is blocking the front camera
• The vehicle is being driven at extremely high speeds
• When driving on a hill
• If the radar sensor or front camera
is misaligned
• When driving in a traffic lane sep-
arated by more than one lane
where oncoming vehicles are driv-
ing while making a right/left turn
• When largely out of place with the opposite facing targeted oncom-
ing vehicle during a right/left turn
• While making a right/left turn,
when a pedestrian approaches
from behind or side of your vehicle
Page 264 of 618

2644-5. Using the driving support systems
Owners Manual_USA_M0C031_en
and press the “-SET” switch
to set the speed.
Cruise control “SET” indicator will
come on.
The vehicle speed at the moment
the switch is released becomes the
set speed.
Adjusting the speed setting:
P. 2 6 0
Canceling and resuming the speed
setting: P. 2 6 3
■Dynamic radar cruise control
with full-speed range can be set
when
●The shift lever is in D.
●The desired set speed can be set
when the vehicle speed is approx-
imately 20 mph (30 km/h) or more.
(However, when the vehicle speed
is set while driving at below
approximately 20 mph [30 km/h],
the set speed will be set to
approximately 20 mph [30 km/h].)
■Accelerating after setting the
vehicle speed
The vehicle can accelerate by oper-
ating the accelerator pedal. After
accelerating, the set speed
resumes. However, during vehicle-
to-vehicle distance control mode,
the vehicle spee d may decrease
below the set speed in order to
maintain the distance to the preced-
ing vehicle.
■When the vehicle stops while
follow-up cruising
●Pressing the “+RES” switch while
the vehicle ahead stops will
resume follow-up cruising if the
vehicle ahead starts off within
approximately 3 seconds after the
switch is pressed.
●If the vehicle ahead starts off
within 3 seconds after your vehicle
stops, follow-up c ruising will be
resumed.
■Automatic cancelation of vehi-
cle-to-vehicle d istance control
mode
Vehicle-to-vehicle distance control
mode is automatically canceled in
the following situations.
●VSC is activated.
●TRAC is activated for a period of
time.
●When the VSC or TRAC system is
turned off.
●The sensor cannot detect cor-
rectly because i t is covered in
some way.
●When the brake control or output
restriction control of a driving sup-
port system operates. (For exam-
ple: Pre-Collision System, Drive-
Start Control)
●The center differe ntial lock/unlock
is not completed within 5 seconds
while the cruise control system is
on.
●The parking brake is operated.
●The vehicle is stopped by system
control on a steep incline.
●The following are detected when
the vehicle has been stopped by
system control:
• The driver is not wearing a seat belt.
• The driver’s door is opened.
• The vehicle has been stopped for
about 3 minutes.
If vehicle-to-vehicle distance control
mode is automatically canceled for