2022 TOYOTA RAV4 HYBRID change time
[x] Cancel search: change timePage 8 of 752

8
Please note that this manual
applies to all models and
explains all equipment, including
options. Therefore, you may find
explanations for equipment not
installed on your vehicle and the
illustrations used may differ from
your vehicle.
All specifications provided in this
manual are current at the time of
printing. Over time, your vehicle
may receive updates that modify
the vehicle and make material in
this manual incomplete and/or
inaccurate. Because of Toyota’s
interest in continual product
improvement, Toyota reserves
the right to make changes to this
manual at any time without
notice.
If Toyota chooses to update the
manual, updated versions can
be viewed by selecting your
vehicle by model and year at the
following URL or on your mobile
device if you have access to the
Toyota app.
www.toyota.com/owners
Approximately five hours after
the hybrid system is turned off, you may hear sound coming
from under the vehicle for sev-
eral minutes. This is the sound
of a fuel evaporation leakage
check and, it does not indicate a
malfunction.
A wide variety of non-genuine
spare parts and accessories for
Toyota vehicles are currently
available in the market. You
should know that Toyota does
not warrant these products and
is not responsible for their per-
formance, repair, or replace-
ment, or for any damage they
may cause to, or adverse effect
they may have on, your Toyota
vehicle.
This vehicle should not be modi-
fied with non-genuine Toyota
products. Modification with non-
genuine Toyota products could
affect its performance, safety or
durability, and may even violate
governmental regulations. In
addition, damage or perfor-
mance problems resulting from
the modification may not be cov-
ered under warranty.
Also, remodeling like this will
have an effect on advanced
safety equipment such as
Toyota Safety Sense 2.0 and
there is a danger that it will not
For your information
Main Owner’s Manual
Noise from under vehicle
after turning off the hybrid
system
Accessories, spare parts
and modification of your
Toyota
Page 73 of 752

731-4. Hybrid system
1
For safety and security
*: When the hybrid battery (traction battery) requires charging or the
engine is warming up, etc., the
gasoline engine will not automati-
cally stop. ( P.73)
■During normal driving
The gasoline engine is predomi-
nantly used. The electric motor
(traction motor) charges the
hybrid battery (traction battery)
as necessary.
■When accelerating sharply
When the accelerator pedal is
depressed heavily, the power of
the hybrid battery (traction bat-
tery) is added to that of the gas-
oline engine via the electric
motor (traction motor).
■When braking (regenera-
tive braking)
The wheels operate the electric
motor (traction motor) as a
power generator, and the hybrid
battery (traction battery) is
charged.
■Regenerative braking
In the following si tuations, kinetic
energy is converted to electric
energy and deceleration force can
be obtained in conjunction with the
recharging of the hybrid battery
(traction battery).
●The accelerator pedal is released
while driving with the shift lever in
D or S.
●The brake pedal is depressed
while driving with the shift lever in
D or S.
■EV indicator
The EV indicator comes on when the vehicle is driven using only the
electric motor (traction motor) or the
gasoline engine is stopped.
The on/off operation of the EV indi-
cator can be changed. (
P.107)
■Conditions in which the gaso-
line engine may not stop
The gasoline engine starts and
stops automatically. However, it
may not stop automatically in the
following conditions
*:
●During gasoline engine warm-up
●During hybrid battery (traction bat-
tery) charging
●When the temperature of the
hybrid battery (traction battery) is
high or low
●When the heater is switched on
*: Depending on the circumstances, the gasoline engine may also not
stop automatically in other situa-
tions.
■Charging the hybrid battery
(traction battery)
As the gasoline engine charges the
hybrid battery (trac tion battery), the
battery does not need to be charged
from an outside source. However, if
the vehicle is left parked for a long
time the hybrid battery (traction bat-
tery) will slowly dis charge. For this
reason, be sure to drive the vehicle
at least once every few months for
at least 30 minutes or 10 miles (16
km). If the hybrid battery (traction
battery) becomes fully discharged
and you are unabl e to start the
hybrid system, contact your Toyota
dealer.
Page 102 of 752

1022-1. Instrument cluster
■The multi-information display is
displayed when
The power swit ch is in ON.
■When changing driving mode
Background color of the multi-infor-
mation display is changed following
the selected drivi ng mode or when
Trail Mode is turned on. ( P.358,
359)
■Liquid crystal display
Small spots or light spots may
appear on the display. This phe-
nomenon is character istic of liquid
crystal displays, and there is no
problem continuing to use the dis-
play.
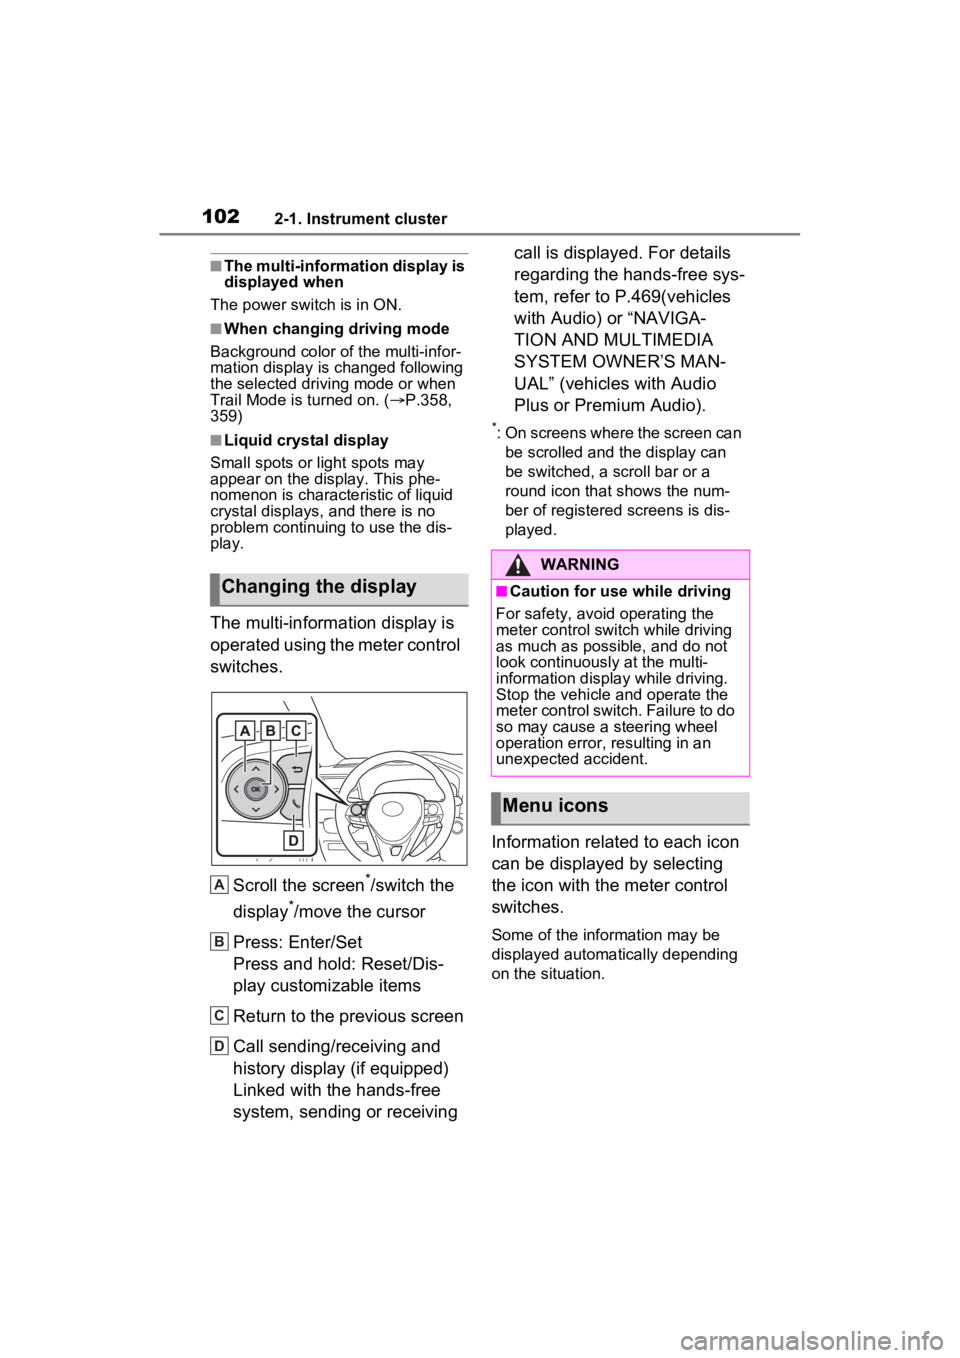
The multi-information display is
operated using the meter control
switches.
Scroll the screen
*/switch the
display
*/move the cursor
Press: Enter/Set
Press and hold: Reset/Dis-
play customizable items
Return to the previous screen
Call sending/receiving and
history display (if equipped)
Linked with the hands-free
system, sending or receiving call is displayed. For details
regarding the hands-free sys-
tem, refer to P.469(vehicles
with Audio) or “NAVIGA-
TION AND MULTIMEDIA
SYSTEM OWNER’S MAN-
UAL” (vehicles with Audio
Plus or Premium Audio).
*: On screens where the screen can
be scrolled and the display can
be switched, a scroll bar or a
round icon that shows the num-
ber of registered screens is dis-
played.
Information related to each icon
can be displayed by selecting
the icon with the meter control
switches.
Some of the information may be
displayed automatically depending
on the situation.
Changing the display
A
B
C
D
�:�$�5�1�,�1�*
■Caution for use while driving
For safety, avoid operating the
meter control switch while driving
as much as possible, and do not
look continuously at the multi-
information display while driving.
Stop the vehicle and operate the
meter control switch. Failure to do
so may cause a steering wheel
operation error, resulting in an
unexpected accident.
Menu icons
Page 104 of 752

1042-1. Instrument cluster
range for using the accelerator
pedal according to driving condi-
tions, and a score result that
evaluates the current driving
status.ECO Accelerator Guidance
“Eco Score”
ECO Accelerator GuidanceECO area
Shows that the vehicle is being
driven in an Eco-friendly manner.
Power area
Shows that an Eco-friendly driving
range is being exceeded (during full
power driving etc.).
Current acceleration
Reference operation range
A zone is display ed in blue under
the Eco area which can be used as
a reference operation range for
using the accelerator pedal accord- ing to driving conditions such as
starting off and cruising.
The ECO Accelerator Guidance
display changes according to the
driving status, such as when start-
ing off or cruising.
It is easier to drive in an Eco-
friendly manner by driving accord-
ing to the display showing the
accelerator pedal operations and
staying within the reference opera-
tion range.
“Eco Score”
The driving status for the follow-
ing 3 situations are evaluated in
5 levels: Smooth start-off accel-
eration (“Start”), driving without
sudden acceleration (“Cruise”)
and smooth stopping (“Stop”).
Each time the vehicle is
stopped, a score result is dis-
played out of a perfect score of
100 points.
Score result
“Start”
“Cruise”
“Stop”
How to read the bar display:
A
B
A
B
C
D
A
B
C
D
Page 106 of 752

1062-1. Instrument cluster
■Navigation system-linked
display (if equipped)
Select to display the following
navigation system-linked infor-
mation.
Route guidance
Compass display
Select to enable selection of an
audio source or track on the dis-
play.
■Drive information
2 items that are selected using
the “Drive Info Items” setting
(average speed, distance and
total time) can be displayed ver-
tically.
The displayed information
changes according to the “Drive
Info Type” setting (since the sys-
tem was started or between
resets). ( P.107)
Use the displayed information as a
reference only.
Following items will be displayed.
“Trip”
• “Average Speed”: Displays the
average vehicl e speed since
hybrid system start
*
• “Distance”: Displ ays the distance
driven since hybrid system start
*
• “Total Time”: Displays the elapsed time since hybrid system
start
*
*
: These items are r eset each time
the hybrid system stops.
“Total”
• “Average Speed”: Displays the
average vehicle speed since the
display was reset
*
• “Distance”: Displ ays the distance
driven since the display was
reset
*
• “Total Time”: Displays the elapsed time since the display
was reset
*
*
: To reset, display the desired item and press and hold .
■Energy monitor
P.111
■AWD system display
Torque distribution display
Displays the drive status of each
wheel in 6 steps from 0 to 5.
G-force display*
Displays the size a nd direction of
the G-force applied to the vehicle
via changes to the position of the
ball on the display.
Audio system-linked dis-
play (if equipped)
Vehicle information dis-
play
A
B
Page 107 of 752

1072-1. Instrument cluster
2
Vehicle status information and indicators
Maximum G-force course*
This item is linked with the G-force
display and the course of the past
movement of the ball is displayed.
Press and hold to reset the
record.
Wheel spin display
When a tire is spin ning, its icon on
the display change s its color and
blinks.
*: This item is displayed only when driving mode is set to sport mode.
Vehicle settings and the content
displayed on the screen can be
changed by using the meter
control switches.
■Setting procedure
1 Operate or of the
meter control switches and
select .
2 Operate or of the
meter control switches and
select the desired item.
• If the function is turned on and off or the volume, etc. is
changed on the setting
screen, the setting is changed
each time is pressed.
• For functions that allow oper- ation contents, display con-
tents, etc., of function to be
selected, the setting screen is
displayed by pressing and
holding . When the setting
screen is displayed, select the setting or desired value (time,
etc.) with .
3 After changing the settings,
press of the meter control
switches.
■ LTA (Lane Tracing
Assist) ( P.252)
Select to set up the following
items.
“Lane Center”
Select to enable /disable the lane
centering function.
“Steering Assist”
Select to enable/d isable steering
wheel assistance.
“Sensitivity”
Select to set the lane departure
alert sensitivity.
“Sway Warning”
Select to enable/disable the vehicle
sway warning.
“Sway Sensitivity”
Select to set the vehicle sway warn-
ing sensitivity.
■ PCS (Pre-Collision Sys-
tem) ( P.244)
Select to set up the following
items.
PCS on/off
Select to enable/disable the pre-
collision system.
“Sensitivity”
Select to change the pre-collision
warning timing.
Settings display
C
D
Page 124 of 752

1243-2. Opening, closing and locking the doors
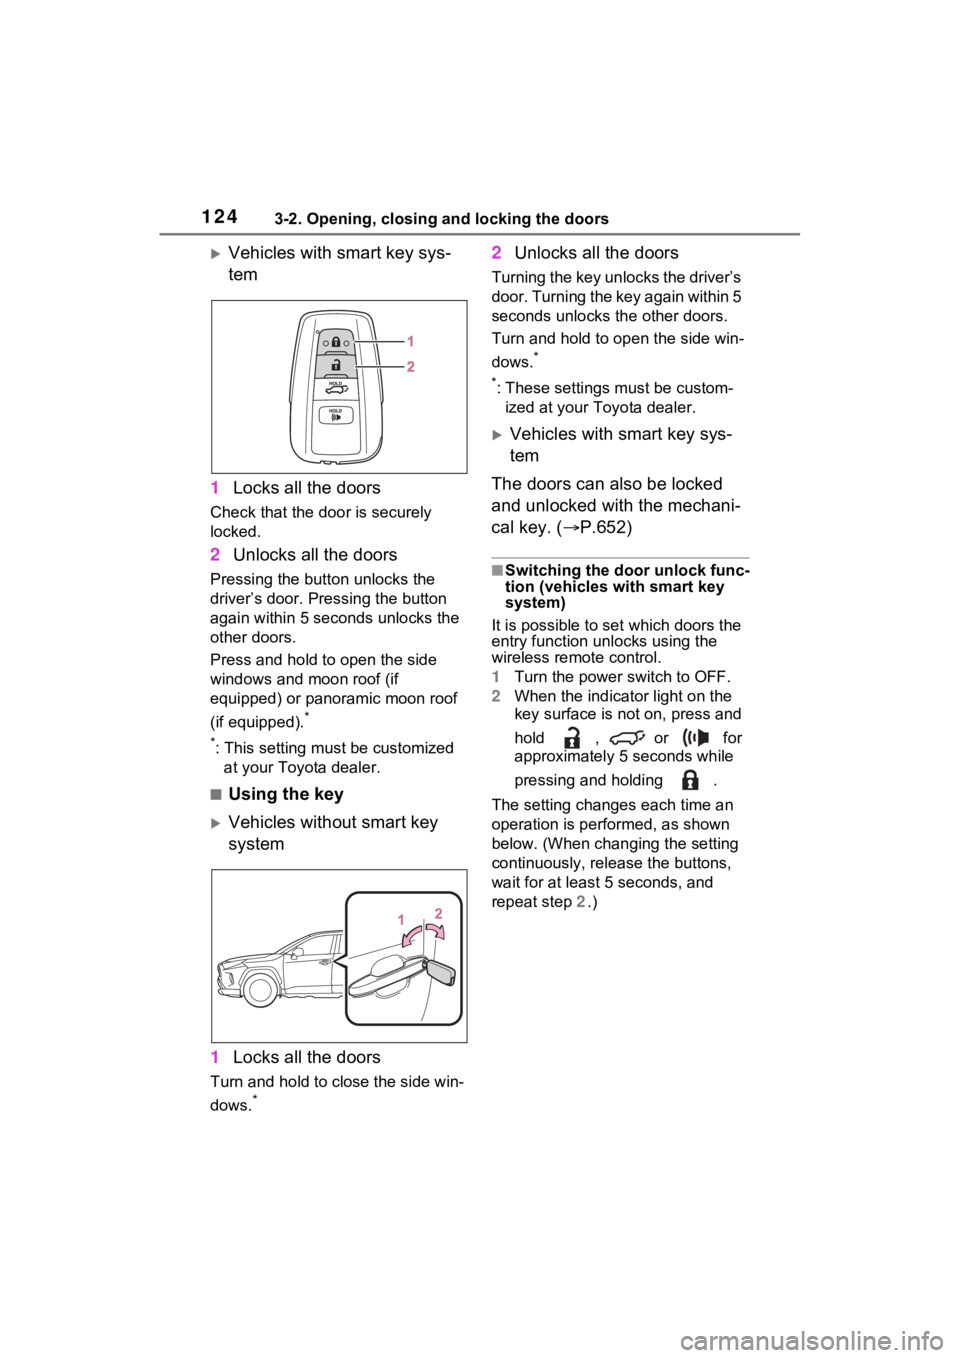
Vehicles with smart key sys-
tem
1 Locks all the doors
Check that the door is securely
locked.
2Unlocks all the doors
Pressing the button unlocks the
driver’s door. Pressing the button
again within 5 seconds unlocks the
other doors.
Press and hold to open the side
windows and moon roof (if
equipped) or panoramic moon roof
(if equipped).
*
*
: This setting must be customized at your Toyota dealer.
■Using the key
Vehicles without smart key
system
1 Locks all the doors
Turn and hold to close the side win-
dows.
*
2Unlocks all the doors
Turning the key unlocks the driver’s
door. Turning the key again within 5
seconds unlocks th e other doors.
Turn and hold to open the side win-
dows.
*
*
: These settings must be custom- ized at your Toyota dealer.
Vehicles with smart key sys-
tem
The doors can also be locked
and unlocked with the mechani-
cal key. ( P.652)
■Switching the door unlock func-
tion (vehicles with smart key
system)
It is possible to set which doors the
entry function unlocks using the
wireless remote control.
1 Turn the power switch to OFF.
2 When the indicator light on the
key surface is not on, press and
hold , or for
approximately 5 seconds while
pressing and holding .
The setting changes each time an
operation is per formed, as shown
below. (When changing the setting
continuously, release the buttons,
wait for at least 5 seconds, and
repeat step 2 .)
Page 125 of 752

1253-2. Opening, closing and locking the doors
3
Before driving
Vehicles with alarm: To prevent
unintended triggering of the alarm,
unlock the doors using the wireless
remote control and open and close
a door once after t he settings have
been changed. (If a door is not
opened within 60 seconds after
is pressed, the doors will be
locked again a nd the alarm will
automatically be set.)
In a case that the alarm is triggered,
immediately stop the alarm.
( P.82)
■Operation signals
Doors: A buzzer sounds and the
emergency flashers flash to indicate
that the doors have been
locked/unlocked using the entry
function or wireless remote control.
(Locked: Once; Unlocked: Twice)
Side windows and moon roof (if
equipped) or panoramic moon roof
(if equipped): A buzzer sounds to indicate that the side windows and
moon roof or panoramic moon roof
are operating us
ing the wireless
remote control.
■Security feature
Vehicles without smart key system
If a door is not opened within
approximately 60 s econds after the
vehicle is unlocked using the wire-
less remote control, the security fea-
ture automatically locks the vehicle
again.
Vehicles with smart key system
If a door is not opened within
approximately 60 s econds after the
vehicle is unlocked using the entry
function or wireles s remote control,
the security featur e automatically
locks the vehicle again. (However,
depending on the location of the
electronic key, the key may be
detected as being in the vehicle. In
this case, vehicle may be unlocked.)
■When the door cannot be
locked by the lock sensor on
the upper part of the door han-
dle (vehicles with smart key
system)
If the door will not lock even when
the topside sensor area is touched,
try touching both the topside and
underside sensor areas at the same
time.
When gloves are being worn,
remove the gloves.
■Door lock buzzer (vehicles with
smart key system)
If an attempt to lock the doors using
the smart key system is made when
a door other than the door you are
locking is open, a buzzer sounds
Multi-informa- tion dis-
play/BeepUnlocking func- tion
Exterior: Beeps 3 times
Interior: Pings once
Holding the
driver’s door han-
dle unlocks only
the driver’s door.
Holding the pas-
senger’s door
handle or press-
ing the back door
opener switch
unlocks all the
doors.
Exterior: Beeps twice
Interior: Pings once
Holding a door
handle or press-
ing the back door
opener switch
unlocks all the
doors.