Page 98 of 320

98
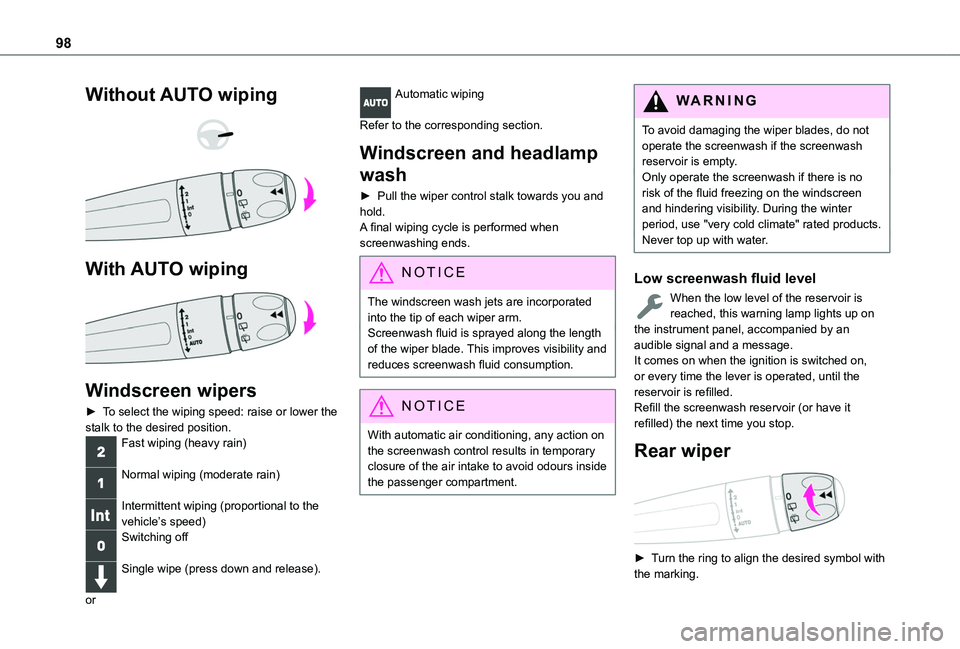
Without AUTO wiping
With AUTO wiping
Windscreen wipers
► To select the wiping speed: raise or lower the stalk to the desired position.Fast wiping (heavy rain)
Normal wiping (moderate rain)
Intermittent wiping (proportional to the vehicle’s speed)Switching off
Single wipe (press down and release).
or
Automatic wiping
Refer to the corresponding section.
Windscreen and headlamp
wash
► Pull the wiper control stalk towards you and hold.A final wiping cycle is performed when screenwashing ends.
NOTIC E
The windscreen wash jets are incorporated into the tip of each wiper arm.Screenwash fluid is sprayed along the length of the wiper blade. This improves visibility and reduces screenwash fluid consumption.
NOTIC E
With automatic air conditioning, any action on the screenwash control results in temporary closure of the air intake to avoid odours inside the passenger compartment.
WARNI NG
To avoid damaging the wiper blades, do not operate the screenwash if the screenwash reservoir is empty.Only operate the screenwash if there is no risk of the fluid freezing on the windscreen and hindering visibility. During the winter period, use "very cold climate" rated products.Never top up with water.
Low screenwash fluid level
When the low level of the reservoir is reached, this warning lamp lights up on the instrument panel, accompanied by an audible signal and a message.It comes on when the ignition is switched on, or every time the lever is operated, until the reservoir is refilled.Refill the screenwash reservoir (or have it refilled) the next time you stop.
Rear wiper
► Turn the ring to align the desired symbol with the marking.
Page 151 of 320

151
Driving
6
Restarting the engine (START mode)
The engine automatically restarts as soon as the driver indicates the intention of moving off again.– With a manual gearbox: with the clutch pedal fully depressed.– With an automatic gearbox:• With the selector in position D or M: with the brake pedal released.• With the selector in position N and the brake pedal released: with the selector at D or M.• With the selector in position P and the brake pedal depressed: with the selector at R, N, D or M.
Special cases
The engine will restart automatically if all conditions for operation are met again and in the following case.– Speed of the vehicle exceeds 3 km/h (2 mph) (depending on the engine).In this case, this indicator lamp flashes for a few seconds, then goes off.
Malfunctions
Depending on the vehicle’s equipment:In the event of a system malfunction, this warning lamp flashes on the instrument panel.The warning lamp in this button flashes and a message appears, accompanied by an audible signal.Have the vehicle checked by a TOYOTA dealer or a qualified workshop.
The vehicle stalls in STOP mode
All of the instrument panel warning lamps come on if there is a fault.Depending on version, a warning message may also be displayed, prompting you to place the gear selector in position N and depress the brake pedal.► Switch off the ignition then start the engine again with the key or the "START/STOP" button.
WARNI NG
12 V batteryThe Stop & Start system requires a 12 V battery of specific technology and specification.All work must be carried out only by any authorized Toyota retailer or Toyota authorized repairer, or any reliable repairer.
Under-inflation detection
This system alerts the driver if one or more tyres suffer a drop in pressure.The alert is raised when the vehicle is moving, not when stationary.It compares the information given by the wheel speed sensors with reference values, which must be reinitialised every time the tyre pressures are adjusted or a wheel changed.It takes into account the last values stored during the reinitialisation request. It is therefore essential that the tyre pressure is correct during the operation. This operation is the driver's responsibility.
WARNI NG
The tyre under-inflation detection cannot, in any circumstances, replace the need for vigilance on the part of the driver.This system does not avoid the need to regularly check the tyre pressures (including the spare wheel), especially before a long journey.Driving with under-inflated tyres, particularly in adverse conditions (heavy load, high speed, long journey):– worsens road-holding.– lengthens braking distances.– causes premature wear of the tyres.– increases energy consumption.
Page 189 of 320

189
Driving
6
Parking space search
► You should drive at a distance of between 0.50 m and 1.50 m (1 ft 7" and 4 ft 11") from the row of parked vehicles, without ever exceeding 30 km/h (19 mph), until the system finds an available space.The parking space search is suspended at higher speeds. The function is automatically deactivated if the vehicle speed exceeds 50 km/h (31 mph).
NOTIC E
For "parallel" parking, the space must measure at least the length of your vehicle plus 0.60 m (1 ft 11").For "bay" parking, the space must be at least as wide as your vehicle plus 0.70 m (2 ft 3").
NOTIC E
If the parking sensors function has been deactivated in the Driving/Vehicle touch screen menu, it will be automatically reactivated when the system is activated.
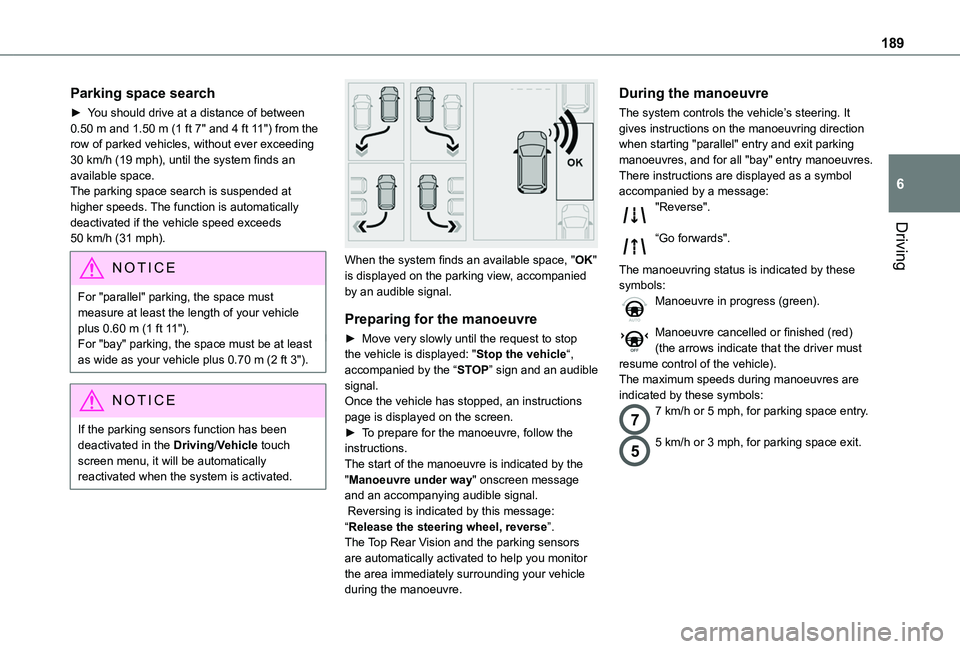
When the system finds an available space, "OK" is displayed on the parking view, accompanied by an audible signal.
Preparing for the manoeuvre
► Move very slowly until the request to stop the vehicle is displayed: "Stop the vehicle“, accompanied by the “STOP” sign and an audible signal.Once the vehicle has stopped, an instructions page is displayed on the screen.► To prepare for the manoeuvre, follow the instructions. The start of the manoeuvre is indicated by the "Manoeuvre under way" onscreen message and an accompanying audible signal. Reversing is indicated by this message: “Release the steering wheel, reverse”.The Top Rear Vision and the parking sensors are automatically activated to help you monitor the area immediately surrounding your vehicle during the manoeuvre.
During the manoeuvre
The system controls the vehicle’s steering. It gives instructions on the manoeuvring direction when starting "parallel" entry and exit parking manoeuvres, and for all "bay" entry manoeuvres.There instructions are displayed as a symbol accompanied by a message:"Reverse".
“Go forwards".
The manoeuvring status is indicated by these symbols:Manoeuvre in progress (green).
Manoeuvre cancelled or finished (red) (the arrows indicate that the driver must resume control of the vehicle).The maximum speeds during manoeuvres are indicated by these symbols:
77 km/h or 5 mph, for parking space entry.
55 km/h or 3 mph, for parking space exit.
Page 201 of 320

201
Practical information
7
Manual reset procedureThe control unit can be reset by simultaneously disconnecting the chargi\
ng connector and the wall socket.Then, reconnect the wall socket first. For more information, refer to the handbook.
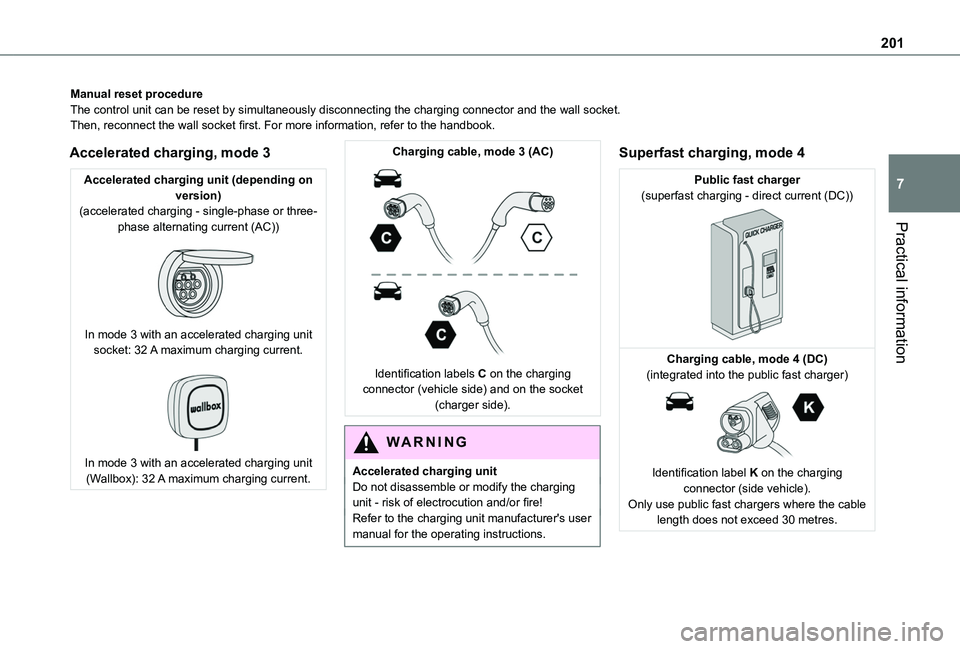
Accelerated charging, mode 3
Accelerated charging unit (depending on version)(accelerated charging - single-phase or three-phase alternating current (AC))
In mode 3 with an accelerated charging unit socket: 32 A maximum charging current.
In mode 3 with an accelerated charging unit (Wallbox): 32 A maximum charging current.
Charging cable, mode 3 (AC)
Identification labels C on the charging connector (vehicle side) and on the socket (charger side).
WARNI NG
Accelerated charging unitDo not disassemble or modify the charging unit - risk of electrocution and/or fire!Refer to the charging unit manufacturer's user manual for the operating instructions.
Superfast charging, mode 4
Public fast charger(superfast charging - direct current (DC))
Charging cable, mode 4 (DC)(integrated into the public fast charger)
Identification label K on the charging connector (side vehicle).Only use public fast chargers where the cable length does not exceed 30 metres.
Page 243 of 320
243
Technical data
9
Dimensions (mm)
These dimensions have been measured on an unladen vehicle.The vehicle is available in two lengths (L1 and L2).Actual values may vary, depending on wheel diameters, loads, engine, etc.The height may vary, depending on wheel diameters.
Vehicle length
L1L2
AOverall length4,4034,753
BOverall heightStandard version1,796 to 1,8251,812 to 1,820
Worksite version1,840 to 1,8601,849 to 1,860
CWheelbase2,7852,975
DFront overhang892
ERear overhang726886
Page 244 of 320
244
Vehicle length
FWidth inc. mirrorsFolded1,921
Unfolded2,107
GFront track width1,553/1,5631,553
HRear track width1,569/1,5771,549/1,568
Vehicle length
L1L2
IInterior width between wheel arches1,229
JMaximum interior widthWithout sliding side door1,733
With 1 sliding side door1,630
With 2 sliding side doors1,527
KClear opening heightWith side-hinged doors1,137
With tailgate1,197
LClear opening width1 242
Page 245 of 320
245
Technical data
9
Vehicle length
L1L2
MClear opening height1,072
NInterior load height(varies depending on the angle of the floor and the curve of the roof)
1,200 to 1,270
OLoading sill heightStandard version548 to 588X
Standard version with increased payload568 to 578561 to 565
Worksite version602 to 610605 to 610
PClear opening widthMax.675
Min.641
QLoading sill heightStandard version534 to 558
Standard version with increased payload551 to 558543 to 552
Worksite version574 to 581575 to 587
Page 246 of 320
246
Vehicle length
L1L2
RInterior floor lengthWith partition1,8172,167
With ladder1,7902,140
SMaximum loading length(With protective cover in place)3,0903 440