2022 TOYOTA PROACE CITY ESP
[x] Cancel search: ESPPage 185 of 320
185
Driving
6
The reproduction screen comes on.► With the engine running, press button 2 to switch the reproduction screen off.
NOTIC E
The function is automatically paused (the reproduction screen becomes grey) in reverse, above 15 km/h (9 mph).The function restarts when the vehicle is
once more travelling at a speed below this threshold.
Operation
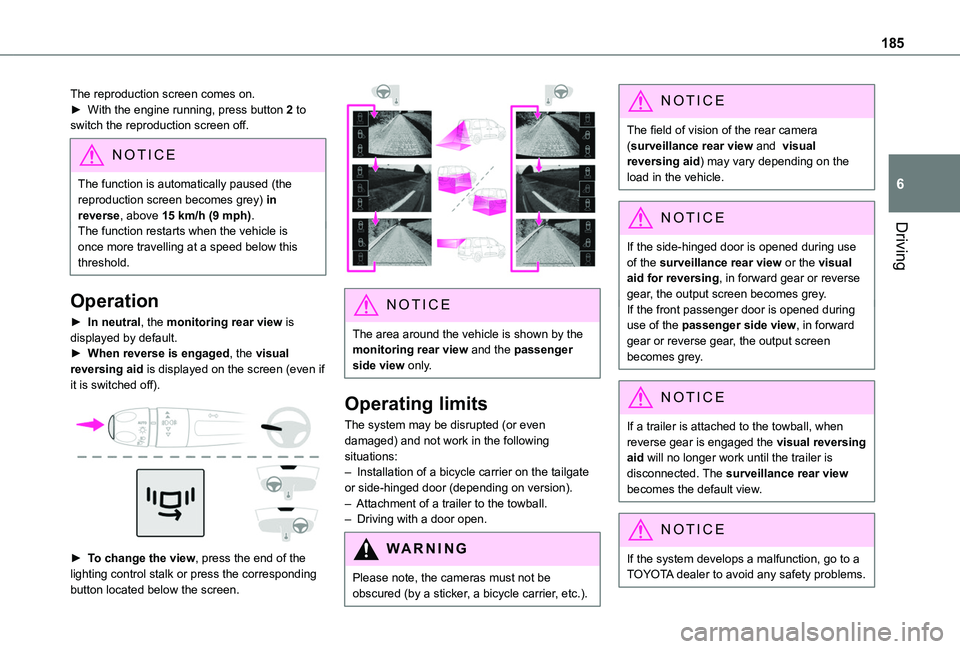
► In neutral, the monitoring rear view is displayed by default.► When reverse is engaged, the visual reversing aid is displayed on the screen (even if it is switched off).
► To change the view, press the end of the lighting control stalk or press the corresponding button located below the screen.
NOTIC E
The area around the vehicle is shown by the monitoring rear view and the passenger side view only.
Operating limits
The system may be disrupted (or even damaged) and not work in the following situations:– Installation of a bicycle carrier on the tailgate or side-hinged door (depending on version).– Attachment of a trailer to the towball.– Driving with a door open.
WARNI NG
Please note, the cameras must not be obscured (by a sticker, a bicycle carrier, etc.).
NOTIC E
The field of vision of the rear camera (surveillance rear view and visual reversing aid) may vary depending on the load in the vehicle.
NOTIC E
If the side-hinged door is opened during use of the surveillance rear view or the visual aid for reversing, in forward gear or reverse gear, the output screen becomes grey.If the front passenger door is opened during use of the passenger side view, in forward gear or reverse gear, the output screen becomes grey.
NOTIC E
If a trailer is attached to the towball, when reverse gear is engaged the visual reversing aid will no longer work until the trailer is disconnected. The surveillance rear view becomes the default view.
NOTIC E
If the system develops a malfunction, go to a TOYOTA dealer to avoid any safety problems.
Page 187 of 320
187
Driving
6
AUTO mode
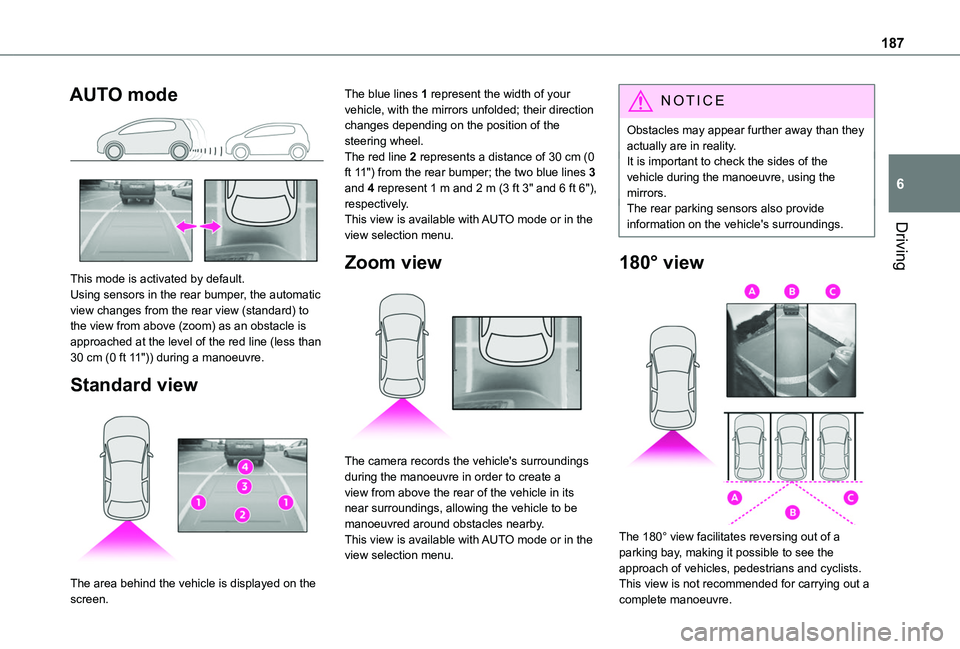
This mode is activated by default.Using sensors in the rear bumper, the automatic view changes from the rear view (standard) to the view from above (zoom) as an obstacle is approached at the level of the red line (less than 30 cm (0 ft 11")) during a manoeuvre.
Standard view
The area behind the vehicle is displayed on the
screen.
The blue lines 1 represent the width of your vehicle, with the mirrors unfolded; their direction changes depending on the position of the steering wheel.The red line 2 represents a distance of 30 cm (0 ft 11") from the rear bumper; the two blue lines 3 and 4 represent 1 m and 2 m (3 ft 3" and 6 ft 6"), respectively.This view is available with AUTO mode or in the view selection menu.
Zoom view
The camera records the vehicle's surroundings during the manoeuvre in order to create a view from above the rear of the vehicle in its near surroundings, allowing the vehicle to be manoeuvred around obstacles nearby.This view is available with AUTO mode or in the view selection menu.
NOTIC E
Obstacles may appear further away than they actually are in reality.It is important to check the sides of the vehicle during the manoeuvre, using the mirrors.The rear parking sensors also provide information on the vehicle's surroundings.
180° view
The 180° view facilitates reversing out of a parking bay, making it possible to see the approach of vehicles, pedestrians and cyclists.This view is not recommended for carrying out a
complete manoeuvre.
Page 190 of 320
190
WARNI NG
During manoeuvring phases, the steering wheel performs rapid turns: do not hold the steering wheel or put your hands between the spokes of the steering wheel. Watch out for any objects that could interfere with the manoeuvre (loose clothing, scarf, tie, etc.). Risk of injury!It is the driver's responsibility to constantly monitor the traffic, especially vehicles coming towards you.The driver should check that no objects or people are obstructing the vehicle’s path.
NOTIC E
The images from the camera(s) displayed on the touch screen may be distorted by the terrain.In shady areas, or in inadequate sunlight or lighting conditions, the image may be darkened and with lower contrast
The manoeuvre can be permanently interrupted at any time, either by the driver or automatically by the system.Interruption by the driver:– taking over control of the steering.
– activating the direction indicator lamps on the opposite side to that of the manoeuvre.– unfastening the driver's seat belt.– switching off the ignition.Interruption by the system:– vehicle exceeding the speed limit of 7 km/h (5 mph) during parking space entry manoeuvres, or 5 km/h (3 mph) during parking space exit manoeuvres.– activation of anti-slip regulation on a slippery road.– opening of a door or the boot.– engine stall.– system malfunction.– after 10 manoeuvres to enter or exit a parallel parking space and after 7 manoeuvres to enter a parking bay.Interrupting the manoeuvre automatically deactivates the function.The manoeuvre symbol is displayed in red, accompanied by the "Manoeuvre cancelled" message on the touch screen.A message prompts the driver to take back
control of the vehicle.The function is deactivated after a few seconds; this warning lamp goes off and the function returns to the initial display.
End of the parking space entry or exit
manoeuvre
The vehicle stops as soon as the manoeuvre is completed.The manoeuvre symbol is displayed in red, accompanied by the message “Manoeuvre completed” on the touch screen.When the function is deactivated, this indicator lamp goes off, accompanied by an audible signal.When entering a parking space, the driver may be required to complete the manoeuvre.
Page 192 of 320
192
Compatibility of fuels
Petrol fuels conforming to the EN228 standard containing up to 5% and 10% ethanol respectively.
Diesel fuels conforming to the EN590, EN16734 and EN16709 standards and containing up to 7%, 10%, 20% and 30% fatty acid methyl ester respectively. The use of B20 or B30 fuels, even occasionally, imposes special maintenance conditions referred to as "Arduous conditions".
Paraffinic Diesel fuel conforming to the EN15940 standard.
WARNI NG
The use of any other type of (bio) fuel (vegetable or animal oils, pure or diluted, domestic fuel, etc.) is strictly prohibited (risk of damage to the engine and fuel system).
NOTIC E
The only fuel additives authorised for use are those that meet the B715001 (petrol) or B715000 (Diesel) standards.
Diesel at low temperature
At temperatures below 0 °C (+32 °F), the formation of paraffins in summer-type Diesel fuels could prevent the engine from operating correctly. In these temperature conditions, use winter-type Diesel fuel and keep the fuel tank more than 50 % full.At temperatures below -15 °C (+5 °F) to avoid problems starting, it is best to park the vehicle under shelter (heated garage).
Travelling abroad
Certain fuels could damage your vehicle’s engine.In certain countries, the use of a particular fuel may be required (specific octane rating, specific trade name, etc.) to ensure correct operation of the engine.For all additional information, consult a dealer.
Refuelling
Fuel tank capacity: approximately 61 litres (petrol) or 50 litres (Diesel).Reserve level: approximately 6 litres.
Low fuel level
/2
1 1When the low fuel level is reached, this warning lamp comes on on the instrument panel, accompanied by an onscreen message and an audible signal. When it first comes on, about 6 litres of fuel remain in the tank.Until sufficient fuel is added, this warning lamp appears every time the ignition is switched on, accompanied by an onscreen message and an audible signal. When driving, this message and audible signal are repeated with increasing frequency as the fuel level drops towards 0.You must refuel as soon as possible to avoid running out of fuel.For more information on Running out of fuel (Diesel), refer to the corresponding section.
N
OTIC E
A small arrow by the warning lamp indicates which side of the vehicle the fuel filler flap is located on.
Page 202 of 320
202
Charging the traction
battery (Electric)
To recharge, connect the vehicle to a domestic electricity supply (domestic or accelerated charging) or to a fast public charger (superfast charging).For a full charge, follow the desired charging procedure without pausing it, until it ends automatically. Charging can be either immediate or deferred (except fast public charger, mode 4).You can stop domestic or accelerated charging at any time by unlocking the vehicle and removing the nozzle. For superfast charging, refer to the fast public charger.For more information on the charging displays on the Instrument panel and the Touch screen, refer to the corresponding section.
NOTIC E
It is also possible to monitor the charging progress using the MyToyota application (Available soon).For more information on Remote functions, refer to the corresponding section.
WARNI NG
As a safety measure, the engine will not start if the charging cable is plugged into the
connector on the vehicle. A warning is displayed on the instrument panel.
NOTIC E
Cooling the traction batteryThe cooling fan in the engine compartment comes on during charging to cool the on-board charger and the traction battery.
NOTIC E
Vehicle in storage for more than 1 monthDischarge the traction battery down to 2 or 3 bars on the charge level indicator on the instrument panel.Do not connect the charging cable.Always park the vehicle in a place with temperatures between -10°C and 30°C (parking in a place with extreme temperatures can damage the traction battery).Disconnect the cable from the (+) terminal of the accessory battery in the engine compartment.Connect a 12 V battery charger to the (+) and (-) terminals of the accessory battery about every 3 months in order to recharge the accessory battery and maintain an operating voltage.
Precautions
Electric vehicles were developed in accordance with the guidelines on maximum electromagnetic fields issued by the International Commission on Non-Ionizing Radiation Protection (ICNIRP - 1998 Guidelines).
Wearers of pacemakers or equivalent devices
Ask your doctor about what precautions you should take, or ask the manufacturer of your implanted electro-medical device about whether its operation is guaranteed in an environment which complies with the ICNIRP recommendations.
WARNI NG
If in doubtDomestic or accelerated charging: do not remain inside or near the vehicle, or near the charging cable or charging unit, even for a short time.Superfast charging: do not use the system yourself and avoid approaching public fast charging points. Leave the area and ask a third party to recharge the vehicle.
Page 204 of 320
204
► Remove the protective cover from the charging nozzle.► Insert the nozzle into the charging connector.The start of charging is confirmed by the flashing green CHARGE indicator lamps in the flap, then those on the control unit.If this is not the case, charging has not started; restart the procedure, ensuring that all connections are properly established.The red indicator lamp in the flap comes on to indicate that the nozzle is locked.
NOTIC E
When charging is complete and while the charging cable is still connected, opening the driver's door will display the charge level on the instrument panel for about 20 seconds.
Accelerated charging, mode 3
► Follow the accelerated charging unit (Wallbox) user instructions.► Remove the protective cover from the charging nozzle.► Insert the nozzle into the charging connector.
The start of charging is confirmed when the charging indicator lamp in the flap flashes green.If this is not the case, charging has not started; restart the procedure, ensuring that the connection has been properly established.The red indicator lamp in the flap comes on to indicate that the nozzle is locked.
Superfast charging, mode 4
► Depending on version, remove the protective cover from the lower part of the connector.► Follow the instructions for use of the fast public charger and connect the cable from the fast public charger to the vehicle's connector.The start of charging is confirmed by the flashing green charging indicator lamp in the flap.If this is not the case, charging has not started; restart the procedure, ensuring that the connection is properly established.The red indicator lamp in the flap comes on to indicate that the nozzle is locked.
Deferred charging
Settings
At any authorized Toyota retailer or Toyota authorized repairer, or any reliable repairer, with touch screen BLUETOOTH audio systemBy default, the deferred charging start time is set to midnight (vehicle time).You can have the deferred charging start time modified.Go to any authorized Toyota retailer or Toyota authorized repairer, or any reliable repairer.On a smartphone or tabletYou can programme the deferred charging function at any time via the MyToyota application (Available soon).For more information on Remote functions, refer to the corresponding section.In the vehicle, with TOYOTA Connect Nav► In the Energy touch screen menu, select the Charge page.► Set the charging start time.► Press OK.
The setting is saved in the system.
Activation
NOTIC E
Deferred charging is only possible with modes 2 and 3.
Page 205 of 320
205
Practical information
7
► After programming the deferred charging, connect your vehicle to the desired charging equipment.
► Press this button in the flap within one minute to activate the system (confirmed by the charging indicator lamp coming on in blue).
Disconnection
Before disconnecting the nozzle from the charging connector:► If the vehicle is unlocked, lock it and then unlock it.► If the vehicle is locked, unlock it.The red indicator lamp in the flap goes out to confirm that the charging nozzle is unlocked.► In modes 2 and 3, remove the charging nozzle within 30 seconds.
NOTIC E
The locking of the nozzle is linked to the locking of the loading area. For more information on Total or selective unlocking, refer to the corresponding section.
The charging indicator lamp comes on in white.
NOTIC E
With selective door unlocking activated, press the unlocking button twice to disconnect the charging nozzle.
NOTIC E
When charging is complete, the green charging indicator lamp in the flap goes out after about 2 minutes.
Domestic charging, mode 2
The end of charging is confirmed when the green CHARGE indicator lamp on the control unit and the green charging indicator lamp in the flap come on fixed.► Replace the protective cover on the charging nozzle and close the charging flap.
► Disconnect the control unit end of the charging cable from the domestic socket.
Accelerated charging , mode 3
The end of charging is indicated by the charging control unit and by the fixed lighting of the green indicator lamp in the flap.► Hang up the nozzle on the charging unit and close the charging flap.
Superfast charging, mode 4
The end of charging is indicated by the charger and by the fixed lighting of the green indicator lamp in the flap.► You can also pause charging by pressing this button in the flap (in mode 4 only).► Hang up the nozzle on the charger.► Depending on version, replace the protective cover on the lower section and close the charging flap.
NOTIC E
When the charging nozzle is disconnected, a message on the instrument panel indicates that charging is complete, even if the charging nozzle was disconnected before full charging was completed.
Page 206 of 320
206
Energy economy mode
This system manages the duration of use of certain functions, in order to conserve a sufficient level of charge in the battery with the ignition off.After switching off the engine and for a maximum cumulative period of around 30 minutes, you can continue to use functions such as the audio and telematic system, dipped beam headlamps or courtesy lamps.
Selecting the mode
A confirmation message is displayed when energy economy mode is entered, and the active functions are placed on standby.
NOTIC E
If a telephone call is in progress at the time, it will be maintained for around 10 minutes via the audio system’s hands-free system.
Exiting the mode
These functions are automatically reactivated the next time the vehicle is used.To restore the use of these functions immediately, start the engine and let it run:– For less than 10 minutes, to use the equipment for approximately 5 minutes.– For more than 10 minutes, to use the equipment for approximately 30 minutes.
Let the engine run for the specified duration to ensure that the battery charge is sufficient.To recharge the battery, avoid repeatedly or continuously restarting the engine.
WARNI NG
A flat battery prevents the engine from starting.For more information on the 12 V battery,
refer to the corresponding section.
Load reduction mode
This system manages the use of certain functions according to the level of charge remaining in the battery.When the vehicle is being driven, the load reduction function temporarily deactivates certain functions, such as the air conditioning and the heated rear screen.The deactivated functions are reactivated automatically as soon as conditions permit.
Snow chains
In wintry conditions, snow chains improve traction as well as the behaviour of the vehicle when braking.
WARNI NG
The snow chains must be fitted only to the front wheels. They must never be fitted to "space-saver" type spare wheels.
NOTIC E
Take account of the legislation specific to each country on the use of snow chains and the maximum authorised speed.
Use only the chains designed to be fitted to the type of wheel fitted to your vehicle:
Original tyre sizeMaximum link size (mm)
195/65 R159
205/60 R16
205/55 R17
215/65 R16
215/60 R17cannot be fitted with chains
You can also use snow socks.