2022 TOYOTA PROACE CITY belt
[x] Cancel search: beltPage 2 of 320

2
■Overview
Overview 4Labels 6
■Eco-driving
1Instruments
Instrument panels 10Warning and indicator lamps 14Indicators 20Trip computer 28Touch screen BLUETOOTH audio system 29Touch screen 30Setting the date and time 32
2Access
Electronic key with remote control function and built-in key, 33Back-up procedures 41Central locking / unlocking 44Doors 46General recommendations for the sliding side doors 47Rear roof flap 48Alarm 49Electric windows 52Tilting rear door windows 53
3Ease of use and comfort
General recommendations for the seats 54Front seats 54Steering wheel adjustment 57Mirrors 582-seat front bench seat 59Rear bench seat (row 2) 61
Rear seats (row 2) 62Rear seats (row 3) 63Interior fittings 65Two-position luggage cover shelf (removable) 71Luggage cover (7-seat) 71Warning triangle 73Extenso cabin 75Crew cab 76Heating and Ventilation 80Heating 81Manual air conditioning 81Dual-zone automatic air conditioning 83Front demisting - defrosting 85Heated windscreen 86Rear screen and/or door mirror demisting/de-icing 86Rear heating and air conditioning 87Additional heating/ventilation system 87A/C preconditioning (Electric) 89
4Lighting and visibility
Lighting control lever 92Direction indicators 93Parking lamps 93Automatic illumination of headlamps 94Daytime running lamps / Sidelamps 94Guide-me-home and welcome lighting 95Automatic lighting systems - General recommendations 95Automatic headlamp dipping 96Headlamp beam height adjustment 97Wiper control lever 97Changing a wiper blade 99Automatic wipers 100
5Safety
General safety recommendations 101Emergency or assistance call 102Hazard warning lamps 104Horn 104Pedestrian horn (Electric) 104Vehicle stability control (VSC) 105Toyota Traction Select 107Hill Assist Descent Control 108Seat belts 11 0Airbags 11 4Child seats 11 7Deactivating the front passenger airbag 11 9ISOFIX child seats 124i-Size child seats 127Manual child lock 128Electric child lock 128
6Driving
Driving recommendations 129Starting/switching off the engine 131Manual parking brake 136Electric parking brake 136Hill start assist 1395-speed manual gearbox 1406-speed manual gearbox 140Automatic gearboxes 141Drive selector (Electric) 147Driving modes 148Gear efficiency indicator 149Stop & Start (Petrol or Diesel) 149Under-inflation detection 151Head-up display 153Driving and manoeuvring aids - General recommendations 154
Page 4 of 320

4
Presentation
Presentation
These illustrations and descriptions are intended as a guide. The presence and location of some components varies according to the version, trim level and country of sale.
Instruments and controls
1.Bonnet release
2.Dashboard fuses
3.Horn
4.Instrument panel
5.AlarmCourtesy lampEmergency call buttonInterior rear view mirror or Surround Rear Vision display screen (Proace City)Monitoring mirror (Proace City Verso)Warning lamp display for seat belts and front passenger airbag (Proace City Verso)Panoramic roof blind control (Proace City Verso)
6.Touch screen BLUETOOTH audio systemTouch screen with TOYOTA Connect Radio or TOYOTA Connect Nav
7.USB port
8.Heating / Air conditioningFront demisting - defrostingRear screen demisting – defrosting
9.Electric parking brake"START/STOP" button
10.Gearbox (Petrol or Diesel)Drive selector
11 .12 V socket
12.230 V accessory socket
13.Glove box
14.Storage compartmentGlove box
15.Front passenger airbag deactivation (on the side of the glove box, with the door open)
Steering mounted controls
1.External lighting / direction indicators control leverSurround Rear Vision view change button (Proace City)Voice recognition activation button
2.Wiper / screenwash / trip computer control lever
3.Controls to select the multimedia source
(SRC), manage music (LIST) and manage phone calls ("telephone" symbol)
4.Speed Limiter / Programmable Cruise Control / Adaptive Cruise Control controls
5.Instrument panel display mode selection wheel
6.Voice controlVolume adjustment
7.Audio system setting controls
Page 15 of 320
15
Instruments
1
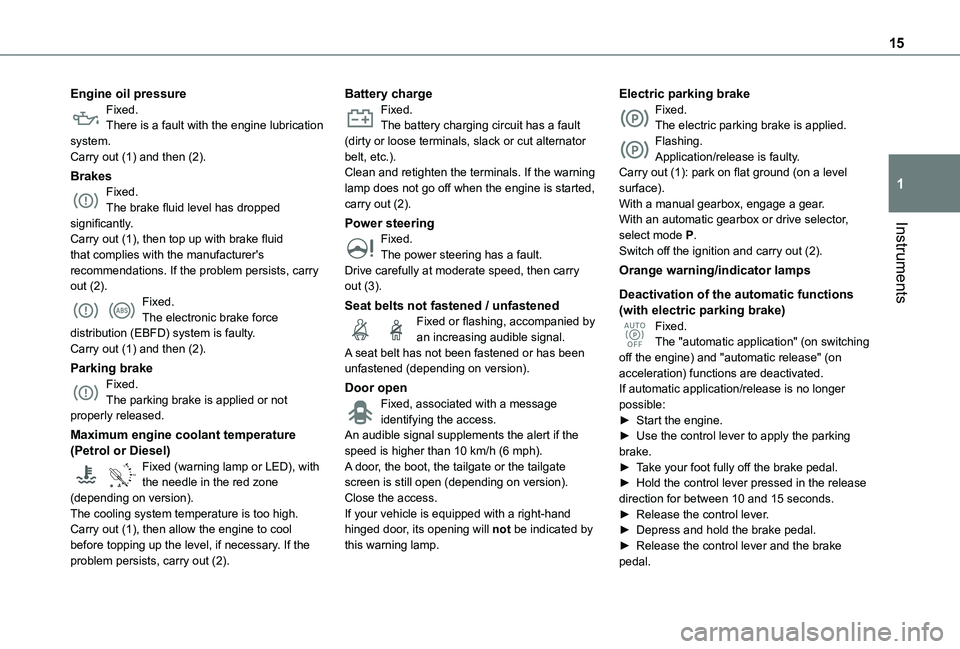
Engine oil pressureFixed.There is a fault with the engine lubrication system.Carry out (1) and then (2).
BrakesFixed.The brake fluid level has dropped significantly.Carry out (1), then top up with brake fluid that complies with the manufacturer's recommendations. If the problem persists, carry out (2).Fixed.The electronic brake force distribution (EBFD) system is faulty.Carry out (1) and then (2).
Parking brakeFixed.The parking brake is applied or not properly released.
Maximum engine coolant temperature
(Petrol or Diesel)
90°CFixed (warning lamp or LED), with the needle in the red zone (depending on version).The cooling system temperature is too high.Carry out (1), then allow the engine to cool before topping up the level, if necessary. If the problem persists, carry out (2).
Battery chargeFixed.The battery charging circuit has a fault (dirty or loose terminals, slack or cut alternator belt, etc.).Clean and retighten the terminals. If the warning lamp does not go off when the engine is started, carry out (2).
Power steeringFixed.The power steering has a fault.Drive carefully at moderate speed, then carry out (3).
Seat belts not fastened / unfastenedFixed or flashing, accompanied by an increasing audible signal.A seat belt has not been fastened or has been unfastened (depending on version).
Door openFixed, associated with a message identifying the access.An audible signal supplements the alert if the
speed is higher than 10 km/h (6 mph).A door, the boot, the tailgate or the tailgate screen is still open (depending on version).Close the access.If your vehicle is equipped with a right-hand hinged door, its opening will not be indicated by this warning lamp.
Electric parking brakeFixed.The electric parking brake is applied.Flashing.Application/release is faulty.Carry out (1): park on flat ground (on a level surface). With a manual gearbox, engage a gear.With an automatic gearbox or drive selector, select mode P.Switch off the ignition and carry out (2).
Orange warning/indicator lamps
Deactivation of the automatic functions (with electric parking brake)Fixed.The "automatic application" (on switching off the engine) and "automatic release" (on acceleration) functions are deactivated.If automatic application/release is no longer possible:► Start the engine.► Use the control lever to apply the parking
brake.► Take your foot fully off the brake pedal.► Hold the control lever pressed in the release direction for between 10 and 15 seconds.► Release the control lever.► Depress and hold the brake pedal.► Release the control lever and the brake pedal.
Page 17 of 320
17
Instruments
1
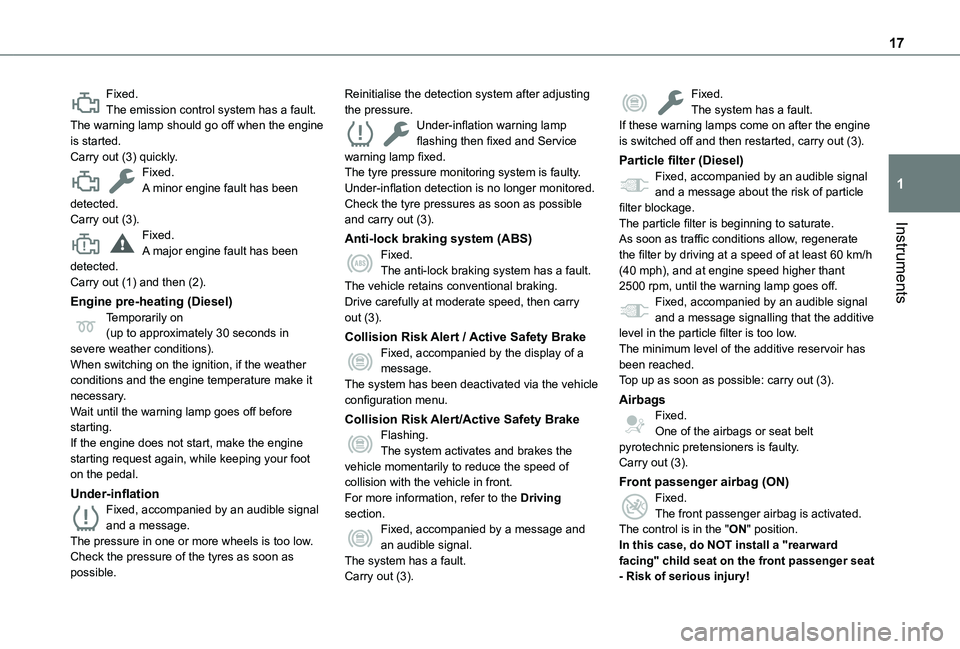
Fixed.The emission control system has a fault.The warning lamp should go off when the engine is started.Carry out (3) quickly.Fixed.A minor engine fault has been detected.Carry out (3).Fixed.A major engine fault has been detected.Carry out (1) and then (2).
Engine pre-heating (Diesel)Temporarily on(up to approximately 30 seconds in severe weather conditions).When switching on the ignition, if the weather conditions and the engine temperature make it necessary.Wait until the warning lamp goes off before starting.If the engine does not start, make the engine
starting request again, while keeping your foot on the pedal.
Under-inflationFixed, accompanied by an audible signal and a message.The pressure in one or more wheels is too low.Check the pressure of the tyres as soon as possible.
Reinitialise the detection system after adjusting the pressure.Under-inflation warning lamp flashing then fixed and Service warning lamp fixed.The tyre pressure monitoring system is faulty.Under-inflation detection is no longer monitored.Check the tyre pressures as soon as possible and carry out (3).
Anti-lock braking system (ABS)Fixed.The anti-lock braking system has a fault.The vehicle retains conventional braking.Drive carefully at moderate speed, then carry out (3).
Collision Risk Alert / Active Safety BrakeFixed, accompanied by the display of a message.The system has been deactivated via the vehicle configuration menu.
Collision Risk Alert/Active Safety BrakeFlashing.
The system activates and brakes the vehicle momentarily to reduce the speed of collision with the vehicle in front.For more information, refer to the Driving section.Fixed, accompanied by a message and an audible signal.The system has a fault.Carry out (3).
Fixed.The system has a fault.If these warning lamps come on after the engine is switched off and then restarted, carry out (3).
Particle filter (Diesel)Fixed, accompanied by an audible signal and a message about the risk of particle filter blockage.The particle filter is beginning to saturate.As soon as traffic conditions allow, regenerate the filter by driving at a speed of at least 60 km/h (40 mph), and at engine speed higher thant 2500 rpm, until the warning lamp goes off.Fixed, accompanied by an audible signal and a message signalling that the additive level in the particle filter is too low.The minimum level of the additive reservoir has been reached.Top up as soon as possible: carry out (3).
AirbagsFixed.One of the airbags or seat belt
pyrotechnic pretensioners is faulty.Carry out (3).
Front passenger airbag (ON)Fixed.The front passenger airbag is activated.The control is in the "ON" position.In this case, do NOT install a "rearward facing" child seat on the front passenger seat - Risk of serious injury!
Page 54 of 320
54
General
recommendations for the
seats
WARNI NG
For safety reasons, seat adjustments must only be made when the vehicle is stationary.
WARNI NG
Folding or unfolding the seat backrests must only be done with the vehicle stationary.
WARNI NG
Before moving the seat backwards, ensure that there is no person or object that might prevent the full travel of the seat.There is a risk of trapping or pinching
passengers if present in the rear seats or of jamming the seat if large objects are placed on the floor behind the seat.
WARNI NG
Do not place hard or heavy objects on the backrests forming a table. They could become
dangerous projectiles in the event of sudden braking or a collision.– Do not remove a head restraint without stowing it; secure it to a support inside the vehicle.– Check that the seat belts remain accessible to the passenger and easy to fasten.– Passengers must never take their seat without adjusting and fastening their seat belt.– In row 3, be careful not to leave your feet under the row 2 seat while it is being tilted.– When a row 3 seat is in the fully folded position, ensure that the strap is correctly hooked to the Top Tether fixing of the row 2 backrest: risk of unexpected tipping of the seat.
WARNI NG
Before carrying out the manoeuvres, check that nothing and no one is obstructing the moving elements and their locking.
To avoid sudden folding, take care to hold the backrest and support it until it is horizontal.Never put your hand underneath the seat cushion to guide the seat downwards or upwards, you could get your fingers trapped. Place your hand on the grip/strap (depending on equipment) at the top of the seat cushion.
WARNI NG
Please note: an incorrectly latched backrest compromises the safety of passengers in the event of sudden braking or an impact.The contents of the boot may be thrown forward - risk of severe injury!
Front seats
Correct driving position
Before taking to the road and to make the most of the ergonomic layout of the instruments and controls, carry out these adjustments in the following order:– head restraint height.– seat backrest angle.– seat cushion height.– longitudinal seat position.– steering wheel height and reach.– rear view mirror and door mirrors.
Page 55 of 320
55
Ease of use and comfort
3
WARNI NG
Once these adjustments have been made, check that the instrument panel can be viewed correctly from your driving position.
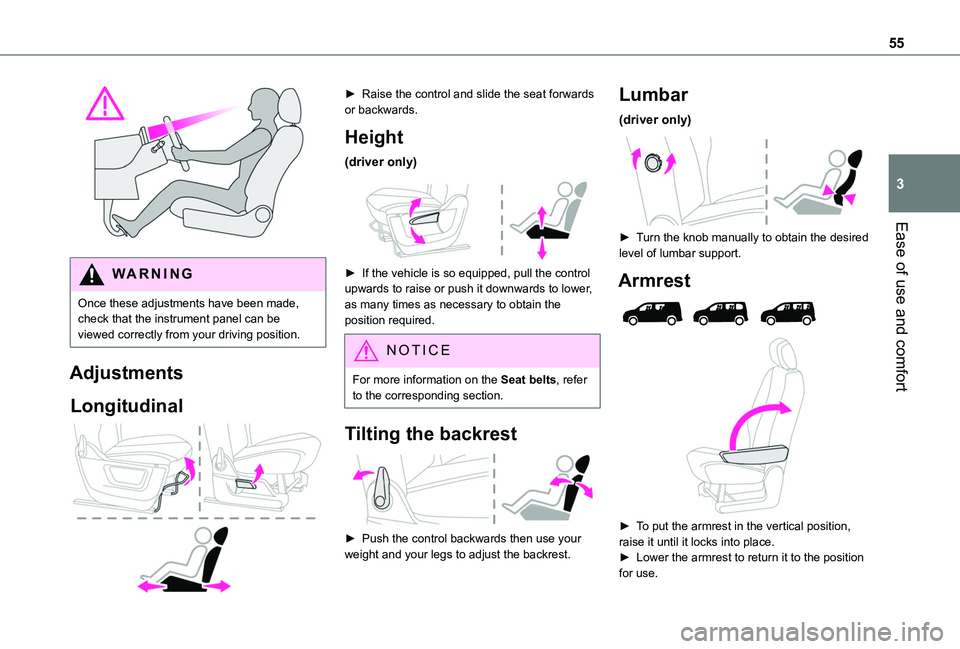
Adjustments
Longitudinal
► Raise the control and slide the seat forwards or backwards.
Height
(driver only)
► If the vehicle is so equipped, pull the control upwards to raise or push it downwards to lower, as many times as necessary to obtain the position required.
NOTIC E
For more information on the Seat belts, refer to the corresponding section.
Tilting the backrest
► Push the control backwards then use your weight and your legs to adjust the backrest.
Lumbar
(driver only)
► Turn the knob manually to obtain the desired level of lumbar support.
Armrest
► To put the armrest in the vertical position, raise it until it locks into place.
► Lower the armrest to return it to the position for use.
Page 60 of 320
60
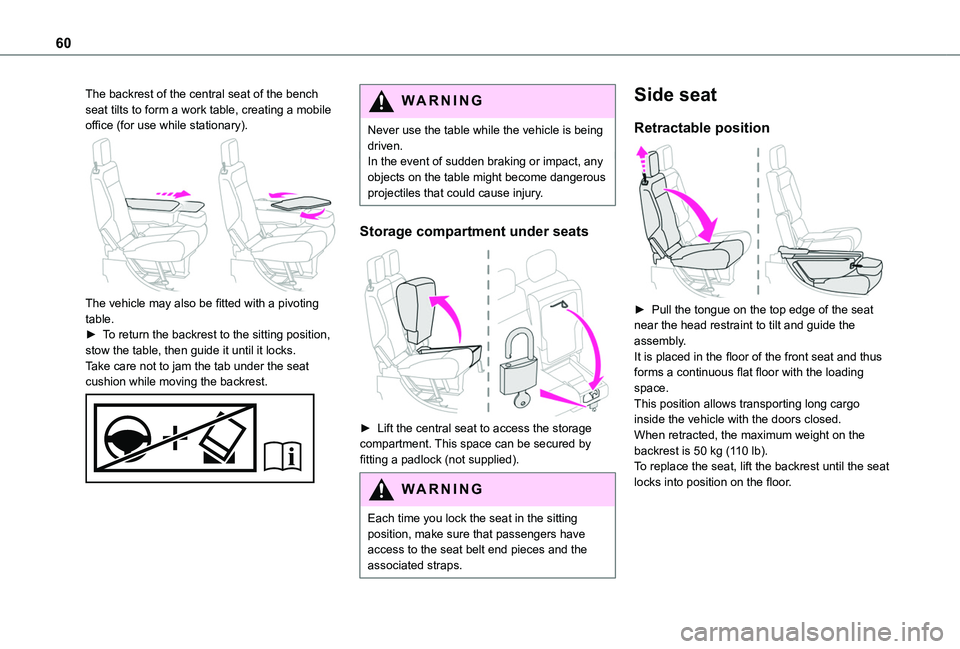
The backrest of the central seat of the bench seat tilts to form a work table, creating a mobile office (for use while stationary).
The vehicle may also be fitted with a pivoting table.► To return the backrest to the sitting position, stow the table, then guide it until it locks.Take care not to jam the tab under the seat cushion while moving the backrest.
WARNI NG
Never use the table while the vehicle is being driven.In the event of sudden braking or impact, any objects on the table might become dangerous projectiles that could cause injury.
Storage compartment under seats
► Lift the central seat to access the storage compartment. This space can be secured by
fitting a padlock (not supplied).
WARNI NG
Each time you lock the seat in the sitting position, make sure that passengers have
access to the seat belt end pieces and the associated straps.
Side seat
Retractable position
► Pull the tongue on the top edge of the seat near the head restraint to tilt and guide the assembly.It is placed in the floor of the front seat and thus forms a continuous flat floor with the loading space.This position allows transporting long cargo inside the vehicle with the doors closed.When retracted, the maximum weight on the backrest is 50 kg (110 lb).To replace the seat, lift the backrest until the seat locks into position on the floor.
Page 61 of 320
61
Ease of use and comfort
3
WARNI NG
Never put your hand underneath the seat cushion to guide the seat downwards or upwards, you could get your fingers trapped.Always just use the strap.Before carrying out these manoeuvres, check that nothing and nobody is obstructing the moving elements and their locking.
Folded position
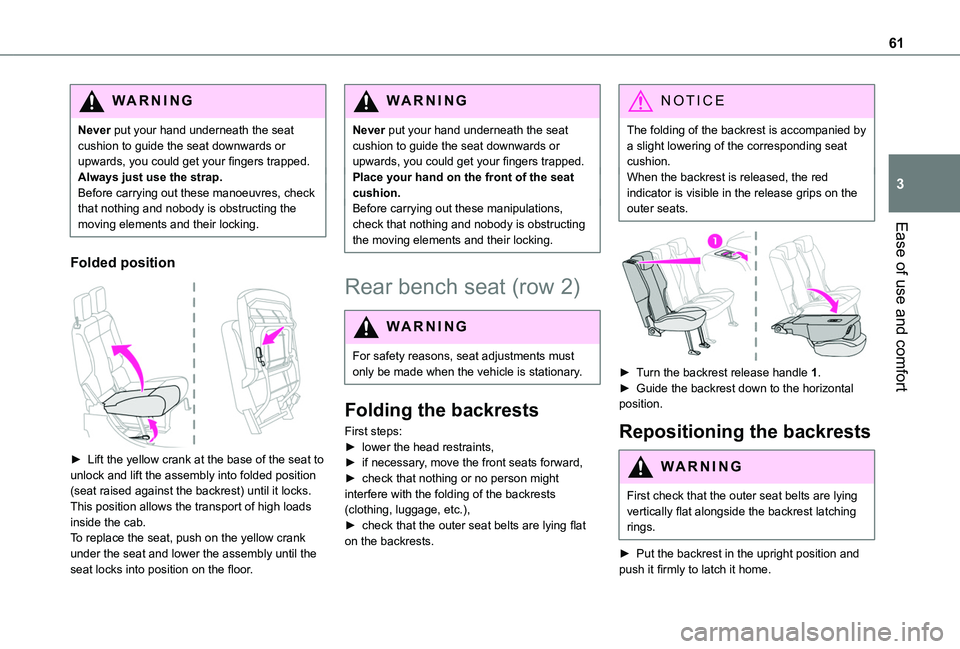
► Lift the yellow crank at the base of the seat to unlock and lift the assembly into folded position (seat raised against the backrest) until it locks.This position allows the transport of high loads inside the cab.To replace the seat, push on the yellow crank under the seat and lower the assembly until the seat locks into position on the floor.
WARNI NG
Never put your hand underneath the seat cushion to guide the seat downwards or upwards, you could get your fingers trapped.Place your hand on the front of the seat cushion.Before carrying out these manipulations, check that nothing and nobody is obstructing the moving elements and their locking.
Rear bench seat (row 2)
WARNI NG
For safety reasons, seat adjustments must only be made when the vehicle is stationary.
Folding the backrests
First steps:
► lower the head restraints,► if necessary, move the front seats forward,► check that nothing or no person might interfere with the folding of the backrests (clothing, luggage, etc.),► check that the outer seat belts are lying flat on the backrests.
NOTIC E
The folding of the backrest is accompanied by a slight lowering of the corresponding seat cushion.When the backrest is released, the red indicator is visible in the release grips on the outer seats.
► Turn the backrest release handle 1.► Guide the backrest down to the horizontal position.
Repositioning the backrests
WARNI NG
First check that the outer seat belts are lying vertically flat alongside the backrest latching rings.
► Put the backrest in the upright position and push it firmly to latch it home.