2022 TOYOTA PROACE CITY ESP
[x] Cancel search: ESPPage 235 of 320
235
In the event of a breakdown
8
Rear lamps
For more information on Changing a bulb and, in particular, the types of bulb, refer to the corresponding section.
With side-hinged doors/tailgate
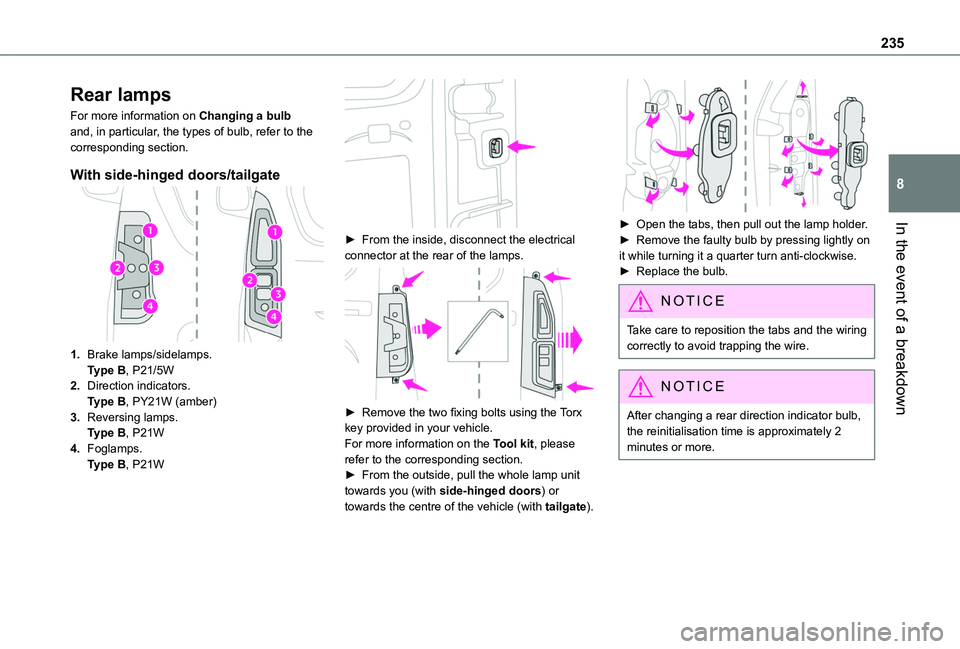
1.Brake lamps/sidelamps.Type B, P21/5W
2.Direction indicators.Type B, PY21W (amber)
3.Reversing lamps.Type B, P21W
4.Foglamps.Type B, P21W
► From the inside, disconnect the electrical connector at the rear of the lamps.
► Remove the two fixing bolts using the Torx key provided in your vehicle.For more information on the Tool kit, please refer to the corresponding section.► From the outside, pull the whole lamp unit towards you (with side-hinged doors) or towards the centre of the vehicle (with tailgate).
► Open the tabs, then pull out the lamp holder.► Remove the faulty bulb by pressing lightly on it while turning it a quarter turn anti-clockwise.► Replace the bulb.
NOTIC E
Take care to reposition the tabs and the wiring correctly to avoid trapping the wire.
NOTIC E
After changing a rear direction indicator bulb, the reinitialisation time is approximately 2
minutes or more.
Page 236 of 320

236
Number plate lamps
Type A, W5W - 5W
With side-hinged doors
► Unclip the interior trim.► Disconnect the connector by moving aside its tab.► Turn the bulb holder a quarter turn anti-clockwise.► Change the bulb.► Put the bulb holder back in place and reconnect the connector.► Put the trim back in place.
With tailgate
► Remove the plastic lens using a screwdriver.► Change the bulb.► Refit the plastic lens and press on it.
Third brake lamp
Type A, W16W - 16W
– Unscrew the two nuts.– Push the rods.– If necessary, disconnect the connector to remove the lamp.– Replace the bulb.
Fuses
WARNI NG
Changing a fuseAll work must be carried out only by any authorized Toyota retailer or Toyota authorized repairer, or any reliable repairer.The replacement of a fuse by a third party could cause a serious malfunction of the
vehicle.
NOTIC E
Installing electrical accessoriesThe vehicle's electrical system is designed to operate with standard or optional equipment.Before fitting other electrical equipment or accessories to your vehicle, contact any authorized Toyota retailer or Toyota authorized repairer, or any reliable repairer.
WARNI NG
TOYOTA accepts no responsibility for the cost incurred in repairing the vehicle or for rectifying malfunctions resulting from the installation of accessories not supplied or not
recommended by TOYOTA and not installed in accordance with its recommendations, in particular when the combined power
Page 237 of 320
237
In the event of a breakdown
8
consumption of all of the additional equipment connected exceeds 10 milliamperes.
12 V battery / Accessory
battery
Procedure for starting the engine using another battery or charging a discharged battery.
Lead-acid starter batteries
ECO
Batteries contain harmful substances such as sulphuric acid and lead.They must be disposed of in accordance with regulations and must not, in any circumstances, be discarded with household waste.Take used remote control batteries and vehicle batteries to a special collection point.
WARNI NG
Protect your eyes and face before handling the battery.All operations on the battery must be carried out in a well ventilated area and away from
naked flames and sources of sparks, so as to avoid the risk of explosion or fire.Wash your hands afterwards.
Electric motor
NOTIC E
Flat accessory batteryIt is no longer possible to start the motor or recharge the traction battery.
WARNI NG
Precautions before working on the accessory batterySelect mode P, switch off the ignition, check that the instrument panel is off and that the vehicle is not plugged in.
WARNI NG
Jump-starting another vehicleDo not use the accessory battery to jump-start another vehicle or to charge another vehicle's battery.
Symbols
No sparks or naked flames, no smoking.
Always protect your eyes. Explosive gases can cause blindness and injury.Keep the vehicle's battery out of the reach of children.
The vehicle's battery contains sulphuric acid which can make you go blind or cause severe burns.For more information, refer to the handbook.Explosive gases can be present close to the battery.
Access to the battery
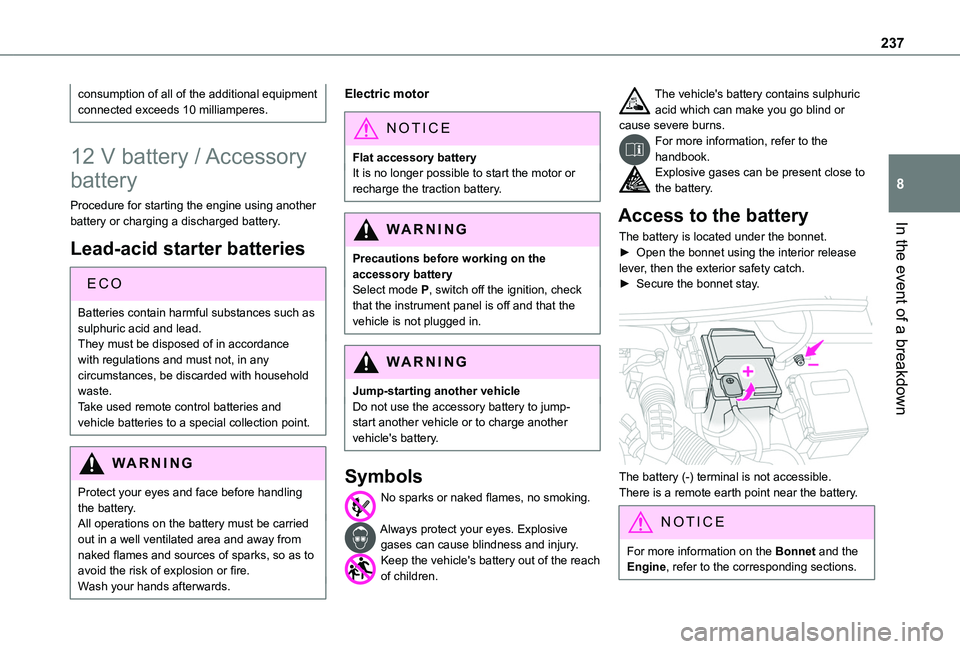
The battery is located under the bonnet.► Open the bonnet using the interior release lever, then the exterior safety catch.► Secure the bonnet stay.
The battery (-) terminal is not accessible.There is a remote earth point near the battery.
NOTIC E
For more information on the Bonnet and the Engine, refer to the corresponding sections.
Page 241 of 320
241
In the event of a breakdown
8
Towing
Procedure for having your vehicle towed or for towing another vehicle using the towing eye.
NOTIC E
General recommendationsObserve the legislation in force in the country where you are driving.Ensure that the weight of the towing vehicle is higher than that of the towed vehicle.The driver must remain at the wheel of the towed vehicle and must have a valid driving licence.When towing a vehicle with all four wheels on the ground, always use an approved towbar; ropes and straps are prohibited.
The towing vehicle must move off gently.When the vehicle is towed with its engine off, there is no longer braking and steering assistance.
WARNI NG
A professional recovery service must be called if:– broken down on a motorway or main road;
– not possible to put the gearbox into neutral, unlock the steering, or release the parking brake;– not possible to tow a vehicle with an automatic gearbox, with the engine running;– towing with only two wheels on the ground;– four-wheel drive vehicle;– no approved towbar available.
WARNI NG
Before towing the vehicle, it is essential to put the vehicle in free-wheeling mode.For more information on Free-wheeling, refer to the corresponding section.
NOTIC E
Electric motorAn electric vehicle cannot under any circumstances be used to tow another vehicle.However, it may be used, for example, to exit a rut.
Towing constraints
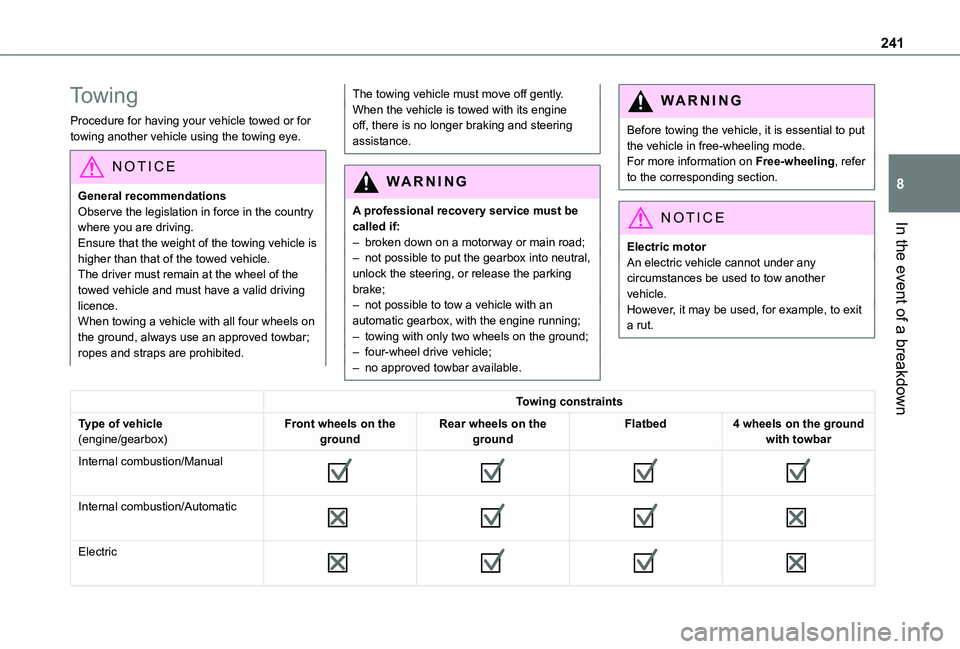
Type of vehicle(engine/gearbox)Front wheels on the groundRear wheels on the groundFlatbed4 wheels on the ground with towbar
Internal combustion/Manual
Internal combustion/Automatic
Electric
Page 242 of 320
242
NOTIC E
In case of battery or electric parking brake failure, it is essential to call a professional using flatbed recovery vehicles (excluding manual gearbox).
Accessing the eye
NOTIC E
For more information on the Tool kit, refer to the corresponding section.
WARNI NG
With a manual gearbox, move the gear lever into neutral.With an automatic gearbox, place the gear selector into position N.Failure to adhere to this instruction may lead to damage to braking system components and the lack of braking assistance on restarting the engine.
Towing your vehicle
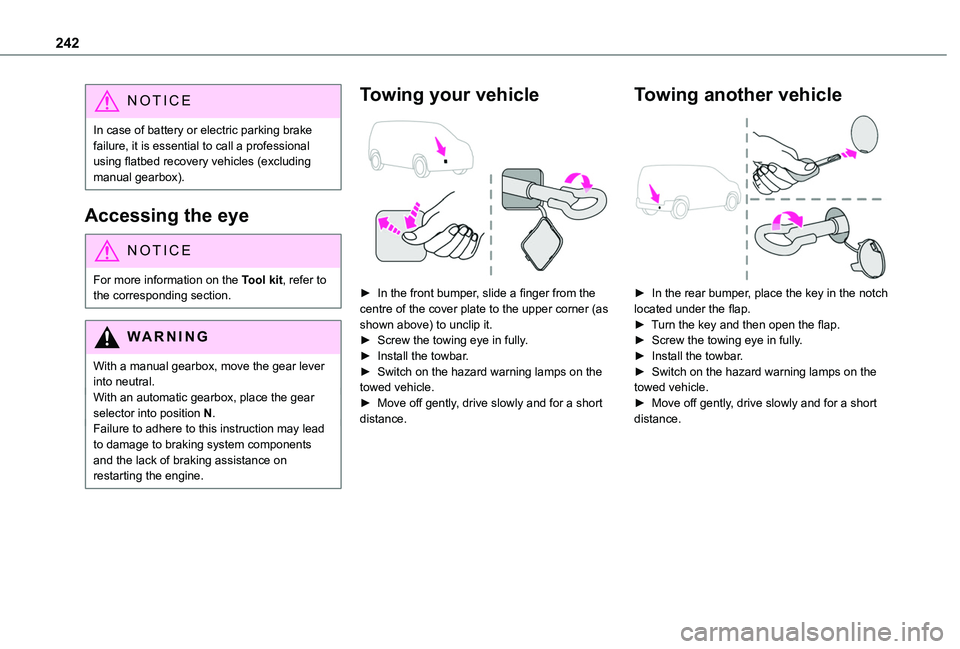
► In the front bumper, slide a finger from the centre of the cover plate to the upper corner (as shown above) to unclip it.► Screw the towing eye in fully.► Install the towbar.► Switch on the hazard warning lamps on the towed vehicle.► Move off gently, drive slowly and for a short distance.
Towing another vehicle
► In the rear bumper, place the key in the notch located under the flap.► Turn the key and then open the flap.► Screw the towing eye in fully.► Install the towbar.► Switch on the hazard warning lamps on the towed vehicle.► Move off gently, drive slowly and for a short distance.
Page 248 of 320
248
Engine technical data and
towed loads
Engines
The engine characteristics are given in the vehicle's registration document, as well as in sales brochures.Only the values available at the time of publication are presented in the tables.Contact any authorized Toyota retailer or Toyota authorized repairer, or any reliable repairer to obtain missing values.
NOTIC E
The maximum power corresponds to the value type-approved on a test bed, under conditions defined by European legislation (Directive 1999/99/EC).
For more information, contact a any authorized Toyota retailer or Toyota authorized repairer, or any reliable repairer.
Weights and towed loads
The weights and towed loads relating to the vehicle are indicated on the registration document, as well as in sales brochures.These values are also indicated on the manufacturer's plate or label.For more information, contact a any authorized Toyota retailer or Toyota authorized repairer, or any reliable repairer.The GTW (Gross Train Weight) and towed load values indicated are valid up to a maximum altitude of 1,000 metres. The towed load value must be reduced by 10% for each additional 1,000 metres of altitude.The maximum authorised nose weight corresponds to the weight permitted on the towball.
WARNI NG
When exterior temperatures are high, the vehicle performance may be limited in order to protect the engine. When the exterior temperature is higher than 37°C, reduce the towed weight.
WARNI NG
Towing even with a lightly loaded vehicle can adversely affect its road holding.Braking distances are increased when towing a trailer.When using a vehicle to tow, never exceed a speed of 62 mph (100 km/h) (observe the local legislation in force).
NOTIC E
If the exterior temperature is high, it is recommended that the engine is allowed to idle for 1 to 2 minutes after the vehicle comes to a stop, to facilitate its cooling.
Page 255 of 320
255
Touch screen BLUETOOTH audio system
10
Touch screen
BLUETOOTH audio
system
Multimedia audio system -
Bluetooth® telephone
NOTIC E
The functions and settings described vary according to the vehicle version and configuration.
WARNI NG
For safety reasons and because they require sustained attention by the driver, the following operations must be carried out with the vehicle stationary and the ignition on:– Pairing the smartphone with the system in Bluetooth mode.– Using the smartphone.– Changing the system settings and configuration.
NOTIC E
The system is protected in such a way that it will only operate in the vehicle.The Energy Economy Mode message is displayed when the system is about to enter the corresponding mode.
First steps
With the engine running, a press mutes the sound.With the ignition off, a press turns the system on.Increase or decrease the volume using the thumbwheel on the left-hand side.To access the menus, press this button on the touch screen.Press the back arrow to go back a level.
WARNI NG
To clean the screen, use a soft, non-abrasive cloth (e.g. spectacles cloth) with no additional product.Do not use sharp objects on the screen.Do not touch the screen with wet hands.
Certain information is displayed permanently in the upper bar of the touch screen:– Air conditioning information (depending on version).– Bluetooth connection.
– Indication of location data sharing.Selection of the audio source:– FM/AM/DAB radio stations (depending on equipment).– Telephone connected via Bluetooth and Bluetooth multimedia broadcast (streaming).– USB memory stick.– Media player connected via the auxiliary socket (depending on equipment).
NOTIC E
In very hot conditions, the volume may be limited to protect the system. It may go into standby (screen and sound off) for at least 5 minutes.The return to normal takes place when the temperature in the passenger compartment has dropped.
Page 259 of 320
259
Touch screen BLUETOOTH audio system
10
DAB (Digital Audio
Broadcasting) radio
Terrestrial Digital Radio
Choosing the DAB radio
Terrestrial digital radio (DAB) provides higher quality reception.The different "multiplexes/ensembles" offer a choice of radio stations arranged in alphabetical order.Press the "Radio" menu.
Press the "SOURCE" button.In the list of available sources, choose "DAB Radio".
Activating FM-DAB Tracking
"DAB" does not cover 100% of the territory.When the digital radio signal is poor, the "FM-DAB tracking" allows you to continue listening to the same station, by automatically
switching to the corresponding "FM" analogue station (if there is one).Press the "Radio Settings" button.
Activate "DAB-FM".
NOTIC E
If "FM-DAB tracking" is activated, there may be a difference of a few seconds when the system switches to "FM" analogue radio with sometimes a variation in volume.Once the digital signal quality is restored, the system automatically changes back to "DAB".
WARNI NG
If the "DAB" station being listened to is not available on "FM", or if the "FM-DAB tracking" is not activated, the sound will cut out while the digital signal is too weak.
Media
Selecting the source
Press the "Media" menu.
Press the "SOURCE" button.Select the source (USB, Bluetooth or AUX, depending on equipment).
USB port
Insert the USB memory stick into the USB port or connect the USB device to the USB port using a suitable cable (not supplied).
WARNI NG
To protect the system, do not use a USB hub.
The system builds playlists (in temporary memory); this operation can take from a few seconds to several minutes at the first connection.Playlists are updated whenever a USB memory stick is connected or the contents of a particular USB memory stick are changed. The lists are memorised: if they are not modified, the subsequent loading time will be shorter.
Auxiliary (AUX) jack socket
Depending on equipmentConnect a portable device (MP3 player, etc.) to the auxiliary jack socket using an audio cable (not supplied).This source is only available if "Aux Amplification" has been selected in the audio settings.
First adjust the volume on the portable device (to a high level). Then adjust the volume of the audio system.Controls are managed via the portable device.