2022 TOYOTA HIGHLANDER fuel cap
[x] Cancel search: fuel capPage 348 of 568

3485-2. Using the air conditioning system and defogger
■Operation of the air condition-
ing system in Eco drive mode
●In Eco drive mode, the air condi-
tioning system is controlled as fol-
lows to prioritize fuel efficiency:
• Engine speed and compressor operation controlled to restrict
heating/cooling capacity
• Fan speed restr icted when auto-
matic mode is selected
●To improve air co nditioning perfor-
mance, perform the following
operations:
• Adjust the fan speed
• Turn off Eco drive mode ( P.311)
• Turn off Eco air conditioning mode
●When the driving mode is set to
Eco driving mode, the air condi-
tioning eco mode will be turned on
automatically. Even in this case,
the air conditioning eco mode can
be turned off by pressing the Eco
air conditioning mode switch.
■When the outside temperature
is low
The dehumidification function may
not operate even when “A/C” is
pressed.
■Ventilation and air conditioning
odors
●To let fresh air in, set the air condi-
tioning system to the outside air
mode.
●During use, various odors from
inside and outside the vehicle may
enter into and a ccumulate in the
air conditioning system. This may
then cause odor to be emitted
from the vents.
●To reduce potential odors from
occurring:
• It is recommended that the air conditioning system be set to out-
side air mode prior to turning the
vehicle off.
• The start timing of the blower may
be delayed for a short period of
time immediately after the air con-
ditioning system is started in auto-
matic mode.
●When parking, the system auto-
matically switches to outside air
mode to encourage better air cir-
culation throughout the vehicle,
helping to reduce odors that occur
when starting the vehicle.
1 Press the automatic mode
switch.
The dehumidification function
begins to operate. Air outlets and
fan speed are automatically
adjusted according to the tempera-
ture setting and humidity.
2Adjust the temperature set-
ting.
3 To stop the operation, press
the “OFF” switch.
If the fan speed setting or air
flow modes are operated, the
automatic mode indicator goes
off. However, automatic mode
for functions other than that
operated is maintained.
■Using automatic mode
Fan speed is adjusted automati-
cally according to the temperature
setting and the am bient conditions.
Therefore, the fan may stop for a
while until warm or cool air is ready
to flow immediately after the auto-
matic mode switch is pressed.
This function automatically con-
trols the air conditioning airflow
so that priority is given to the
front seats. When the front pas-
Using automatic mode
Front seat concentrated
airflow mode (S-FLOW)
Page 404 of 568

4046-2. Maintenance
The OBD system determines
that a problem exists some-
where in the emission control
system. Your vehicle may not
pass the I/M test and may need
to be repaired. Contact your
Toyota dealer to service the
vehicle.
When the battery is discon-
nected or discharged
Readiness codes that are set
during ordinary driving are erased.
Also, depending on your driving
habits, the readiness codes may
not be completely set.
When the fuel tank cap is
loose
Vehicle exterior
ItemsCheck points
Doors
• Do the doors
operate
smoothly?
Engine hood
• Does the engine hood lock system
work properly?
Fluid leaks
• There should not be any signs of
fluid leakage
after the vehicle
has been parked.
Tires
• Is the tire infla-tion pressure
correct?
• The tires should not be damaged
or excessively
worn.
• Have the tires been rotated
according to the
maintenance
schedule?
• The wheel nuts should not be
loose.
Windshield
wipers/rear
window wiper
• The wiper blades should not show
any signs of
cracking, split-
ting, wear, con-
tamination or
deformation.
• The wiper blades should clear the
windshield/rear
window without
streaking or skip-
ping.
Emission inspection
and maintenance (I/M)
programs
Some states have vehicle
emission inspection pro-
grams which include OBD
(On Board Diagnostics)
checks. The OBD system
monitors the operation of
the emission control sys-
tem.
If the malfunction indica-
tor lamp comes on
Your vehicle may not pass
the I/M test in the follow-
ing situations:
Page 429 of 568
4296-3. Do-it-yourself maintenance
6
Maintenance and care
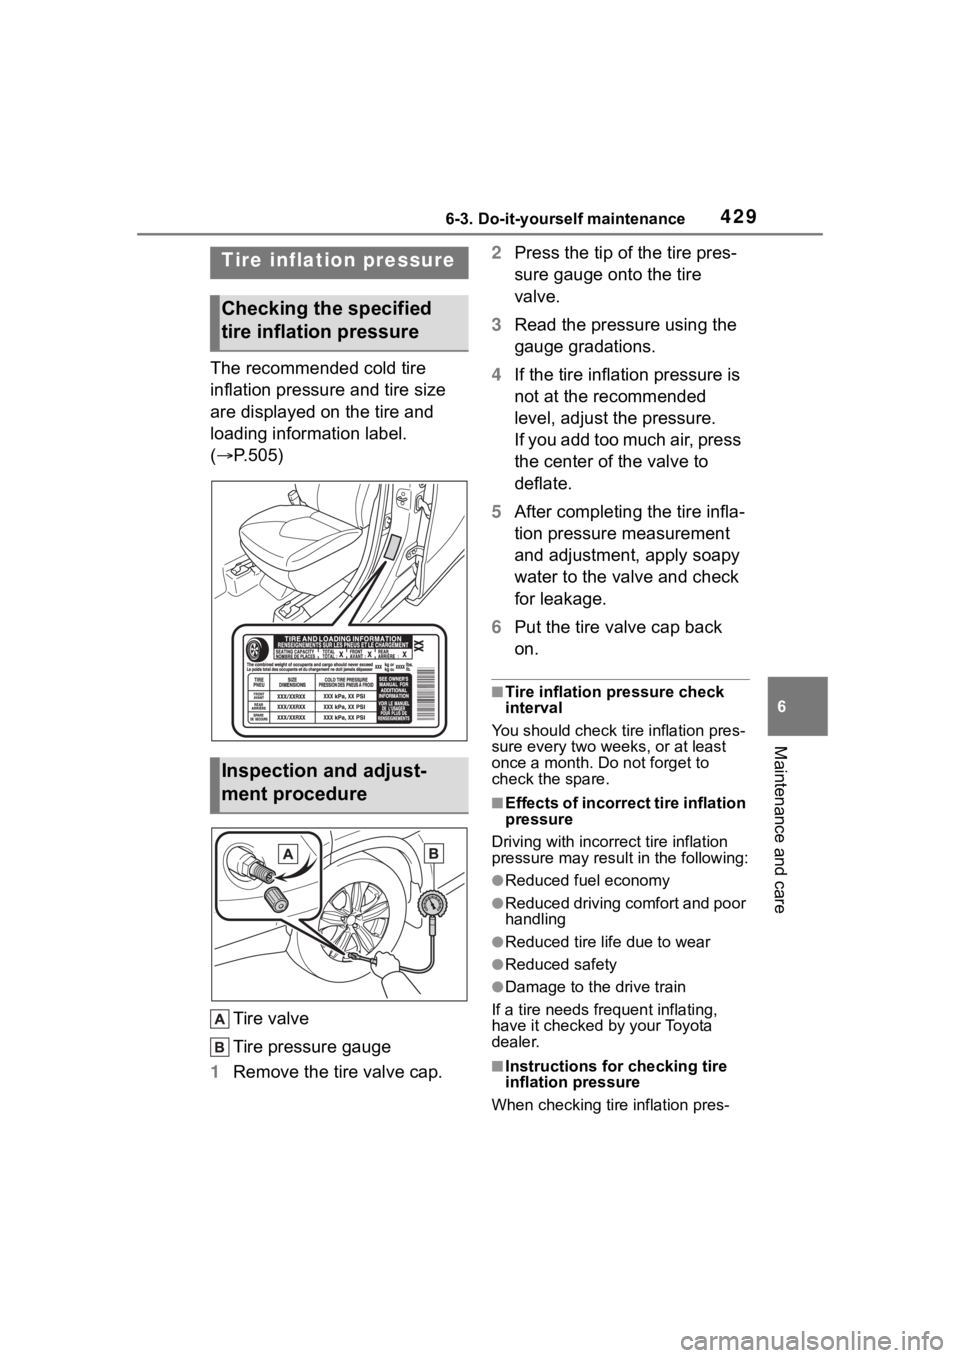
The recommended cold tire
inflation pressure and tire size
are displayed on the tire and
loading information label.
(P.505)
Tire valve
Tire pressure gauge
1 Remove the tire valve cap. 2
Press the tip of the tire pres-
sure gauge onto the tire
valve.
3 Read the pressure using the
gauge gradations.
4 If the tire inflation pressure is
not at the recommended
level, adjust the pressure.
If you add too much air, press
the center of the valve to
deflate.
5 After completing the tire infla-
tion pressure measurement
and adjustment, apply soapy
water to the valve and check
for leakage.
6 Put the tire valve cap back
on.
■Tire inflation pressure check
interval
You should check ti re inflation pres-
sure every two week s, or at least
once a month. Do not forget to
check the spare.
■Effects of incorrect tire inflation
pressure
Driving with incorrec t tire inflation
pressure may resul t in the following:
●Reduced fuel economy
●Reduced driving comfort and poor
handling
●Reduced tire life due to wear
●Reduced safety
●Damage to the drive train
If a tire needs frequent inflating,
have it checked by your Toyota
dealer.
■Instructions for checking tire
inflation pressure
When checking tire inflation pres-
Tire inflation pressure
Checking the specified
tire inflation pressure
Inspection and adjust-
ment procedure
Page 463 of 568

4637-2. Steps to take in an emergency
7
When trouble arises
■Parking brake indicator (warning buzzer)*
*: A buzzer will sound if the vehicle is driven at a speed of app roximately 3
mph (5 km/h) or more.
■Brake hold operated indicator
■Warning buzzer
In some cases, the buzzer may not
be heard due to being in a noisy
location or audio sound.
■Front passenger detection sen-
sor, seat belt reminder and
warning buzzer
●If luggage is placed on the front
passenger seat, the front passen-
ger detection sensor may cause
the warning light to flash and the
warning buzzer to sound even if a
passenger is not sitting in the
seat.
●If a cushion is placed on the seat,
the sensor may n ot detect a pas-
senger, and the warning light may
not operate properly.
■SRS warning light
This warning light system monitors
the airbag sensor assembly, front
impact sensors, side impact sensors
(front), side impact sensors (front door), side impact sensors (rear),
driver’s seat position sensor,
driver’s seat belt buckle switch, front
passenger occupan
t classification
system (ECU and s ensors), “PASS
AIR BAG ON” indicator light, “PASS
AIR BAG OFF” indicator light, front
passenger’s seat belt buckle switch,
driver’s seat belt pretensioner, front
passenger’s seat b elt pretensioner
and force limiter, airbags, intercon-
necting wiring and power sources.
( P. 3 4 )
■If the malfunction indicator
lamp comes on while driving
First check the following:
●Is the fuel tank empty?
If it is, fill the fuel tank immediately.
●Is the fuel ta nk cap loose?
If it is, tighten it securely.
The light will go off after several
driving trips.
If the light does not go off even after
several trips, con tact your Toyota
Warning lightDetails/Actions
(flashes)
(U.S.A.)
or
(flashes)
(Canada)
It is possible that the parking brake is not fully engaged or
released
Operate the parking brake switch once again.
This light comes on when the parking brake is not released.
If the light turns of f after the parking brake is fully release d,
the system is operating normally.
Warning lightDetails/Actions
(flashes)
Indicates a malfunction in the brake hold system
Have the vehicle inspected by your Toyota dealer
immediately.
Page 468 of 568

4687-2. Steps to take in an emergency
■If “Engine Stopped Steering
Power Low” is displayed
This message is displayed if the
engine is stopped while driving.
When steering wheel operations are
heavier than usual, grip the steering
wheel firmly and operate it using
more force th an usual.
■If “Shift to P when Parked” is
displayed
This message is displayed when the
driver’s door is opened without turn-
ing the engine switch off with the
shift lever in any position other than
P. Change the shift lever to P.
■If “Auto Power OFF to Conserve
Battery” is displayed
Power was cut off due to the auto-
matic power off function. Next time
when starting the engine, increase
the engine speed slightly and main-
tain that level for approximately 5
minutes to recha rge the battery.
■If “Headlight System Malfunc-
tion Visit Your Dealer” is dis-
played
The following systems may be mal-
functioning. Have the vehicle
inspected by your Toyota dealer
immediately.
●The LED headlight system (if AFS
[Adaptive Front-lighting System]
equipped)
●AFS (Adaptive Fr ont-lighting Sys-
tem) (if equipped)
●The automatic headlight leveling
system (if equipped)
●Automatic High Beam
■If “Radar Cruise Control
Unavailable” is displayed
The dynamic radar cruise control
with full-speed range system cannot
be used temporarily. Use the system
when it becomes available again.
■If a message that indicates the
malfunction of front camera is
displayed
The following systems may be sus-
pended until the problem shown in
the message is resolved. (P.233,
462)
●PCS (Pre-Collision system)
●LTA (Lane Tracing Assist)
●Automatic High Beam
●RSA (Road Sign Assist) (if
equipped)
●Dynamic radar cruise control with
full-speed range
■If a message that indicates the
malfunction of radar sensor is
displayed
The following systems may be sus-
pended until the problem shown in
the message is resolved. (P.233,
462)
●PCS (Pre-Collision system)
●LTA (Lane Tracing Assist)
●Dynamic radar cruise control with
full-speed range
■If “AWD System Overheated
Switching to 2WD Mode” or
“AWD System Overheated 2WD
Mode Engaged” is displayed
This message may be displayed
when driving under extremely high
load conditions.
Drive the vehicle at low speeds or
stop the vehicle in a safe place with
the engine running until the mes-
sage is cleared.
If the message is not cleared, have
the vehicle inspected by your Toyota
dealer.
■If “Check Fuel Cap” is dis-
played
The fuel tank cap is not properly
installed. Correctly install the fuel
tank cap.
Page 486 of 568
4867-2. Steps to take in an emergency
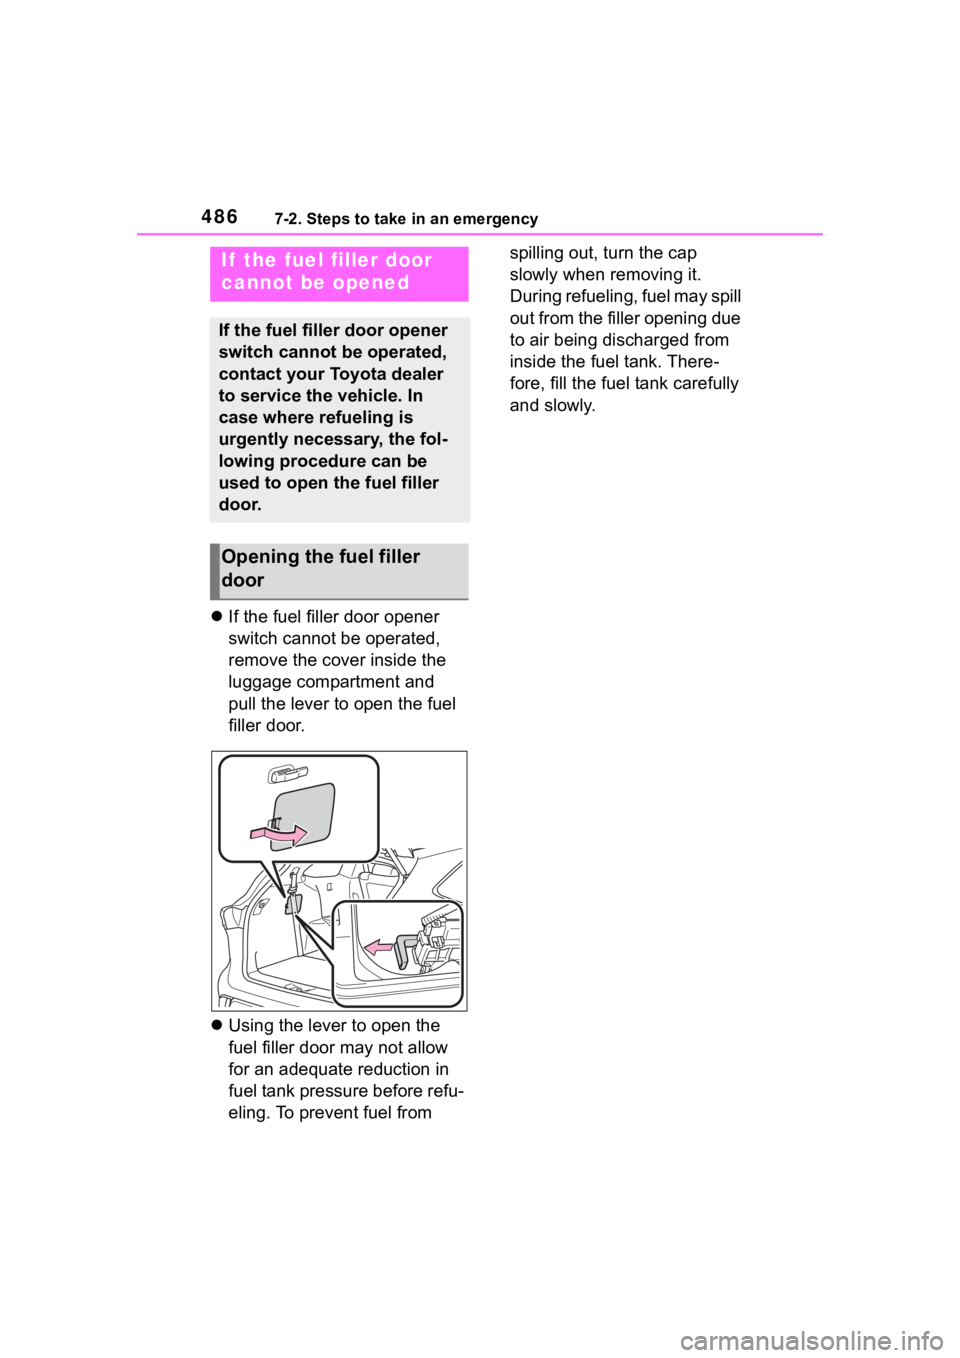
If the fuel filler door opener
switch cannot be operated,
remove the cover inside the
luggage compartment and
pull the lever to open the fuel
filler door.
Using the lever to open the
fuel filler door may not allow
for an adequate reduction in
fuel tank pressure before refu-
eling. To prevent fuel from spilling out, turn the cap
slowly when removing it.
During refueling, fuel may spill
out from the filler opening due
to air being discharged from
inside the fuel tank. There-
fore, fill the fuel tank carefully
and slowly.
If the fuel filler door
cannot be opened
If the fuel filler door opener
switch cannot be operated,
contact your Toyota dealer
to service the vehicle. In
case where refueling is
urgently necessary, the fol-
lowing procedure can be
used to open the fuel filler
door.
Opening the fuel filler
door
Page 500 of 568

5008-1. Specifications
8-1.Specifications
*1: Unladen vehicle
*2: For GSU70L-ARZSHA, GSU75L-ARZSHA models*7
*3
: For 7-seat models
*4: For 8-seat models
*5: For GSU75L-ARZGHA models*7
*6
: Except for GSU75L-ARZGHA models*7
*7
: The model code is indicated o n the Certification Label. (P.500)
■Vehicle identification num-
ber The vehicle identification num-
ber (VIN) is the legal identifier
for your vehicle. This is the pri-
Maintenance data (fuel, oil level, etc.)
Dimensions and weight
Overall length194.9 in. (4950 mm)
197.3 in. (5012 mm)
*2
Overall width76 in. (1930 mm)
Overall height*168.1 in. (1730 mm)
Wheelbase112.2 in. (2850 mm)
TreadFront65.3 in. (1659 mm)
Rear65.4 in. (1662 mm)
Vehicle capacity weight
(Occupants + luggage)1225 lb. (555 kg)*3
1330 lb. (605 kg)*4,5
1390 lb. (630 kg)*4,6
Trailer Weight Rating
(Trailer weight + cargo weight)5000 lb. (2200 kg)
Seating capacity
Seating capacity7-seat models8-seat models
7 (Front 2, Rear 5)8 (Front 2, Rear 6)
Vehicle identification
Page 501 of 568
5018-1. Specifications
8
Vehicle specifications
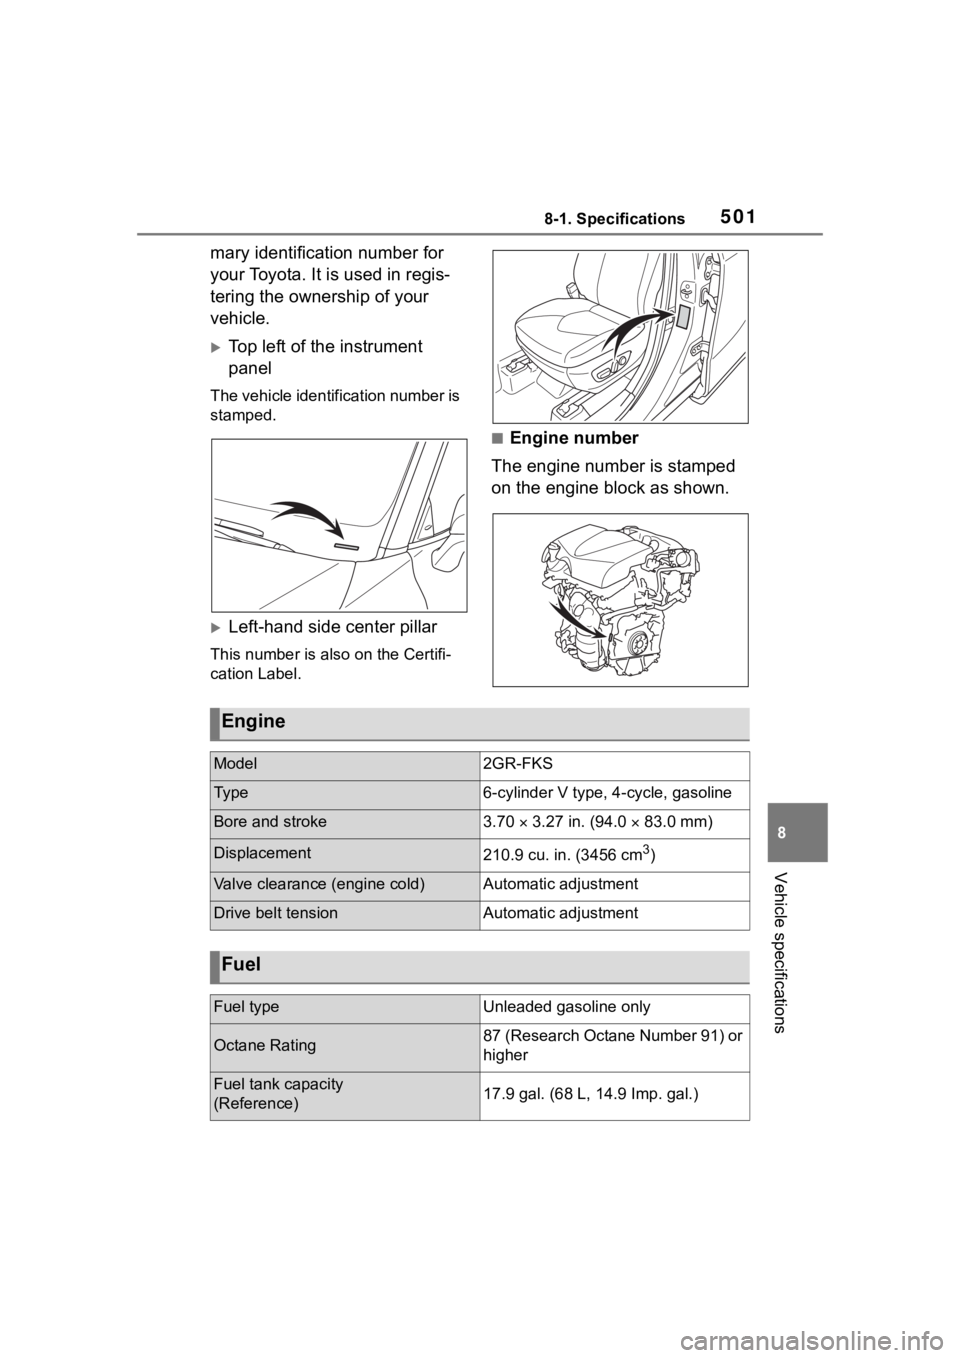
mary identification number for
your Toyota. It is used in regis-
tering the ownership of your
vehicle.
Top left of the instrument
panel
The vehicle identification number is
stamped.
Left-hand side center pillar
This number is also on the Certifi-
cation Label.
■Engine number
The engine number is stamped
on the engine block as shown.
Engine
Model2GR-FKS
Ty p e6-cylinder V type, 4 -cycle, gasoline
Bore and stroke3.70 3.27 in. (94.0 83.0 mm)
Displacement210.9 cu. in. (3456 cm3)
Valve clearance (engine cold)Automatic adjustment
Drive belt tensionAutomatic adjustment
Fuel
Fuel typeUnleaded gasoline only
Octane Rating87 (Research Octane Number 91) or
higher
Fuel tank capacity
(Reference)17.9 gal. (68 L, 14.9 Imp. gal.)