2022 TOYOTA GR SUPRA transmission
[x] Cancel search: transmissionPage 26 of 356
262-1. QUICK REFERENCE
The LED and indicator light go
out.
The parking brake is released.
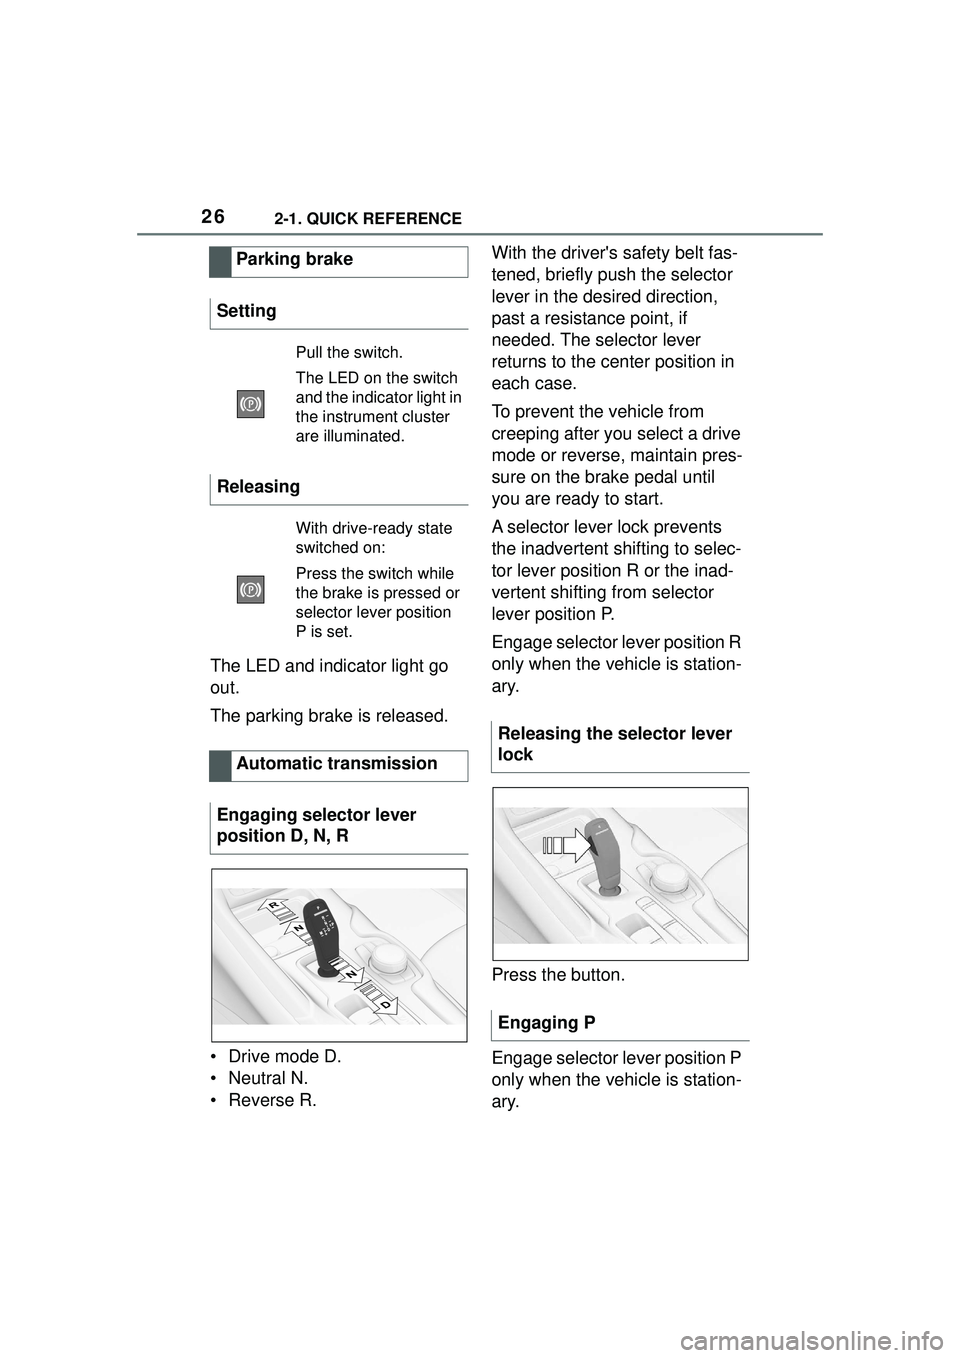
• Drive mode D.
• Neutral N.
•Reverse R.With the driver's safety belt fas-
tened, briefly push the selector
lever in the desired direction,
past a resistance point, if
needed. The selector lever
returns to the center position in
each case.
To prevent the vehicle from
creeping after you select a drive
mode or reverse, maintain pres-
sure on the brake pedal until
you are ready to start.
A selector lever lock prevents
the inadvertent shifting to selec-
tor lever position R or the inad-
vertent shifting from selector
lever position P.
Engage selector lever position R
only when the vehicle is station-
ary.
Press the button.
Engage selector lever position P
only when the vehicle is station-
ary.
Parking brake
Setting
Pull the switch.
The LED on the switch
and the indica tor light in
the instrument cluster
are illuminated.
Releasing
With drive-ready state
switched on:
Press the switch while
the brake is pressed or
selector lever position
P is set.
Automatic transmission
Engaging selector lever
position D, N, R
Releasing the selector lever
lock
Engaging P
Page 27 of 356
272-1. QUICK REFERENCE
2
QUICK REFERENCE
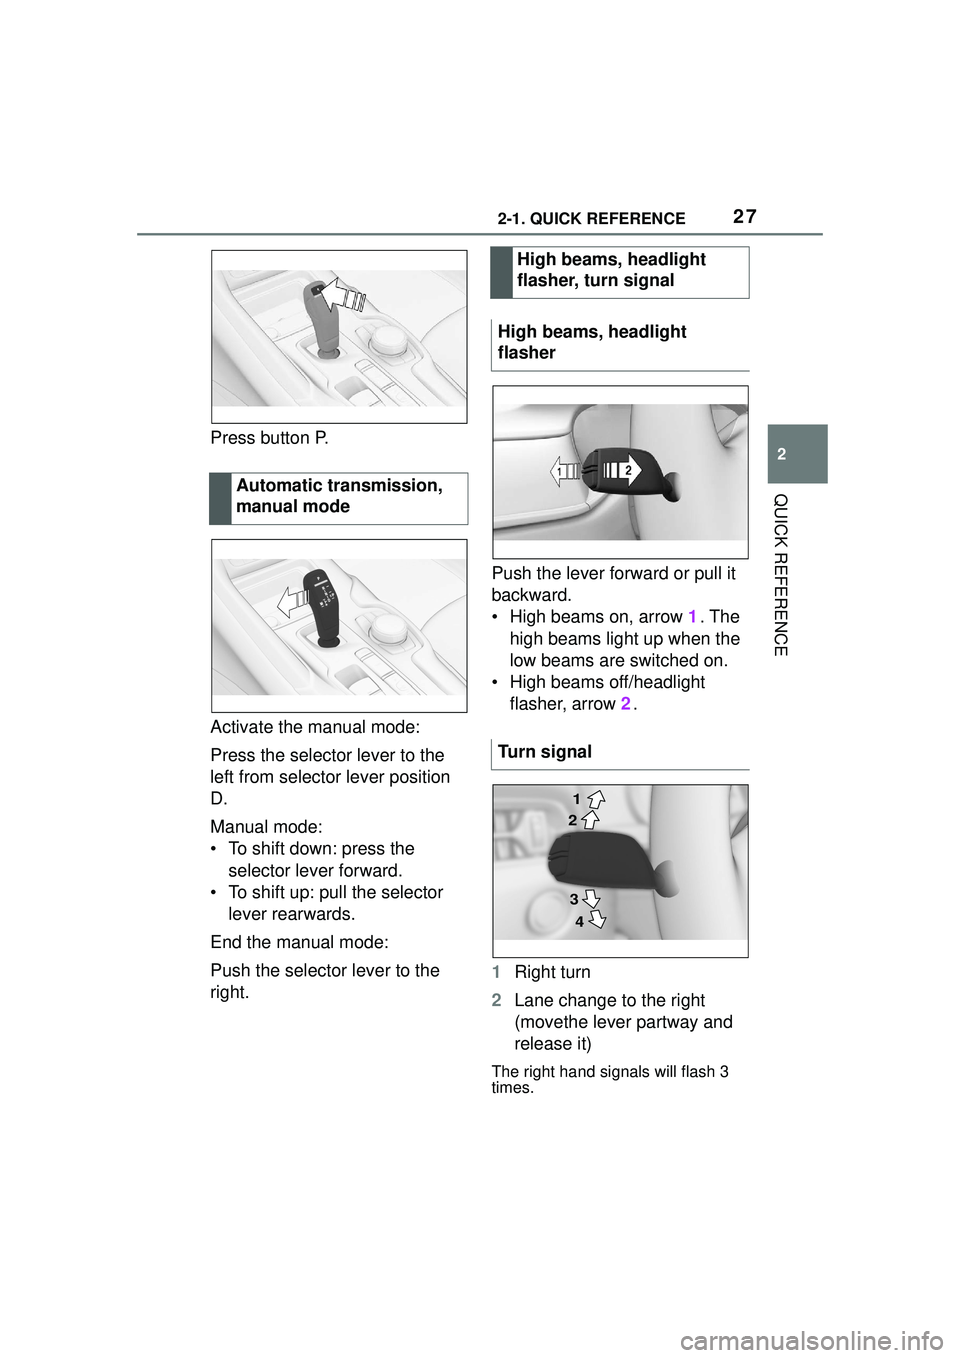
Press button P.
Activate the manual mode:
Press the selector lever to the
left from selector lever position
D.
Manual mode:
• To shift down: press the selector lever forward.
• To shift up: pull the selector lever rearwards.
End the manual mode:
Push the selector lever to the
right. Push the lever forward or pull it
backward.
• High beams on, arrow 1. The
high beams light up when the
low beams are switched on.
• High beams off/headlight flasher, arrow 2.
1 Right turn
2 Lane change to the right
(movethe lever partway and
release it)
The right hand signals will flash 3
times.
Automatic transmission,
manual mode
High beams, headlight
flasher, turn signal
High beams, headlight
flasher
Turn signal
2 1
3 4
Page 39 of 356
393-1. CONTROLS
3
CONTROLS
9 Parking brake P.119
10 Automatic transmission
selector lever P.126 11
Switch drive-ready
state on/off P.115
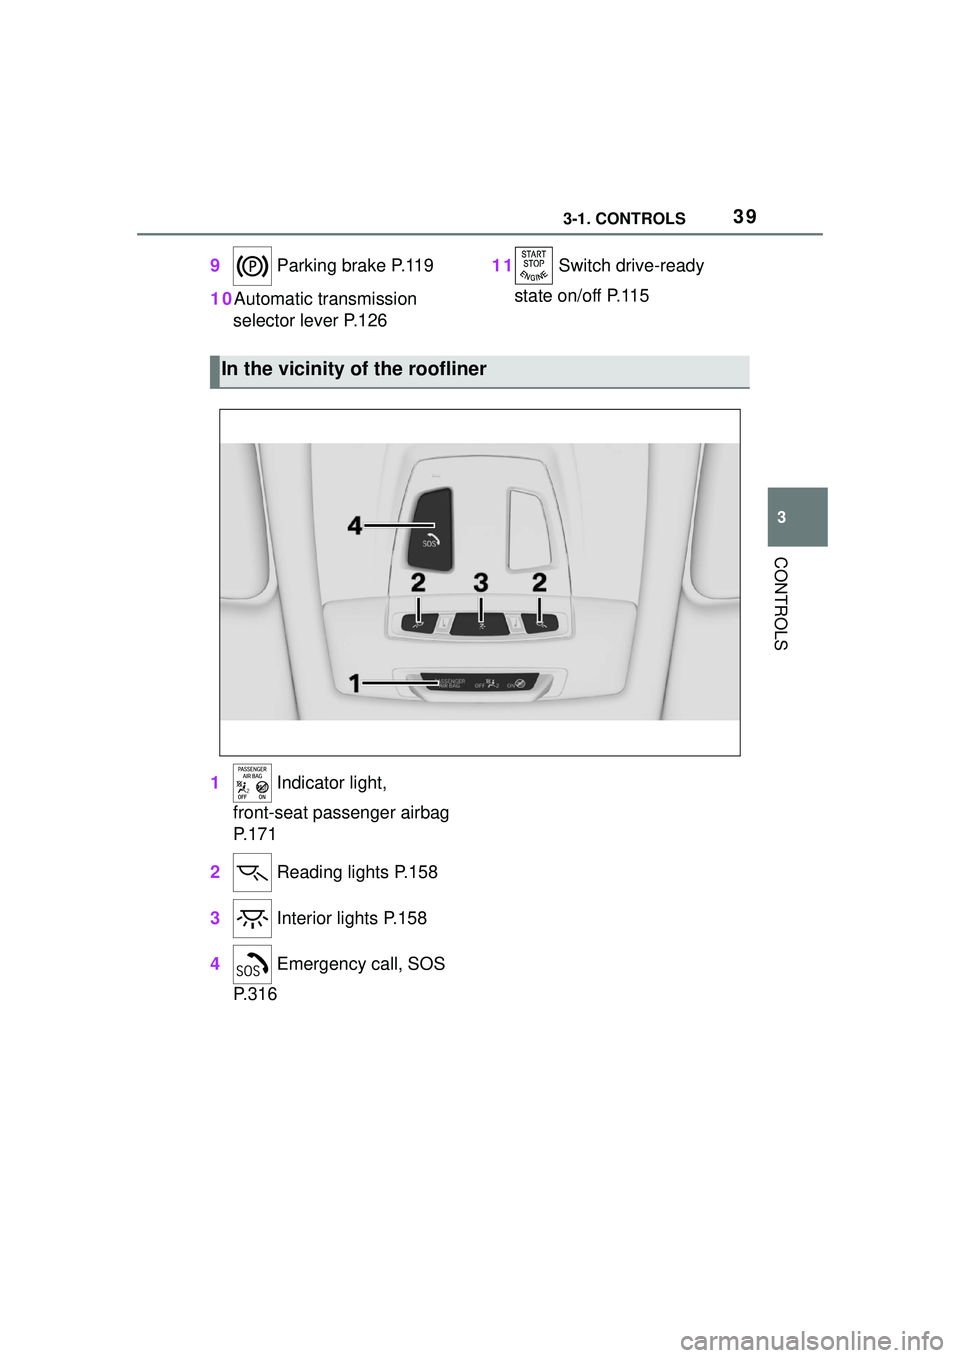
1 Indicator light,
front-seat passenger airbag
P.171
2 Reading lights P.158
3 Interior lights P.158
4 Emergency call, SOS
P.316
In the vicinity of the roofliner
Page 45 of 356

453-1. CONTROLS
3
CONTROLS
1Depress the brake pedal.
2 Press the Start/Stop button. The ignition is activated auto-
matically for a brief time and is
stopped as soon as the engine
starts.
Most of the indicator/warning
lights in the instrument cluster
light up for a varied length of
time.
Depending on the engine condi-
tion, the full drive power may not
be available for approximately
30 seconds after starting the
engine. In this case, the vehicle
will not accelerate as usual.
READY in the instrument cluster
indicates that drive-ready state
is switched on.
1
Engage selector lever posi-
tion P with the vehicle
stopped.
2 Press the Start/Stop button.
The engine is switched off. The
vehicle switches into standby state.
3Set the parking brake.
WARNING
An unsecured vehicle can begin
to move and possibly roll away.
There is a risk of an accident.
Before exiting, secure the vehicle
against rolling.
In order to ensure that the vehicle
is secured against rolling away,
follow the following:
• Set the parking brake.
• On uphill grades or on a down-
hill slope, turn the front wheels
in the direction of the curb.
• On uphill grades or on a down- hill slope, also secure the vehi-
cle, for instance with a wheel
chock.
NOTICE
In the case of repeated starting
attempts or repeated starting in
quick succession, the fuel is not
burned or is inadequately burned.
The catalytic converter can over-
heat. There is a risk of damage to
property. Avoid repeated starting
in quick succession.
Switching on drive-ready
state
Concept
Drive-ready state
is switched on via
the Start/Stop but-
ton:
Automatic transmission
Gasoline engine
Display in the instrument
cluster
Switching off drive-ready
state
Page 71 of 356
713-1. CONTROLS
3
CONTROLS
The device is connected and dis-
played in the device list, refer to
page 75.
All requirements are met and all
required steps were completed
in the specified order. Despite
that, the mobile device does not
function as expected.
In this case, the following expla-
nations can help:
Why could the mobile phone not
be paired or connected?
• There are too many Bluetooth devices connected to the
mobile phone or vehicle.
In the vehicle, delete Bluetooth
connections with other devices.
Delete all known Bluetooth connec-
tions from the device list on the
mobile phone and start a new
device search.
• The mobile phone is in power-save mode or has only
a limited remaining battery
life.
Charge mobile phone.
Why does the mobile phone no
longer react?
• The applications on the mobile phone do not function
anymore.
Switch the mobile phone off and on
again.
• Too high or too low ambient temperature for mobile phone
operation.
Do not subject the mobile phone to
extreme ambient temperatures.
Why can phone functions not be
used via Toyota Supra Com-
mand?
• The mobile phone may not be properly configured, for
instance as Bluetooth audio
device.
Connect the mobile phone with the
telephone or additional phone func-
tion.
Why are no or not all phone
book entries displayed or why
are they incomplete?
• Transmission of the phone book entries is not yet com-
plete.
• It is possible that only the phone book entries of the
mobile phone or the SIM card
are transmitted.
• It may not be possible to dis- play phone book entries with
special characters.
• It may not be possible to transmit contacts from social
networks.
• The number of phone book entries to be stored is too
high.
• Data volume of the contact too large, for instance due to
stored information such as
notes.
Reduce the data volume of the con-
tact.
• A mobile phone can only be connected as audio source or
as telephone.
Frequently asked ques-
tions
Page 82 of 356
823-1. CONTROLS
4Insert a type CR 2032 3V
battery with the positive side
facing up.
5 Press the cover closed.
6 Push the integrated key into
the vehicle key until the inte-
grated key engages.
Additional remote controls are
available from your Toyota
dealer.
A lost remote control can be
blocked and replaced by your
Toyota dealer.
If the lost remote control has an
assigned driver profile, refer to
page 65, the connection to this
remote control must be deleted.
A new remote control can then
be assigned to the driver profile.
A vehicle message, refer to
page 134, is displayed.
Remote control detection by the
vehicle may malfunction under the following circumstances:
• The battery of the vehicle key
is discharged. For replacing
the battery, refer to page 81.
• Interference of the radio con- nection from transmission
towers or other equipment
with high transmitting power.
• Shielding of the remote con- trol due to metal objects.
Do not transport the remote control
together with metal objects.
• Interference of the radio con-nection from mobile phones
or other electronic devices in
direct proximity to the remote
control.
Do not transport the remote control
together with electronic devices.
• Interference of radio transmis-sion by a chargi ng process of
mobile devices, for instance
charging of a mobile phone.
• The remote control is in direct proximity of the wireless
charging tray.
Place the remote control down at a
different location.
In the case of interference, the
vehicle can be unlocked and
locked from the outside with the
integrated key, refer to page 83.
Have old batteries dis-
posed of by your Toyota
dealer or take them to a
collection point.
Additional remote controls
Loss of the remote con-
trols
Malfunction
General information
Page 126 of 356
1263-1. CONTROLS
3Wipers return to their resting
position and are ready again
for operation.
The Automatic transmission
combines the functions of man-
ual shifting, if needed.
Selector lever position for nor-
mal vehicle operation. All gears
for forward travel are activated
automatically. Engage selector lever position R
only when the vehicle is station-
ary.
The vehicle may be pushed or
roll without power, for instance
in vehicle washes, refer to page
128, in selector lever position N.
Selector lever position, for
instance for parking the vehicle.
The transmission blocks the
drive wheels in selector lever
position P.
Engage selector lever position P
only when the vehicle is station-
ary.
■P is engaged automatically
Selector lever position P is
engaged automatically in situa-
tions such as the following:
After the drive-ready state is
switched off and selector
lever position R, D or M is
engaged.
After the standby state has
been switched off when selec-
tor lever position N is
engaged.
If the driver's safety belt is
unbuckled, the driver's door is
opened, and the brake pedal
is not pressed while the vehi-
Automatic transmission
Concept
Safety information
WARNING
An unsecured vehicle can begin
to move and possibly roll away.
There is a risk of an accident.
Before exiting, secure the vehicle
against rolling.
In order to ensure that the vehicle
is secured against rolling away,
follow the following:
●Set the parking brake.
●On uphill grades or on a down-
hill slope, turn the front wheels
in the direction of the curb.
●On uphill grades or on a down-
hill slope, also secure the vehi-
cle, for instance with a wheel
chock.
Selector lever positions
Drive mode D
Reverse R
Neutral N
Parking position P
Page 129 of 356
1293-1. CONTROLS
3
CONTROLS
To shift down: press the
selector lever forward.
To shift up: pull the selector
lever rearwards.
Push the selector lever to the
right.
D is displayed in the instrument
cluster.
The shift paddles on the steer-
ing wheel allow you to shift
gears quickly while keeping both
hands on the steering wheel.
■Shifting
The vehicle only shifts at suit-
able engine and road speeds.
■Short-term manual mode
In selector lever position D,
actuating a shift paddle switches
into manual mode temporarily.
After conservative driving in
manual mode without accelera-
tion or shifting via the shift pad-
dles for a certain amount of
time, the transmission switches
back to automatic mode. It is possible to switch into auto-
matic mode as follows:
Pull and hold right shift pad-
dle.
In addition to the briefly pulled
right shift paddle, briefly pull
the left shift paddle.
■Continuous manual mode
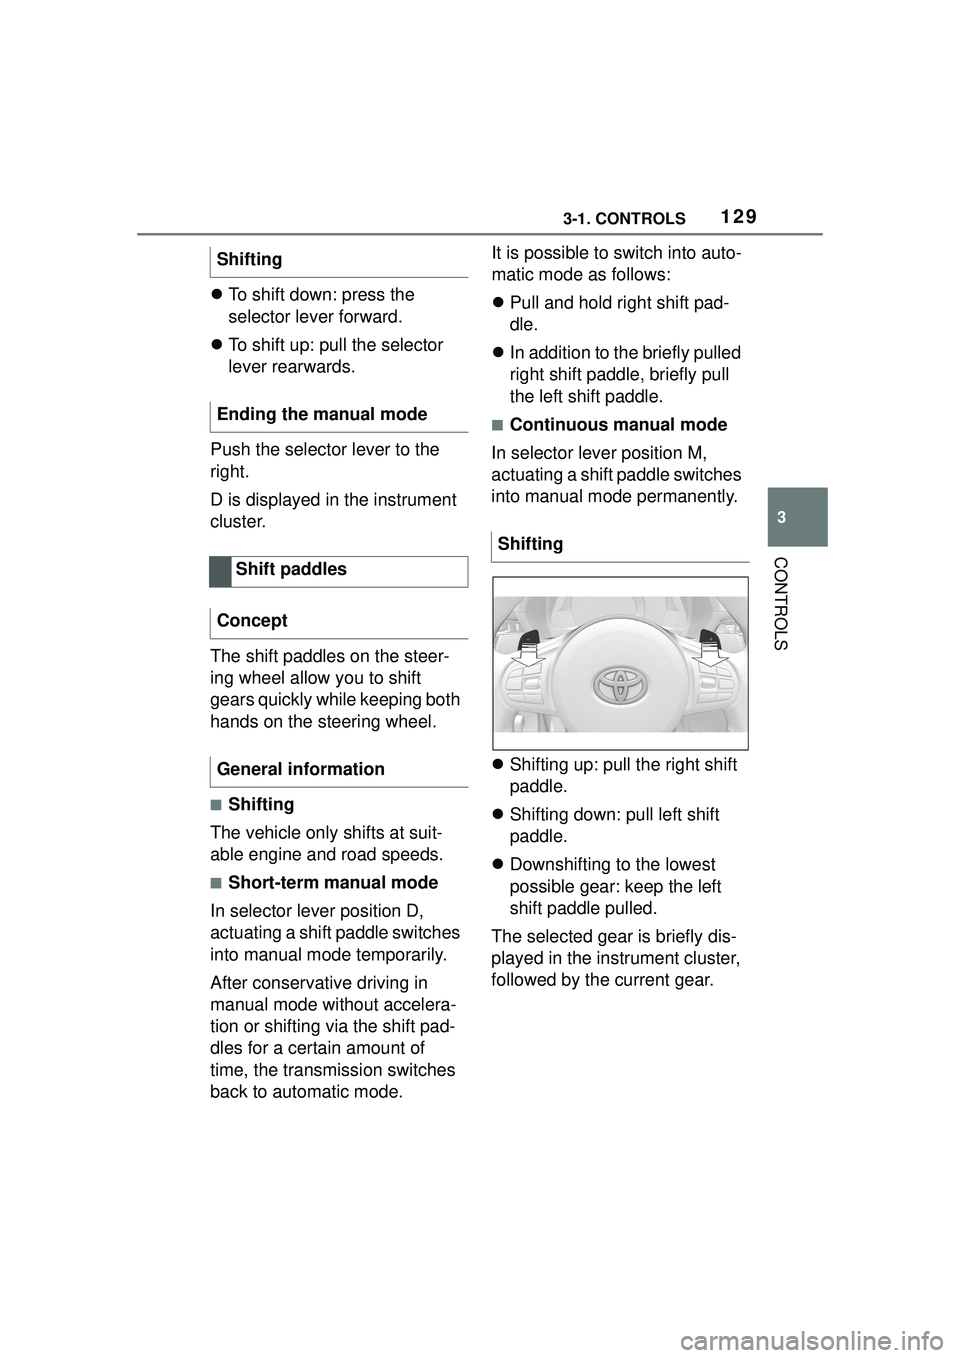
In selector lever position M,
actuating a shift paddle switches
into manual mode permanently.
Shifting up: pull the right shift
paddle.
Shifting down: pull left shift
paddle.
Downshifting to the lowest
possible gear: keep the left
shift paddle pulled.
The selected gear is briefly dis-
played in the instrument cluster,
followed by the current gear.
Shifting
Ending the manual mode
Shift paddles
Concept
General information
Shifting