2022 TOYOTA GR SUPRA tow
[x] Cancel search: towPage 16 of 356

162-1. QUICK REFERENCE
2-1.QUICK REFERENCE
Before starting the engine, per-
form the necessary routine vehi-
cle checks. It is the owner’s
responsibility to perform routine
vehicle checks and any legally
necessary yearly inspections,
according to any local laws and
regulations. For details about
inspection procedures, refer to
the Service Book (Maintenance
Guide).
Entering
Before driving
Vehicle inspection
WARNING
Do not leave flammable objects in
the vehicle.
If a fuel can, combustible car care
products, spray cans, etc. are left
in the vehicle, there is a danger
that they may catch fire and
explode. Also, when the vehicle is
parked with the doors and win-
dows completely closed, do not
leave containers of carbonated
beverages in the vehicle, as the
temperature inside the vehicle
can increase to over 122°F,
depending on the location.
WARNING
Make sure to securely stow all
luggage.
In the case of sudden braking or a
collision, unsecured objects may
fly about and strike the occupants,
possibly causing injury. Make sure
to stow luggage securely in the
luggage compartment.
WARNING
Do not leave objects on the
driver’s side floor.
Page 29 of 356

292-1. QUICK REFERENCE
2
QUICK REFERENCE
■Activating/deactivating
To activate: press the lever up
once from its standard position,
arrow 1.
To deactivate: press the lever
back into the standard position.
■Adjusting the sensitivity
Turn the thumbwheel on the
wiper lever. Pull the wiper lever towards you.
Rain sensor
Cleaning the windshield
Climate control
ButtonFunction
Temperature.
Recirculated-air mode.
Maximum cooling.
AUTO program.
Air distribution, manual.
Switching off.
Defrost and defog the
windshield.
Rear window defroster.
Page 41 of 356

413-1. CONTROLS
3
CONTROLS
depressions or in tight curves.
• When the camera field of view is covered, for instance by a
fogged up windshield or
labels.
• When the camera lens is dirty or damaged.
• When driving toward bright lights or strong reflections,
e.g., because of a setting sun.
• When it is dark outside.
• Camera behind the wind- shield: if the camera has over-
heated and been temporarily
switched off due to exces-
sively high temperatures.
• Camera behind the wind- shield: during calibration of
the camera immediately after
vehicle delivery.
If applicable, a Check Control
message is displayed if the sys-
tem fails.
The radar sensor is located in
the front bumper.
*: if equipped
The radar sensors are located in
the bumper.
The radar sensors may not be
fully functional or may not be
available in the following situa-
tions:
• If sensors are dirty, such as due to icing.
• If sensors are covered, such as by labels, films or a num-
ber plate baseplate.
• If the sensor is not aligned correctly, for instance due to
parking damage.
• If the radiation range of the sensors is covered, e.g., by
protruding cargo.
• If the field of view of the sen- sors is covered, e.g., by
garage walls, hedges or snow
hills.
• After improperly performed work on the vehicle paint in
the area of the sensors.
• On steep hilltops or in sharp
Radar sensors
Front radar sensor
Radar sensors, side, rear*
System limits of the radar
sensors
Page 42 of 356

423-1. CONTROLS
dips in the road.
If applicable, a Check Control
message is displayed if the sys-
tem fails.
*: if equipped
The detection of objects with
ultrasound measurements can
run into physical limits, e.g., in
the following situations:
• In case of dirty sensors.
• In case of covered sensors, such as due to labels.
• If the sensor is not aligned correctly, for instance due to
parking damage.
• After improperly performed work on the vehicle paint in
the area of the sensors.
• For small children and ani- mals.
• For persons with certain cloth- ing, for instance coats.
• In case of external interfer- ence of the ultrasound, for
instance from passing vehi- cles, loud machines or other
ultrasonic sources.
• Under certain weather condi- tions, e.g., high relative
humidity, wet conditions,
snowfall, cold, extreme heat,
or strong wind.
• With tow bars and trailer cou- plings of other vehicles.
• With thin or wedge-shaped objects.
• With moving objects.
• With elevated, protruding objects such as ledges.
• With objects with corners, edges, and smooth surfaces.
• With objects with a fine sur- face structure such as fences.
• For objects with porous sur- faces.
• With small and low objects, for instance boxes.
• With soft obstacles or obsta- cles covered in foam material.
• With plants and bushes.
• In automatic car washes.
• On uneven surfaces, such as speed bumps.
• Due to heavy exhaust.
• Cargo that extends beyond the perimeter of the vehicle is
not taken into account by the
ultrasonic sensors.
If applicable, a Check Control
message is displayed if the sys-
tem fails.
Ultrasound sensors
Ultrasound sensors in the
front/rear bumpers*
Ultrasound sensors of
the Parking Sensor, for
instance in the bum-
pers.
System limits of the ultra-
sound sensors
Page 82 of 356

823-1. CONTROLS
4Insert a type CR 2032 3V
battery with the positive side
facing up.
5 Press the cover closed.
6 Push the integrated key into
the vehicle key until the inte-
grated key engages.
Additional remote controls are
available from your Toyota
dealer.
A lost remote control can be
blocked and replaced by your
Toyota dealer.
If the lost remote control has an
assigned driver profile, refer to
page 65, the connection to this
remote control must be deleted.
A new remote control can then
be assigned to the driver profile.
A vehicle message, refer to
page 134, is displayed.
Remote control detection by the
vehicle may malfunction under the following circumstances:
• The battery of the vehicle key
is discharged. For replacing
the battery, refer to page 81.
• Interference of the radio con- nection from transmission
towers or other equipment
with high transmitting power.
• Shielding of the remote con- trol due to metal objects.
Do not transport the remote control
together with metal objects.
• Interference of the radio con-nection from mobile phones
or other electronic devices in
direct proximity to the remote
control.
Do not transport the remote control
together with electronic devices.
• Interference of radio transmis-sion by a chargi ng process of
mobile devices, for instance
charging of a mobile phone.
• The remote control is in direct proximity of the wireless
charging tray.
Place the remote control down at a
different location.
In the case of interference, the
vehicle can be unlocked and
locked from the outside with the
integrated key, refer to page 83.
Have old batteries dis-
posed of by your Toyota
dealer or take them to a
collection point.
Additional remote controls
Loss of the remote con-
trols
Malfunction
General information
Page 92 of 356

923-1. CONTROLS
3"Doors/Key"
4 "Turn off after door opening"
Opening the front doors establishes
the idle state, refer to page 43.
When the vehicle is locked, the
vehicle alarm system reacts to
the following changes:
• Opening a door, the hood or
the trunk lid.
• Movements in the car's inte- rior.
• Changes in the vehicle tilt, e. g., during attempts at stealing
a wheel or when towing the
vehicle.
• Disconnected battery voltage.
• Improper use of the socket for OBD Onboard Diagnosis.
• Locking the vehicle while a device is connected to the
socket for the OBD Onboard-
Diagnosis. For socket for the
OBD Onboard Diagnosis,
refer to page 302.
The alarm system signals the
following changes visually and
acoustically:
• Acoustic alarm: Depending on local regulations, the acoustic
alarm may be suppressed.
• Visual alarm: By flashing of the hazard warning system
and headlights, where
required. Do not modify the system to
ensure function of the alarm
system.
When you unlock and lock the
vehicle, either with the remote
control or with Comfort entry, the
alarm system is switched off and
on at the same time.
The alarm system is triggered
when a door is opened if the
door was unlocked using the
integrated key in the door lock.
Switching off the alarm, refer to
page 94.
The trunk lid can be opened
even when the alarm system is
switched on.
After the trunk lid is closed, it is
locked and monitored again pro-
vided the doors are locked. The
hazard warning system flashes
once.
You can trigger the alarm sys-
tem if you find yourself in a dan-
Alarm system
General information
Switching on/off
Opening the doors with
the alarm system switched
on
Opening the trunk lid with
the alarm system switched
on
Panic mode
Page 93 of 356

933-1. CONTROLS
3
CONTROLS
gerous situation.
To switch off the alarm: press
any button.
• The indicator light flashes briefly every 2 seconds: The
alarm system is switched on.
• Indicator light flashes for approx. 10 seconds, then it
flashes briefly every 2 sec-
onds: Interior motion sensor
and tilt alarm sensor are not
active, as doors, hood, or
trunk lid are not correctly
closed. Correctly closed
access points are secured.
When the still open access points
are closed, interior motion sensor
and tilt alarm sensor will be
switched on.
• The indicator light goes out
after unlocking: The vehicle has not been tampered with.
• The indicator light flashes after unlocking until
drive-ready state is switched
on, but no longer than approx.
5 minutes: An alarm has been
triggered.
The tilt of the vehicle is moni-
tored.
The alarm system responds in
situations such as attempts to
steal a wheel or when the vehi-
cle is towed.
The car's interior is monitored to
the height of the seats. The
alarm system is switched on
together with the interior motion
sensor even when the window is
open. Falling objects such as
leaves can trigger the alarm
unintentionally.
The tilt alarm sensor and interior
motion sensor can trigger an
alarm, although no unauthorized
action occurred.
Possible situations for an
unwanted alarm:
• In automatic vehicle washes.
• Press the button on the remote control and hold
for at least 3 seconds.
• Briefly press the button on the remote control
three times in succes-
sion.
Indicator light on the inte-
rior mirror
Tilt alarm sensor
Interior motion sensor
Avoiding unintentional
alarms
General information
Page 130 of 356

1303-1. CONTROLS
Electronically unlock the trans-
mission lock to maneuver vehi-
cle from a danger area.
Unlocking is possible, if the
starter can spin the engine.
Before unlocking the transmis-
sion lock, set the parking brake
to prevent the vehicle from roll-
ing away.
1Press and hold down brake
pedal.
2 Press the Start/Stop button.
The starter must audibly
start. Hold the Start/Stop but-
ton pressed.
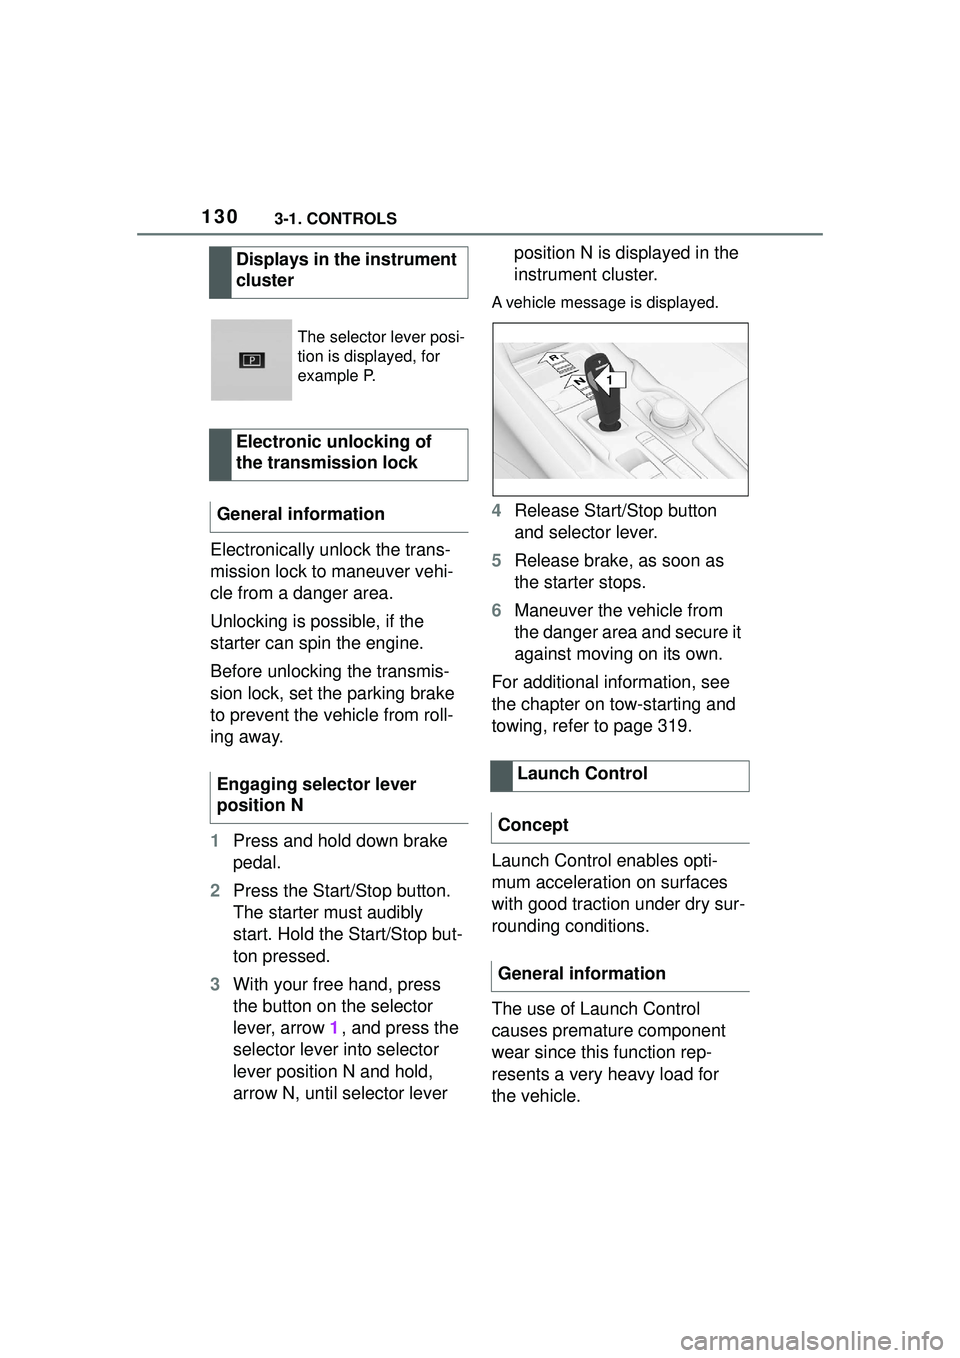
3 With your free hand, press
the button on the selector
lever, arrow 1, and press the
selector lever into selector
lever position N and hold,
arrow N, until selector lever position N is displayed in the
instrument cluster.
A vehicle message is displayed.
4
Release Start/Stop button
and selector lever.
5 Release brake, as soon as
the starter stops.
6 Maneuver the vehicle from
the danger area and secure it
against moving on its own.
For additional information, see
the chapter on tow-starting and
towing, refer to page 319.
Launch Control enables opti-
mum acceleration on surfaces
with good traction under dry sur-
rounding conditions.
The use of Launch Control
causes premature component
wear since this function rep-
resents a very heavy load for
the vehicle.
Displays in the instrument
cluster
The selector lever posi-
tion is displayed, for
example P.
Electronic unlocking of
the transmission lock
General information
Engaging selector lever
position N
Launch Control
Concept
General information
1
R
N