2022 TOYOTA GR SUPRA lock
[x] Cancel search: lockPage 161 of 356

1613-1. CONTROLS
3
CONTROLS
Airbags are not triggered in
every impact situation, for
instance in less severe acci-
dents.
Keep a distance from the air-
bags.
Always grasp the steering
wheel on the steering wheel
rim. Hold your hands at the 3
o'clock and 9 o'clock posi-
tions, to keep the risk of injury
to your hands or arms as low
as possible when the airbag is
triggered.
Adjust seat and steering
wheel so that hands can be
crossed over the steering
wheel. Select the settings so
that the shoulder rests against
the backrest when crossing
the hands and the upper body is as far back as possible
while still maintaining a com-
fortable grip on the steering
wheel.
Make sure that the front pas-
senger is sitting correctly, i.e.,
keeps his or her feet and legs
in the floor area and does not
support them on the dash-
board.
Make sure that occupants
keep their heads away from
the side airbag.
There should be no addi-
tional persons, animals or
objects between an airbag
and a person.
Dashboard and windshield on
the front passenger side must
stay clear - do not attach
adhesive labels or coverings
and do not attach brackets or
cables, for instance for GPS
devices or mobile phones.
Do not apply adhesive materi-
als to the airbag cover panels,
do not cover them or modify
them in any way.
Do not use the cover of the
front airbag on the front pas-
senger side as a storage
area.
Do not attach slip covers, seat
cushions or other objects to
the front passenger seat that
are not specifically suited for
seats with integrated side air-
bags.
Protective effect
General information
Information on optimum
effect of the airbags
WARNING
If the seat position is incorrect or
the deployment area of the air-
bags is impaired, the airbag sys-
tem cannot provide protection as
intended and may cause addi-
tional injuries due to triggering.
There is a risk of injuries or dan-
ger to life. Follow the information
on achieving the optimum protec-
tive effect of the airbag system.
Page 190 of 356

1903-1. CONTROLS
area or after deactivation of the
turn signal.
A flashing of the light during
vehicle unlocking serves as sys-
tem self-test.
If the vehicle speed exceeds
approx. 155 mph/250 km/h, the
system is deactivated temporar-
ily.
If the vehicle speed falls below
approx. 155 mph/250 km/h, the
system once again responds
according to the setting.
Additional information:
• Radar sensors, refer to page 40. The system may not be fully
functional in the following situa-
tions:
When a vehicle is approach-
ing at a speed much faster
than your own.
In heavy fog, wet conditions,
or snowfall.
In tight curves or on narrow
lanes.
If the bumper is dirty, iced up,
or covered, for instance by
stickers.
After improperly performed
work on the vehicle paint.
If cargo protrudes.
A vehicle message is displayed
when the system is not fully
functional.
Depending on the selected
warning settings, e.g., warning
time, more or fewer warnings
can be displayed. However,
there may also be an excess of
premature warnings of critical
situations.
Depending on the equipment
Flashing of the light
System limits
Safety information
WARNING
The system is designed to oper-
ate in certain conditions and cir-
cumstances. Due to conditions or
other factors, the system may not
respond. There may be a risk of
accident or risk of damage to
property. Actively intervene as
needed. Refer to the information
in this Owner’s Manual regarding
the scope of the system’s opera-
tion and limitations.
Upper speed limit
System limits of the sensors
Functional limitations
Displaying warnings
Rear-end collision prepa-
ration
Principle
Page 193 of 356

1933-1. CONTROLS
3
CONTROLS
The system is switched on each
time drive-ready state is
switched on.
After travel has begun, the sys-
tem monitors certain aspects of
the driver's behavior, so that
decreasing alertness or fatigue
can be detected.
This procedure takes the follow-
ing criteria into account:
Personal driving style, for
instance steering behavior.
Driving conditions, for
instance length of trip.
Starting at approx. 43 mph/70
km/h, the system is active and
can also display a recommenda-
tion to take a break.
The Driver attention control is
active automatically with each
switching on of drive-ready state
and can thus display a break
recommendation.
The break recommendation can
also be switched on or off and
adjusted via Toyota Supra Com-
mand.
Via Toyota Supra Command:
1 "My Vehicle"
2 "Vehicle settings" 3
"Driver attention control"
4 Select desired setting:
"Standard": the break recom-
mendation is made with a
defined value.
"Sensitive": the break recom-
mendation is issued earlier.
"Off": no break recommenda-
tion is made.
If the driver becomes less alert
or fatigued, a message is dis-
played in the Control Display
with the recommendation to
take a break.
During the display, the following
settings can be selected:
"Do not ask again"
"Places to stop"
"Remind me later"
The break recommendation is
repeated after 20 minutes.
After a break, another recom-
mendation to take a break can-
not be displayed until after
approximately 45 minutes.
The function may be limited in
the following situations and may
be output an incorrect warning
or no warning at all.
When the clock is set incor-
rectly.
Function
Break recommendation
Settings
Display
System limits
Page 194 of 356

1943-1. CONTROLS
When the vehicle speed is
mainly below about 43
mph/70 km/h.
With a sporty driving style,
such as during rapid accelera-
tion or when cornering fast.
In active driving situations,
such as when changing lanes
frequently.
When the road surface is
poor.
In the event of strong side
winds.
The system is reset approx. 45
minutes after parking the vehi-
cle, for instance in the case of a
break during longer trips on
highways. This chapter describes all stan-
dard, country-specific and
optional features offered with
the series. It also describes fea-
tures and functions that are not
necessarily available in your
vehicle, e.g., due to the selected
options or country versions. This
also applies to safety-related
functions and systems. When
using these functions and sys-
tems, the applicable laws and
regulations must be observed.
ABS prevents locking of the
wheels during braking.
The vehicle maintains its steer-
ing power even during full brake
applications, which increases
the active safety.
ABS is operational every time
you start the engine.
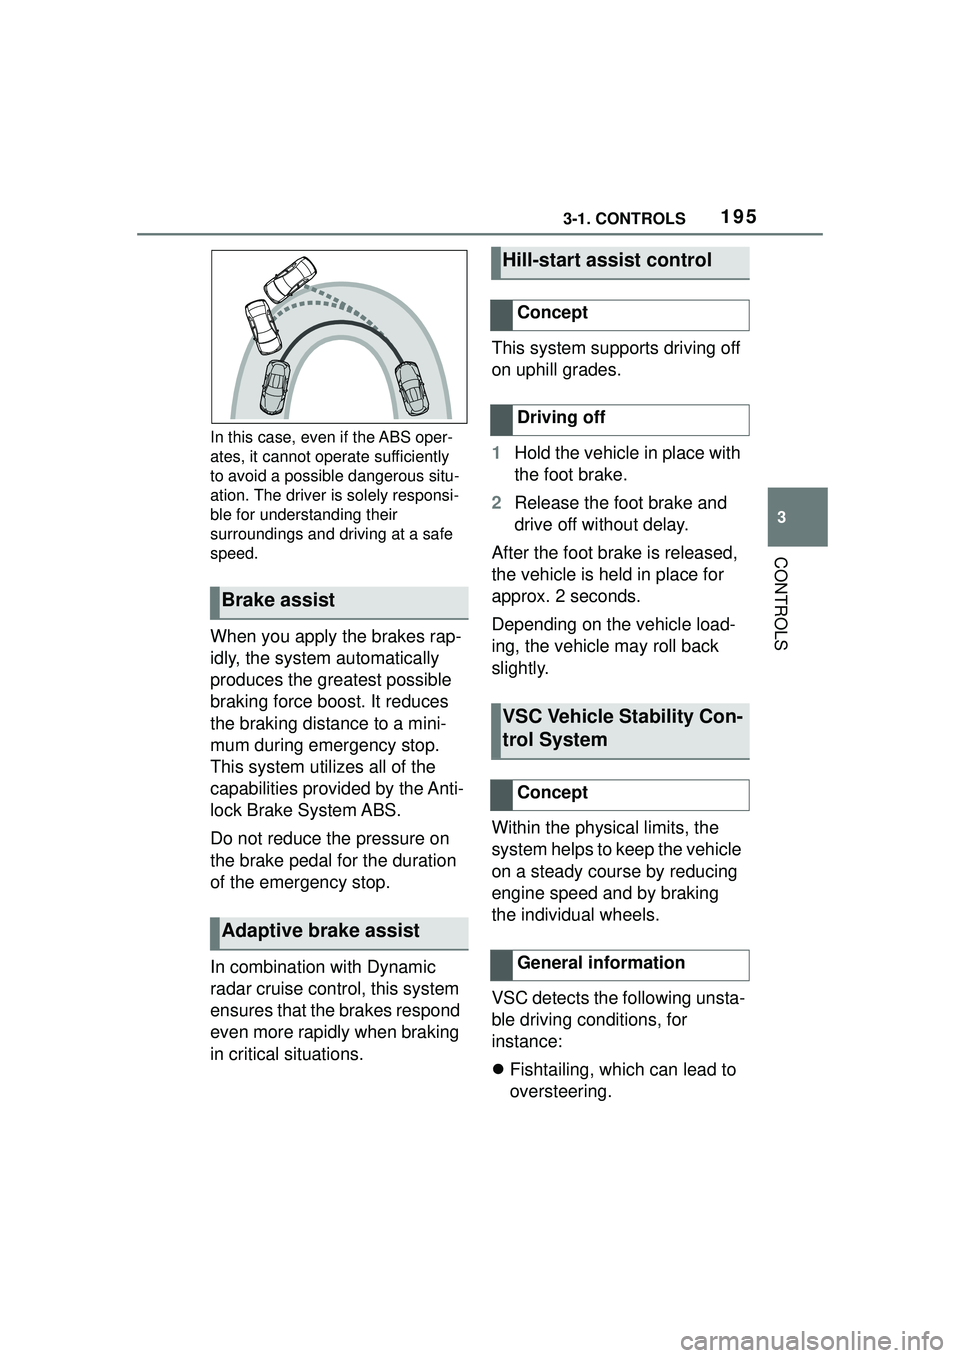
Situations which the ABS can-
not operate sufficiently:
When entering a curve at an
excessively high rate of speedDriving stability con-
trol systems
Vehicle features and
options
Anti-lock Braking System
ABS
Page 195 of 356

1953-1. CONTROLS
3
CONTROLS
In this case, even if the ABS oper-
ates, it cannot operate sufficiently
to avoid a possible dangerous situ-
ation. The driver is solely responsi-
ble for understanding their
surroundings and driving at a safe
speed.
When you apply the brakes rap-
idly, the system automatically
produces the greatest possible
braking force boost. It reduces
the braking distance to a mini-
mum during emergency stop.
This system utilizes all of the
capabilities provided by the Anti-
lock Brake System ABS.
Do not reduce the pressure on
the brake pedal for the duration
of the emergency stop.
In combination with Dynamic
radar cruise control, this system
ensures that the brakes respond
even more rapidly when braking
in critical situations.This system supports driving off
on uphill grades.
1
Hold the vehicle in place with
the foot brake.
2 Release the foot brake and
drive off without delay.
After the foot brake is released,
the vehicle is held in place for
approx. 2 seconds.
Depending on the vehicle load-
ing, the vehicle may roll back
slightly.
Within the physical limits, the
system helps to keep the vehicle
on a steady course by reducing
engine speed and by braking
the individual wheels.
VSC detects the following unsta-
ble driving conditions, for
instance:
Fishtailing, which can lead to
oversteering.
Brake assist
Adaptive brake assist
Hill-start assist control
Concept
Driving off
VSC Vehicle Stability Con-
trol System
Concept
General information
Page 198 of 356

1983-1. CONTROLS
If Traction mode is activated,
TRACTION is displayed in the
instrument cluster.
In certain situations, the VSC is
activated automatically:
If Dynamic radar cruise con-
trol with full-speed range is
activated.
On a braking intervention by
the Toyota Supra Safety sys-
tems.
The vehicle has a flat tire.
*: if equipped
The active differential step-
lessly locks the rear axle
depending on the driving condi-
tions. This provides optimal
power transfer in all driving con-
ditions by helping prevent wheel
spin at either rear wheel.
The driver is responsible adapt-
ing his or her driving style to the
situation.
Activating/deactivating
Traction mode
Activating Traction mode
Press the button.
TRACTION is displayed in
the instrument cluster and
the indicator light for VSC
OFF lights up.
Deactivating Traction mode
Press the button again.
TRACTION and the VSC
OFF indicator light go out.
Display
Display in the instrument
cluster
Indicator/warning lights
The indicator light lights
up: Traction mode is acti-
vated.
Automatic program
change
Active differential*
Page 228 of 356

2283-1. CONTROLS
Via Toyota Supra Command:
1"My Vehicle"
2 "Vehicle settings"
3 "Climate functions"
4 "Temperature adjustment,
upper body"
5 Set the desired temperature.
Do not rapidly switch between
different temperature settings.
Otherwise, the automatic air
conditioning will not have suffi-
cient time to adjust the set tem-
perature.
The air in the car's interior will
be cooled and dehumidified
and, depending on the tempera-
ture setting, warmed again.
The car's interior can only be
cooled with the drive-ready state
switched on. Air conditioning is switched on
with the engine running.
Depending on the weather, the
windshield and side windows
may fog up briefly when
drive-ready state is switched on.
The air conditioning is switched
on automatically with the AUTO
program.
When using the automatic air
conditioning, condensation
water develops and collects
underneath the vehicle.
The system is set to the lowest
temperature, optimum air flow
and recirculated-air mode with
the drive-ready state switched
on.
The function is available with
external temperatures above
approx. 32 °F/0 °C and with the
drive-ready state switched on.
Adjusting
Turn the dial clockwise
to increase the tempera-
ture and counterclock-
wise to decrease the
temperature.
Air conditioning
Concept
Switching on/off
Press the button.
Maximum cooling
Concept
General information
Page 233 of 356

2333-1. CONTROLS
3
CONTROLS
■Switching on
Press any button except:
Rear window defroster.
Lower air flow button side.
Seat heating.
Menu.
■Switching off
The system switches off after
leaving and locking the vehicle.
Press and hold the bot-
tom button.
1 "My Vehicle"
2 "Vehicle settings"
3 "Climate functions"
4 "Comfort ventilation"
5 "Activate now" Different departure times can be
adjusted to ensure a comfort-
able interior temperature in the
vehicle at the time of departure.
One-time departure time: the
time can be set.
The system is switched on once.
Departure time with week-
day: time and day of the week
can be set.
On the desired weekdays, the sys-
tem will be switched on promptly
before the set departure time.
The departure time is prese-
lected in two steps:
Set departure times.
Activate departure times.
A minimum of 10 minutes
should pass between set-
ting/activating the departure
time and the planned departure
time to allow a sufficient period
of time for the climate control.
■Via Toyota Supra Command
1 "My Vehicle"
2 "Vehicle settings"
3 "Climate functions"
4 "Comfort ventilation"
5 Select the desired departure
time.
Via Toyota Supra Command
Display
SymbolDescription
Symbol on the auto-
matic air conditioning
indicates the system is
switched on.
REST is displayed on
the automatic air condi-
tioning. The residual
engine heat is used.
Departure time
Concept
Setting the departure time