2022 TOYOTA COROLLA ECU
[x] Cancel search: ECUPage 79 of 678

77
1
1-4. Theft deterrent system
For safety and security
●A person inside the vehicle opens a
door, the trunk or hood, or unlocks the vehicle.
●A person inside the vehicle unlocks the door using the inside lock buttons.
●The battery is recharged or replaced when the vehicle is locked. ( P.516)
■Alarm-operated door lock
In the following cases, depending on the
situation, the door may automatically
lock to prevent improper entry into the vehicle:
●When a person remaining in the vehi-cle unlocks the door and the alarm is
activated.
●While the alarm is activated, a person
remaining in the vehicle unlocks the
door.
●When recharging or replacing the bat-
tery
NOTICE
■To ensure the system operates correctly
Do not modify or remove the system.
If modified or removed, the proper operation of the system cannot be
guaranteed.
Page 86 of 678

842-1. Instrument cluster
*1: These lights come on when the
engine switch is turned to ON to indi-
cate that a system check is being
performed. They will turn off after the
engine is started, or after a few sec-
onds. There may be a malfunction in
a system if the lights do not come
on, or turn off. Have the vehicle
inspected by any authorized Toyota
retailer or Toyota authorized repairer,
or any reliable repairer.
*2: This light comes on when the system
is turned off.
*3: Depending on the operating condi-
tion, the color and illuminating/flash-
ing state of the light change.
*4: This light illuminates on the outside
rear view mirrors.
*5: This light illuminates on the
multi-information display.
*6: When the outside temperature is
approximately 3°C (37°F) or lower,
this indicator will flash for approxi-
mately 10 seconds, then stay on.
*7: This light illuminates on the center
panel.
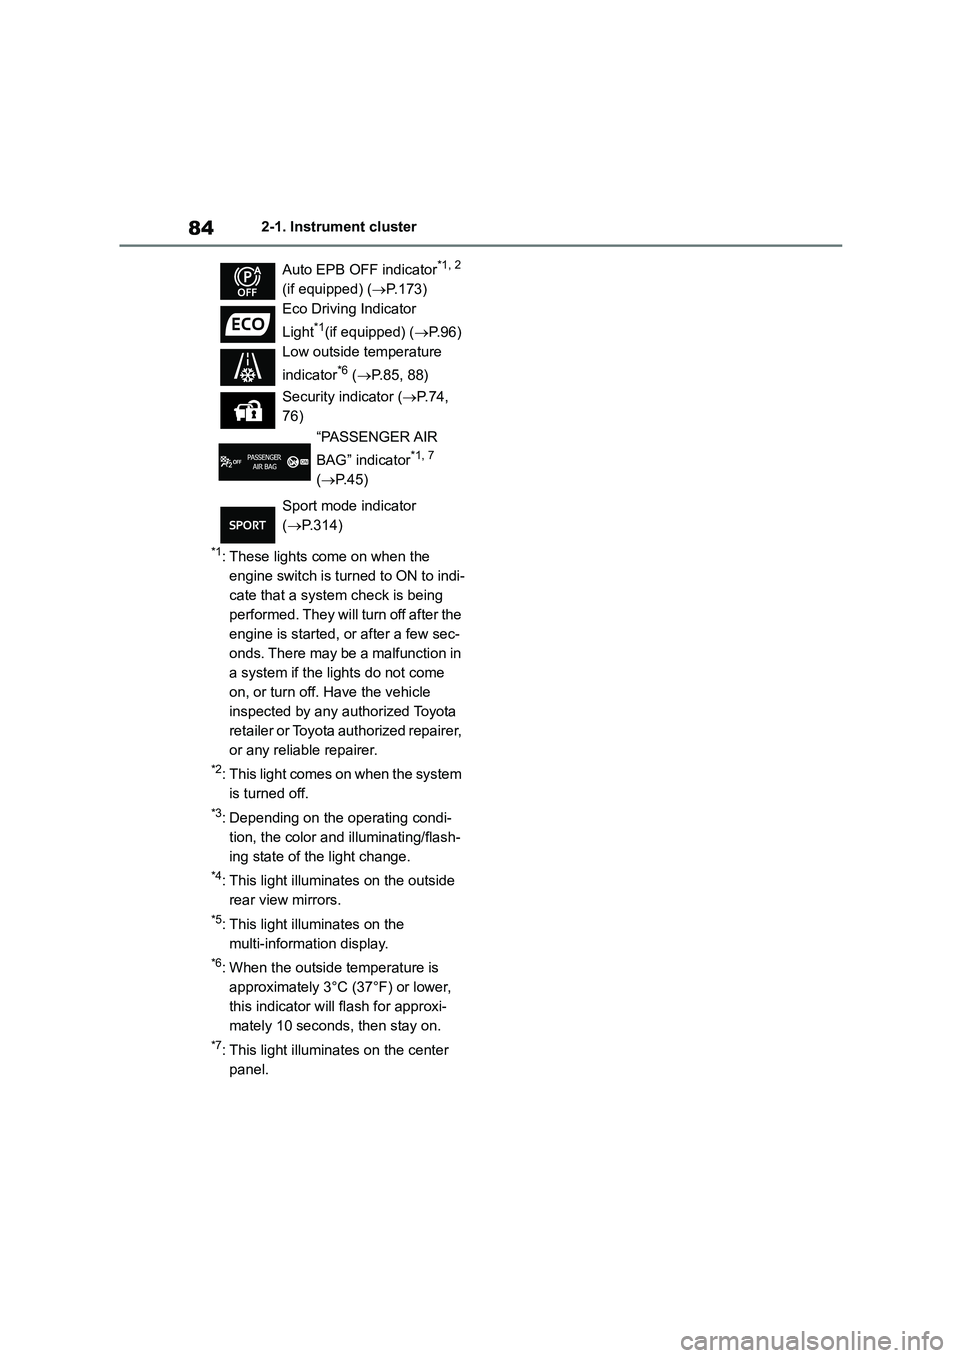
Auto EPB OFF indicator*1, 2
(if equipped) ( P.173)
Eco Driving Indicator
Light*1(if equipped) ( P.96)
Low outside temperature
indicator*6 ( P.85, 88)
Security indicator ( P. 7 4 ,
76)
“PASSENGER AIR
BAG” indicator*1, 7
( P. 4 5 )
Sport mode indicator
( P.314)
Page 115 of 678

113
3
3-2. Opening, closing and locking the doors
Before driving
3-2.Opening, closing and locking the doors
■Entry function (if equipped)
Carry the electronic key to enable
this function.
1 Grip the front door handle to
unlock all the doors.*
Make sure to touch the sensor on the
back of the handle.
The doors cannot be unlocked for 3
seconds after the doors are locked.
*: The door unlock settings can be
changed. ( P.114, 538)
2Touch the lock sensor (the
indentation on the side of the
front door handle) to lock all the
doors.
Check that the door is securely locked.
■Wireless remote control
Vehicles without a smart entry &
start system
1 Locks all the doors
Check that the door is securely locked.
Press and hold to close the win-
dows*1and moon roof.*1, 2
2 Unlocks all the doors
Press and hold to open the win-
dows*1and moon roof.*1, 2
Vehicles with a smart entry &
start system
1 Locks all the doors
Check that the door is securely locked.
Press and hold to close the win-
dows*1and moon roof.*1, 2
2 Unlocks all the doors
Press and hold to open the win-
dows*1and moon roof.*1, 2
*1: This setting must be customized at
Doors
Unlocking and locking the
doors from the outside
Page 117 of 678

115
3
3-2. Opening, closing and locking the doors
Before driving
30 seconds after is pressed, the
doors will be locked again and the alarm will automatically be set.)
In case that the alarm is triggered,
immediately stop the alarm. ( P. 7 6 )
■Operation signals
Vehicles without a smart entry & start
system
The emergency flashers flash to indicate
that the doors have been locked/unlocked using the wireless
remote control. (Locked: Once;
Unlocked: Twice)
Vehicles with a smart entry & start
system
The emergency flashers flash to indicate
that the doors have been locked/unlocked using the entry func-
tion* or wireless re mote control.
(Locked: Once; Unlocked: Twice)
A buzzer sounds to indicate that the win-
dows and moon roof*are operating.*: If equipped
■Security feature
Vehicles without a smart entry & start
system
If a door is not opened within approxi-
mately 30 seconds after the vehicle is unlocked using the wireless remote con-
trol, the security feature automatically
locks the vehicle again.
Vehicles with a smart entry & start
system
If a door is not opened within approxi-
mately 30 seconds after the vehicle is
unlocked using the entry function (if equipped) or wireless remote control,
the security featur e automatically locks
the vehicle again.
■When the door cannot be locked by the lock sensor on the surface of
the front door handle (vehicles with
entry function)
If the doors cannot be locked by touch-
ing the lock sensor with a finger, touch
the lock sensor with the palm of your
hand.
If you are wearing gloves, remove them.
■Door lock buzzer (vehicles with a
smart entry & start system)
If an attempt to lock the doors using the
entry function (if equipped) or wireless
remote control is made when a door is not fully closed, a buzzer will sound con-
tinuously for 5 seconds. Fully close the
door to stop the buzzer, and lock the doors again.
■Alarm (if equipped)
Locking the doors will set the alarm sys-
tem. ( P. 7 6 )
■Conditions affecting the operation of the smart entry & start system (if
equipped) or wireless remote con-
trol
Vehicles without a smart entry & start
system
P. 1 1 1
Vehicles with a smart entry & start
system
P. 1 2 2
■If the smart entry & start system (if
equipped) or the wireless remote
control does not operate properly
Vehicles without a smart entry & start
system
Replace the key battery with a new one
if it is depleted. ( P.449)
Vehicles with a smart entry & start
system
Use the mechanical key to lock and
unlock the doors. ( P.512)
Replace the key battery with a new one
if it is depleted. ( P.449)
Page 120 of 678

1183-2. Opening, closing and locking the doors
Trunk
The trunk can be opened using
the trunk opener, entry func-
tion (if equipped) or wireless
remote control.
WA R N I N G
Observe the following precautions.
Failure to do so may result in death or
serious injury.
■Before driving
●Make sure that the trunk lid is fully closed. If the trunk lid is not fully
closed, it may open unexpectedly
while driving and hit near-by objects or luggage in the trunk may be
thrown out, causing an accident.
●Do not allow children to play in the
trunk.
If a child is accidentally locked in the trunk, they could suffer from
heat exhaustion, suffocation or
other injuries.
●Do not allow a child to open or
close the trunk lid. Doing so may cause the trunk lid to
open unexpectedly, or cause the
child’s hands, head, or neck to be caught by the closing trunk lid.
■Important points while driving
Never let anyone sit in the trunk. In
the event of sudden braking or a colli-
sion, they are susceptible to death or serious injury.
■Using the trunk
Observe the following precautions.
Failure to do so may cause parts of
the body to be caught, resulting in serious injury.
●Remove any heavy loads, such as snow and ice, from the trunk lid
before opening it. Failure to do so
may cause the trunk lid to suddenly shut again after it is opened.
●When opening or closing the trunk lid, thoroughly check to make sure
the surrounding area is safe.
●If anyone is in the vicinity, make
sure they are safe and let them
know that the trunk is about to open or close.
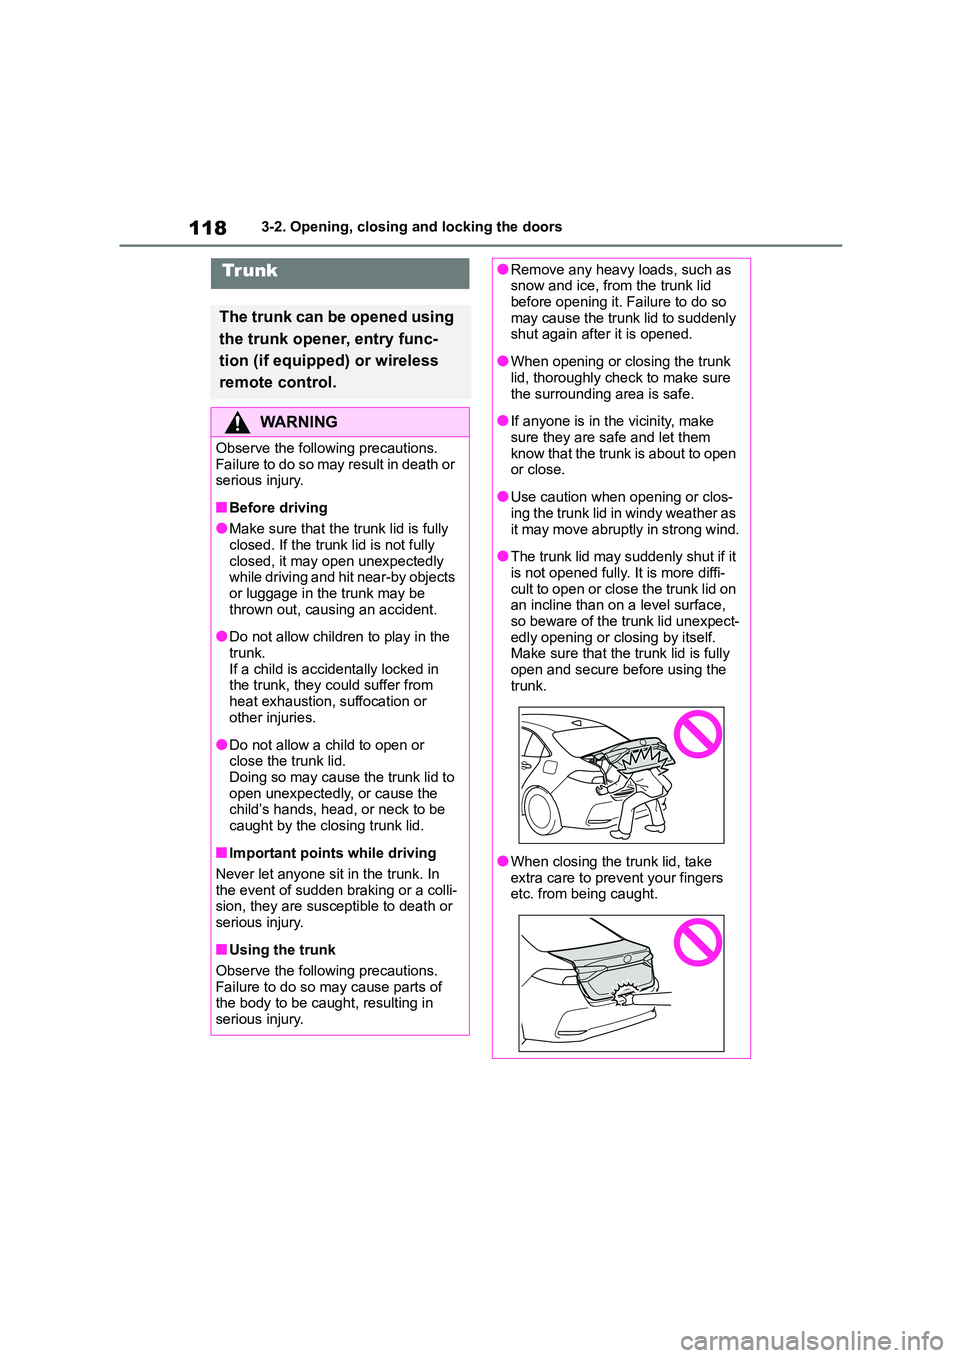
●Use caution when opening or clos-ing the trunk lid in windy weather as
it may move abruptly in strong wind.
●The trunk lid may suddenly shut if it
is not opened fully. It is more diffi-
cult to open or close the trunk lid on an incline than on a level surface,
so beware of the trunk lid unexpect-
edly opening or closing by itself. Make sure that the trunk lid is fully
open and secure before using the
trunk.
●When closing the trunk lid, take
extra care to prevent your fingers etc. from being caught.
Page 126 of 678

1243-2. Opening, closing and locking the doors
●Touching the door lock or unlock sen-
sor while wearing gloves may prevent lock or unlock operation.
●On some models: When the lock operation is performed using the lock
sensor, recognition signals will be
shown up to two consecutive times. After this, no recognition signals will
be given.
●If the door handle becomes wet while
the electronic key is within the effec-
tive range, the door may lock and unlock repeatedly. In that case, follow
the following correction procedures to
wash the vehicle: • Place the electronic key in a location 2
m (6 ft.) or more away from the vehi-
cle. (Take care to ensure that the key is not stolen.)
• Set the electronic key to battery-sav-
ing mode to disable the smart entry & start system. ( P.122)
●If the electronic key is inside the vehi- cle and a door handle becomes wet
during a car wash, a message may be
shown on the multi-information dis- play and a buzzer will sound outside
the vehicle. To turn off the alarm, lock
all the doors.
●The lock sensor may not work prop-
erly if it comes into contact with ice, snow, mud, etc. Clean the lock sensor
and attempt to operate it again.
●A sudden handle operation or a han-
dle operation immediately after enter-
ing the effective range may prevent the doors from being unlocked. Touch
the door unlock sensor and check that
the doors are unlocked before pulling the door handle again.
●If there is another electronic key in the
detection area, it may take slightly longer to unlock the doors after the
door handle is gripped.
■When the vehicle is not driven for
extended periods
●To prevent theft of the vehicle, do not
leave the electronic key within 2 m (6 ft.) of the vehicle.
●The smart entry & start system can be
deactivated in advance. ( P.538)
●Setting the electronic key to bat-
tery-saving mode helps to reduce key battery depletion. ( P.122)
■To operate the system properly
●Make sure to carry the electronic key when operating th e system. Do not
get the electronic key too close to the
vehicle when operating the system from the outside of the vehicle.
Depending on the position and holding condition of the electronic key, the key
may not be detected correctly and the
system may not operate properly. (The alarm may go off accidentally, or the
door lock prevention function may not
operate.)
●Do not leave the electronic key inside
the trunk. The key confinement prevention func-
tion may not operate, depending on
the location of the key (the inside edge of the trunk), conditions (inside a
metal bag, close to metallic objects)
and the radio waves in the surround- ing area. ( P.120)
■If the smart entry & start system
does not operate properly
●Locking and unlocking the doors
(vehicles with entry function): P.512
●Starting the engine: P.512
■Customization
Some functions can be customized.
( P.538)
■If the smart entry & start system has been deactivated in a custom-
ized setting
●Locking and unlocking the doors (vehicles with entry function): Use the
wireless remote control or mechanical
key. ( P.113, 512)
●Starting the engine and changing
engine switch modes: P.512
●Stopping the engine: P.162
Page 129 of 678

127
3
3-3. Adjusting the seats
Before driving
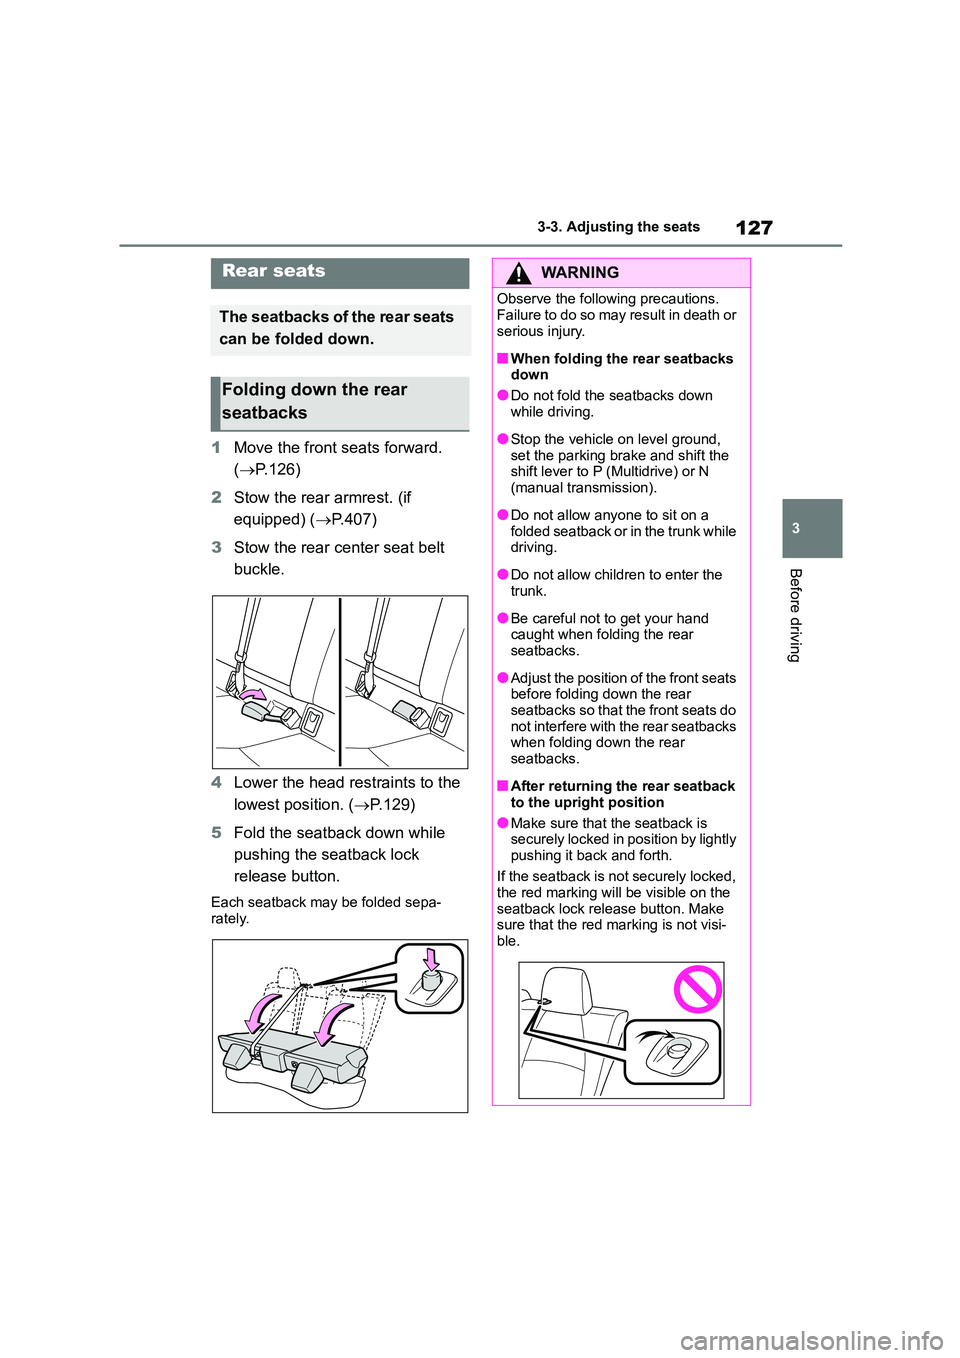
1 Move the front seats forward.
( P.126)
2 Stow the rear armrest. (if
equipped) ( P.407)
3 Stow the rear center seat belt
buckle.
4 Lower the head restraints to the
lowest position. ( P.129)
5 Fold the seatback down while
pushing the seatback lock
release button.
Each seatback may be folded sepa- rately.
Rear seats
The seatbacks of the rear seats
can be folded down.
Folding down the rear
seatbacks
WA R N I N G
Observe the following precautions.
Failure to do so may result in death or
serious injury.
■When folding the rear seatbacks
down
●Do not fold the seatbacks down
while driving.
●Stop the vehicle on level ground, set the parking brake and shift the
shift lever to P (Multidrive) or N
(manual transmission).
●Do not allow anyone to sit on a
folded seatback or in the trunk while driving.
●Do not allow children to enter the trunk.
●Be careful not to get your hand caught when folding the rear
seatbacks.
●Adjust the position of the front seats
before folding down the rear
seatbacks so that the front seats do not interfere with the rear seatbacks
when folding down the rear
seatbacks.
■After returning the rear seatback
to the upright position
●Make sure that the seatback is
securely locked in position by lightly
pushing it back and forth.
If the seatback is not securely locked,
the red marking will be visible on the
seatback lock releas e button. Make sure that the red marking is not visi-
ble.
Page 130 of 678

1283-3. Adjusting the seats
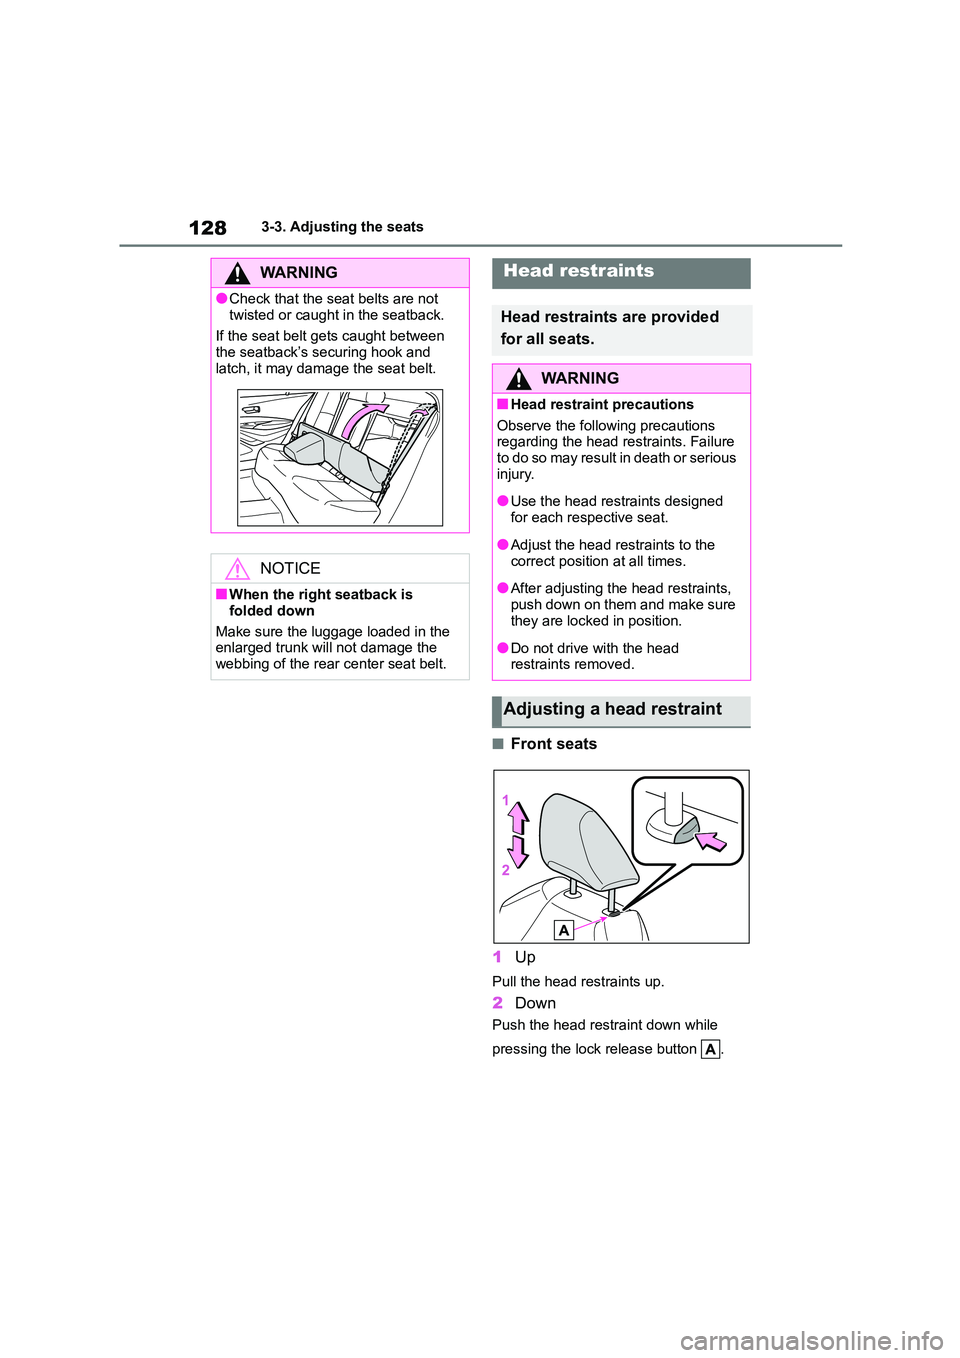
■Front seats
1 Up
Pull the head restraints up.
2Down
Push the head restraint down while
pressing the lock release button .
WA R N I N G
●Check that the seat belts are not
twisted or caught in the seatback.
If the seat belt gets caught between the seatback’s securing hook and
latch, it may damage the seat belt.
NOTICE
■When the right seatback is
folded down
Make sure the luggage loaded in the
enlarged trunk will not damage the
webbing of the rear center seat belt.
Head restraints
Head restraints are provided
for all seats.
WA R N I N G
■Head restraint precautions
Observe the following precautions
regarding the head restraints. Failure to do so may result in death or serious
injury.
●Use the head restraints designed
for each respective seat.
●Adjust the head restraints to the
correct position at all times.
●After adjusting the head restraints,
push down on them and make sure
they are locked in position.
●Do not drive with the head
restraints removed.
Adjusting a head restraint