Page 482 of 678
4808-2. Steps to take in an emergency
■Warning messages
The warning messages explained below
may differ from the actual messages
according to operation conditions and vehicle specifications.
■Warning buzzer
A buzzer may sound when a message is
displayed. The buzzer may not be audible if the
vehicle is in a noisy location or if the
audio system volume is high.
WA R N I N G
●Vehicles with a compact spare tire:
If the tire pressure warning light
comes on even after tire inflation pressure adjustment, it is probable
that you have a flat tire. Check the
tires. If a tire is flat, change it with the spare tire and have the flat tire
repaired by the nearest any author-
ized Toyota retailer or Toyota
authorized repairer, or any reliable repairer.
●Vehicles with emergency tire punc-ture repair kit: If the tire pressure
warning light comes on even after
tire inflation pressure adjustment, it is probable that you have a flat tire.
Check the tires. If a tire is flat, repair
the flat tire by using emergency tire puncture repair kit.
●Avoid abrupt maneuvering and braking.
If the vehicle tires deteriorate, you
could lose control of the steering wheel or the brakes.
■If a blowout or sudden air leak-age should occur
The tire pressure warning system
may not activate immediately.
NOTICE
■To ensure the tire pressure warn- ing system operates properly
Do not install tires with different speci-
fications or makers, as the tire pres- sure warning system may not operate
properly.
If a war ning message is
displayed
The multi-information display
shows warnings for system
malfunctions and incorrectly
performed operations, and
messages that indicate a need
for maintenance. When a mes-
sage is displayed, perform the
appropriate corrective action
for the message.
If a warning message is dis-
played again after the appro-
priate actions have been
performed, contact any author-
ized Toyota retailer or Toyota
authorized repairer, or any reli-
able repairer.
Additionally, if a warning light
comes on or flashes at the
same time that a warning mes-
sage is displayed, take the
appropriate corrective action
for the warning light. ( P.471)
Page 490 of 678
4888-2. Steps to take in an emergency
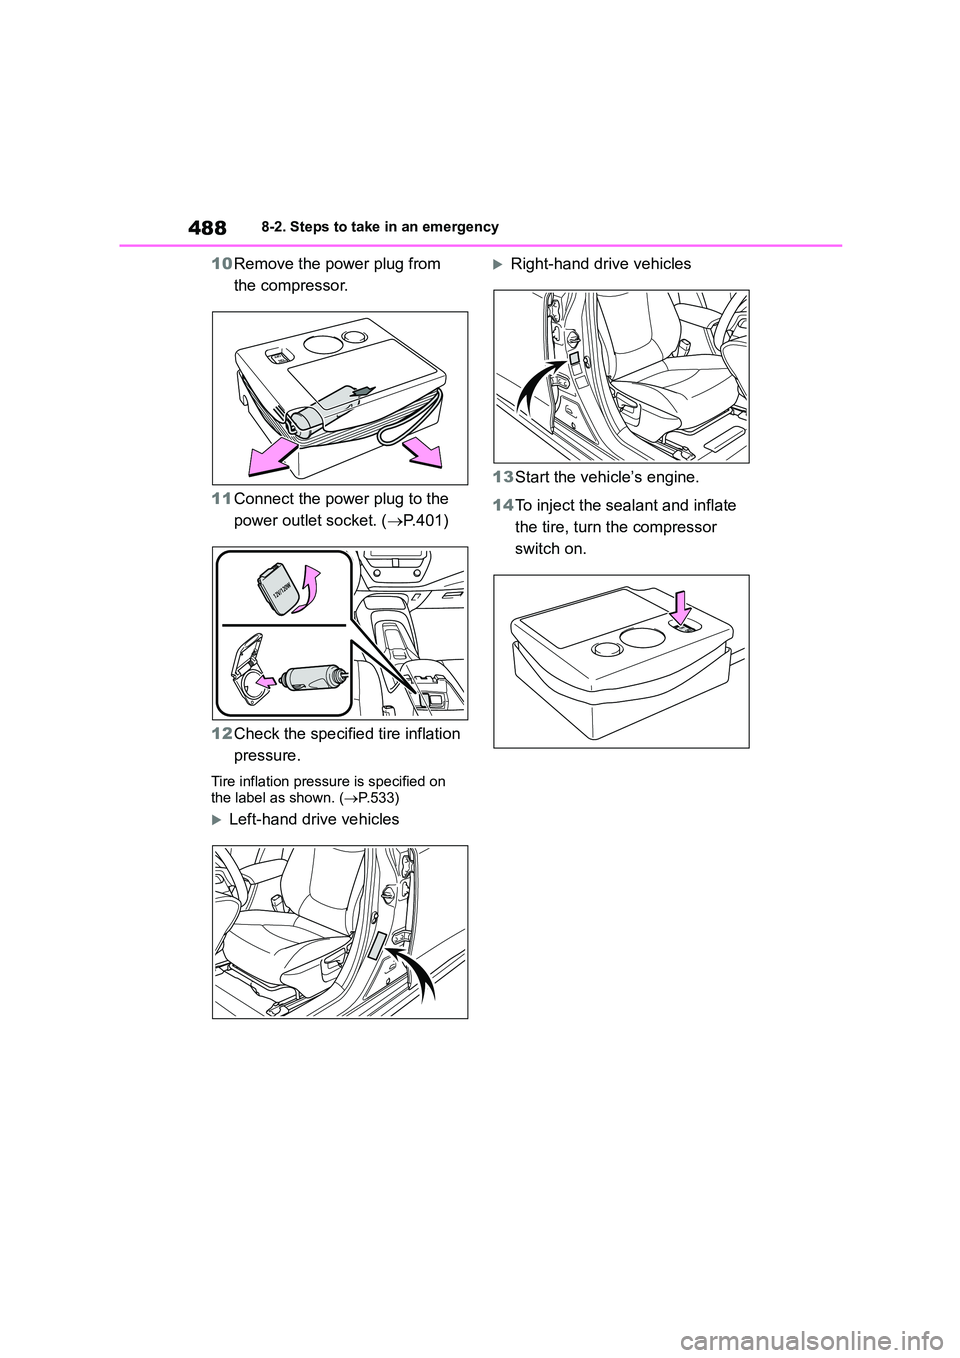
10Remove the power plug from
the compressor.
11 Connect the power plug to the
power outlet socket. ( P.401)
12 Check the specified tire inflation
pressure.
Tire inflation pressure is specified on
the label as shown. ( P.533)
Left-hand drive vehicles
Right-hand drive vehicles
13 Start the vehicle’s engine.
14 To inject the sealant and inflate
the tire, turn the compressor
switch on.
Page 491 of 678
489
8
8-2. Steps to take in an emergency
When trouble arises
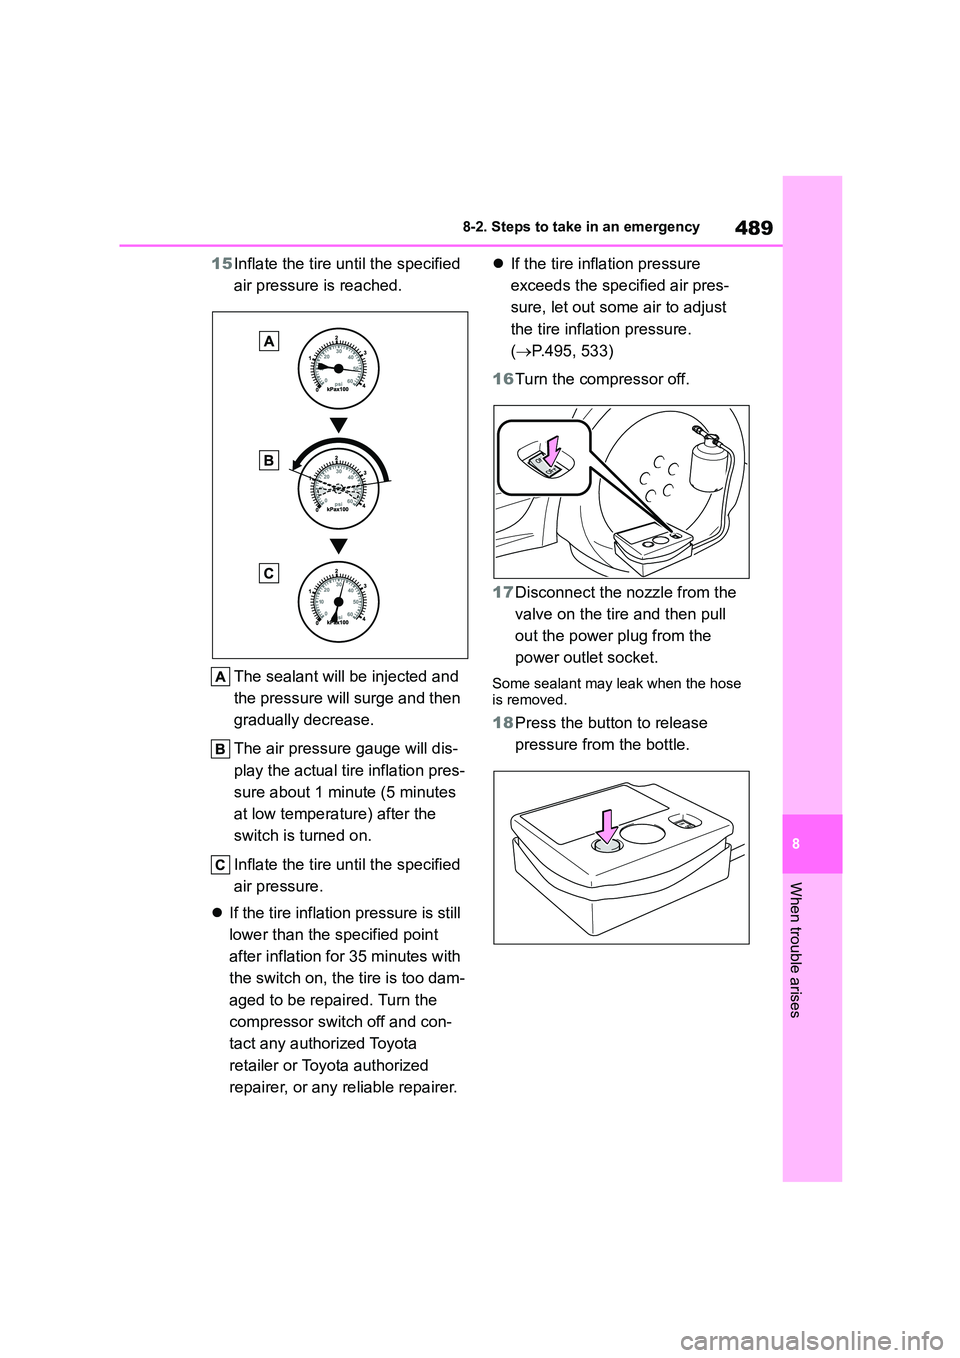
15 Inflate the tire until the specified
air pressure is reached.
The sealant will be injected and
the pressure will surge and then
gradually decrease.
The air pressure gauge will dis-
play the actual tire inflation pres-
sure about 1 minute (5 minutes
at low temperature) after the
switch is turned on.
Inflate the tire until the specified
air pressure.
If the tire inflation pressure is still
lower than the specified point
after inflation for 35 minutes with
the switch on, the tire is too dam-
aged to be repaired. Turn the
compressor switch off and con-
tact any authorized Toyota
retailer or Toyota authorized
repairer, or any reliable repairer.
If the tire inflation pressure
exceeds the specified air pres-
sure, let out some air to adjust
the tire inflation pressure.
( P.495, 533)
16 Turn the compressor off.
17 Disconnect the nozzle from the
valve on the tire and then pull
out the power plug from the
power outlet socket.
Some sealant may leak when the hose
is removed.
18 Press the button to release
pressure from the bottle.
Page 492 of 678
4908-2. Steps to take in an emergency
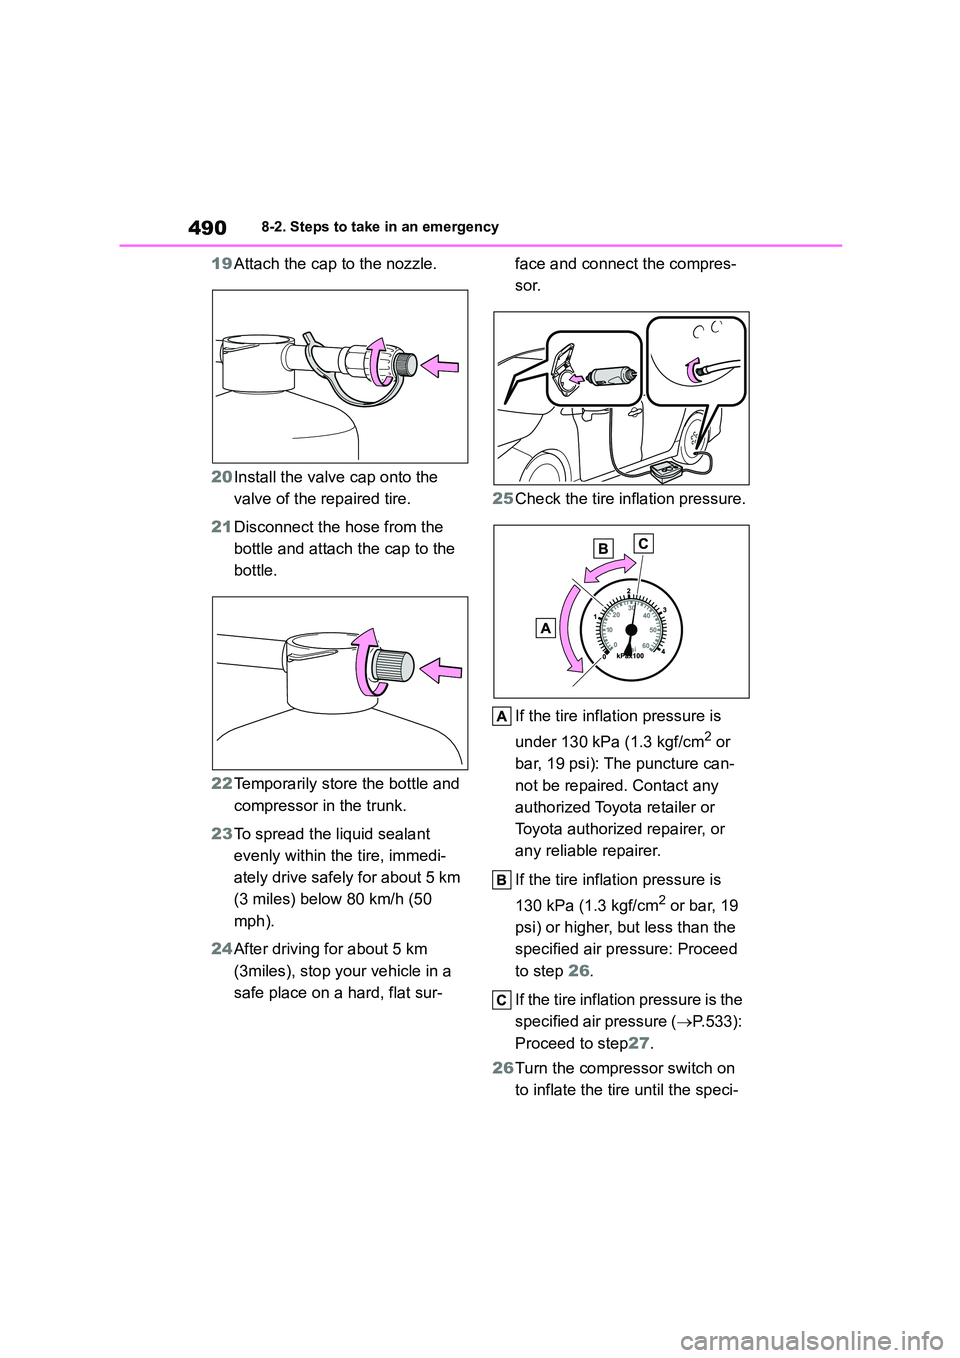
19Attach the cap to the nozzle.
20 Install the valve cap onto the
valve of the repaired tire.
21 Disconnect the hose from the
bottle and attach the cap to the
bottle.
22 Temporarily store the bottle and
compressor in the trunk.
23 To spread the liquid sealant
evenly within the tire, immedi-
ately drive safely for about 5 km
(3 miles) below 80 km/h (50
mph).
24 After driving for about 5 km
(3miles), stop your vehicle in a
safe place on a hard, flat sur-
face and connect the compres-
sor.
25 Check the tire inflation pressure.
If the tire inflation pressure is
under 130 kPa (1.3 kgf/cm2 or
bar, 19 psi): The puncture can-
not be repaired. Contact any
authorized Toyota retailer or
Toyota authorized repairer, or
any reliable repairer.
If the tire inflation pressure is
130 kPa (1.3 kgf/cm2 or bar, 19
psi) or higher, but less than the
specified air pressure: Proceed
to step 26.
If the tire inflation pressure is the
specified air pressure ( P.533):
Proceed to step 27.
26 Turn the compressor switch on
to inflate the tire until the speci-
Page 494 of 678
4928-2. Steps to take in an emergency
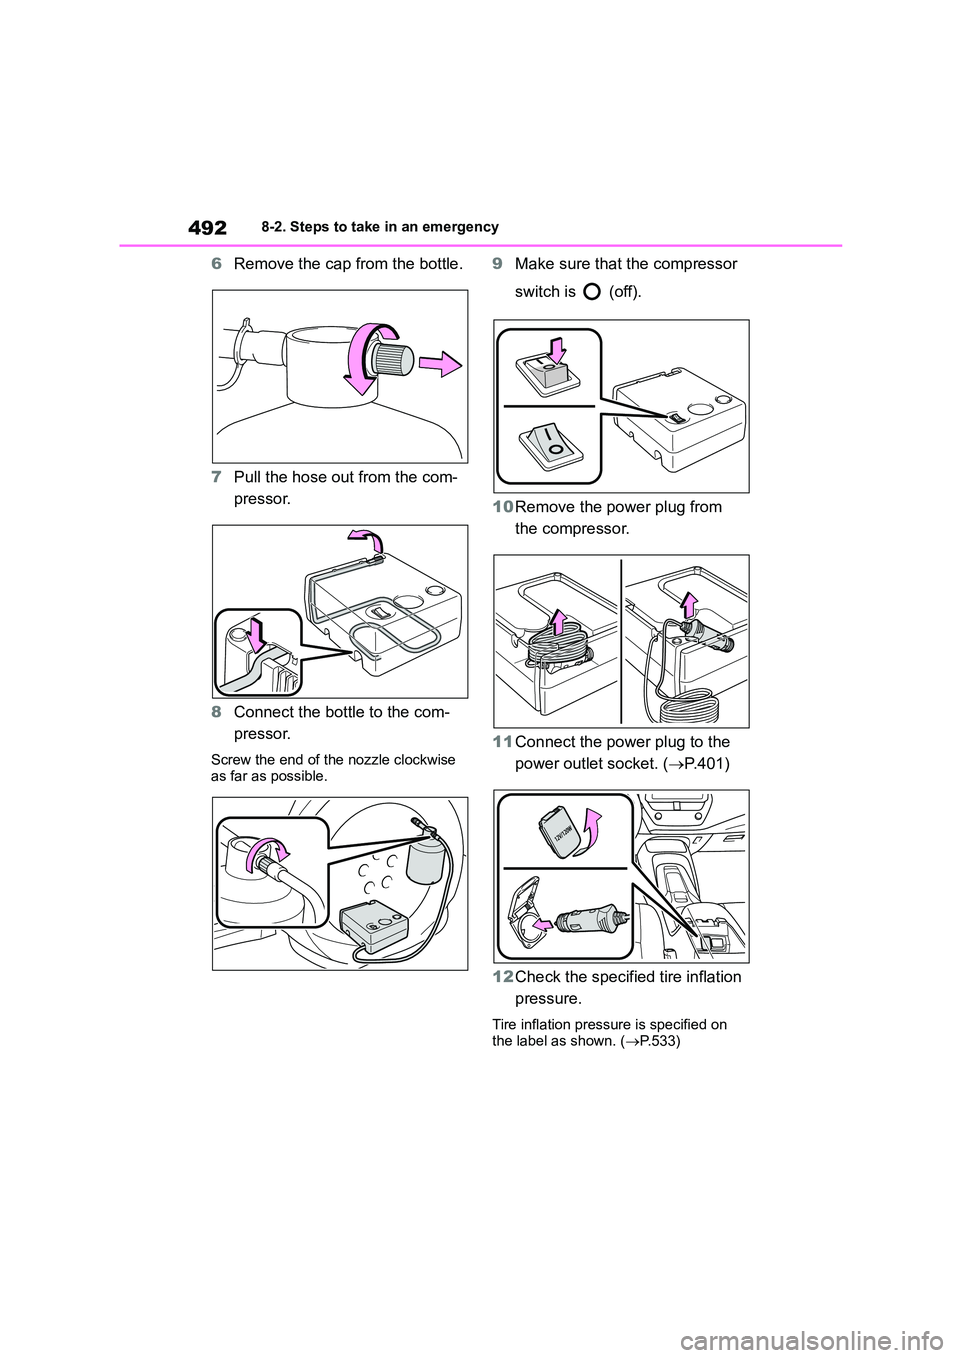
6Remove the cap from the bottle.
7 Pull the hose out from the com-
pressor.
8 Connect the bottle to the com-
pressor.
Screw the end of the nozzle clockwise
as far as possible.
9 Make sure that the compressor
switch is (off).
10 Remove the power plug from
the compressor.
11 Connect the power plug to the
power outlet socket. ( P.401)
12 Check the specified tire inflation
pressure.
Tire inflation pressure is specified on
the label as shown. ( P.533)
Page 495 of 678
493
8
8-2. Steps to take in an emergency
When trouble arises
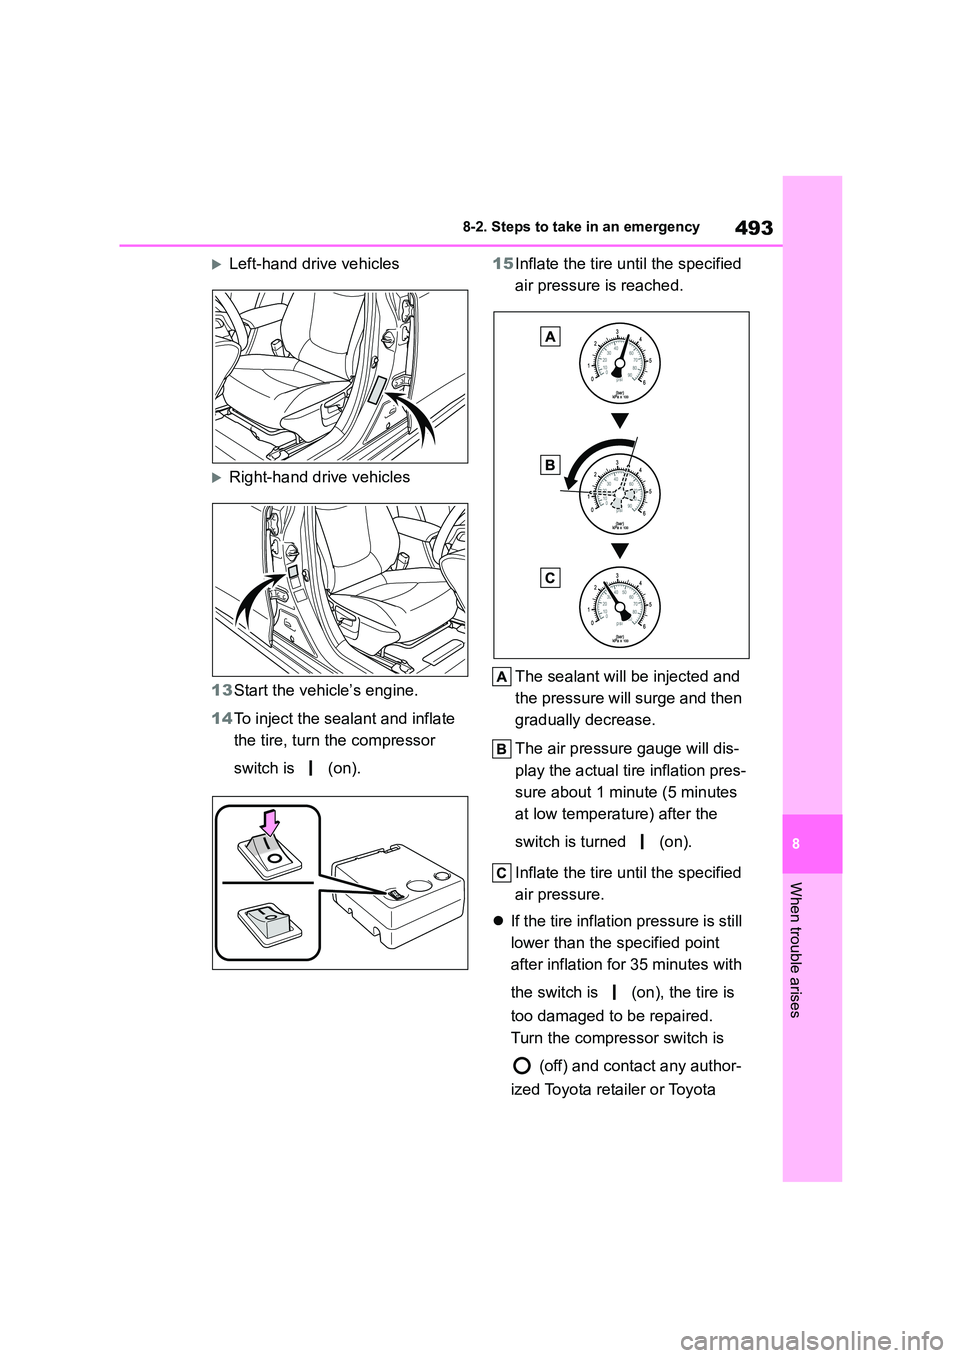
Left-hand drive vehicles
Right-hand drive vehicles
13 Start the vehicle’s engine.
14 To inject the sealant and inflate
the tire, turn the compressor
switch is (on).
15 Inflate the tire until the specified
air pressure is reached.
The sealant will be injected and
the pressure will surge and then
gradually decrease.
The air pressure gauge will dis-
play the actual tire inflation pres-
sure about 1 minute (5 minutes
at low temperature) after the
switch is turned (on).
Inflate the tire until the specified
air pressure.
If the tire inflation pressure is still
lower than the specified point
after inflation for 35 minutes with
the switch is (on), the tire is
too damaged to be repaired.
Turn the compressor switch is
(off) and contact any author-
ized Toyota retailer or Toyota
Page 496 of 678
4948-2. Steps to take in an emergency
authorized repairer, or any relia-
ble repairer.
If the tire inflation pressure
exceeds the specified air pres-
sure, let out some air to adjust
the tire inflation pressure.
( P.495, 533)
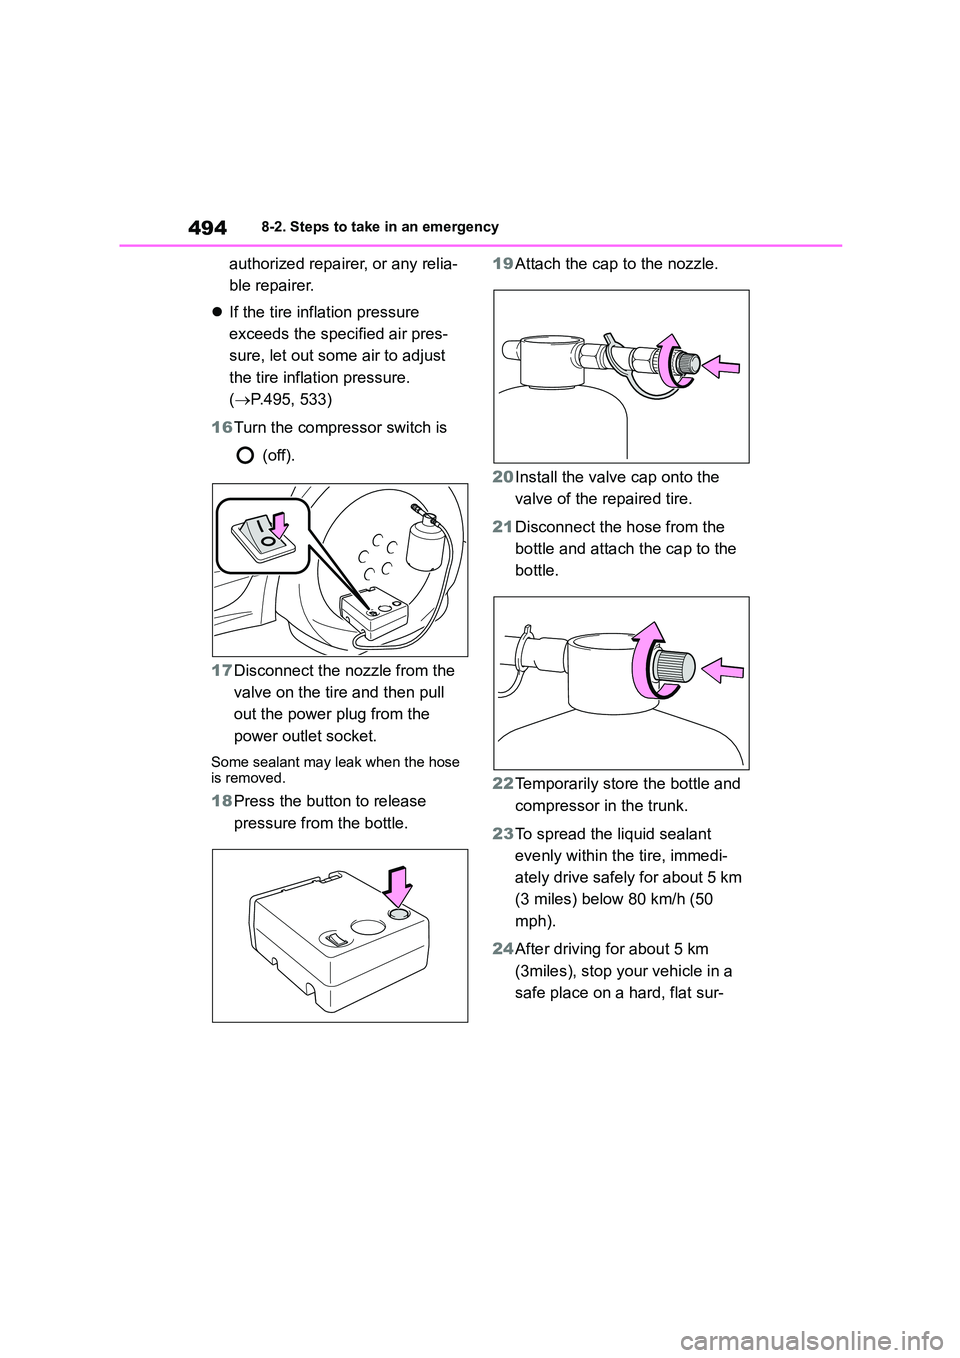
16 Turn the compressor switch is
(off).
17 Disconnect the nozzle from the
valve on the tire and then pull
out the power plug from the
power outlet socket.
Some sealant may leak when the hose is removed.
18 Press the button to release
pressure from the bottle.
19 Attach the cap to the nozzle.
20 Install the valve cap onto the
valve of the repaired tire.
21 Disconnect the hose from the
bottle and attach the cap to the
bottle.
22 Temporarily store the bottle and
compressor in the trunk.
23 To spread the liquid sealant
evenly within the tire, immedi-
ately drive safely for about 5 km
(3 miles) below 80 km/h (50
mph).
24 After driving for about 5 km
(3miles), stop your vehicle in a
safe place on a hard, flat sur-
Page 497 of 678
495
8
8-2. Steps to take in an emergency
When trouble arises
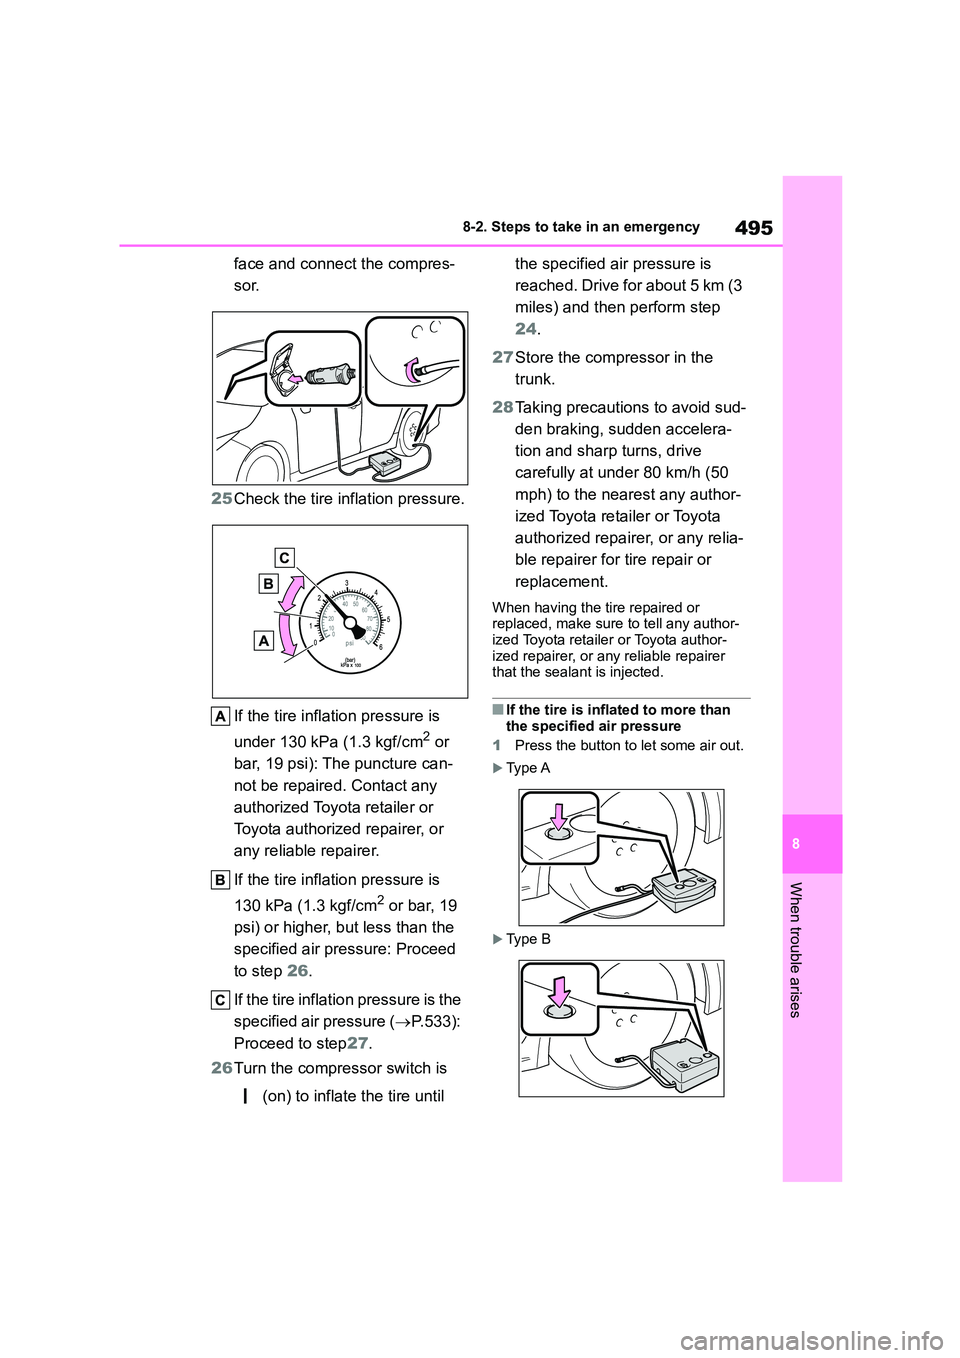
face and connect the compres-
sor.
25 Check the tire inflation pressure.
If the tire inflat ion pressure is
under 130 kPa (1.3 kgf/cm2 or
bar, 19 psi): The puncture can-
not be repaired. Contact any
authorized Toyota retailer or
Toyota authorized repairer, or
any reliable repairer.
If the tire inflat ion pressure is
130 kPa (1.3 kgf/cm2 or bar, 19
psi) or higher, but less than the
specified air pressure: Proceed
to step 26.
If the tire inflatio n pressure is the
specified air pressure ( P.533):
Proceed to step 27.
26 Turn the compressor switch is
(on) to inflate the tire until
the specified air pressure is
reached. Drive for about 5 km (3
miles) and then perform step
24 .
27 Store the compressor in the
trunk.
28 Taking precautions to avoid sud-
den braking, sudden accelera-
tion and sharp turns, drive
carefully at under 80 km/h (50
mph) to the nearest any author-
ized Toyota reta iler or Toyota
authorized repairer, or any relia-
ble repairer for tire repair or
replacement.
When having the tire repaired or
replaced, make sure to tell any author-
ized Toyota retailer or Toyota author- ized repairer, or any reliable repairer
that the sealant is injected.
■If the tire is infl ated to more than the specified air pressure
1 Press the button to let some air out.
Ty p e A
Ty p e B