2022 TOYOTA COROLLA change time
[x] Cancel search: change timePage 8 of 678
6
Please note that this manual
applies to all models and explains
all equipment, including options.
Therefore, you may find some
explanations for equipment not
installed on your vehicle.
All specifications provided in this
manual are current at the time of
printing. However, because of the
Toyota policy of continual product
improvement, we reserve the right
to make changes at any time with-
out notice.
Depending on specifications, the
vehicle shown in the illustrations
may differ from your vehicle in
terms of equipment.
Both genuine Toyota and a wide
variety of other spare parts and
accessories for Toyota vehicles are
currently available on the market.
Should it be determined that any of
the genuine Toyota parts or acces-
sories supplied with the vehicle
need to be replaced, Toyota recom-
mends that genuine Toyota parts or
accessories, be used to replace
them. Other parts or accessories of
matching quality can also be used.
Toyota cannot accept any liability or
guarantee spare parts and acces-
sories which are not genuine
Toyota products, nor for replace-
ment or installati on involving such
parts. In addition, damage or per-
formance problems resulting from
the use of non-genuine Toyota
spare parts or accessories may not
be covered under warranty.
The installation of an RF-transmit-
ter system in your vehicle could
affect electronic systems such as:
Multiport fuel injection sys-
tem/sequential multiport fuel
injection system
Toyota Safety Sense (if
equipped)
Cruise control system (if
equipped)
Anti-lock brake system
SRS airbag system
Seat belt pretensioner system
Be sure to check with any author-
ized Toyota retailer or Toyota
authorized repairer, or any reliable
repairer for precautionary meas-
ures or special instructions regard-
ing installation of an RF-transmitter
system.
Further information regarding fre-
quency bands, power levels,
antenna positions and installation
provisions for the installation of
For your infor mation
Main Owner’s Manual
Accessories, spare parts
and modification of your
To y o t a
Installation of an RF-trans-
mitter system
Page 89 of 678
87
2
2-1. Instrument cluster
Vehicle status information and indicators
lights are on and off.
• To adjust the brightness, display the
meter light control display and press
and hold the display change button.
■Adjusting the minute to “00”
1 Press or to select of
the multi-information display.
2 Press or to select “Clock
: 00”.
Press the to set the clock to
the beginning of the nearest hour.
e.g.
1:00 to 1:29 1:00
1:30 to 1:59 2:00
■Changing the clock
1 Press or to select of
the multi-information display.
2 Press or to select “Clock
: 00”.
3 Press and hold the .
4 Press or to select an
item to be changed.
5 Press or to change the
setting.
The following can be changed:
12-hour/24-hour format
Hour
Minute
■Clock adjustment
The clocks on the following can be
adjusted on the audio system
screen.
Multi-information display
Audio system screen
For details, refer to “Navigation and
multimedia system Owner’s manual” or
“Multimedia Owner’s Manual”.
■Clock settings screen (vehicles
with navigation/multimedia system)
If “Clock : 00” is displayed when is
selected on the multi-information dis-
play, the system may be malfunctioning.
Have the vehicle inspected by any authorized Toyota retailer or Toyota
authorized repairer, or any reliable
repairer.
Adjusting the clock (vehi-
cles without navigation/mul-
timedia system)
Adjusting the clock (vehi-
cles with navigation/multi-
media system)
Page 94 of 678
922-1. Instrument cluster
■Adjusting the minute to “00”
1 Press or to select of
the multi-information display.
2 Press or to select “Clock
: 00”.
Press the to set the clock to
the beginning of the nearest hour.
e.g.
1:00 to 1:29 1:00
1:30 to 1:59 2:00
■Changing the clock
1 Press or to select of
the multi-information display.
2 Press or to select “Clock
: 00”.
3 Press and hold the .
4 Press or to select an
item to be changed.
5 Press or to change the
setting.
The following can be changed:
12-hour/24-hour format
Hour
Minute
■Clock adjustment
The clocks on the following can be
adjusted on the audio system
screen.
Multi-information display
Audio system screen
For details, refer to “Navigation and
multimedia system Owner’s manual” or
“Multimedia Owner’s Manual”.
■Clock settings screen (vehicles
with navigation/multimedia system)
If “Clock : 00” is displayed when is
selected on the multi-information dis-
play, the system may be malfunctioning.
Have the vehicle inspected by any authorized Toyota retailer or Toyota
authorized repairer, or any reliable
repairer.
Adjusting the clock (vehi-
cles without navigation/mul-
timedia system)
Adjusting the clock (vehi-
cles with navigation/multi-
media system)
Page 96 of 678
942-1. Instrument cluster
■Liquid crystal display
Small spots or light spots may appear
on the display. This phenomenon is characteristic of liq uid crystal displays,
and there is no problem continuing to
use the display.
The multi-informat ion display is
operated using the meter control
switches.
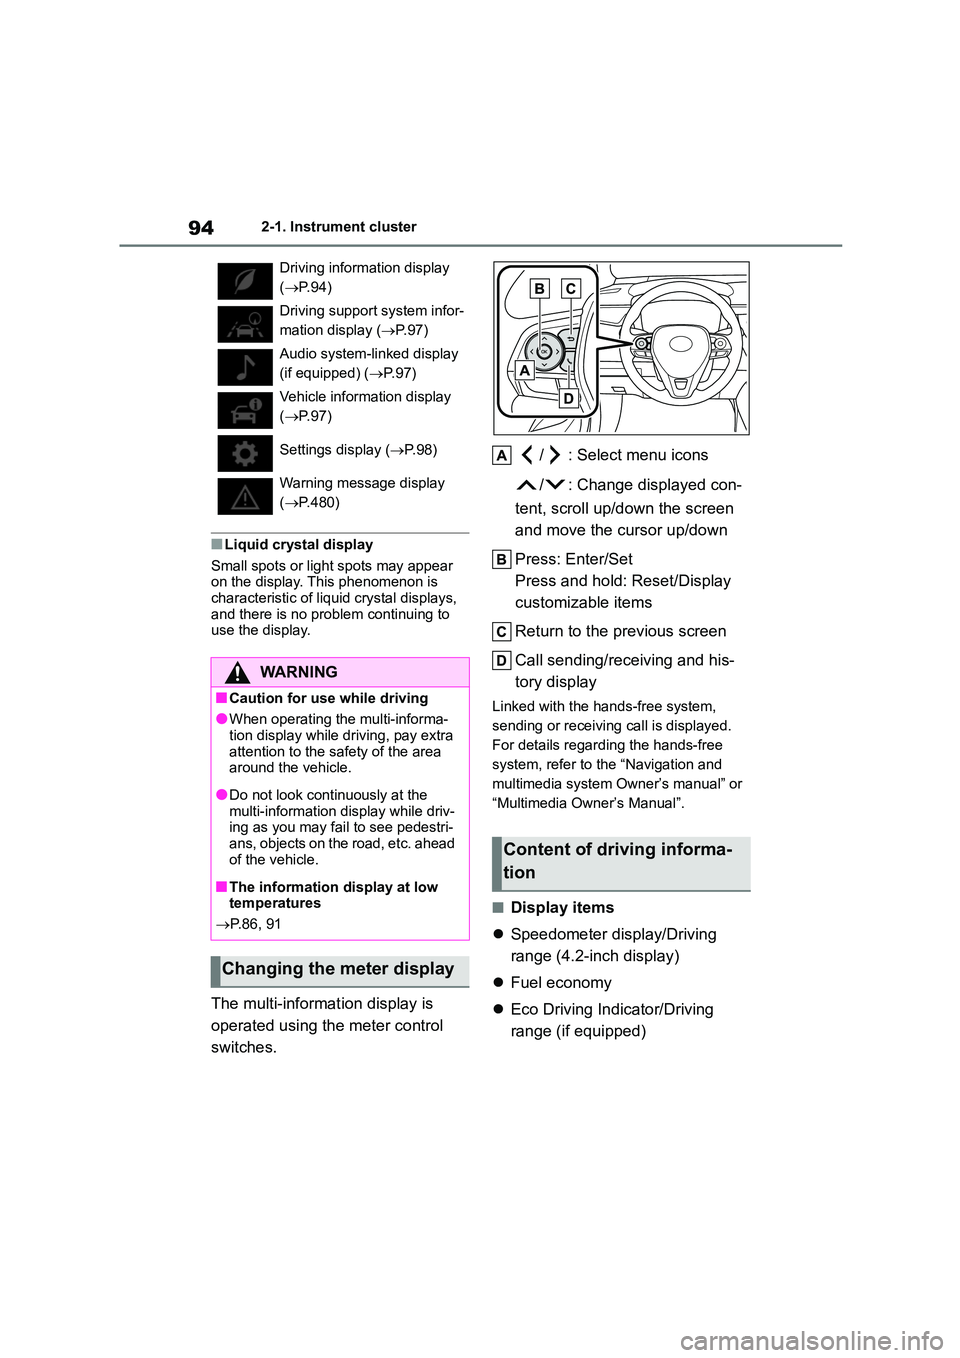
/ : Select menu icons
/ : Change displayed con-
tent, scroll up/down the screen
and move the cursor up/down
Press: Enter/Set
Press and hold: Reset/Display
customizable items
Return to the previous screen
Call sending/receiving and his-
tory display
Linked with the hands-free system,
sending or receiving call is displayed.
For details regarding the hands-free
system, refer to the “Navigation and
multimedia system Owner’s manual” or
“Multimedia Owner’s Manual”.
■Display items
Speedometer display/Driving
range (4.2-inch display)
Fuel economy
Eco Driving Indicator/Driving
range (if equipped)
Driving information display
( P. 9 4 )
Driving suppor t system infor-
mation display ( P. 9 7 )
Audio system-linked display
(if equipped) ( P. 9 7 )
Vehicle information display
( P. 9 7 )
Settings display ( P. 9 8 )
Warning message display
( P.480)
WA R N I N G
■Caution for use while driving
●When operating the multi-informa-
tion display while driving, pay extra
attention to the safety of the area around the vehicle.
●Do not look continuously at the multi-information display while driv-
ing as you may fail to see pedestri-
ans, objects on the road, etc. ahead of the vehicle.
■The information display at low temperatures
P.86, 91
Changing the meter display
Content of driving informa-
tion
Page 98 of 678
962-1. Instrument cluster
driven may differ from that displayed.
When only a small amount of fuel is
added to the tank, the display may not
be updated.
When refueling, turn the engine switch
off. If the vehicle is refueled without
turning the engine switch off, the dis-
play may not be updated.
The average fuel economy display
can be changed in . ( P. 9 8 )
Average fuel economy (after
start)
Displays the average fuel consumption
since engine start.
Average fuel economy (after
refuel)
Displays the average fuel consumption
since the vehicle was refueled.
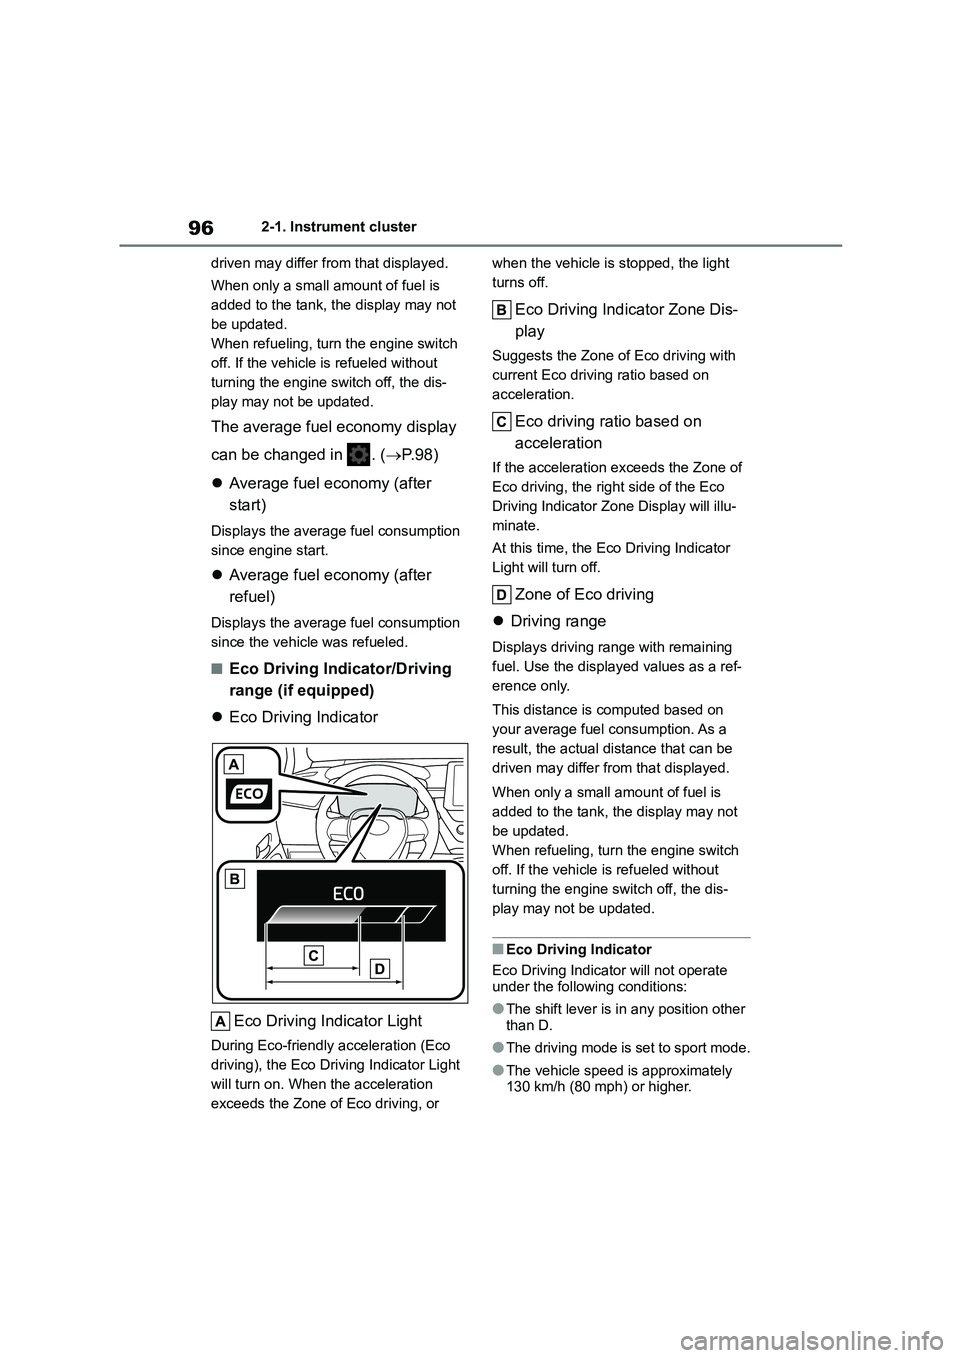
■Eco Driving Indicator/Driving
range (if equipped)
Eco Driving Indicator
Eco Driving Indicator Light
During Eco-friendly acceleration (Eco
driving), the Eco Driving Indicator Light
will turn on. When the acceleration
exceeds the Zone of Eco driving, or
when the vehicle is stopped, the light
turns off.
Eco Driving Indicator Zone Dis-
play
Suggests the Zone of Eco driving with
current Eco driving ratio based on
acceleration.
Eco driving ratio based on
acceleration
If the acceleration exceeds the Zone of
Eco driving, the right side of the Eco
Driving Indicator Zone Display will illu-
minate.
At this time, the Eco Driving Indicator
Light will turn off.
Zone of Eco driving
Driving range
Displays driving range with remaining
fuel. Use the displayed values as a ref-
erence only.
This distance is computed based on
your average fuel consumption. As a
result, the actual distance that can be
driven may differ from that displayed.
When only a small amount of fuel is
added to the tank, the display may not
be updated.
When refueling, turn the engine switch
off. If the vehicle is refueled without
turning the engine switch off, the dis-
play may not be updated.
■Eco Driving Indicator
Eco Driving Indicator will not operate under the following conditions:
●The shift lever is in any position other than D.
●The driving mode is set to sport mode.
●The vehicle speed is approximately
130 km/h (80 mph) or higher.
Page 100 of 678
982-1. Instrument cluster
• Average vehicle speed: Displays the
average vehicle speed since the dis-
play was reset*
*: To reset, display the desired item and
press and hold the meter control
switch.
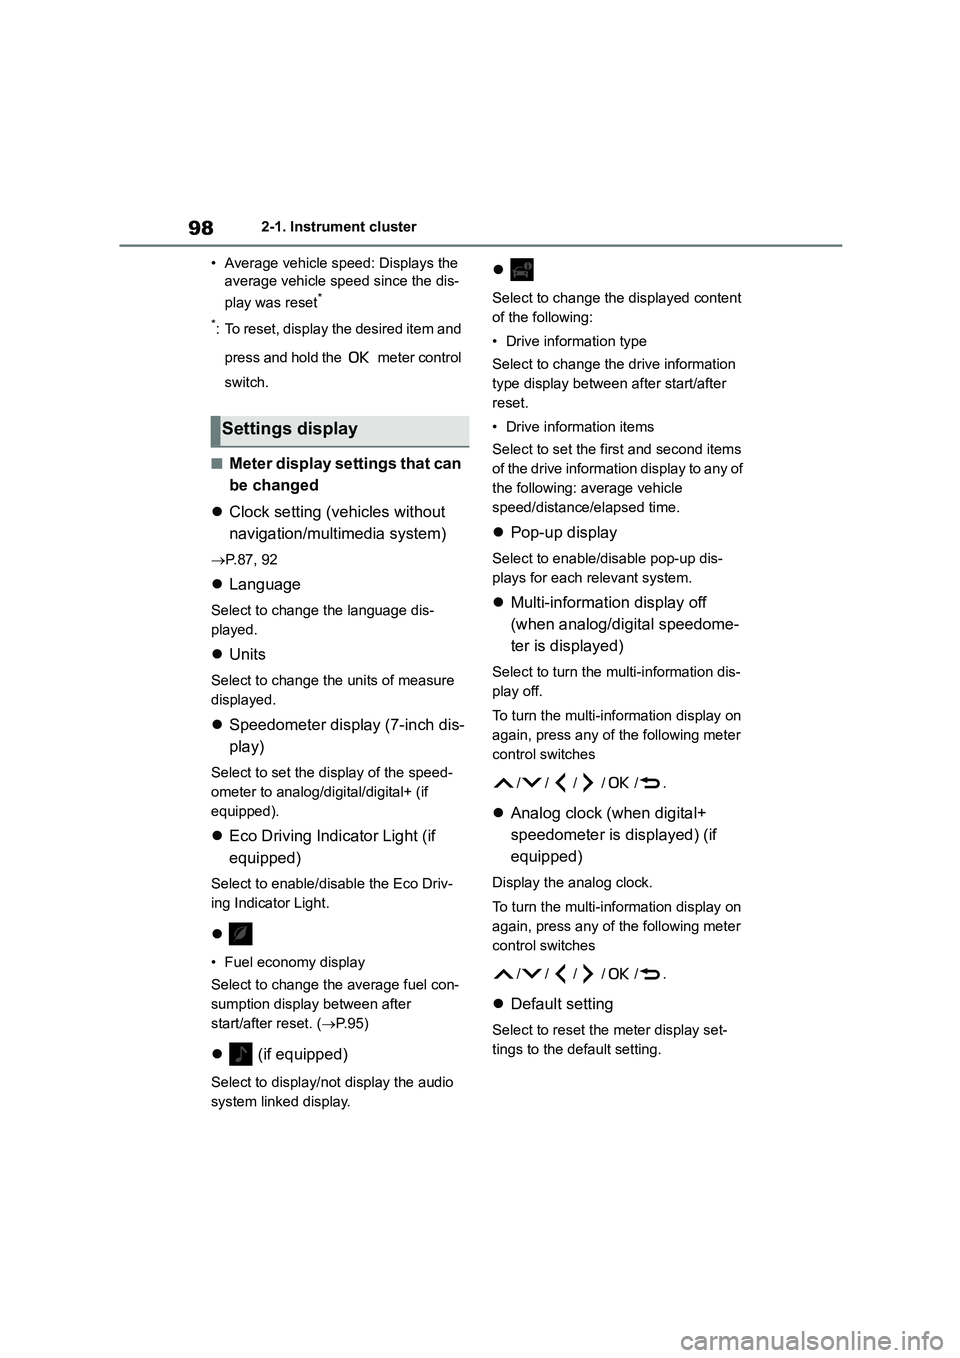
■Meter display settings that can
be changed
Clock setting (vehicles without
navigation/multimedia system)
P.87, 92
Language
Select to change the language dis-
played.
Units
Select to change the units of measure
displayed.
Speedometer display (7-inch dis-
play)
Select to set the display of the speed-
ometer to analog/digital/digital+ (if
equipped).
Eco Driving Indicator Light (if
equipped)
Select to enable/disable the Eco Driv-
ing Indicator Light.
• Fuel economy display
Select to change the average fuel con-
sumption display between after
start/after reset. ( P. 9 5 )
(if equipped)
Select to display/not display the audio
system linked display.
Select to change the displayed content
of the following:
• Drive information type
Select to change the drive information
type display between after start/after
reset.
• Drive information items
Select to set the first and second items
of the drive information display to any of
the following: average vehicle
speed/distance/elapsed time.
Pop-up display
Select to enable/disable pop-up dis-
plays for each relevant system.
Multi-information display off
(when analog/digital speedome-
ter is displayed)
Select to turn the multi-information dis-
play off.
To turn the multi-information display on
again, press any of the following meter
control sw itches
//// /.
Analog clock (when digital+
speedometer is displayed) (if
equipped)
Display the analog clock.
To turn the multi-information display on
again, press any of the following meter
control sw itches
//// /.
Default setting
Select to reset the meter display set-
tings to the default setting.
Settings display
Page 116 of 678
1143-2. Opening, closing and locking the doors
any authorized Toyota retailer or
Toyota authorized repairer, or any
reliable repairer.
*2: If equipped
■Key
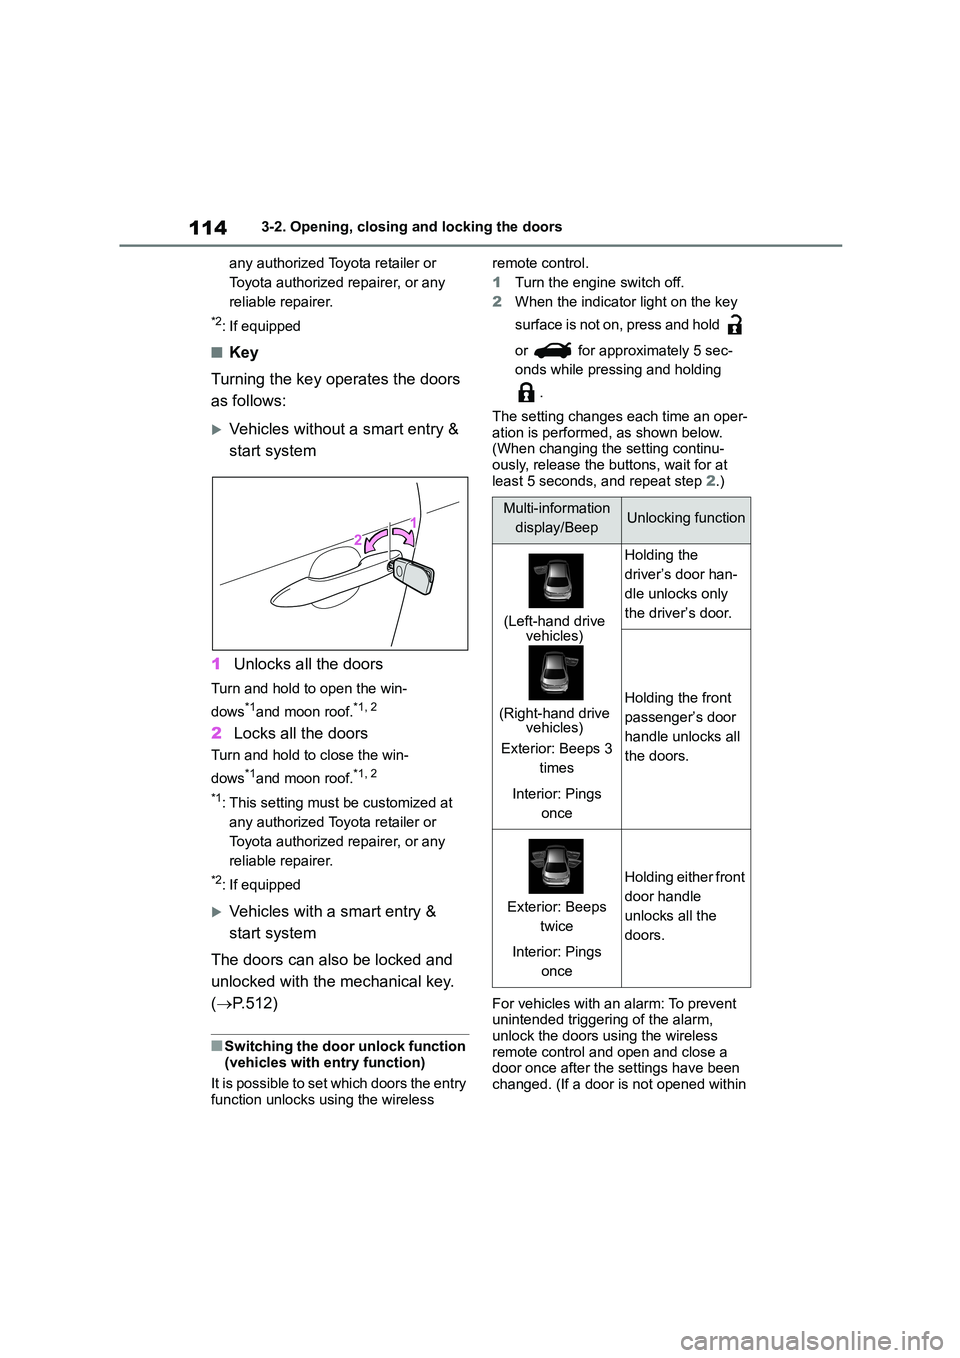
Turning the key operates the doors
as follows:
Vehicles without a smart entry &
start system
1 Unlocks all the doors
Turn and hold to open the win-
dows*1and moon roof.*1, 2
2 Locks all the doors
Turn and hold to close the win-
dows*1and moon roof.*1, 2
*1: This setting must be customized at
any authorized Toyota retailer or
Toyota authorized repairer, or any
reliable repairer.
*2: If equipped
Vehicles with a smart entry &
start system
The doors can also be locked and
unlocked with the mechanical key.
( P.512)
■Switching the door unlock function
(vehicles with entry function)
It is possible to set which doors the entry function unlocks using the wireless
remote control.
1 Turn the engine switch off.
2 When the indicator light on the key
surface is not on, press and hold
or for approximately 5 sec-
onds while pressing and holding
.
The setting changes each time an oper-
ation is performed, as shown below.
(When changing the setting continu- ously, release the buttons, wait for at
least 5 seconds, and repeat step 2.)
For vehicles with an alarm: To prevent
unintended triggering of the alarm,
unlock the doors using the wireless remote control and open and close a
door once after the settings have been
changed. (If a door is not opened within
Multi-information
display/BeepUnlocking function
(Left-hand drive vehicles)
(Right-hand drive vehicles)
Exterior: Beeps 3
times
Interior: Pings
once
Holding the
driver’s door han-
dle unlocks only
the driver’s door.
Holding the front
passenger’s door
handle unlocks all
the doors.
Exterior: Beeps
twice
Interior: Pings
once
Holding either front
door handle
unlocks all the
doors.
Page 153 of 678
151
4
4-1. Before driving
Driving
NOTICE
●Observe the following precautions.
Failure to do so may cause exces-
sive premature wear or damage to the clutch, eventually making it diffi-
cult to accelerate and start off from
a stop. Have the vehicle inspected by any authorized Toyota retailer or
Toyota authorized repairer, or any
reliable repairer.
• Do not rest your foot on the clutch pedal or depress it any time other
than when shifting.
Doing so may cause clutch trouble.
• Do not use any gear other than the
1st gear when starting off and mov- ing forward.
Doing so may damage the clutch.
• Do not use the clutch pedal to
adjust vehicle speed.
Doing so may damage the clutch.
• When stopping the vehicle with the
shift lever in a position other than N, make sure to fully depress the
clutch pedal and stop the vehicle
using the brakes.
●Do not shift the shift lever to R with-
out the vehicle completely stopped. Doing so may damage the clutch,
transmission and gears.
■When parking the vehicle (vehi-
cles with a Multidrive)
Always set the parking brake and shift the shift lever to P. Failure to do so
may cause the vehicle to move or the
vehicle may accelerate suddenly if the accelerator pedal is accidentally
depressed.
■Avoiding damage to vehicle parts
●Do not turn the steering wheel fully
in either direction and hold it there for an extended period of time.
Doing so may damage the power
steering motor.
●When driving over bumps in the road, drive as slowly as possible to
avoid damaging the wheels, under-
side of the vehicle, etc.
■If you get a flat tire while driving
A flat or damaged tire may cause the following situations. Hold the steering
wheel firmly and gradually depress
the brake pedal to slow down the vehicle.
●It may be difficult to control your vehicle.
●The vehicle will make abnormal sounds or vibrations.
●The vehicle will lean abnormally.
Information on what to do in case of a
flat tire (P.482, 498)
■When encountering flooded
roads
Do not drive on a road that has
flooded after heavy rain etc. Doing so
may cause the following serious dam- age to the vehicle:
●Engine stalling
●Short in electrical components
●Engine damage caused by water
immersion
In the event that you drive on a
flooded road and the vehicle
becomes flooded or stuck in mud or sand, be sure to have any authorized
Toyota retailer or Toyota authorized
repairer, or any reliable repairer check the following:
●Brake function
●Changes in the quantity and quality
of the engine oil, transaxle fluid,
clutch fluid, differential oil, etc.
●Lubricant condition for the bearings
and suspension joints (where possi- ble), and the function of all joints,
bearings, etc.