2022 TOYOTA COROLLA airbag off
[x] Cancel search: airbag offPage 53 of 678
51
1
1-2. Child safety
For safety and security
WA R N I N G
WA R N I N G
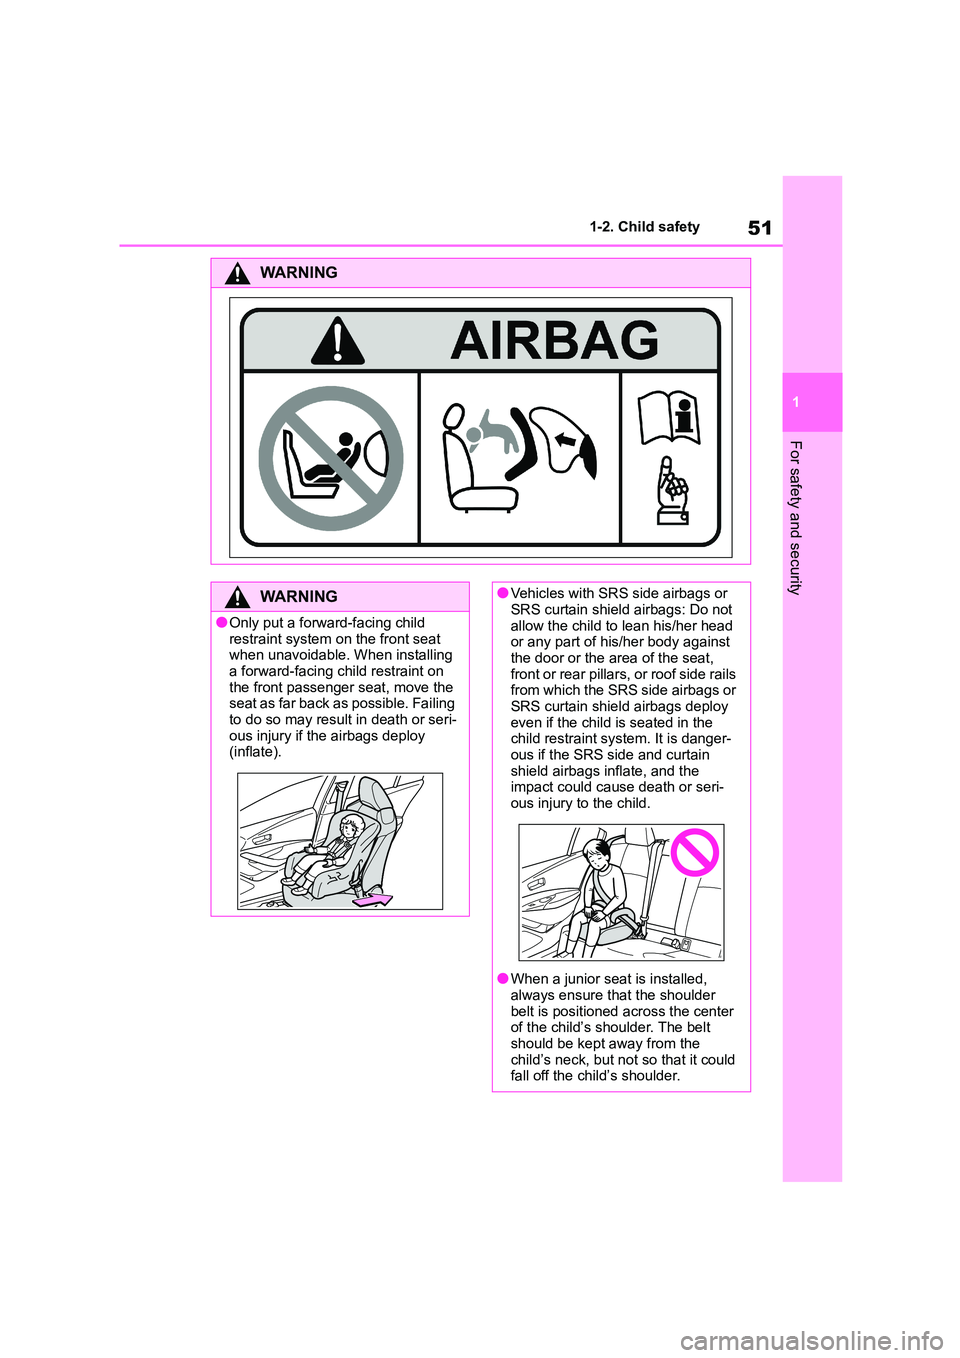
●Only put a forward-facing child
restraint system on the front seat
when unavoidable. When installing a forward-facing child restraint on
the front passenger seat, move the
seat as far back as possible. Failing to do so may result in death or seri-
ous injury if the airbags deploy
(inflate).
●Vehicles with SRS side airbags or
SRS curtain shield airbags: Do not
allow the child to lean his/her head or any part of his/her body against
the door or the area of the seat,
front or rear pillars, or roof side rails
from which the SRS side airbags or SRS curtain shield airbags deploy
even if the child is seated in the
child restraint system. It is danger- ous if the SRS side and curtain
shield airbags inflate, and the
impact could cause death or seri- ous injury to the child.
●When a junior seat is installed, always ensure that the shoulder
belt is positioned across the center
of the child’s shoulder. The belt should be kept away from the
child’s neck, but not so that it could
fall off the child’s shoulder.
Page 56 of 678
541-2. Child safety
*1: Move the front seat fully rearward. If
the passenger seat height can be
adjusted, move it to the upper most
position.
*2: Adjust the seatback angle to the
most upright position. When install-
ing a forward-facing child seat, if
there is a gap between the child seat
and the seatback, adjust the
seatback angle until good contact is
achieved.
*3: If the head restraint interferes with
your child restra int system, and the
head restraint can be removed,
remove the head restraint.
Otherwise, put the head restraint in
the upper most position.
*4: Use only a front-fa cing child restraint
system when the airbag manual
on-off switch is on.
*5: Not suitable for ch ild restraint system
with support leg.
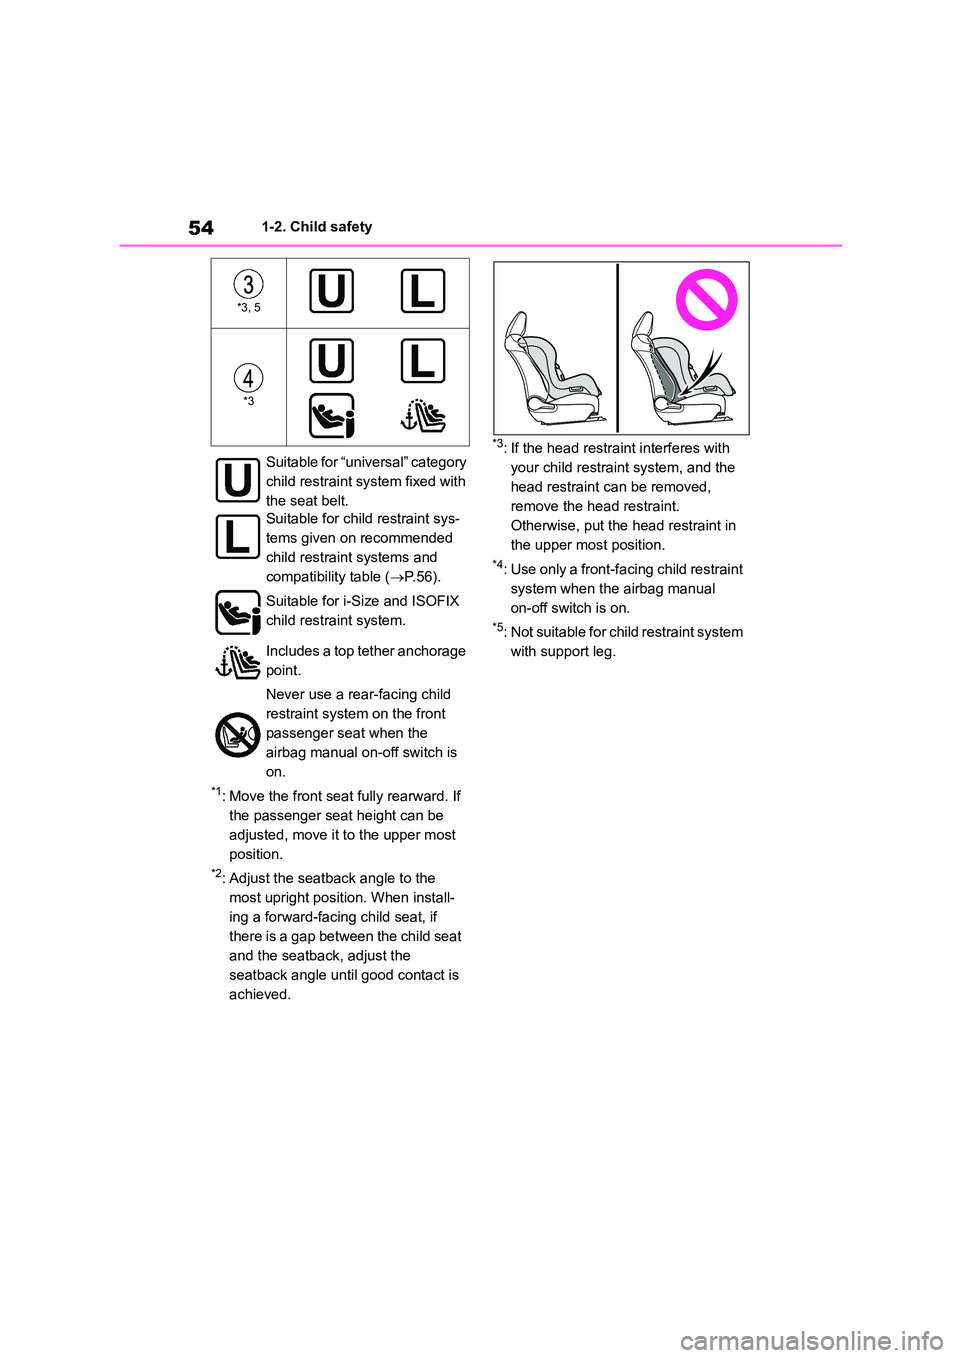
*3, 5
*3
Suitable for “universal” category
child restraint syst em fixed with
the seat belt.
Suitable for child restraint sys-
tems given on recommended
child restraint systems and
compatibility table ( P. 5 6 ) .
Suitable for i-Size and ISOFIX
child restraint system.
Includes a top tether anchorage
point.
Never use a rear-facing child
restraint system on the front
passenger seat when the
airbag manual on-off switch is
on.
Page 57 of 678
55
1
1-2. Child safety
For safety and security
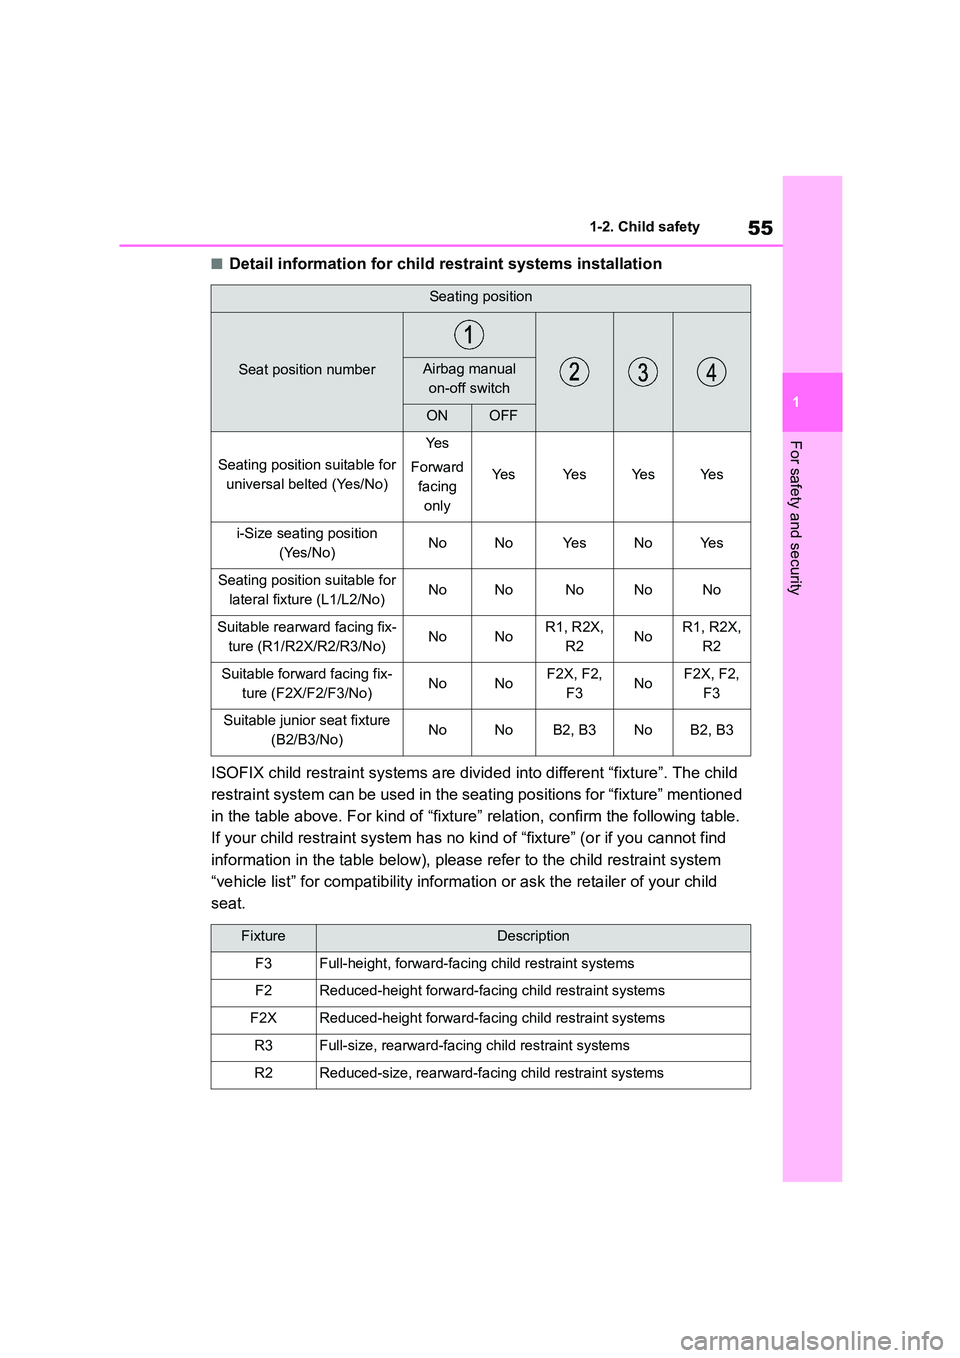
■Detail information for child restraint systems installation
ISOFIX child restraint systems are divid ed into different “fixture”. The child
restraint system can be used in the se ating positions for “fixture” mentioned
in the table above. For kind of “fixtu re” relation, confirm the following table.
If your child restraint system has no ki nd of “fixture” (or if you cannot find
information in the table below), please refer to the child restraint system
“vehicle list” for compatib ility information or ask the retailer of your child
seat.
Seating position
Seat position numberAirbag manual
on-off switch
ONOFF
Seating position suitable for
universal belted (Yes/No)
Ye s
Forward
facing
only
Ye sYe sYe sYe s
i-Size seating position
(Yes/No)NoNoYe sNoYe s
Seating position suitable for
lateral fixture (L1/L2/No)NoNoNoNoNo
Suitable rearward facing fix-
ture (R1/R2X/R2/R3/No)NoNoR1, R2X,
R2NoR1, R2X,
R2
Suitable forward facing fix-
ture (F2X/F2/F3/No)NoNoF2X, F2,
F3NoF2X, F2,
F3
Suitable junior seat fixture
(B2/B3/No)NoNoB2, B3NoB2, B3
FixtureDescription
F3Full-height, forward-faci ng child restraint systems
F2Reduced-height forward-facing child restraint systems
F2XReduced-height forward-facing child restraint systems
R3Full-size, rearward-facing child restraint systems
R2Reduced-size, rearward-facing child restraint systems
Page 58 of 678
561-2. Child safety
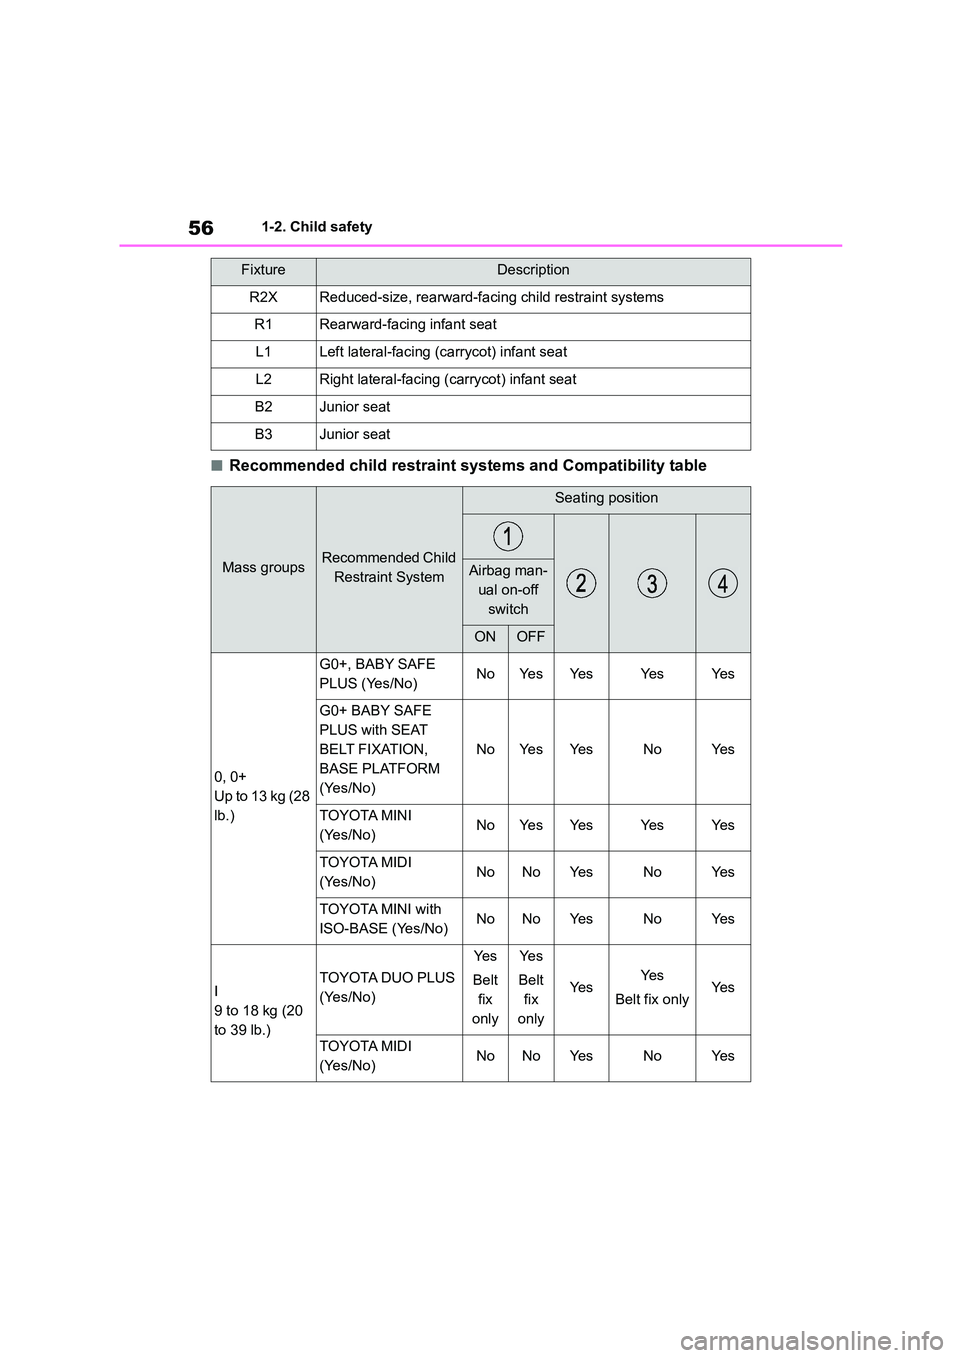
■Recommended child restraint systems and Compatibility table
R2XReduced-size, rearward-facing child restraint systems
R1Rearward-facing infant seat
L1Left lateral-facing (carrycot) infant seat
L2Right lateral-facing (carrycot) infant seat
B2Junior seat
B3Junior seat
Mass groupsRecommended Child
Restraint System
Seating position
Airbag man-
ual on-off
switch
ONOFF
0, 0+
Up to 13 kg (28
lb.)
G0+, BABY SAFE
PLUS (Yes/No)NoYe sYe sYe sYe s
G0+ BABY SAFE
PLUS with SEAT
BELT FIXATION,
BASE PLATFORM
(Yes/No)
NoYe sYe sNoYe s
TOYOTA MINI
(Yes/No)NoYe sYe sYe sYe s
TOYOTA MIDI
(Yes/No)NoNoYe sNoYe s
TOYOTA MINI with
ISO-BASE (Yes/No)NoNoYe sNoYe s
I
9 to 18 kg (20
to 39 lb.)
TOYOTA DUO PLUS
(Yes/No)
Ye s
Belt
fix
only
Ye s
Belt
fix
only
Ye sYe s
Belt fix onlyYe s
TOYOTA MIDI
(Yes/No)NoNoYe sNoYe s
FixtureDescription
Page 59 of 678
57
1
1-2. Child safety
For safety and security
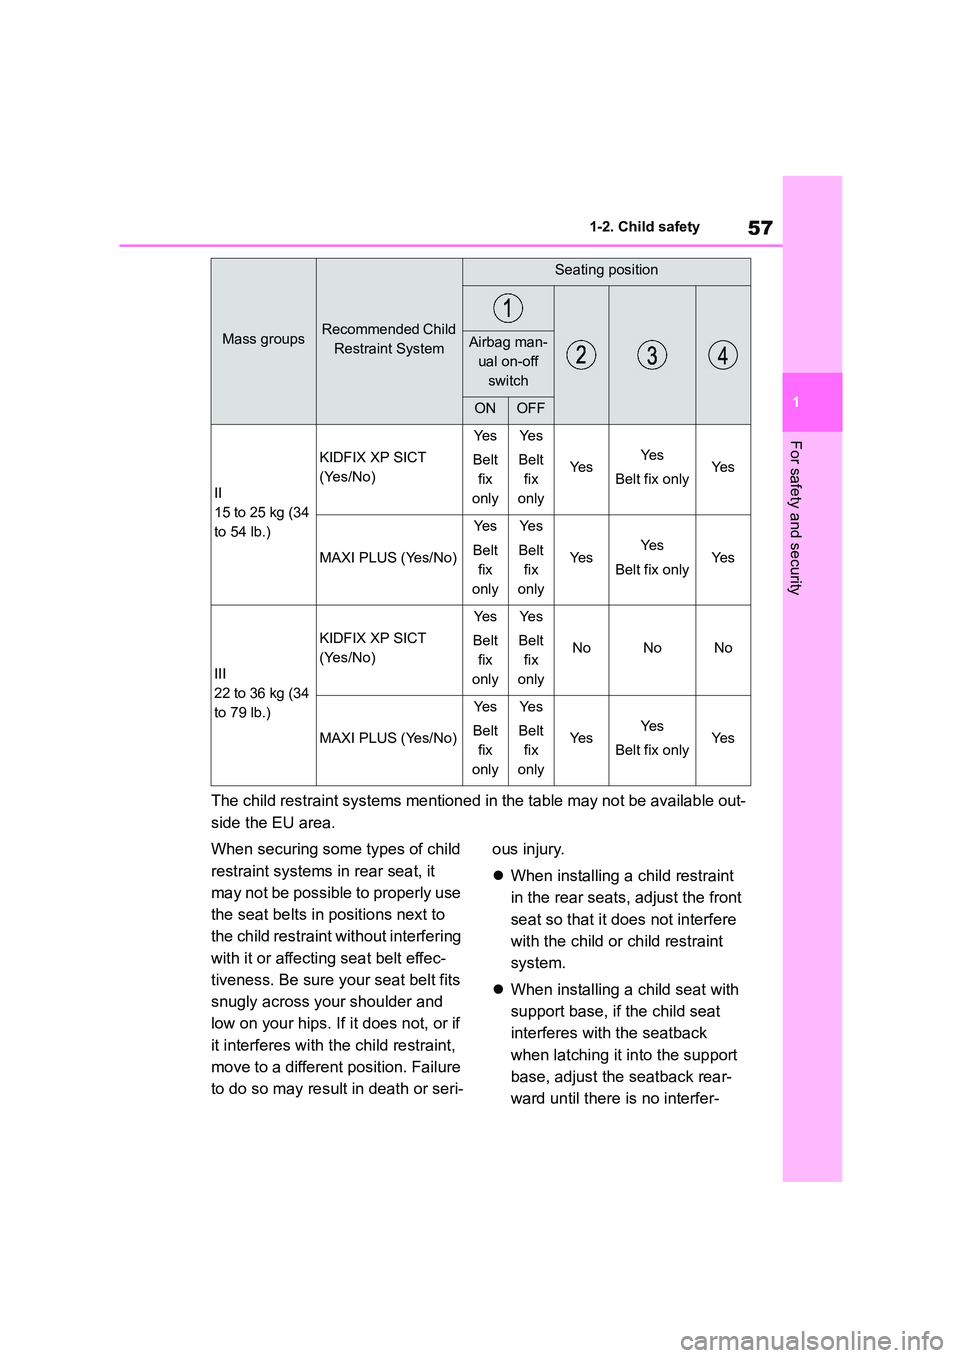
The child restraint systems mentioned in the table may not be available out-
side the EU area.
When securing some types of child
restraint systems in rear seat, it
may not be possible to properly use
the seat belts in positions next to
the child restraint without interfering
with it or affecting seat belt effec-
tiveness. Be sure your seat belt fits
snugly across your shoulder and
low on your hips. If it does not, or if
it interferes with the child restraint,
move to a different position. Failure
to do so may result in death or seri-
ous injury.
When installing a child restraint
in the rear seats, adjust the front
seat so that it does not interfere
with the child or child restraint
system.
When installing a child seat with
support base, if the child seat
interferes with the seatback
when latching it into the support
base, adjust the seatback rear-
ward until there is no interfer-
II
15 to 25 kg (34
to 54 lb.)
KIDFIX XP SICT
(Yes/No)
Ye s
Belt
fix
only
Ye s
Belt
fix
only
Ye sYe s
Belt fix onlyYe s
MAXI PLUS (Yes/No)
Ye s
Belt
fix
only
Ye s
Belt
fix
only
Ye sYe s
Belt fix onlyYe s
III
22 to 36 kg (34
to 79 lb.)
KIDFIX XP SICT
(Yes/No)
Ye s
Belt
fix
only
Ye s
Belt
fix
only
NoNoNo
MAXI PLUS (Yes/No)
Ye s
Belt
fix
only
Ye s
Belt
fix
only
Ye sYe s
Belt fix onlyYe s
Mass groupsRecommended Child
Restraint System
Seating position
Airbag man-
ual on-off
switch
ONOFF
Page 397 of 678
395
6
6-2. Using the interior lights
Interior features
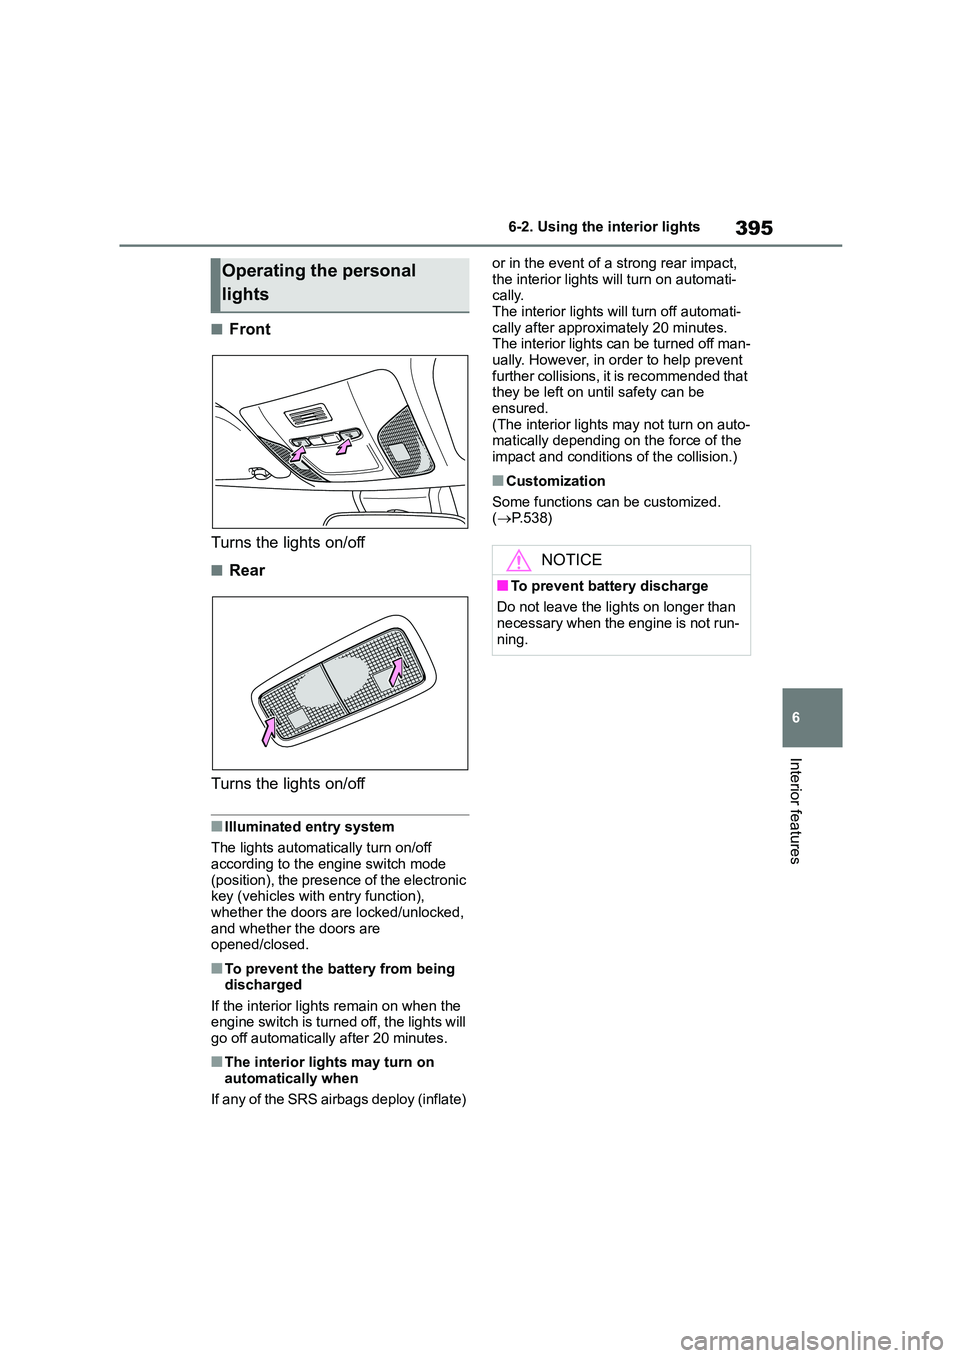
■Front
Turns the lights on/off
■Rear
Turns the lights on/off
■Illuminated entry system
The lights automatically turn on/off according to the engine switch mode
(position), the presence of the electronic
key (vehicles with entry function), whether the doors are locked/unlocked,
and whether the doors are
opened/closed.
■To prevent the battery from being discharged
If the interior lights remain on when the
engine switch is turned off, the lights will go off automatically after 20 minutes.
■The interior lights may turn on
automatically when
If any of the SRS airbags deploy (inflate)
or in the event of a strong rear impact,
the interior lights will turn on automati- cally.
The interior lights will turn off automati-
cally after approximately 20 minutes. The interior lights can be turned off man-
ually. However, in order to help prevent
further collisions, it is recommended that they be left on until safety can be
ensured.
(The interior lights may not turn on auto- matically depending on the force of the
impact and conditions of the collision.)
■Customization
Some functions can be customized. ( P.538)
Operating the personal
lights
NOTICE
■To prevent battery discharge
Do not leave the lights on longer than
necessary when the engine is not run- ning.
Page 415 of 678
413
7
7-1. Maintenance and care
Maintenance and care
Remove dirt and dust using a
vacuum cleaner. Wipe dirty sur-
faces with a cloth dampened with
lukewarm water.
If dirt cannot be removed, wipe it
off with a soft cloth dampened
with neutral detergent diluted to
approximately 1%.
Wring out any excess water from
the cloth and thoroughly wipe off
remaining traces of detergent
and water.
■Shampooing the carpets
There are several commercial foam-
ing-type cleaners available. Use a
sponge or brush to apply the foam. Rub in overlapping circles. Do not use water.
Wipe dirty surfaces and let them dry.
Excellent results are obtained by keep- ing the carpet as dry as possible.
■Handling the seat belts
Clean with mild soap and lukewarm
water using a cloth or sponge. Also check the belts peri odically for exces-
sive wear, fraying or cuts.
Cleaning and protecting
the vehicle interior
Perform cleaning in a manner
appropriate to each compo-
nent and its material.
Protecting the vehicle inte-
rior
WA R N I N G
■Water in the vehicle
●Do not splash or spill liquid in the
vehicle. Doing so may cause electrical com-
ponents, etc. to malfunction or
catch fire.
●Do not get any of the SRS compo-
nents or wiring in the vehicle interior
wet. ( P. 3 5 )
An electrical malfunction may
cause the airbags to deploy or not function properly, resulting in death
or serious injury.
●Vehicles with wireless charger:
Do not let the wireless charger
( P.402) get wet. Failure to do so may cause the charger to become
hot and cause burns or could cause
electric shock resulting in death or serious injury.
■Cleaning the interior (especially instrument panel)
Do not use polish wax or polish
cleaner. The instrument panel may reflect off the windshield, obstructing
the driver’s view and leading to an
accident, resulting in death or serious injury.
NOTICE
■Cleaning detergents
●Do not use the following types of detergent, as they may discolor the
vehicle interior or cause streaks or
damage to painted surfaces:
• Non-seat portions: Organic sub-
stances such as benzene or gaso-
line, alkaline or acidic solutions, dye, and bleach
• Seats: Alkaline or acidic solutions, such as thinner, benzene, and alco-
hol
Page 464 of 678
4628-1. Essential information
8-1.Essential information
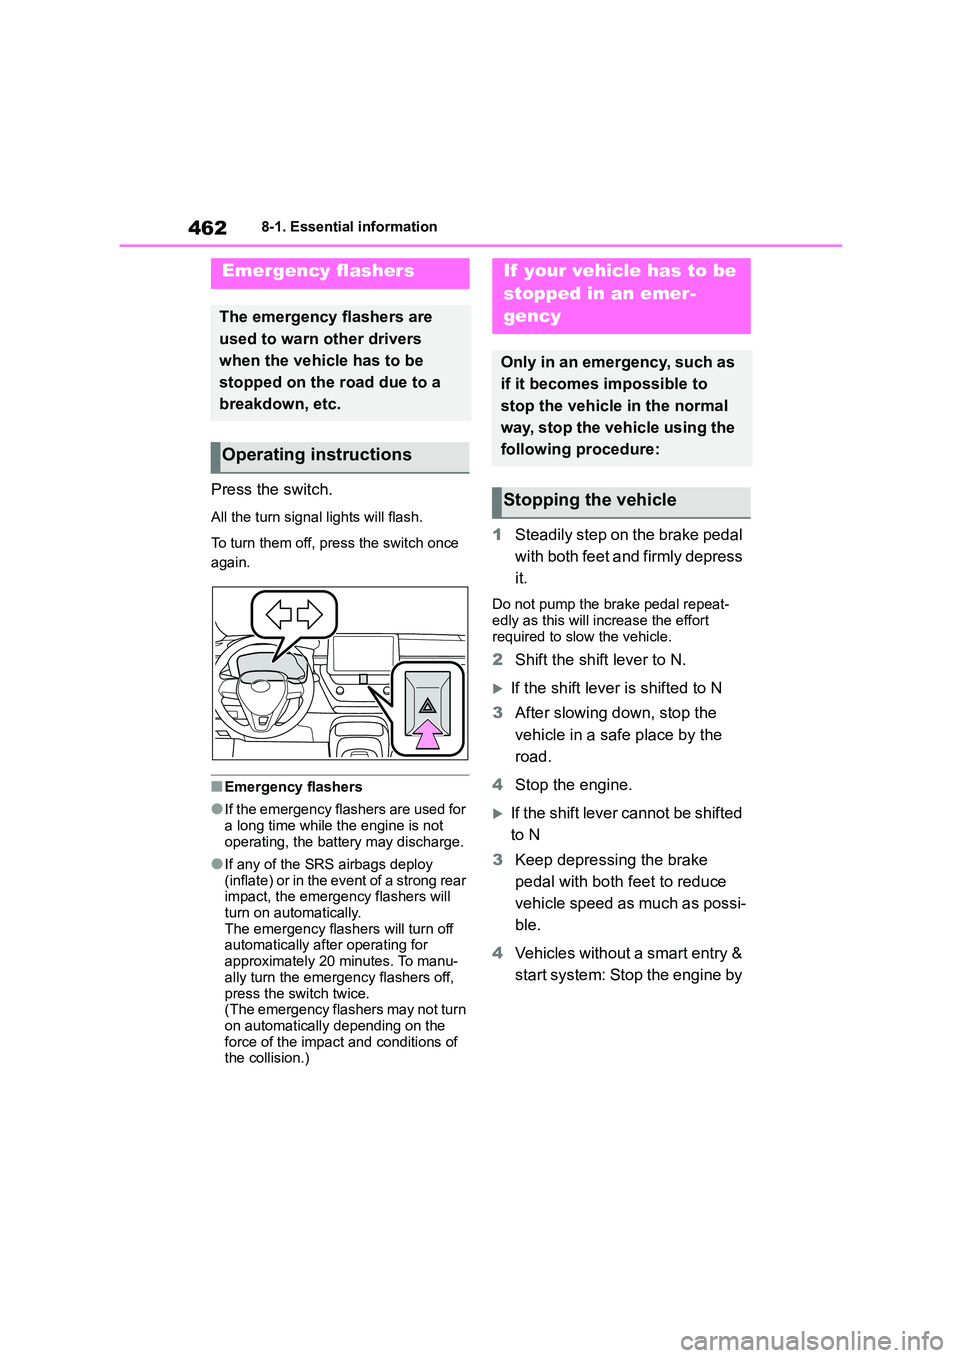
Press the switch.
All the turn signal lights will flash.
To turn them off, press the switch once
again.
■Emergency flashers
●If the emergency flashers are used for
a long time while the engine is not
operating, the battery may discharge.
●If any of the SRS airbags deploy
(inflate) or in the event of a strong rear impact, the emergency flashers will
turn on automatically.
The emergency flashers will turn off automatically after operating for
approximately 20 minutes. To manu-
ally turn the emergency flashers off,
press the switch twice. (The emergency flashers may not turn
on automatically depending on the
force of the impact and conditions of the collision.)
1 Steadily step on the brake pedal
with both feet and firmly depress
it.
Do not pump the brake pedal repeat-
edly as this will increase the effort required to slow the vehicle.
2 Shift the shift lever to N.
If the shift lever is shifted to N
3 After slowing down, stop the
vehicle in a safe place by the
road.
4 Stop the engine.
If the shift lever cannot be shifted
to N
3 Keep depressing the brake
pedal with both feet to reduce
vehicle speed as much as possi-
ble.
4 Vehicles without a smart entry &
start system: Stop the engine by
Emergency flashers
The emergency flashers are
used to warn other drivers
when the vehicle has to be
stopped on the road due to a
breakdown, etc.
Operating instructions
If your vehicle has to be
stopped in an emer-
gency
Only in an emergency, such as
if it becomes impossible to
stop the vehicle in the normal
way, stop the vehicle using the
following procedure:
Stopping the vehicle