2022 TOYOTA COROLLA HATCHBACK lights
[x] Cancel search: lightsPage 456 of 758

4546-4. Other interior features
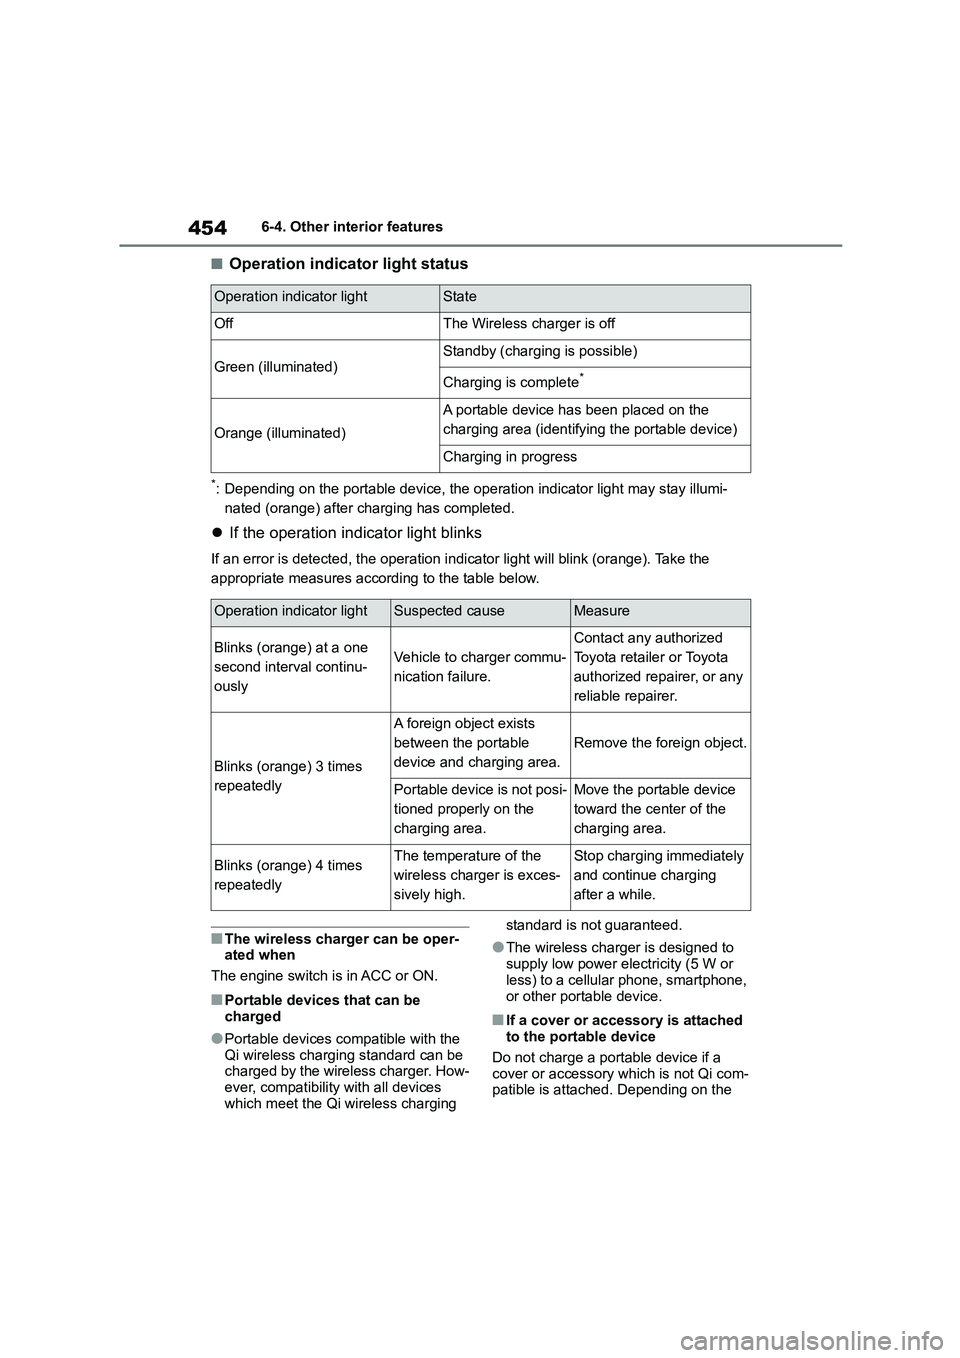
■Operation indicator light status
*: Depending on the portable device, the operation indicator light may stay illumi-
nated (orange) after charging has completed.
If the operation indicator light blinks
If an error is detected, the operation indicator light will blink (orange). Take the
appropriate measures according to the table below.
■The wireless charger can be oper-
ated when
The engine switch is in ACC or ON.
■Portable devices that can be
charged
●Portable devices compatible with the
Qi wireless charging standard can be
charged by the wireless charger. How- ever, compatibility with all devices
which meet the Qi wireless charging
standard is not guaranteed.
●The wireless charger is designed to
supply low power electricity (5 W or
less) to a cellular phone, smartphone,
or other portable device.
■If a cover or accessory is attached to the portable device
Do not charge a portable device if a
cover or accessory which is not Qi com- patible is attached. Depending on the
Operation indicator lightState
OffThe Wireless charger is off
Green (illuminated)Standby (charging is possible)
Charging is complete*
Orange (illuminated)
A portable device has been placed on the
charging area (identifying the portable device)
Charging in progress
Operation indicator lightSuspected causeMeasure
Blinks (orange) at a one
second interval continu-
ously
Vehicle to charger commu-
nication failure.
Contact any authorized
Toyota retailer or Toyota
authorized repairer, or any
reliable repairer.
Blinks (orange) 3 times
repeatedly
A foreign object exists
between the portable
device and charging area.
Remove the foreign object.
Portable device is not posi-
tioned properly on the
charging area.
Move the portable device
toward the center of the
charging area.
Blinks (orange) 4 times
repeatedly
The temperature of the
wireless charger is exces-
sively high.
Stop charging immediately
and continue charging
after a while.
Page 459 of 758

457
6
6-4. Other interior features
Interior features
■To prevent battery discharge
If the vanity lights remain on when the
engine switch is OFF, the lights will go
off automatically after 20 minutes.
Fold down the armrest for use.
An assist grip inst alled on the ceil-
ing can be used to support your
body while sitting on the seat.
The coat hooks are provided with
the rear assist grips.
NOTICE
■To prevent the battery from being discharged
Do not leave the vanity lights on for
extended periods while the engine is stopped.
Armrest (if equipped)
NOTICE
■To prevent damage to the arm-
rest
Do not apply too much load on the armrest.
Assist grips
WA R N I N G
■Assist grip
Do not use the assist grip when get-
ting in or out of the vehicle or rising
from your seat.
NOTICE
■To prevent damage to the assist
grip
Do not hang any heavy object or put a
heavy load on the assist grip.
Coat hooks
Page 464 of 758

4627-1. Maintenance and care
NOTICE
• If the vehicle becomes heavily
soiled with dust or mud
• If liquids such as benzene and gas-
oline are spilled on the paint sur-
face
●If the paint is chipped or scratched,
have it repaired immediately.
●To prevent the wheels from corrod-
ing, remove any dirt and store in a
place with low humidity when stor- ing the wheels.
■Cleaning the exterior lights
●Wash carefully. Do not use organic
substances or scrub with a hard
brush. This may damage the surfaces of
the lights.
●Do not apply wax to the surfaces of
the lights.
Wax may cause damage to the lenses.
■To prevent damage to the wind-shield wiper arms
When lifting the wiper arms away
from the windshield, pull the driver side wiper arm upward first, and
repeat for the passenger side. When
returning the wipers to their original position, do so from the passenger
side first.
■When using an automatic car
wash (vehicles with rain-sensing
windshield wipers)
Set the wiper switch to the off posi-
tion. If the wiper switch is in “AUTO”,
the wipers may operate and the wiper blades may be damaged.
■When using a high pressure car wash
●Vehicles with rear view monitor sys-
tem: When washing the vehicle, do not spray the camera or its sur-
rounding area directly with a high
pressure washer. Shock applied from high pressure water may
cause the device to not operate
normally.
●Do not bring the nozzle tip close to
boots (rubber or resin manufac- tured cover), connectors or the fol-
lowing parts. The parts may be
damaged if they come into contact with high-pressure water.
• Traction related parts
• Steering parts
• Suspension parts
•Brake parts
●Keep the cleaning nozzle at least
30 cm (11.9 in.) away from the vehi-
cles body. Otherwise resin section, such as moldings and bumpers,
may be deformed and damaged.
Also, do not continuously hold the nozzle in the same place.
●Do not spray the lower part of the windshield continuously. If water
enters the air c onditioning system
intake located near the lower part of the windshield, the air conditioning
system may not operate correctly.
Page 498 of 758

4967-3. Do-it-yourself maintenance
Blown fuse
■After a fuse is replaced
●When installing the lid, make sure that
the tab is installed securely.
●If the lights do not turn on even after
the fuse has been replaced, a bulb
may need replacement. ( P.497)
●If the replaced fuse blows again, have
the vehicle inspected by any author- ized Toyota retailer or Toyota author-
ized repairer, or any reliable repairer.
■If there is an overload in a circuit
The fuses are designed to blow, protect- ing the wiring harness from damage.
■When replacing light bulbs
Toyota recommends that you use genu-
ine Toyota products designed for this vehicle.
Because certain bulbs are connected to
circuits designed to prevent overload, non-genuine parts or parts not designed
for this vehicle may be unusable.
WA R N I N G
■To prevent system breakdowns
and vehicle fire
Observe the following precautions.
Failure to do so may cause damage
to the vehicle, and possibly a fire or injury.
●Never use a fuse of a higher amperage rating than that indi-
cated, or use any other object in
place of a fuse.
●Always use a genuine Toyota fuse
or equivalent. Never replace a fuse with a wire,
even as a temporary fix.
●Do not modify the fuses or fuse
boxes.
NOTICE
■Before replacing fuses
Have the cause of electrical overload
determined and repaired by any authorized Toyota retailer or Toyota
authorized repairer, or any reliable
repairer as soon as possible.
Page 499 of 758

497
7
7-3. Do-it-yourself maintenance
Maintenance and care
Check the wattage of the light bulb
to be replaced. ( P.575)
P. 5 8 0
Hatchback
License plate lights
Wagon
License plate lights
■Bulbs that need to be replaced
by any authorized Toyota
retailer or Toyota authorized
repairer, or any reliable
repairer
Headlights
Front position lights
Daytime running lights
Turn signal lights
Front fog lights (if equipped)
Tail lights
Stop lights
Back-up light
Rear fog light
High mounted stoplight
■LED light bulbs
The lights other than the license plate
lights consist of a number of LEDs. If any of the LEDs burn out, take your
vehicle to any authorized Toyota retailer
or Toyota authorized repairer, or any reli- able repairer to have the light replaced.
■Condensation build-up on the
inside of the lens
Temporary condensation build-up on the inside of the headlight lens does not
indicate a malfunction. Contact any
Light bulbs
You may replace the following
bulbs by yourself. The diffi-
culty level of replacement var-
ies depending on the bulb. As
there is a danger that compo-
nents may be damaged, we
recommend that replacement
is carried out by any author-
ized Toyota reta iler or Toyota
authorized repairer, or any reli-
able repairer.
Preparing for light bulb
replacement
Canceling the power back
door system (if equipped)
Bulb locations
Page 500 of 758

4987-3. Do-it-yourself maintenance
authorized Toyota retailer or Toyota
authorized repairer, or any reliable repairer for more information in the fol-
lowing situations:
●Large drops of water have built up on
the inside of the lens.
●Water has built up inside the head-
light.
■When replacing light bulbs
P.496
■License plate lights
Hatchback
1 Remove the light unit.
Insert a flathead screwdriver or similar
into the hole next to the light and remove it as shown in the illustration.
To prevent damaging the vehicle, wrap
the flathead screwdriver with a tape.
2 Turn the bulb base
counterclockwise and remove it.
3 Remove the light bulb.
4 When installing, reverse the
steps listed.
Wagon
1 Remove the cover.
Insert a flathead screwdriver,
etc. into the slot on the right side
and disengage the claw.
Insert a flathead screwdriver,
etc. into the slot on the left side
Replacing light bulbs
Page 502 of 758

5007-3. Do-it-yourself maintenance
or left hooks .
2 Push the lens into place.
7 After installation, confirm that
the lens is properly installed by
gently pulling it.
8 Reinstall the cover.
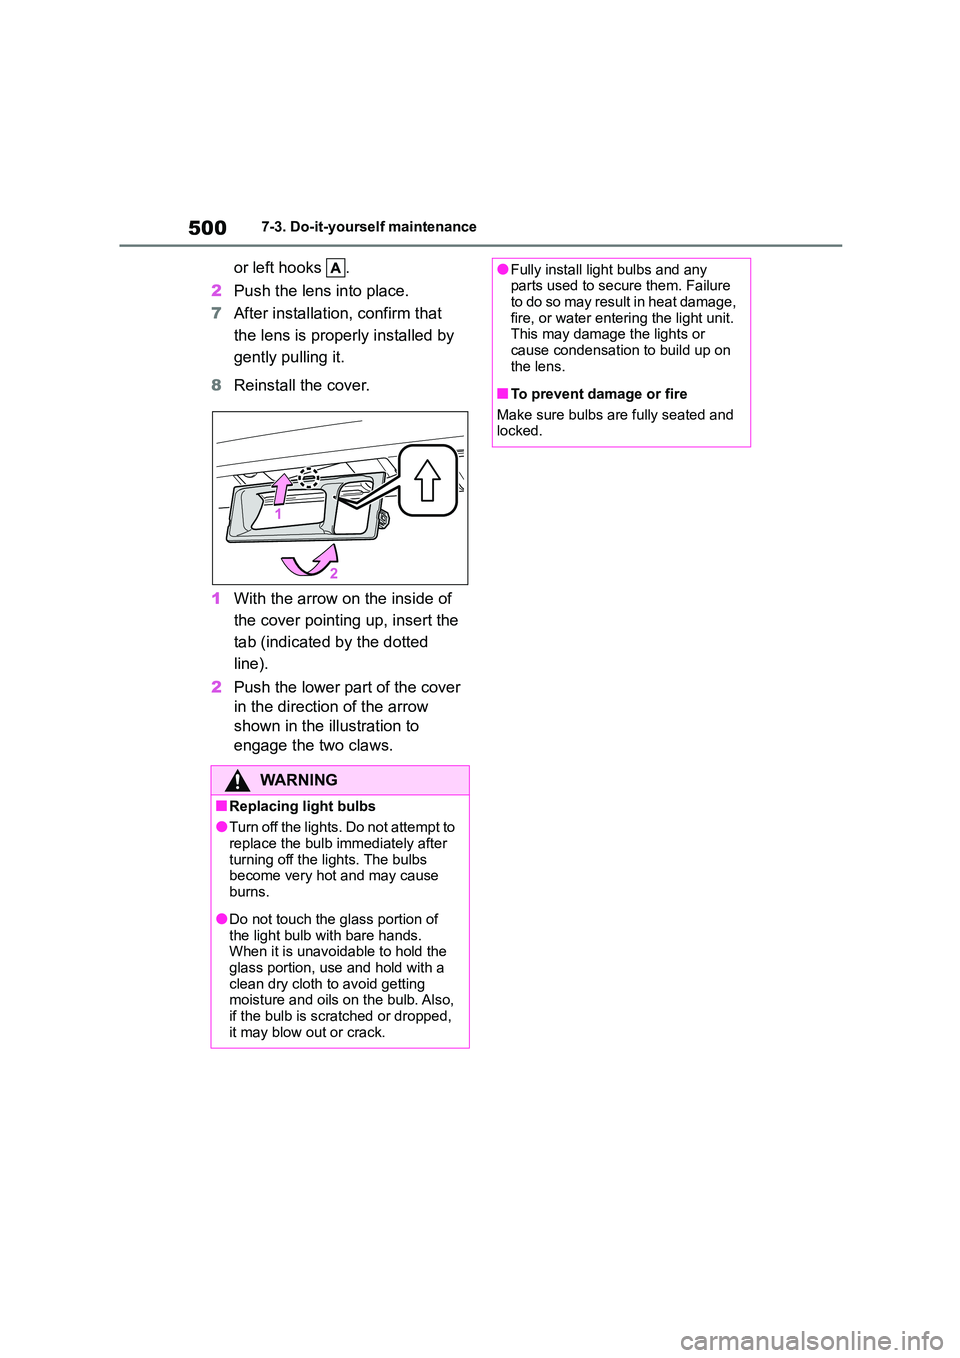
1 With the arrow on the inside of
the cover pointing up, insert the
tab (indicated by the dotted
line).
2 Push the lower part of the cover
in the direction of the arrow
shown in the illustration to
engage the two claws.
WA R N I N G
■Replacing light bulbs
●Turn off the lights. Do not attempt to replace the bulb immediately after
turning off the lights. The bulbs
become very hot and may cause
burns.
●Do not touch the glass portion of
the light bulb with bare hands. When it is unavoidable to hold the
glass portion, use and hold with a
clean dry cloth to avoid getting moisture and oils on the bulb. Also,
if the bulb is scratched or dropped,
it may blow out or crack.
●Fully install light bulbs and any parts used to secure them. Failure
to do so may result in heat damage,
fire, or water entering the light unit. This may damage the lights or
cause condensation to build up on
the lens.
■To prevent damage or fire
Make sure bulbs are fully seated and locked.
Page 504 of 758

5028-1. Essential information
8-1.Essential information
Press the switch.
All the turn signal lights will flash.
To turn them off, press the switch once
again.
■Emergency flashers
●If the emergency flashers are used for
a long time while the engine is not
operating, the battery may discharge.
●If any of the SRS airbags deploy
(inflate) or in the event of a strong rear impact, the emergency flashers will
turn on automatically.
The emergency flashers will turn off automatically after operating for
approximately 20 minutes. To manu-
ally turn the emergency flashers off,
press the switch twice. (The emergency flashers may not turn
on automatically depending on the
force of the impact and conditions of the collision.)
1 Steadily step on the brake pedal
with both feet and firmly depress
it.
Do not pump the brake pedal repeat-
edly as this will increase the effort required to slow the vehicle.
2 Shift the shift lever to N.
If the shift lever is shifted to N
3 After slowing down, stop the
vehicle in a safe place by the
road.
4 Stop the engine.
If the shift lever cannot be shifted
to N
3 Keep depressing the brake
pedal with both feet to reduce
vehicle speed as much as possi-
ble.
4 Vehicles without a smart entry &
start system: Stop the engine by
Emergency flashers
The emergency flashers are
used to warn other drivers
when the vehicle has to be
stopped on the road due to a
breakdown, etc.
Operating instructions
If your vehicle has to be
stopped in an emer-
gency
Only in an emergency, such as
if it becomes impossible to
stop the vehicle in the normal
way, stop the vehicle using the
following procedure:
Stopping the vehicle