2022 TOYOTA COROLLA CROSS turn signal
[x] Cancel search: turn signalPage 334 of 612

3345-6. Radio operation
game, every NASCAR® race,
NHL® games, 24/7 talk channels
dedicated to the biggest leagues,
and more. You get all kinds of
commercial-free mu sic, including
artist-dedicated channels and
more, plus sports, news, talk and
entertainment.
●Radio operation
• Look for the Sirius, XM, SiriusXM,
Band, SAT, AUX, Radio or Source
button and you’re in. If you can’t
hear us, it’s easy to get started:
U.S.A.:
Locate your Radio ID by turning to
Channel 0. If you don’t see your
number there, go to siri-
usxm.com/activationhelp to find it.
Visit siriusxm.com/refresh
or call
1-855-MYREFRESH (697-3373)
to send a refresh signal to your
radio.
Canada:
Locate your Radio ID by turning to
Channel 0.
Visit siriusxm.ca/refresh
to send a
refresh signal to your radio or call 1-888-539-7474 for service.
Each SiriusXM tuner is identified
with a unique radio ID. The radio
ID is required when activating
an SiriusXM service or when
reporting a problem.
If “Ch 000” is selected using
the “TUNE SCROLL” knob,
the ID code, which is 8 alpha-
numeric characters, will be
displayed. If another channel
is selected, the ID code will no
longer be displayed. The
channel (000) alternates
between displaying the radio
ID and the specific radio
code.
When problems occur with the SiriusXM tuner, a message will
appear on the screen. Referring to the table below to identify the
problem, take the suggested corrective action.
Displaying the radio ID
Refer to the table below to identify the problem and take
the suggested corrective action
MessageExplanation
“Check
Antenna”
The SiriusXM antenna is not connected. Check whether the
SiriusXM antenna cable is attached securely. Contact your
Toyota dealer for assistance.
A short circuit occurs in the antenna or the surrounding
antenna cable. Contact your Toyota dealer for assistance.
“No Signal”The SiriusXM signal is too weak at the current location. Wait
until your vehicle reaches a location with a stronger signal.
Page 471 of 612

4717-3. Do-it-yourself maintenance
7
Maintenance and care
■How to change the unit
1 Park the vehicle in a safe
place and turn the engine
switch off.
Changing the unit cannot be per-
formed while the vehicle is moving.
2Turn the engine switch to
ON.
3 Press or of the meter
control switch to select .
4 Press or to select
“Vehicle Settings” and then
press and hold .
5 Press or to select
“TPWS setting” and then
press .
6 Press or to select
“Setting Unit”.
7 Press or to select the
desired unit and then press
.
■Routine tire inflation pressure
checks
The tire pressure warning system
does not replace routine tire inflation
pressure checks. Make sure to
check tire inflation pressure as part
of your routine of daily vehicle
checks.
■Tire inflation pressure
●It may take a few minutes to dis-
play the tire inflation pressure
after the engine switch is turned to
ON. It may also take a few min-
utes to display the tire inflation
pressure after inflation pressure
has been adjusted.
●Tire inflation pressure changes
with temperature.
The displayed values may also be
different from the values mea-
sured using a tire pressure gauge.
■Situations in which the tire
pressure warning system may
not operate properly
●In the following cases, the tire
pressure warning system may not
operate properly.
• If non-genuine Toyota wheels are
used.
• A tire has been replaced with a tire that is not an OE (Original
Equipment) tire.
• A tire has been replaced with a tire that is not of the specified size.
• Tire chains, etc. are equipped.
• An auxiliary-sup ported run-flat tire
is equipped.
• If a window tint that affects the radio wave signals is installed.
• If there is a lot of snow or ice on
the vehicle, particularly around the
wheels or wheel housings.
• If the tire inflation pressure is
extremely higher than the speci-
fied level.
• If wheel without tire pressure
warning valves and transmitters
are used.
• If the ID code on the tire pressure
warning valves and transmitters is
not registered in the tire pressure
warning computer.
●Performance may be affected in
the following situations.
• Near a TV tower, electric power plant, gas station, radio station,
large display, airport or other facil-
ity that generates strong radio
waves or electrical noise
• When carrying a portable radio,
cellular phone, cordless phone or
other wireless communication
device
●If tire position information is not
correctly displayed due to the
radio wave conditions, the display
may be corrected by driving and
changing the radio wave condi-
Page 490 of 612

4907-3. Do-it-yourself maintenance
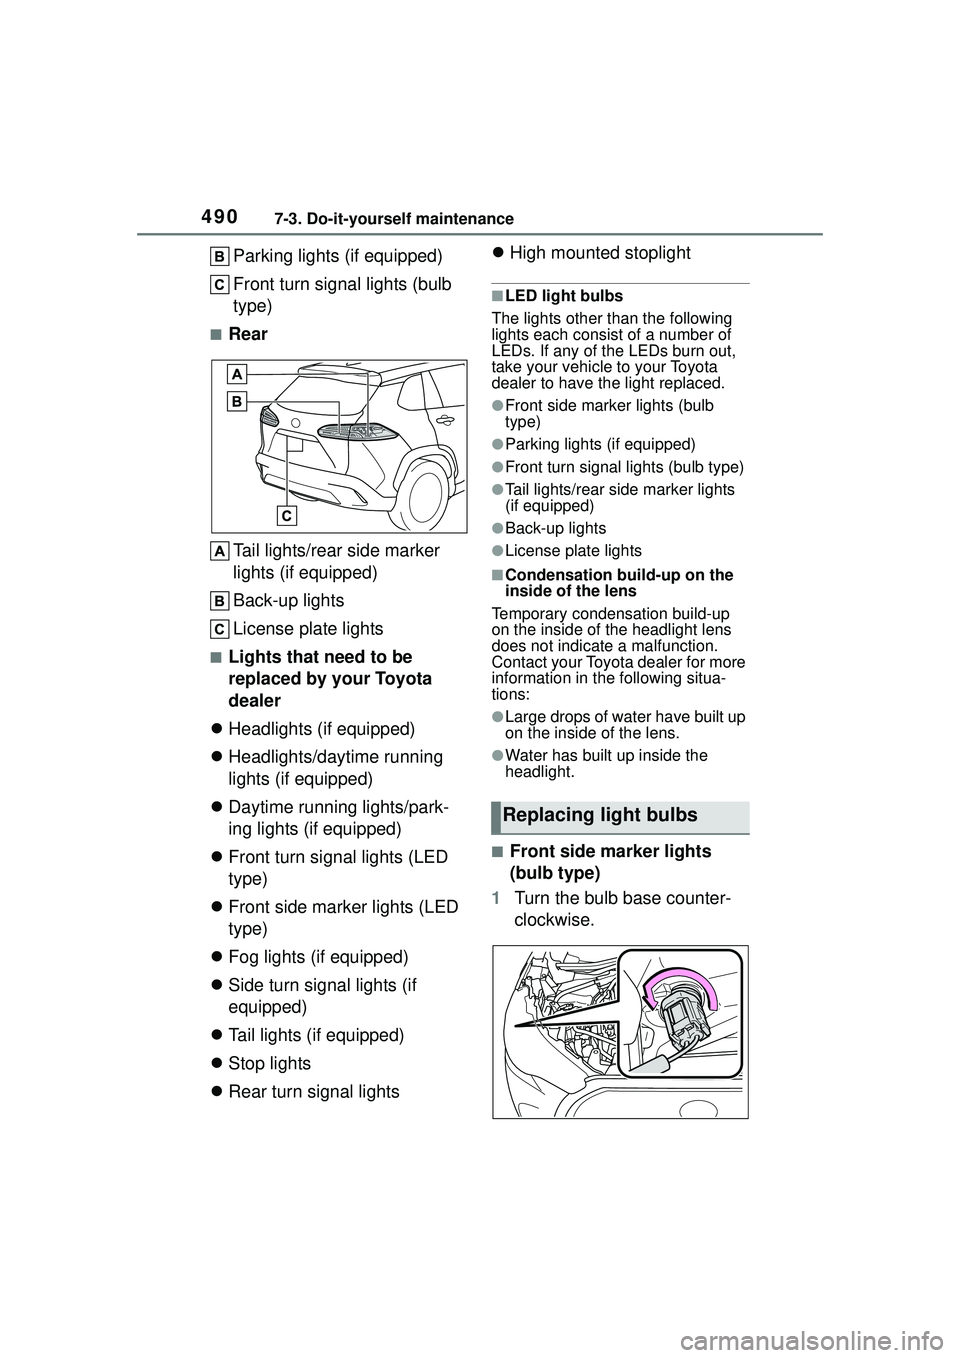
Parking lights (if equipped)
Front turn signal lights (bulb
type)
■RearTail lights/rear side marker
lights (if equipped)
Back-up lights
License plate lights
■Lights that need to be
replaced by your Toyota
dealer
Headlights (if equipped)
Headlights/daytime running
lights (if equipped)
Daytime running lights/park-
ing lights (if equipped)
Front turn signal lights (LED
type)
Front side marker lights (LED
type)
Fog lights (if equipped)
Side turn signal lights (if
equipped)
Tail lights (if equipped)
Stop lights
Rear turn signal lights
High mounted stoplight
■LED light bulbs
The lights other than the following
lights each consist of a number of
LEDs. If any of the LEDs burn out,
take your vehicle to your Toyota
dealer to have the light replaced.
●Front side marker lights (bulb
type)
●Parking lights (if equipped)
●Front turn signal lights (bulb type)
●Tail lights/rear side marker lights
(if equipped)
●Back-up lights
●License plate lights
■Condensation build-up on the
inside of the lens
Temporary condensation build-up
on the inside of the headlight lens
does not indicate a malfunction.
Contact your Toyota dealer for more
information in th e following situa-
tions:
●Large drops of water have built up
on the inside of the lens.
●Water has built up inside the
headlight.
■Front side marker lights
(bulb type)
1 Turn the bulb base counter-
clockwise.
Replacing light bulbs
Page 491 of 612

4917-3. Do-it-yourself maintenance
7
Maintenance and care
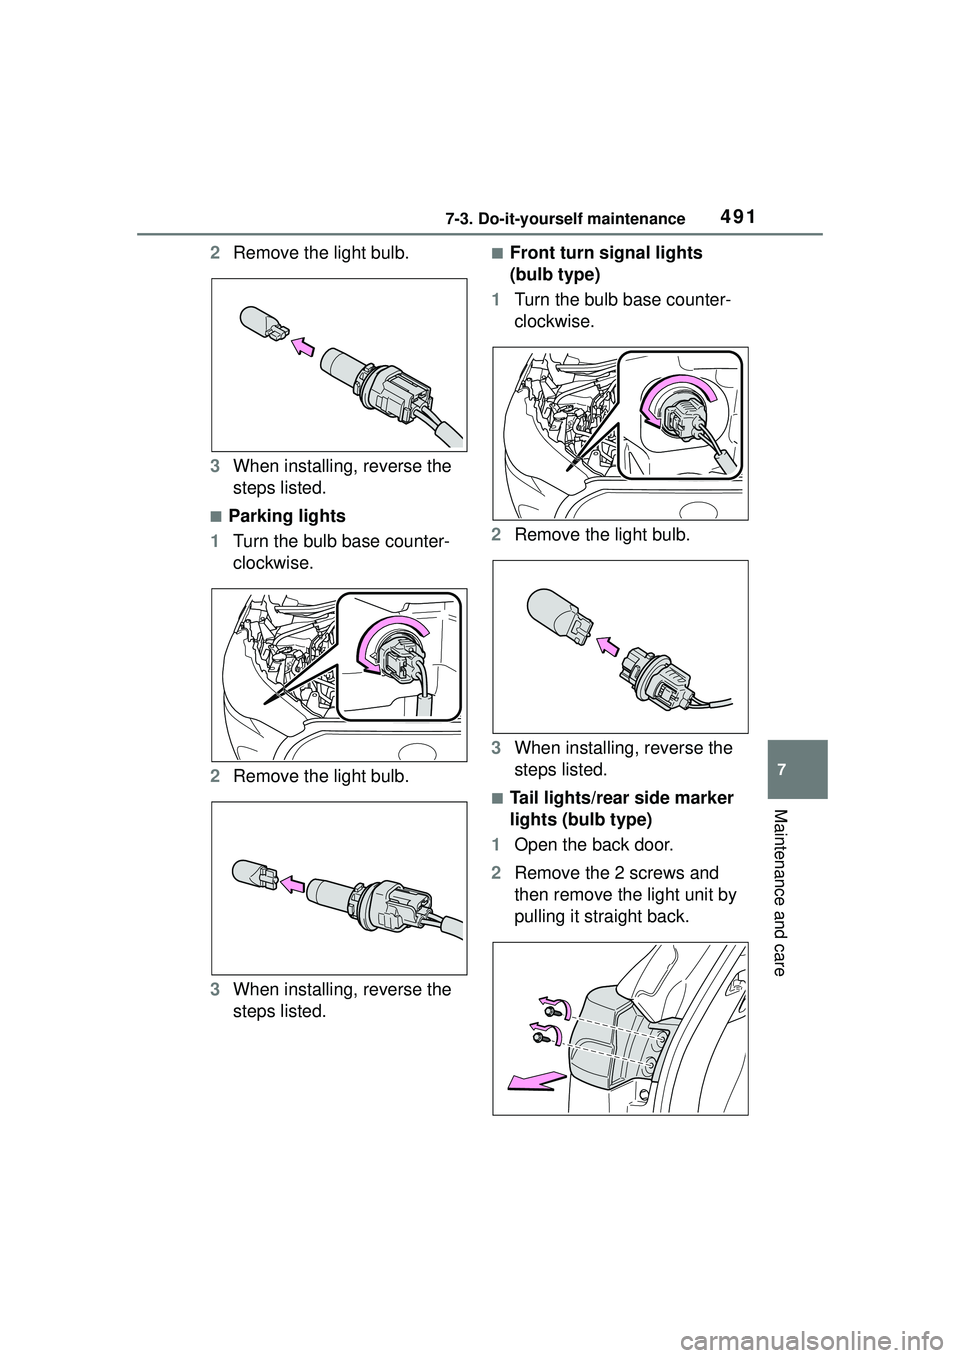
2Remove the light bulb.
3 When installing, reverse the
steps listed.
■Parking lights
1 Turn the bulb base counter-
clockwise.
2 Remove the light bulb.
3 When installing, reverse the
steps listed.
■Front turn signal lights
(bulb type)
1 Turn the bulb base counter-
clockwise.
2 Remove the light bulb.
3 When installing, reverse the
steps listed.
■Tail lights/rear side marker
lights (bulb type)
1 Open the back door.
2 Remove the 2 screws and
then remove the light unit by
pulling it straight back.
Page 496 of 612

4968-1. Essential information
8-1.Essential information
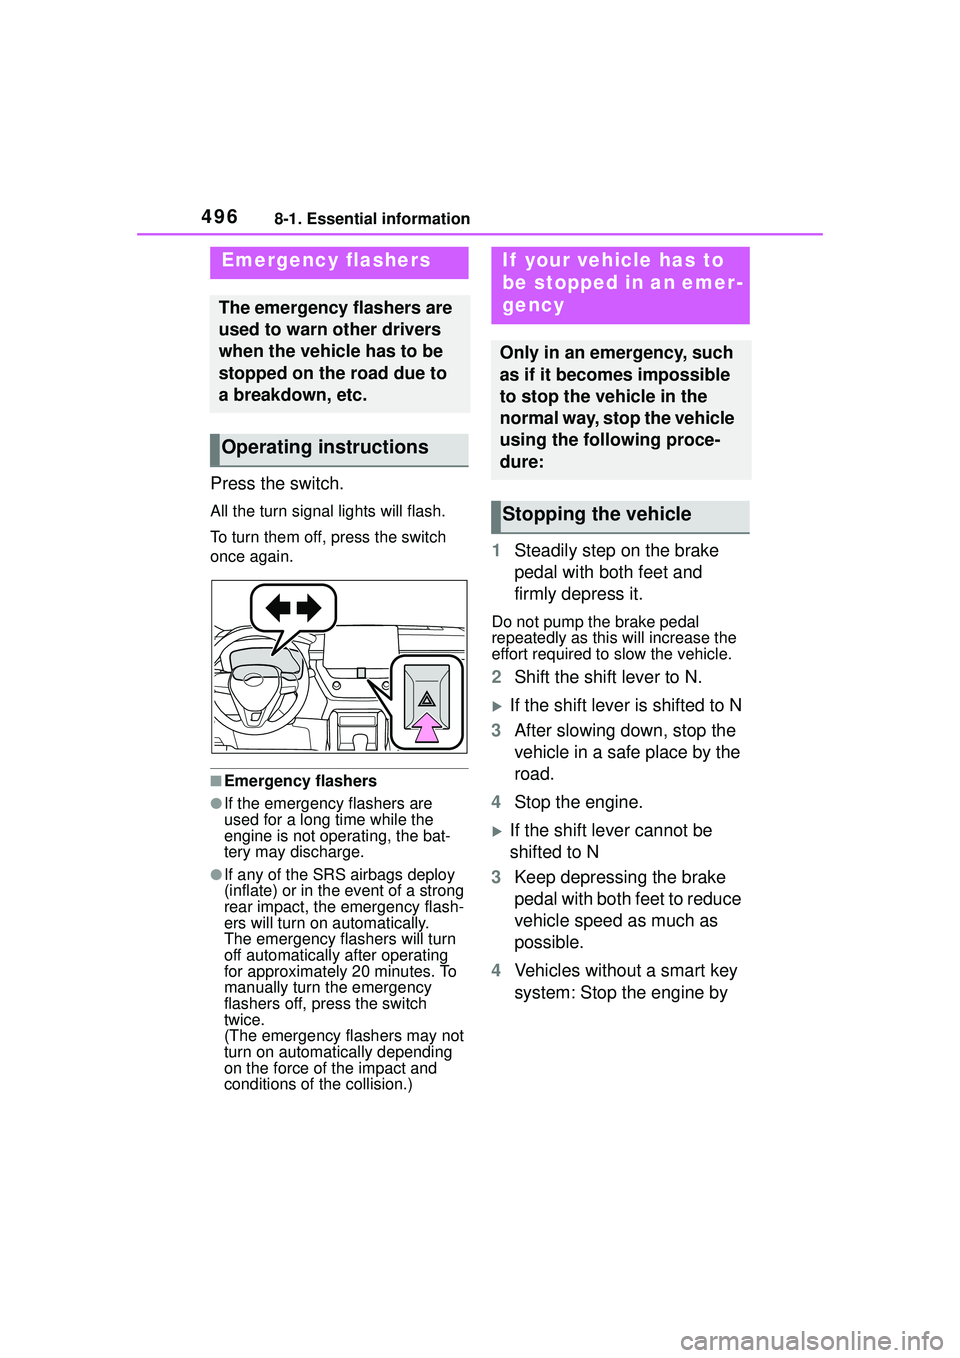
Press the switch.
All the turn signal lights will flash.
To turn them off, press the switch
once again.
■Emergency flashers
●If the emergency flashers are
used for a long time while the
engine is not operating, the bat-
tery may discharge.
●If any of the SRS airbags deploy
(inflate) or in the event of a strong
rear impact, the emergency flash-
ers will turn on automatically.
The emergency flashers will turn
off automatically after operating
for approximately 20 minutes. To
manually turn the emergency
flashers off, press the switch
twice.
(The emergency flashers may not
turn on automatically depending
on the force of the impact and
conditions of the collision.)
1Steadily step on the brake
pedal with both feet and
firmly depress it.
Do not pump the brake pedal
repeatedly as this will increase the
effort required to slow the vehicle.
2Shift the shift lever to N.
If the shift lever is shifted to N
3 After slowing down, stop the
vehicle in a safe place by the
road.
4 Stop the engine.
If the shift lever cannot be
shifted to N
3 Keep depressing the brake
pedal with both feet to reduce
vehicle speed as much as
possible.
4 Vehicles without a smart key
system: Stop the engine by
Emergency flashers
The emergency flashers are
used to warn other drivers
when the vehicle has to be
stopped on the road due to
a breakdown, etc.
Operating instructions
If your vehicle has to
be stopped in an emer-
gency
Only in an emergency, such
as if it becomes impossible
to stop the vehicle in the
normal way, stop the vehicle
using the following proce-
dure:
Stopping the vehicle
Page 549 of 612

5499-1. Specifications
9
Vehicle specifications
Ty p e D
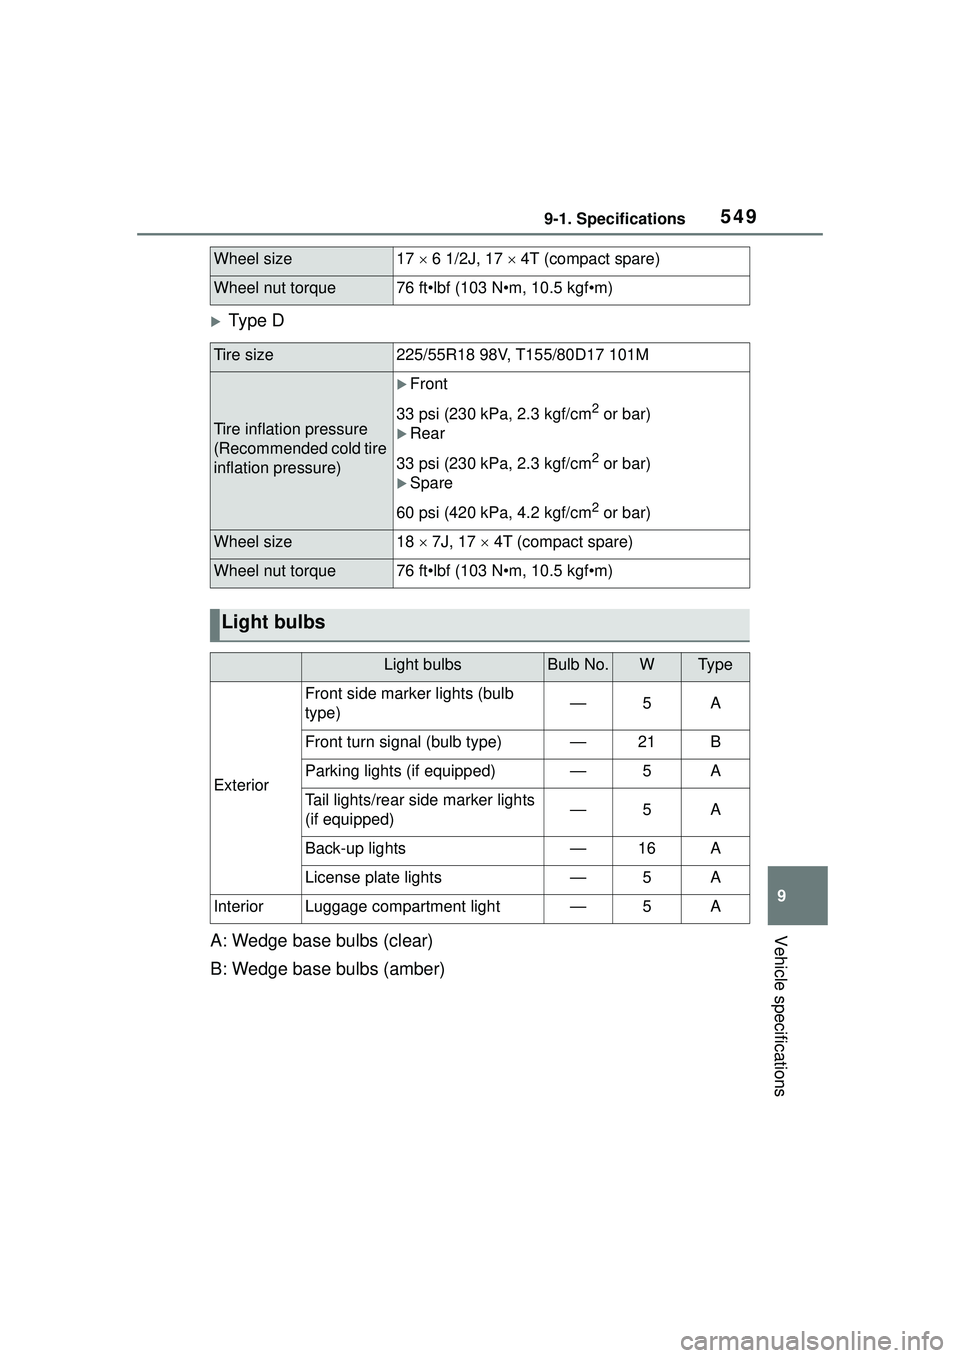
A: Wedge base bulbs (clear)
B: Wedge base bulbs (amber)
Wheel size17 6 1/2J, 17 4T (compact spare)
Wheel nut torque76 ft•lbf (103 N•m, 10.5 kgf•m)
Tire size225/55R18 98V, T155/80D17 101M
Tire inflation pressure
(Recommended cold tire
inflation pressure)
Front
33 psi (230 kPa, 2.3 kgf/cm
2 or bar)
Rear
33 psi (230 kPa, 2.3 kgf/cm
2 or bar)
Spare
60 psi (420 kPa, 4.2 kgf/cm
2 or bar)
Wheel size18 7J, 17 4T (compact spare)
Wheel nut torque76 ft•lbf (103 N•m, 10.5 kgf•m)
Light bulbs
Light bulbsBulb No.WTy p e
Exterior
Front side marker lights (bulb
type)—5A
Front turn signal (bulb type)—21B
Parking lights (if equipped)—5A
Tail lights/rear side marker lights
(if equipped)—5A
Back-up lights—16A
License plate lights—5A
InteriorLuggage compartment light—5A
Page 571 of 612

5719-2. Customization
9
Vehicle specifications
*: If equipped
■Vehicle customization
●When the smart key system is off,
Smart door unlocking cannot be
customized.
●When the doors remain closed
after unlocking the doors and the
automatic door lock function is
activated, the signals will be gen-
erated in accordance with the
operation signal (buzzer) and the
operation signal (emergency
flashers) settings.
■In the following situations, cus-
tomize mode in which the set-
tings can be changed through
the multi-information display
will automatically be turned off
●A warning message appears after
the customize mode screen is dis-
played
●The engine switch is turned off.
●The vehicle begins to move while
the customize mode screen is dis-
played.
Operation after the
engine switch is turned
off
OnOff——O
Operation when the
doors are unlockedOnOff——O
Operation when you
approach the vehicle
with the electronic key
on your person
*
OnOff——O
Cup holder lights* and
center tray light
*OnOff——O
FunctionDefault settingCustomized setting
Page 591 of 612

591Alphabetical Index
Ignition switch (engine switch)................................... 162, 163
Overheating.......................... 536
Tachometer ...................... 81, 85
Engine coolant Capacity ............................... 545
Checking .............................. 463
Preparing and checking before winter.................................. 274
Engine coolant temperature gauge................................. 81, 85
Engine immobilizer system ..... 71
Engine oil Capacity ............................... 544
Checking .............................. 461
Preparing and checking before winter.................................. 274
Warning light ........................ 506
Engine switch ................. 162, 163 Auto power off function ........ 166
Changing the engine switch modes ................................ 166
If your vehicle has to be stopped in an emergency................. 496
Enhanced VSC ........................ 269
Entering letters and num- bers/list screen operation ... 291Entering letters and numbers291
List screen ............................ 292
EPS (Electric Power Steering) ............................................... 269Warning light ........................ 507
Establishing an Android Auto connection ............................ 313
Establishing an Apple CarPlay connection ............................ 312
Event data record er (EDR)......... 9
Extended Headlight Lighting. 179F
Flat tire Tire pressure warning system...........................................470
Vehicles with a spare tire......518
Floor mats .................................24
Fluid Brake ....................................547
Continuously variable transmis-sion .....................................546
Washer .................................467
FM ............................................331
Fog lights ................................184 Switch ...................................184
Front passenger occupant clas- sification system ....................40
Front seats Adjustment ...........................124
Cleaning ...............................449
Correct driving posture ...........25
Head restraints .....................127
Seat heaters .........................424
Front side marker lights Light switch...........................177
Replacing light bulbs ............489
Wattage ................................549
Front turn signal lights Replacing light bulbs ............489
Turn signal lever ...................170
Wattage ................................549
Fuel Capacity ...............................544
Fuel gauge .......................81, 85
Fuel pump shut off system ...504
Information ......... ..................550
Refueling ..............................188
Type......................................544
Warning light.........................508
Fuel consumption Average fuel economy ............92
Current fuel consumption .......92