2022 TOYOTA COROLLA CROSS headlights
[x] Cancel search: headlightsPage 249 of 612

2494-5. Using the driving support systems
4
Driving
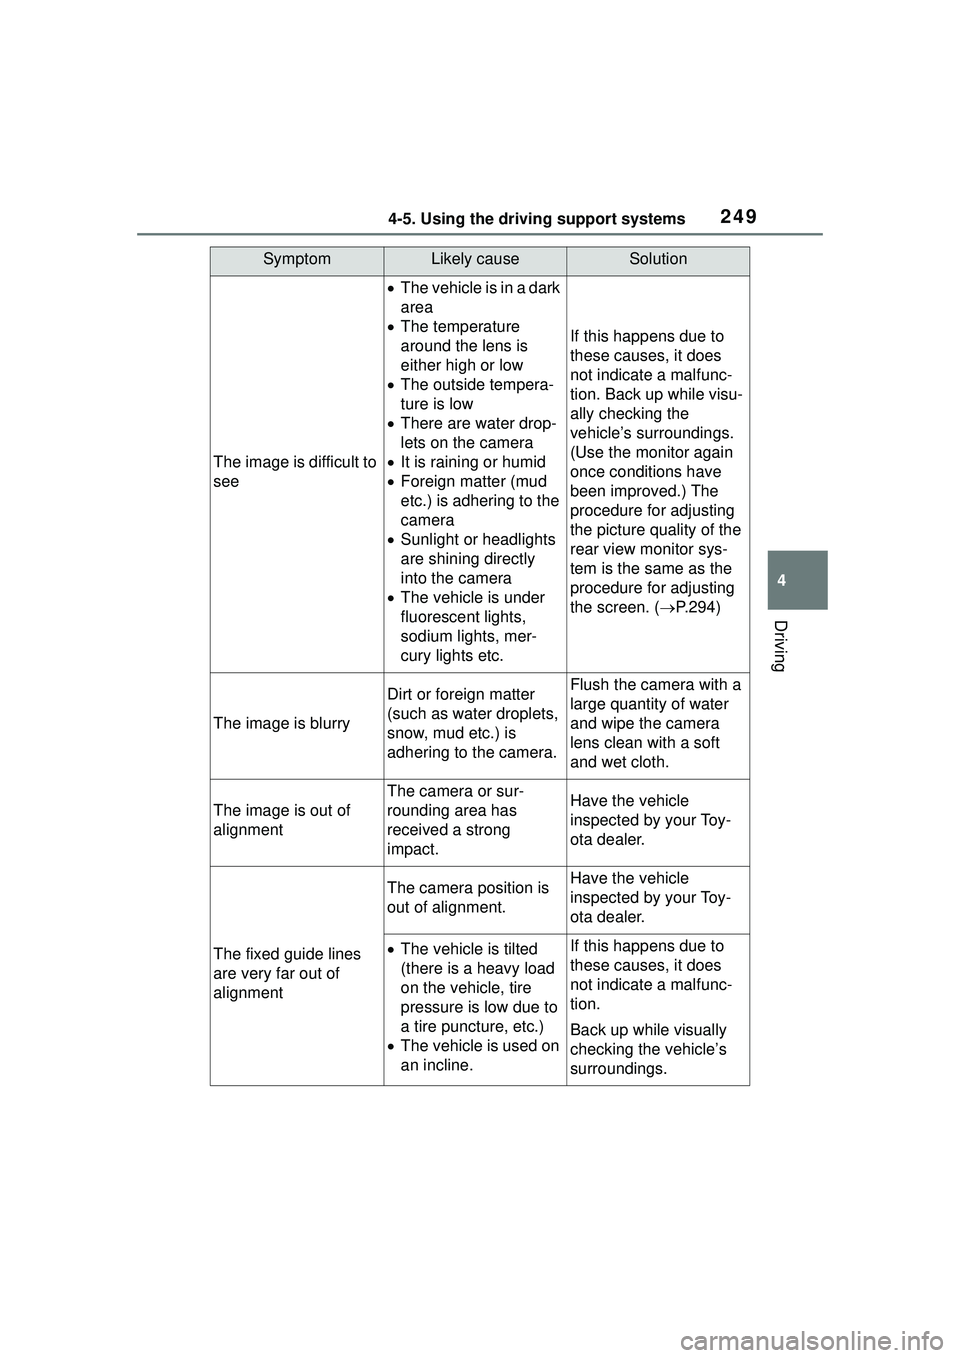
SymptomLikely causeSolution
The image is difficult to
see
The vehicle is in a dark
area
The temperature
around the lens is
either high or low
The outside tempera-
ture is low
There are water drop-
lets on the camera
It is raining or humid
Foreign matter (mud
etc.) is adhering to the
camera
Sunlight or headlights
are shining directly
into the camera
The vehicle is under
fluorescent lights,
sodium lights, mer-
cury lights etc.
If this happens due to
these causes, it does
not indicate a malfunc-
tion. Back up while visu-
ally checking the
vehicle’s surroundings.
(Use the monitor again
once conditions have
been improved.) The
procedure for adjusting
the picture quality of the
rear view monitor sys-
tem is the same as the
procedure for adjusting
the screen. ( P.294)
The image is blurry
Dirt or foreign matter
(such as water droplets,
snow, mud etc.) is
adhering to the camera.Flush the camera with a
large quantity of water
and wipe the camera
lens clean with a soft
and wet cloth.
The image is out of
alignment
The camera or sur-
rounding area has
received a strong
impact.Have the vehicle
inspected by your Toy-
ota dealer.
The fixed guide lines
are very far out of
alignment
The camera position is
out of alignment.Have the vehicle
inspected by your Toy-
ota dealer.
The vehicle is tilted
(there is a heavy load
on the vehicle, tire
pressure is low due to
a tire puncture, etc.)
The vehicle is used on
an incline.If this happens due to
these causes, it does
not indicate a malfunc-
tion.
Back up while visually
checking the vehicle’s
surroundings.
Page 490 of 612

4907-3. Do-it-yourself maintenance
Parking lights (if equipped)
Front turn signal lights (bulb
type)
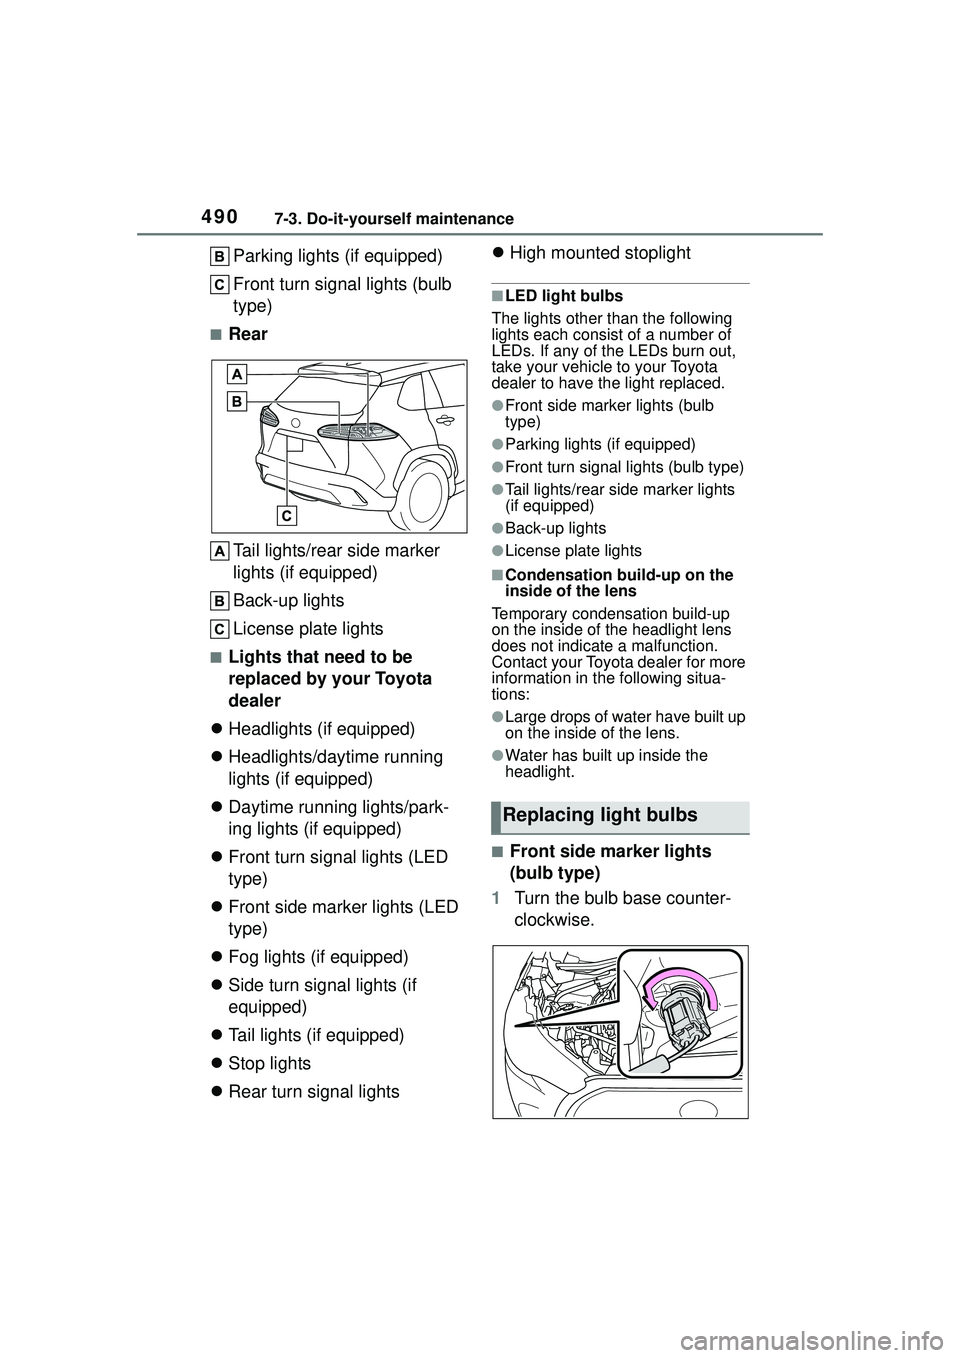
■RearTail lights/rear side marker
lights (if equipped)
Back-up lights
License plate lights
■Lights that need to be
replaced by your Toyota
dealer
Headlights (if equipped)
Headlights/daytime running
lights (if equipped)
Daytime running lights/park-
ing lights (if equipped)
Front turn signal lights (LED
type)
Front side marker lights (LED
type)
Fog lights (if equipped)
Side turn signal lights (if
equipped)
Tail lights (if equipped)
Stop lights
Rear turn signal lights
High mounted stoplight
■LED light bulbs
The lights other than the following
lights each consist of a number of
LEDs. If any of the LEDs burn out,
take your vehicle to your Toyota
dealer to have the light replaced.
●Front side marker lights (bulb
type)
●Parking lights (if equipped)
●Front turn signal lights (bulb type)
●Tail lights/rear side marker lights
(if equipped)
●Back-up lights
●License plate lights
■Condensation build-up on the
inside of the lens
Temporary condensation build-up
on the inside of the headlight lens
does not indicate a malfunction.
Contact your Toyota dealer for more
information in th e following situa-
tions:
●Large drops of water have built up
on the inside of the lens.
●Water has built up inside the
headlight.
■Front side marker lights
(bulb type)
1 Turn the bulb base counter-
clockwise.
Replacing light bulbs
Page 528 of 612

5288-2. Steps to take in an emergency
One of the following may be the
cause of the problem:
There may not be sufficient
fuel in the vehicle’s tank.
Refuel the vehicle.
The engine may be flooded.
Try to restart the engine again
following correct starting pro-
cedures. ( P.162, 163)
There may be a malfunction
in the engine immobilizer sys-
tem. ( P.71)
One of the following may be the
cause of the problem:
The battery may be dis-
charged. ( P.532)
NOTICE
■When replacing the tires
When removing or fitting the
wheels, tires or t he tire pressure
warning valve and transmitter,
contact your Toyota dealer as the
tire pressure warning valve and
transmitter may be damaged if not
handled correctly.
■To avoid damage to the tire
pressure warning valves and
transmitters
When a tire is repaired with liquid
sealants, the tire pressure warn-
ing valve and transmitter may not
operate properly. If a liquid seal-
ant is used, contact your Toyota
dealer or other qualified service
shop as soon as possible. Make
sure to replace the tire pressure
warning valve and transmitter
when replacing the tire.
If the engine will not
star t
If the engine will not start
even though correct starting
procedures are being fol-
lowed ( P.162, 163), con-
sider each of the following
points:
The engine will not start
even though the starter
motor operates normally.
The starter motor turns
over slowly, the interior
lights and headlights are
dim, or the horn does not
sound or sounds at a low
volume.
Page 529 of 612

5298-2. Steps to take in an emergency
8
When trouble arises
The battery terminal connec-
tions may be loose or cor-
roded. ( P.465)
The engine starting system may
be malfunctioning due to an
electrical problem such as elec-
tronic key battery depletion or a
blown fuse. However, an interim
measure is available to start the
engine. ( P.529)
One of the following may be the
cause of the problem:
The battery may be dis-
charged. ( P.532)
One or both of the battery ter-
minals may be disconnected.
( P.465)
Contact your Toyota dealer if the
problem cannot be repaired, or if
repair procedures are unknown.
When the engine does not start,
the following steps can be used as an interim measure to start
the engine if the engine switch is
functioning normally.
Do not use this starting proce-
dure except in case of emer-
gency.
1
Set the parking brake.
( P.171)
2 Check that the shift lever is in
P.
3 Turn the engine switch to
ACC.
4 Press and hold the engine
switch for about 15 seconds
while depressing the brake
pedal firmly.
Even if the engine can be started
using the above steps, the system
may be malfunctioning. Have the
vehicle inspected by your Toyota
dealer.
The starter motor does
not turn over (vehicles
with a smart key system)
The starter motor does
not turn over, the interior
lights and headlights do
not turn on, or the horn
does not sound.
Emergency start function
(vehicles with a smart key
system)
Page 534 of 612

5348-2. Steps to take in an emergency
recharge the battery of your
vehicle.
5 Vehicles with a smart key
system: Open and close any
of the doors of your vehicle
with the engine switch OFF.
6 Maintain the engine speed of
the second vehicle and start
the engine of your vehicle by
turning the engine switch to
ON.
7 Once the vehicle’s engine
has started, remove the
jumper cables in the exact
reverse order from which
they were connected.
Once the engine starts, have the
vehicle inspected at your Toyota
dealer as soon as possible.
■Starting the engine when the
battery is discharged
The engine cannot be started by
push-starting.
■To prevent battery discharge
●Turn off the headlights and the
audio system while the engine is
off.
●Turn off any unnecessary electri-
cal components when the vehicle
is running at a low speed for an
extended period, such as in heavy
traffic.
■When the battery is removed or
discharged
●Information stored in the ECU is
cleared. When the battery is
depleted, have the vehicle
inspected at your Toyota dealer.
●Some systems may require initial-
ization. ( P.572)
■When removing the battery ter-
minals
When the battery terminals are
removed, the information stored in
the ECU is cleared. Before remov-
ing the battery te rminals, contact
your Toyota dealer.
■Charging the battery
The electricity stored in the battery
will discharge gradually even when
the vehicle is not in use, due to nat-
ural discharge and the draining
effects of certain electrical appli-
ances. If the vehicle is left for a long
time, the battery may discharge,
and the engine may be unable to
start. (The battery recharges auto-
matically during driving.)
■When recharging or replacing
the battery (vehicles with a
smart key system)
●In some cases, it may not be pos-
sible to unlock the doors using the
smart key system when the bat-
tery is discharged. Use the wire-
less remote control or the
mechanical key to lock or unlock
the doors.
●The engine may not start on the
first attempt after the battery has
recharged but will start normally
after the second attempt. This is
not a malfunction.
●The engine switch mode is memo-
rized by the vehicle. When the
battery is reconnected, the system
will return to the mode it was in
before the battery was dis-
charged. Before disconnecting the
battery, turn the engine switch off.
If you are unsure what mode the
engine switch was in before the
battery discharged, be especially
careful when reconnecting the
battery.
●Vehicles with power back door:
The power back door must be ini-
tialized. ( P. 1 1 5 )
■When replacing the battery
●Use a battery that conforms to
Page 546 of 612

5469-1. Specifications
*: The fluid capacity is a reference quantity.
If replacement is necessary, contact your Toyota dealer.
*: The fluid capacity is a reference quantity.
If replacement is necessary, contact your Toyota dealer.
Electrical system (battery)
Open voltage at 68°F (20°C):
12.3 V or higher
(Turn the engine switch off and turn on the
high beam headlights for 30 seconds.)
Specific gravity reading at 68°F
(20°C):1.25 or more
If the specific gravity is lower than the stan-
dard value, charge the battery.
Charging rate5 A max.
Continuously variable transmission
Fluid capacity*8.7 qt. (8.2 L, 7.2 Imp. qt.)
Fluid typeToyota Genuine CVT Fluid FE
NOTICE
■Continuously variable transmission fluid type
Using continuously variable transmission fluid other than the above type
may cause abnormal noise or vibration, or damage the continuously vari-
able transmission of your vehicle.
Transfer (AWD models)
Oil capacity*0.47 qt. (0.45 L, 0.39 Imp. qt.)
Oil type and viscosityToyota Genuine Differential Gear Oil LT
75W-85 GL-5 or equivalent
NOTICE
■Transfer oil type precaution
Using transfer oil other than the specified oil may cause abnormal noise
or vibration, or damage the transfer of your vehicle.
Page 568 of 612

5689-2. Customization
■Automatic light control system* ( P.177)
*: If equipped
■Lights ( P.177)
*: Except for Canada
■PCS (Pre-Collision System) ( P.195)
■LTA (Lane Tracing Assist) ( P.203)
FunctionDefault settingCustomized setting
Light sensor sensitivityStandard-2 to 2O—O
Time elapsed before
headlights automatically
turn off after doors are
closed
30 seconds
Off
O—O60 seconds
90 seconds
Windshield wiper linked
headlight illuminationOnOff——O
FunctionDefault settingCustomized setting
Daytime running light
systemOnOff*O—O
Welcome lightingOnOff——O
FunctionDefault settingCustomized setting
PCS (Pre-Collision Sys-
tem)OnOff—O—
Adjust alert timingMiddleEarly—O—Late
FunctionCustomized setting
Lane centering functionOn, Off—O—
Steering assist functionOn, Off—O—
Alert sensitivityHigh, Standard—O—
Vehicle sway warning
functionOn, Off—O—
Vehicle sway warning
sensitivityHigh, Standard, Low—O—
Page 592 of 612

592Alphabetical Index
Fuel economy ........................... 92
Fuel filler door Refueling .............................. 188
Fuel gauge .......................... 81, 85
Fuel pump shut off system.... 504
Functional overview ............... 396
Fuses ....................................... 486
G
Gauges ................................ 81, 85
General button (Setup screen) ....................................... 286, 319
General settings ..................... 319 Displaying the general settings screen ................................ 319
General settings screen ....... 319
Glove box ................................ 429
Glove box light ....................... 429
H
Hands-free system ................. 367
Head restraints ....................... 127
Headlight aim .......................... 488
Headlights Adaptive Front-lighting System (AFS) .................................. 180
Automatic High Beam system ........................................... 180
Extended Headlight Lighting 179
Light switch .......................... 177
Replacing light bulbs ............ 490
Headlights/daytime running lightsReplacing light bulbs ............ 490
Heated steering wheel ........... 424
Heaters Automatic air conditioning sys-tem ..................................... 416
Heated steering wheel ......... 424
Manual air conditioning system ........................................... 410 Outside rear view mirrors ...412,
419
Seat heaters .........................424
High mounted stoplight Replacing light bulbs ............490
Hill-start assist control...........269
HOME button...........................290
Home screen ...........................290
Hood Open.....................................459
Hooks Coat hooks ...........................443
Retaining hooks (floor mat) ....24
Horn .........................................129
I
I/M test .....................................456
Identification Engine ..................................543
Vehicle ..................................543
Ignition switch (engine switch) .......................................162, 163Auto power off function .........166
Changing the engine switch modes.................................166
If your vehicle has to be stopped in an emergency .................496
Illuminated entry system .......427
Indicators ..................................78
Info button (Menu screen) .....283
Initial screen............................287 Caution screen .....................287
Restarting the system ...........287
Initialization Items to initialize ...................572
Maintenance .........................453
Power windows ....................133
Tire pressure warning system...........................................473
Inside rear view mirror ...........130
Instrument panel light control83,
88