Page 324 of 612

3245-4. Other settings
1Press the “MENU” button.
2 Select “Setup”.
3 Select “Vehicle”.
4 Select the desired items to
be set.
Select to set vehicle customi-
zation. ( P.563)
Select to set valet mode.
( P.324) The security system can be set
to on by entering a security code
(4-digit number).
When set to on, the system will
become inoperative once the
electrical power source is dis-
connected until the security
code is entered.
1
Display the vehicle settings
screen. ( P.324)
2 Select “Valet Mode”.
3 Enter the 4-digit personal
code and select “OK”.
4 Enter the same 4-digit per-
sonal code again and select
“OK”.
The system will request that
you input the security code
again to confirm that you
remember it correctly.
When valet mode activates,
the system stops and a secu-
rity code (4-digit number)
standby screen is displayed.
If the 4-digit personal code is forgot-
ten, please contact your Toyota
dealer.
Enter the 4-digit personal code
and select “OK”.
If an incorrect security code (4-digit
number) is entered 6 times, the sys-
tem will not accept another security
Vehicle settings
Settings are available for
vehicle customization, etc.
Displaying the vehicle
settings screen
Vehicle settings screen
Setting the valet mode
If the valet mode has been
activated
Page 327 of 612

3275-5. Using the audio/visual system
5
Audio
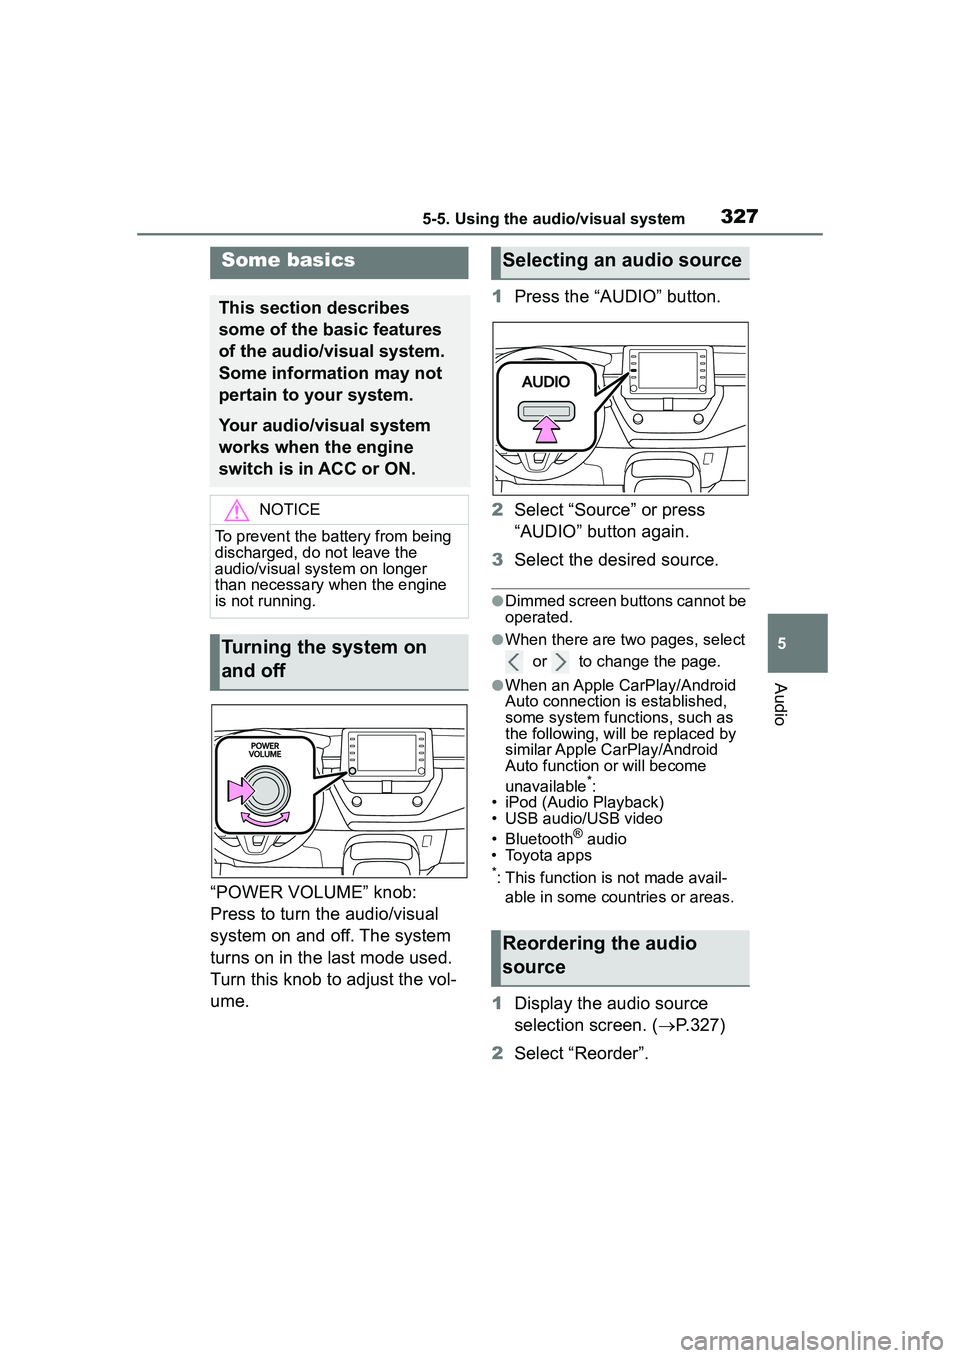
“POWER VOLUME” knob:
Press to turn the audio/visual
system on and off. The system
turns on in the last mode used.
Turn this knob to adjust the vol-
ume.1
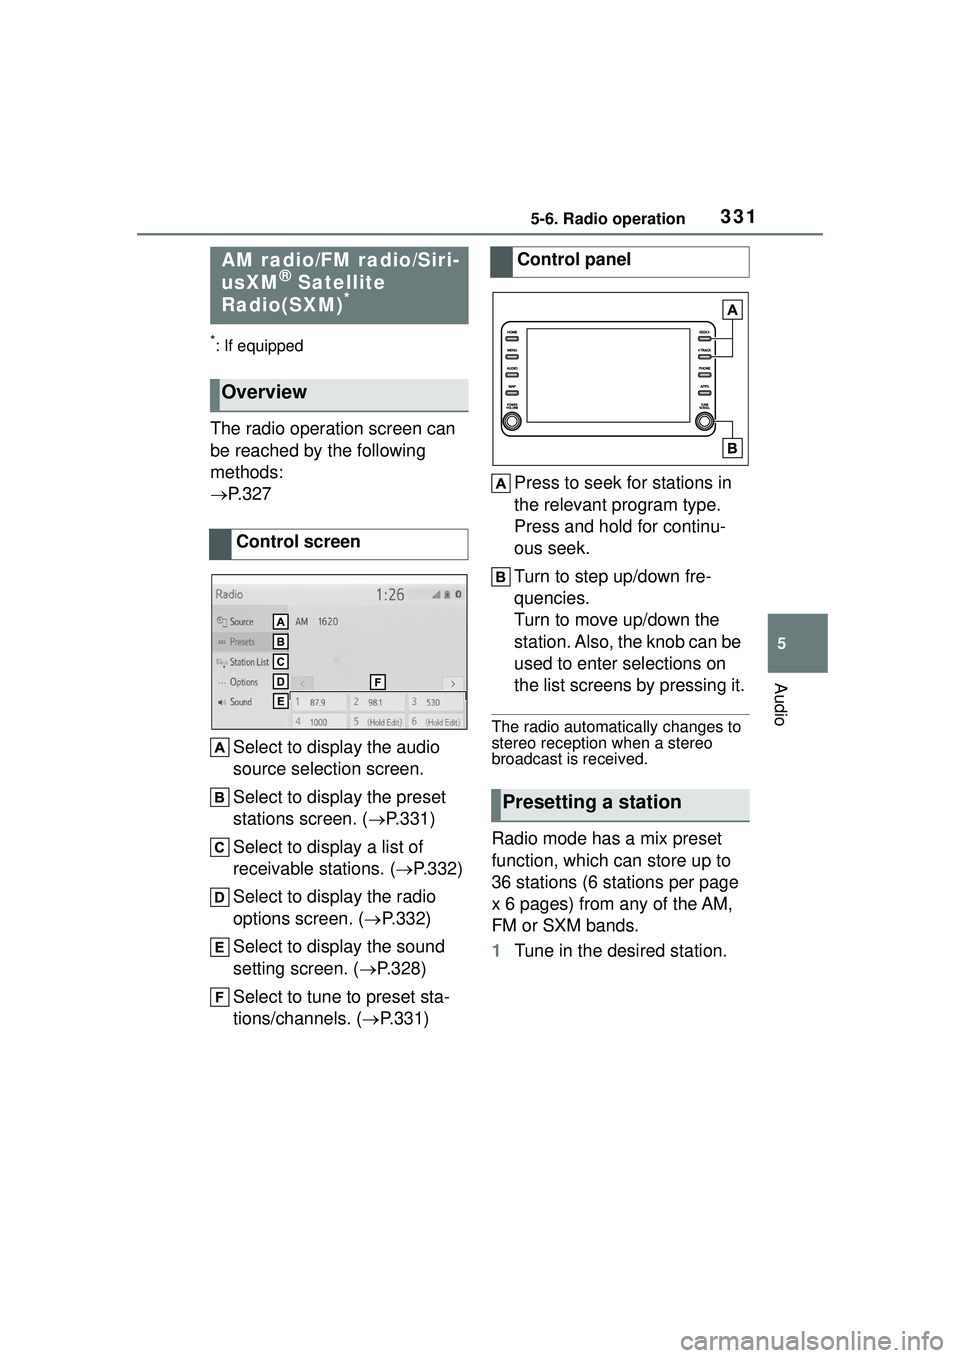
Press the “AUDIO” button.
2 Select “Source” or press
“AUDIO” button again.
3 Select the desired source.
●Dimmed screen buttons cannot be
operated.
●When there are two pages, select
or to change the page.
●When an Apple CarPlay/Android
Auto connection is established,
some system functions, such as
the following, will be replaced by
similar Apple CarPlay/Android
Auto function or will become
unavailable
*:
• iPod (Audio Playback)
• USB audio/USB video
• Bluetooth
® audio
• Toyota apps
*: This function is not made avail-
able in some countries or areas.
1 Display the audio source
selection screen. ( P.327)
2 Select “Reorder”.
Some basics
This section describes
some of the basic features
of the audio/visual system.
Some information may not
pertain to your system.
Your audio/visual system
works when the engine
switch is in ACC or ON.
NOTICE
To prevent the battery from being
discharged, do not leave the
audio/visual system on longer
than necessary when the engine
is not running.
Turning the system on
and off
Selecting an audio source
Reordering the audio
source
Page 328 of 612

3285-5. Using the audio/visual system
3Select the desired audio
source then or to reor-
der.
4 Select “OK”.
Connect a device.
Turn on the power of the device if it
is not turned on.
●If a USB hub is plugged-in, two
devices can be connected at a
time.
●Even if a USB hub is used to con-
nect more than two USB devices,
only the first two connected
devices will be recognized.
●If a USB hub that has more than
two ports is connected to the USB
port, devices connected to the
USB hub may not charge or be
inoperable, as the supply of cur-
rent may be insufficient.
1 Display the audio control
screen. ( P.327)
2 Select “Sound”. 3
Select the desired item to be
set.
Select to set the tre-
ble/mid/bass. ( P.328)
Select to set the fader/bal-
ance. ( P.329)
Select to set the automatic
sound levelizer. ( P.329)
■Treble/Mid/Bass
How good an audio program
sounds is largely determined by
the mix of the treble, mid and
bass levels. In fact, different
kinds of music and vocal pro-
grams usually sound better with
different mixes of treble, mid
and bass.
1 Select “Treble/Mid/Bass”.
2 Select the desired screen
button.
Select “+” or “-” to adjust
high-pitched tones.
USB port
Sound settings
Page 329 of 612

3295-5. Using the audio/visual system
5
Audio
Select “+” or “-” to adjust
mid-pitched tones.
Select “+” or “-” to adjust
low-pitched tones.
■Fader/Balance
A good balance of the left and
right stereo channels and of the
front and rear sound levels is
also important.
Keep in mind that when listening
to a stereo recording or broad-
cast, changing the right/left bal-
ance will increase the volume of
1 group of sounds while
decreasing the volume of
another.
1 Select “Fader/Balance”.
2 Select the desired screen
button.
Select to adjust the sound
balance between the front
and rear speakers.
Select to adjust the sound
balance between the left and
right speakers.
■Automatic sound levelizer
(ASL)
The system adjusts to the opti-
mum volume and tone quality according to vehicle speed to
compensate for increased road
noise, wind noise, or other
noises while driving.
1
Select “Automatic Sound
Levelizer”.
2 Select “High”, “Mid”, “Low” or
“Off”.
■Screen format settings
The screen format can be
selected for USB video.
1 Press the “MENU” button.
2 Select “Setup”.
3 Select “Audio”.
4 Select “Common”.
5 Select “Screen Format”.
6 Select the desired item to be
adjusted.
Select to display a 4 : 3
screen, with either side in
black.
Select to enlarge the image
horizontally and vertically to
full screen.
Select to enlarge the image
by the same ratio horizontally
Audio screen adjustment
Page 330 of 612
3305-5. Using the audio/visual system
and vertically.
■Contrast and brightness
adjustment
The contrast and brightness of
the screen can be adjusted.
1 Press the “MENU” button.
2 Select “Setup”.
3 Select “Audio”.
4 Select “Common”.
5 Select “Display”.
6 Select the desired item to be
adjusted.
“Contrast”
“+”: Select to strengthen the con-
trast of the screen.
“-”: Select to weaken the contrast of
the screen.
“Brightness”
“+”: Select to brighten the screen.
“-”: Select to darken the screen.
Depending on the audio source,
some functions may not be avail-
able.
1 Press this switch to operate
the voice command system.
The voice command system and its
list of commands can be operated.
( P.358)
Voice command system
Page 331 of 612

3315-6. Radio operation
5
Audio
5-6.Radio operation
*: If equipped
The radio operation screen can
be reached by the following
methods:
P. 3 2 7
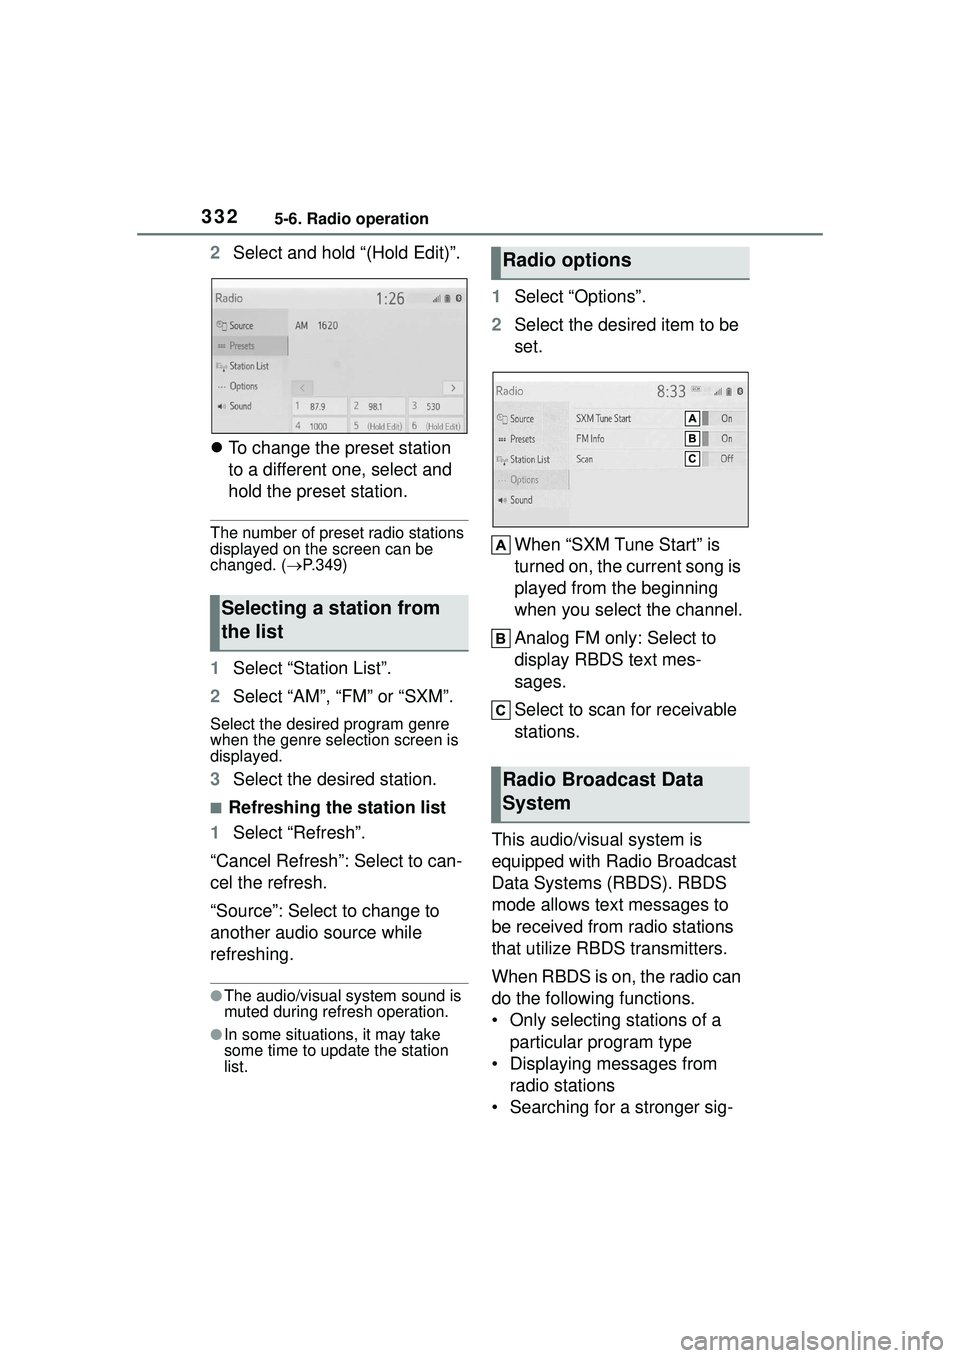
Select to display the audio
source selection screen.
Select to display the preset
stations screen. ( P.331)
Select to display a list of
receivable stations. ( P.332)
Select to display the radio
options screen. ( P.332)
Select to display the sound
setting screen. ( P.328)
Select to tune to preset sta-
tions/channels. ( P.331) Press to seek for stations in
the relevant program type.
Press and hold for continu-
ous seek.
Turn to step up/down fre-
quencies.
Turn to move up/down the
station. Also, the knob can be
used to enter selections on
the list screens by pressing it.
The radio automatically changes to
stereo reception when a stereo
broadcast is received.
Radio mode has a mix preset
function, which can store up to
36 stations (6 stations per page
x 6 pages) from any of the AM,
FM or SXM bands.
1
Tune in the desired station.
AM radio/FM radio/Siri-
usXM® Satellite
Radio(SXM)*
Overview
Control screen
Control panel
Presetting a station
Page 332 of 612

3325-6. Radio operation
2Select and hold “(Hold Edit)”.
To change the preset station
to a different one, select and
hold the preset station.
The number of preset radio stations
displayed on the screen can be
changed. ( P.349)
1 Select “Station List”.
2 Select “AM”, “FM” or “SXM”.
Select the desired program genre
when the genre selection screen is
displayed.
3Select the desired station.
■Refreshing the station list
1 Select “Refresh”.
“Cancel Refresh”: Select to can-
cel the refresh.
“Source”: Select to change to
another audio source while
refreshing.
●The audio/visual system sound is
muted during refresh operation.
●In some situations, it may take
some time to update the station
list.
1 Select “Options”.
2 Select the desired item to be
set.
When “SXM Tune Start” is
turned on, the current song is
played from the beginning
when you select the channel.
Analog FM only: Select to
display RBDS text mes-
sages.
Select to scan for receivable
stations.
This audio/visual system is
equipped with Radio Broadcast
Data Systems (RBDS). RBDS
mode allows text messages to
be received from radio stations
that utilize RBDS transmitters.
When RBDS is on, the radio can
do the following functions.
• Only selecting stations of a particular program type
• Displaying messages from radio stations
• Searching for a stronger sig-
Selecting a station from
the list
Radio options
Radio Broadcast Data
System
Page 334 of 612

3345-6. Radio operation
game, every NASCAR® race,
NHL® games, 24/7 talk channels
dedicated to the biggest leagues,
and more. You get all kinds of
commercial-free mu sic, including
artist-dedicated channels and
more, plus sports, news, talk and
entertainment.
●Radio operation
• Look for the Sirius, XM, SiriusXM,
Band, SAT, AUX, Radio or Source
button and you’re in. If you can’t
hear us, it’s easy to get started:
U.S.A.:
Locate your Radio ID by turning to
Channel 0. If you don’t see your
number there, go to siri-
usxm.com/activationhelp to find it.
Visit siriusxm.com/refresh
or call
1-855-MYREFRESH (697-3373)
to send a refresh signal to your
radio.
Canada:
Locate your Radio ID by turning to
Channel 0.
Visit siriusxm.ca/refresh
to send a
refresh signal to your radio or call 1-888-539-7474 for service.
Each SiriusXM tuner is identified
with a unique radio ID. The radio
ID is required when activating
an SiriusXM service or when
reporting a problem.
If “Ch 000” is selected using
the “TUNE SCROLL” knob,
the ID code, which is 8 alpha-
numeric characters, will be
displayed. If another channel
is selected, the ID code will no
longer be displayed. The
channel (000) alternates
between displaying the radio
ID and the specific radio
code.
When problems occur with the SiriusXM tuner, a message will
appear on the screen. Referring to the table below to identify the
problem, take the suggested corrective action.
Displaying the radio ID
Refer to the table below to identify the problem and take
the suggested corrective action
MessageExplanation
“Check
Antenna”
The SiriusXM antenna is not connected. Check whether the
SiriusXM antenna cable is attached securely. Contact your
Toyota dealer for assistance.
A short circuit occurs in the antenna or the surrounding
antenna cable. Contact your Toyota dealer for assistance.
“No Signal”The SiriusXM signal is too weak at the current location. Wait
until your vehicle reaches a location with a stronger signal.